headlamp Peugeot 308 2021 User Guide
[x] Cancel search | Manufacturer: PEUGEOT, Model Year: 2021, Model line: 308, Model: Peugeot 308 2021Pages: 244, PDF Size: 8.21 MB
Page 57 of 244
55
Lighting and visibility
4Windscreen wipers
► To select the wiping speed: raise or lower the
stalk to the desired position.
Fast wiping (heavy rain)
Normal wiping (moderate rain)
Intermittent wiping (proportional to the
vehicle’s speed)
Switching off
Single wipe (press down and release).
or
Automatic wiping
Refer to the corresponding section.
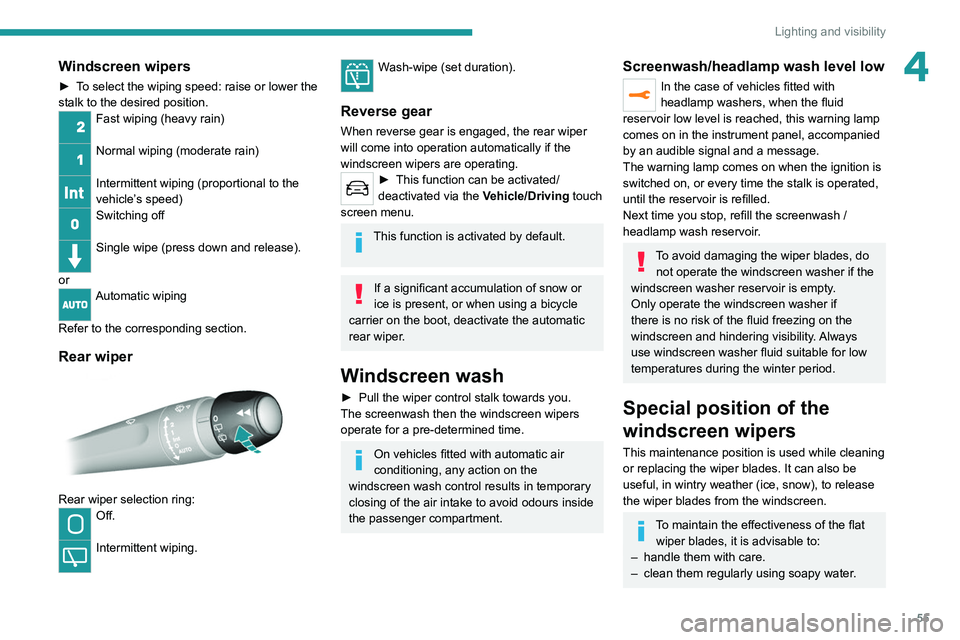
Rear wiper
Rear wiper selection ring:Off.
Intermittent wiping.
Wash-wipe (set duration).
Reverse gear
When reverse gear is engaged, the rear wiper
will come into operation automatically if the
windscreen wipers are operating.
► This function can be activated/
deactivated via the V
ehicle/Driving touch
screen menu.
This function is activated by default.
If a significant accumulation of snow or
ice is present, or when using a bicycle
carrier on the boot, deactivate the automatic
rear wiper.
Windscreen wash
► Pull the wiper control stalk towards you.
The screenwash then the windscreen wipers
operate for a pre-determined time.
On vehicles fitted with automatic air
conditioning, any action on the
windscreen wash control results in temporary
closing of the air intake to avoid odours inside
the passenger compartment.
Screenwash/headlamp wash level low
In the case of vehicles fitted with
headlamp washers, when the fluid
reservoir low level is reached, this warning lamp
comes on in the instrument panel, accompanied
by an audible signal and a message.
The warning lamp comes on when the ignition is
switched on, or every time the stalk is operated,
until the reservoir is refilled.
Next time you stop, refill the screenwash /
headlamp wash reservoir.
To avoid damaging the wiper blades, do not operate the windscreen washer if the
windscreen washer reservoir is empty.
Only operate the windscreen washer if
there is no risk of the fluid freezing on the
windscreen and hindering visibility. Always
use windscreen washer fluid suitable for low
temperatures during the winter period.
Special position of the
windscreen wipers
This maintenance position is used while cleaning
or replacing the wiper blades. It can also be
useful, in wintry weather (ice, snow), to release
the wiper blades from the windscreen.
To maintain the effectiveness of the flat wiper blades, it is advisable to:
–
handle them with care.
–
clean them regularly using soapy water
.
Page 84 of 244
82
Driving
Starting with the key
The parking brake must be applied.
► With a manual gearbox in neutral, fully
depress the clutch pedal.
► With an automatic gearbox in mode P or N,
fully depress the brake pedal.
► Insert the key into the ignition switch.
– The system recognises the starting code.
► Unlock the steering column by simultaneously
turning the steering wheel and the key.
In some cases, you may have to apply
some force to turn the wheels (if the
wheels are turned against a kerb, for
example).
► With a petrol engine, operate the starter
motor by turning the key to position 3 without
pressing the accelerator pedal, until the engine
starts. As soon as the engine starts, release the
key.
► With a Diesel engine, turn the key to position
2, ignition on, to operate the engine preheating
system.
► Wait until this warning lamp goes off in
the instrument panel, then turn the key to
position 3 without pressing the accelerator pedal,
to operate the starter motor until the engine
starts. As soon as the engine starts, release the
key.
If the outside temperature is high, let the
engine idle for 1 to 2 minutes after the
vehicle comes to a stop, to help it to cool.
Before setting off
Nose weight
► Distribute the load in the trailer so that the
heaviest items are as close as possible to the
axle and the nose weight (at the point where it
joins your vehicle) approaches the maximum
permitted without exceeding it.
Tyres
► Check the tyre pressures of the towing
vehicle and of the trailer , observing the
recommended pressures.
Lighting
► Check the electrical signalling on the trailer
and the headlamp beam height of your vehicle.
If a genuine PEUGEOT towing device is
used, the rear parking sensors will be
deactivated automatically to avoid the audible
signal.
When driving
Cooling
Towing a trailer uphill causes the coolant
temperature to increase. The maximum towable
load depends on the gradient and the exterior temperature. The fan’s cooling capacity does not
increase with engine speed.
►
Reduce speed and lower the engine speed to
limit the amount of heating produced.
In all cases, pay attention to the coolant
temperature.
If this warning lamp and the STOP
warning lamp come on, stop the
vehicle and switch off the engine as soon as
possible.
Brakes
Braking distances are increased when towing a
trailer. To avoid overheating the brakes, the use
of engine braking is recommended.
Side wind
Bear in mind that the vehicle will be more
susceptible to wind when towing.
Anti-theft protection
Electronic immobiliser
The key contains an electronic chip which has a
special code. When the ignition is switched on,
this code must be recognised in order for starting
to be possible.
This electronic engine immobiliser locks the
engine management system a few minutes after
the ignition is switched off, and prevents the
engine being started by anyone who does not
have the key.
In the event of a fault, you are informed
by illumination of this warning lamp, an
audible signal and a message in the screen.In
this case, your vehicle will not start; contact a
PEUGEOT dealer as soon as possible.
Keep safely, away from your vehicle, the
label attached to the keys given to you
when you purchased your vehicle.
Starting/Switching off the
engine, remote control
key
Place the gear lever into neutral.
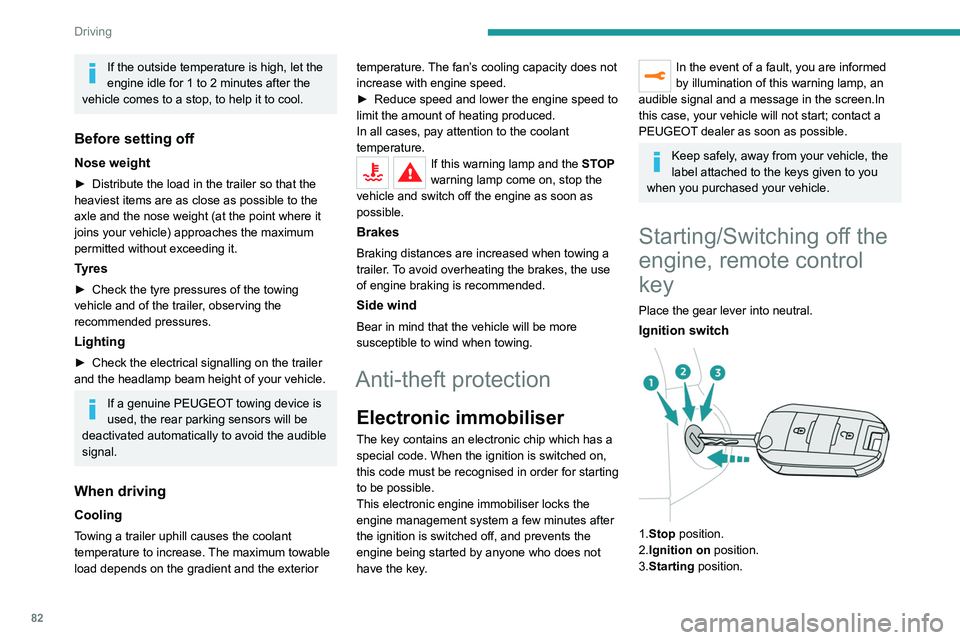
Ignition switch
1.Stop position.
2.Ignition on position.
3.Starting position.
Page 103 of 244

101
Driving
6Driving aids
You should hold the steering wheel
with both hands, always use the interior and
exterior rear view mirrors, always keep the
feet close to the pedals and take a break
every two hours.
Manoeuvring aids
The driver must always check the
surroundings of the vehicle before and during
the whole manoeuvre, in particular using the
mirrors.
Radar
The operation of the radar as well as the
associated functions may be impaired through
the accumulation of dirt (mud, frost, etc.), in
certain difficult weather conditions (very heavy
rain, snow) or if the bumper is damaged.
If the front bumper is to be repainted, contact
a PEUGEOT dealer or a qualified workshop;
certain types of paint could interfere with the
operation of the radar.
Driving aids camera
This camera and its associated functions
may be impaired or not work if the windscreen
area in front of the camera is dirty, misty,
frosty, covered with snow, damaged or
masked by a sticker.
On versions with camera alone, this message
indicates to you that the camera is obstructed:
"Driving aids camera: visibility limited, see
user guide".
In humid and cold weather, demist the
windscreen regularly.
Poor visibility (inadequate street lighting,
heavy rain, thick fog, snowfall), dazzle
(headlamps of an oncoming vehicle, low sun,
reflections on a damp road, leaving a tunnel,
alternating shade and light) can also impair
detection performance.
In the event of a windscreen replacement,
contact a PEUGEOT dealer or a qualified
workshop to recalibrate the camera;
otherwise, the operation of the associated
driving aids may be disrupted.
Other cameras
The images from the camera(s)
displayed on the touch screen or on the
instrument panel may be distorted by the
relief.
In the presence of areas in shade, or in
conditions of bright sunlight or inadequate
lighting, the image may be darkened and with
lower contrast.
Obstacles may appear further away than they
actually are.
Sensors
The operation of the sensors as well as
the associated functions may be disturbed
by sound interference such as that emitted
by noisy vehicles and machinery (e.g. lorries,
pneumatic drills), by the accumulation of
snow or dead leaves on the road or in the
event of damaged bumpers and mirrors.
When reverse gear is engaged, an audible
signal (long beep) indicates that the sensors
may be dirty.
A front or rear impact to the vehicle can
upset the sensors’ settings, which is not
always detected by the system: distance
measurements may be distorted.
The sensors do not systematically detect
obstacles that are too low (pavements, studs)
or too thin (trees, posts, wire fences).
Certain obstacles located in the sensors’ blind
spots may not be detected or may no longer
be detected during the manoeuvre.
Certain materials (fabrics) absorb sound
waves: pedestrians may not be detected.
Maintenance
Clean the bumpers and door mirrors and
the field of vision of the cameras regularly.
When washing your vehicle at high pressure,
direct the spray from at least 30
cm away
from the radar, sensors and cameras.
Mats
The use of mats not approved by
PEUGEOT may interfere with the operation of
the speed limiter or cruise control.
To avoid any risk of jamming the pedals:
Page 113 of 244

111
Driving
6Certain situations cannot be managed by the
system and require the driver to take back
control of the vehicle.
Cases of non-detection by the radar:
–
Pedestrians, some cyclists, animals.
–
Stationary vehicles (traffic jam, breakdown,
etc.).
– Vehicles crossing your lane.
– V ehicles driving in the opposite direction.
Situations in which the driver must pause the
cruise control system:
– Vehicles in a tight bend.
– When approaching a roundabout.
– When following a narrow vehicle.
Reactivate cruise control when conditions permit.
Situations in which the driver is prompted to
immediately resume control:
–
Excessively sharp deceleration by the vehicle
in front of you.
– When a vehicle cuts in sharply between your
vehicle and the one in front.
The system must not be activated in the
following situations:
–
Use of the "space-saver" type spare wheel
(depending on version).
–
Towing.
–
Following an impact on the front bumper
.
Be particularly careful:
– When motorcycles are present and
when there are vehicles staggered across the
traffic lane.
–
When you enter a tunnel or cross a bridge.
Cruise control operates by day and night,
in fog or moderate rainfall.
However, it is strongly recommended that
you always keep a safe distance from the
vehicles in front of you according to the traffic
conditions, weather conditions and the state
of the road surface.
Use the cruise control only where the driving
conditions allow running at a constant speed
and keeping an adequate safety distance.
Do not activate the cruise control in urban
areas where pedestrians are likely to cross
the road, in heavy traffic (except for versions
with EAT8 gearbox), on winding or steep
roads, on slippery or flooded roads, when
there is snowfall, if the front bumper is
damaged or when the brake lamps have
failed.
In certain circumstances, it may not
be possible for the speed setting to be
maintained or even reached: loaded vehicle,
ascending a steep hill, etc.
The system is not intended for the following situations:
–
if the front end of the vehicle has been
modified (addition of long-range headlamps,
painting of the front bumper),
–
driving on a racing circuit,
–
running on a rolling road,
–
use of snow chains, non-slip covers or
studded tyres.
The use of mats not approved by PEUGEOT
may interfere with the operation of the cruise
control.
To avoid any risk of jamming the pedals:
–
ensure that the mat is secured correctly
,
–
never put one mat on top of another
.
Page 114 of 244
11 2
Driving
Deactivation of the system is signalled by
the illumination of this warning lamp,
accompanied by the display of a message.
Operating conditions and
limits
Vehicle moving forward.
ESC system in working order.
DSC system activated.
Seat belts fastened for all passengers.
Stabilised speed on roads with few bends.
In the following cases, deactivating the system
via the vehicle's configuration menu is advised:
– Towing a trailer.
– Carrying long objects on roof bars or roof rack.
– Vehicle with snow chains fitted.
– Before using an automatic car wash, with the
engine running.
– Before placing the vehicle on a rolling road in
a workshop.
– Towed vehicle, engine running.
– If the brake lamps are not working.
– Damaged front bumper.
– Following an impact to the windscreen close to
the detection camera.
The system is automatically deactivated when the use of a "space-saver" type
spare wheel is detected, or if a fault with the
lateral brake lamps is detected.
It can be dangerous to drive if the brake
lamps are not in perfect working order.
The following situations may interfere with the operation of the system or
prevent it from working:
–
driving on a winding road,
–
poor visibility (inadequate street lighting,
falling snow
, heavy rain, thick fog, etc.),
–
dazzle (headlamps of an oncoming vehicle,
low sun, reflections on a damp road, leaving a
tunnel, alternating shade and light, etc.),
–
radar obstructed (mud, frost, snow
,
condensation, etc.).
In these situations, detection performance
may be reduced.
Malfunction
In the event of a cruise control
malfunction, dashes are displayed instead
of the cruise control speed setting.
This warning lamp comes on, accompanied by a warning message and
an audible signal, to indicate a system
malfunction.
Have the system checked by a PEUGEOT
dealer or a qualified workshop.
The adaptive cruise control deactivates automatically if the use of a “space-
saver” type spare wheel is detected or in the
event of a malfunction of the lateral brake
lamps or trailer brake lamps (for approved
trailers).
Active Safety Brake with Distance Alert and
Intelligent emergency
braking assistance
Refer to the General recommendations on the
use of driving and manoeuvring aids .
This system:
–
warns the driver that their vehicle is at risk of
collision with the vehicle in front.
–
reduces the vehicle's speed to avoid a
collision or limit its severity
.
This system is comprised of three functions:
–
Distance Alert.
–
Intelligent emergency braking assistance.
–
Active Safety Brake (automatic emergency
braking).
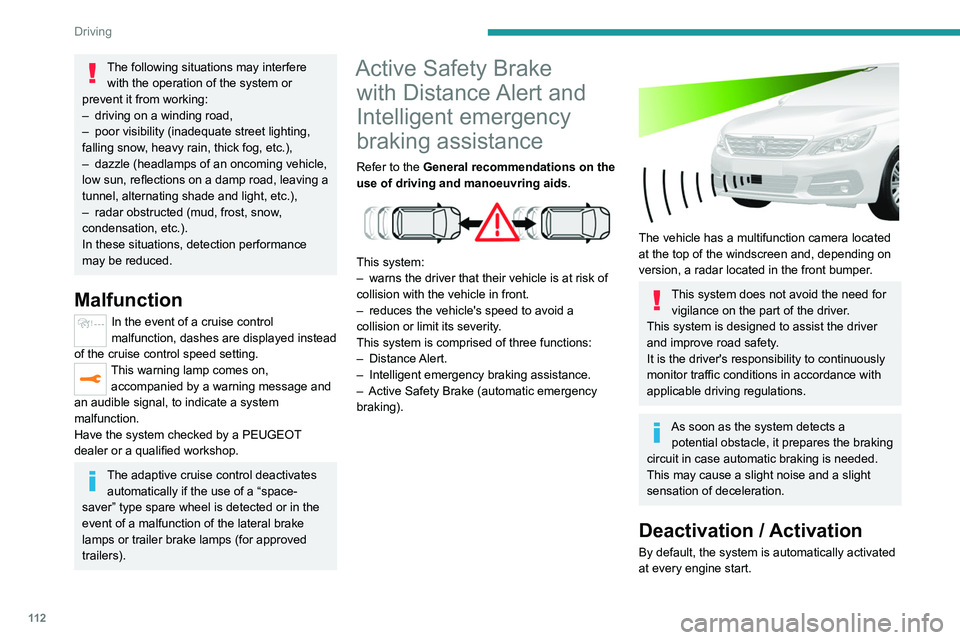
The vehicle has a multifunction camera located
at the top of the windscreen and, depending on
version, a radar located in the front bumper.
This system does not avoid the need for vigilance on the part of the driver.
This system is designed to assist the driver
and improve road safety.
It is the driver's responsibility to continuously
monitor traffic conditions in accordance with
applicable driving regulations.
As soon as the system detects a potential obstacle, it prepares the braking
circuit in case automatic braking is needed.
This may cause a slight noise and a slight
sensation of deceleration.
Deactivation / Activation
By default, the system is automatically activated
at every engine start.
Page 136 of 244
134
Practical information
Towing device
Load distribution
► Distribute the load in the trailer so that the
heaviest items are as close as possible to the
axle, and the nose weight approaches the
maximum permitted without exceeding it.
Air density decreases with altitude, thus reducing
engine performance.
The maximum towable load
must be reduced by 10% per 1,000
metres of
altitude.
Use genuine towing devices and their
wiring harnesses approved by
PEUGEOT. We recommend having them
fitted by a PEUGEOT dealer or a qualified
workshop.
If not fitted by a PEUGEOT dealer, they must
still be fitted in accordance with the vehicle
manufacturer's instructions.
Certain driving or manoeuvring aid functions
are automatically deactivated while an
approved towing system is in use.
Comply with the maximum authorised
towable weight, as indicated on your
vehicle's registration certificate, on the
manufacturer's label and in the Technical
data section of this guide.
Complying with the maximum authorised
nose weight (towball weight) also includes
the use of accessories (bicycle carriers,
tow boxes, etc.).
Observe the legislation in force in the
country where you are driving.
GTi towing
Your vehicle cannot be fitted with a
tow-bar.
Towing device with towball
Before each use
To ensure the towball is correctly fitted,
check the follow points:
Saloon:
–
The green mark on the wheel is in line with
the green mark on the towball.
–
The wheel is in contact with the towball
(position A
).
–
The safety lock is on and the key removed;
the wheel can no longer be operated.
–
The towball must not be able to move in
its carrier; test by attempting to move it with
your hand.
SW :
–
The towball is correctly engaged (position
A
).
–
The safety lock is on and the key removed;
the trigger can no longer be operated.
–
The towball must not be able to move in
its carrier; test by attempting to move it with
your hand.
If the towball is not engaged, the trailer can
become detached -
Accident risk!
During use
Never release the locking system when
a trailer or load carrier is connected to the
towball.
Never exceed the maximum authorised
weight for the vehicle - Gross Train Weight
or GTW.
Always comply with the maximum authorised
load on the towing device: if it is exceeded,
this device may become detached from the
vehicle - risk of an accident!
Check that the trailer lamps work correctly.
Before setting off, check and/or adjust
headlamp beam height.
For more information on Headlamp height
adjustment, refer to the corresponding
section.
Following use
When travelling without a trailer or load
on a towbar-mounted carrier, the towball
must be removed and the protective plug
inserted in the carrier. This measure applies
particularly where the towball might obscure
visibility of the number plate or its lighting.
Blanking plug
In the event of recovery, it is essential to remove
the blanking plug if your vehicle has one.
To do this, contact a PEUGEOT dealer or a
qualified workshop.
The blanking plug behind the lower air intake grille.
Towbar with quickly detachable towball
(hatchback)
Presentation
This genuine towing device can be fitted and
removed with no need for tools.
Page 141 of 244
139
Practical information
7► Lift the protective cover on the connection
socket and connect the trailer's electric plug.
Removing the towball
► Disconnect the trailer's electric plug from the
connection socket on the carrier .
►
Detach the trailer safety cable from the safety
eye on the carrier
.
►
Unhitch the trailer from the towball.
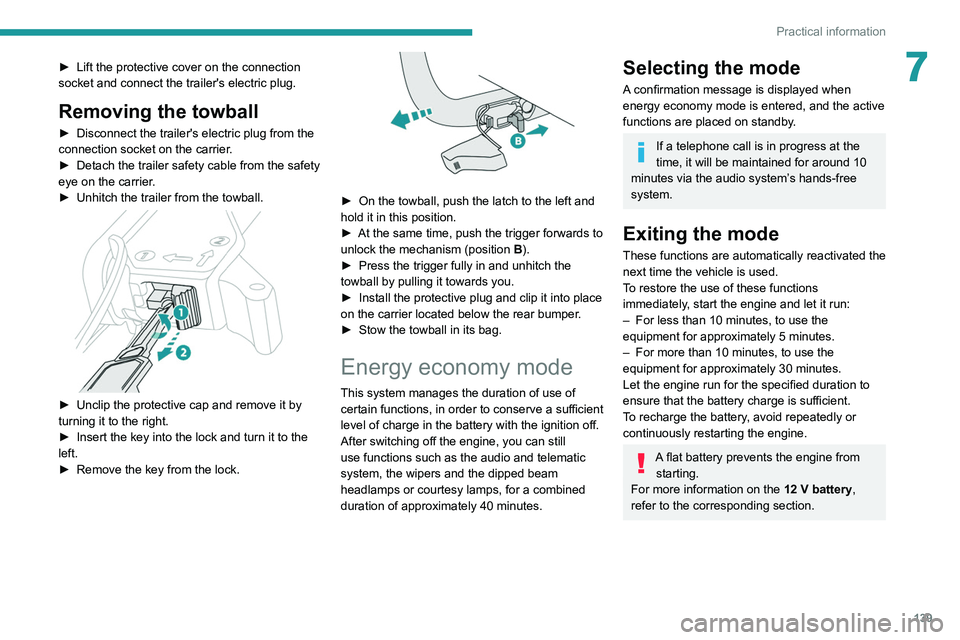
► Unclip the protective cap and remove it by
turning it to the right.
►
Insert the key into the lock and turn it to the
left.
►
Remove the key from the lock.
► On the towball, push the latch to the left and
hold it in this position.
►
At the same time, push the trigger forwards to
unlock the mechanism (position B
).
►
Press the trigger fully in and unhitch the
towball by pulling it towards you.
►
Install the protective plug and clip it into place
on the carrier
located below the rear bumper.
►
Stow the towball in its bag.
Energy economy mode
This system manages the duration of use of
certain functions, in order to conserve a sufficient
level of charge in the battery with the ignition off.
After switching off the engine, you can still
use functions such as the audio and telematic
system, the wipers and the dipped beam
headlamps or courtesy lamps, for a combined
duration of approximately 40 minutes.
Selecting the mode
A confirmation message is displayed when
energy economy mode is entered, and the active
functions are placed on standby.
If a telephone call is in progress at the
time, it will be maintained for around 10
minutes via the audio system’s hands-free
system.
Exiting the mode
These functions are automatically reactivated the
next time the vehicle is used.
To restore the use of these functions
immediately, start the engine and let it run:
–
For less than 10 minutes, to use the
equipment for approximately 5 minutes.
–
For more than 10 minutes, to use the
equipment for approximately 30 minutes.
Let the engine run for the specified duration to
ensure that the battery charge is sufficient.
T
o recharge the battery, avoid repeatedly or
continuously restarting the engine.
A flat battery prevents the engine from starting.
For more information on the 12
V battery,
refer to the corresponding section.
Page 162 of 244
160
In the event of a breakdown
If your vehicle is fitted with alloy wheels, when
tightening the bolts on fitting, it is normal to
notice that the washers do not come into
contact with the "space-saver" spare wheel.
The wheel is secured by the conical contact
of each bolt.
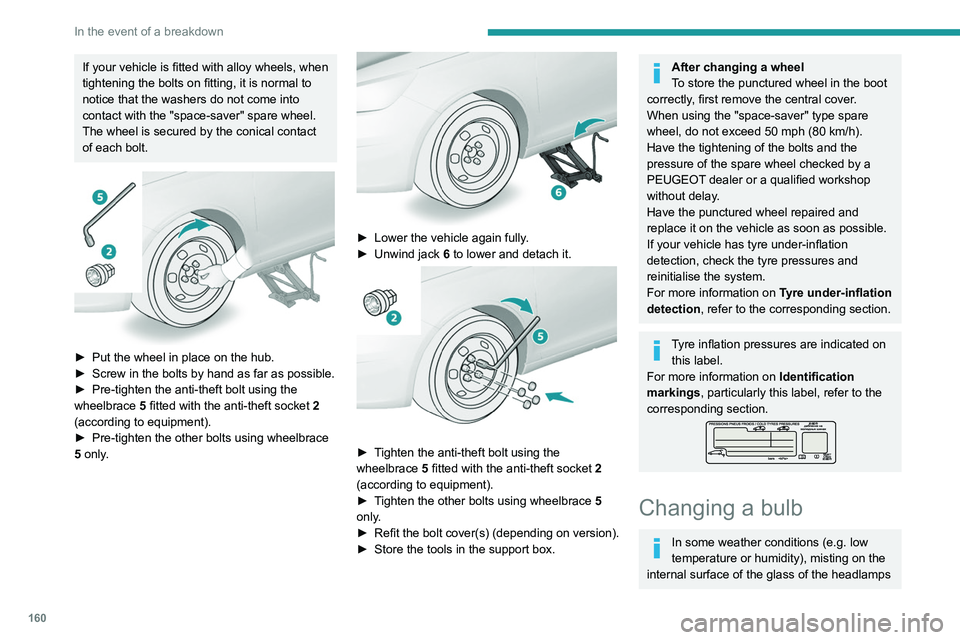
► Put the wheel in place on the hub.
► Screw in the bolts by hand as far as possible.
►
Pre-tighten the anti-theft bolt using the
wheelbrace 5
fitted with the anti-theft socket 2
(according to equipment).
►
Pre-tighten the other bolts using wheelbrace
5
only.
► Lower the vehicle again fully .
► Unwind jack 6
to lower and detach it.
► Tighten the anti-theft bolt using the
wheelbrace 5 fitted with the anti-theft socket 2
(according to equipment).
►
T
ighten the other bolts using wheelbrace 5
only.
►
Refit
the bolt cover(s) (depending on version).
►
Store the tools in the support box.
After changing a wheel
To store the punctured wheel in the boot
correctly, first remove the central cover.
When using the "space-saver" type spare
wheel, do not exceed 50 mph (80 km/h).
Have the tightening of the bolts and the
pressure of the spare wheel checked by a
PEUGEOT dealer or a qualified workshop
without delay.
Have the punctured wheel repaired and
replace it on the vehicle as soon as possible.
If your vehicle has tyre under-inflation
detection, check the tyre pressures and
reinitialise the system.
For more information on Tyre under-inflation
detection, refer to the corresponding section.
Tyre inflation pressures are indicated on this label.
For more information on Identification
markings, particularly this label, refer to the
corresponding section.
Changing a bulb
In some weather conditions (e.g. low
temperature or humidity), misting on the
internal surface of the glass of the headlamps
and rear lamps is normal, and will disappear
after the lamps have been on for a few
minutes.
The headlamps have polycarbonate lenses with a protective coating:
– Do not clean them with a dry or abrasive
cloth, nor with detergent or solvent
products.
– Use a sponge and soapy water or a pH
neutral product.
– When using a high-pressure washer on
persistent marks, do not keep the lance
directed towards the headlamps, lamps or
their edges for too long, so as not to damage
their protective coating and seals.
Changing a bulb must only be done with
the ignition off and after the headlamp /
lamp has been switched off for several
minutes - risk of serious burns!
Do not touch the bulb directly with your
fingers; use a lint-free cloth.
It is essential only to use anti-ultraviolet
(UV) type bulbs, so as not to damage the
headlamp.
Always replace a failed bulb with a new bulb
of the same type and specification. To avoid
lighting imbalance, replace the bulbs in pairs.
Page 163 of 244
161
In the event of a breakdown
8and rear lamps is normal, and will disappear
after the lamps have been on for a few
minutes.
The headlamps have polycarbonate lenses with a protective coating:
–
Do not clean them with a dry or abrasive
cloth, nor with detergent or solvent
products.
–
Use a sponge and soapy water or a pH
neutral product.
–
When using a high-pressure washer on
persistent marks, do not keep the lance
directed towards the headlamps, lamps or
their edges for too long, so as not to damage
their protective coating and seals.
Changing a bulb must only be done with
the ignition off and after the headlamp /
lamp has been switched off for several
minutes - risk of serious burns!
Do not touch the bulb directly with your
fingers; use a lint-free cloth.
It is essential only to use anti-ultraviolet
(UV) type bulbs, so as not to damage the
headlamp.
Always replace a failed bulb with a new bulb
of the same type and specification. To avoid
lighting imbalance, replace the bulbs in pairs.
Refitting the lamp units
Perform the operations in the reverse
order to dismantling.
Light-emitting diode (LED)
headlamps and lamps
Depending on version, the affected types of
headlamps/lamps are:
–
Full LED technology headlamps.
–
Daytime running lamps/sidelamps.
–
Direction indicator side repeaters.
–
Side spotlamps.
–
Third brake lamp.
–
Rear sidelamps.
If you need to replace this type of bulb,
you must contact a PEUGEOT dealer or
a qualified workshop.
Do not touch LED or Full LED
technology
headlamps - risk of electrocution!
Front lamps
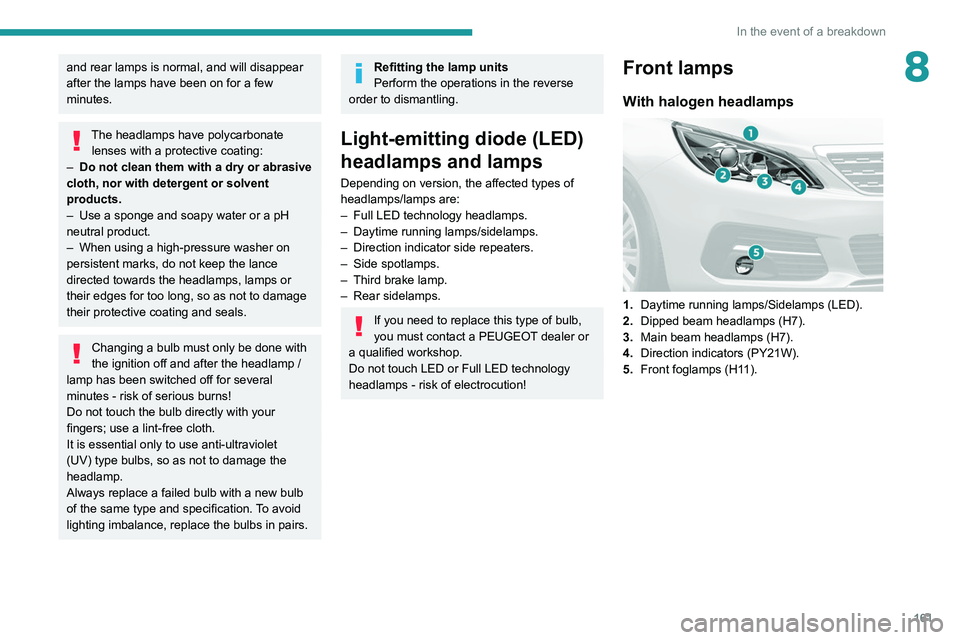
With halogen headlamps
1. Daytime running lamps/Sidelamps (LED).
2. Dipped beam headlamps (H7).
3. Main beam headlamps (H7).
4. Direction indicators (PY21W).
5. Front foglamps (H11).
Page 164 of 244
162
In the event of a breakdown
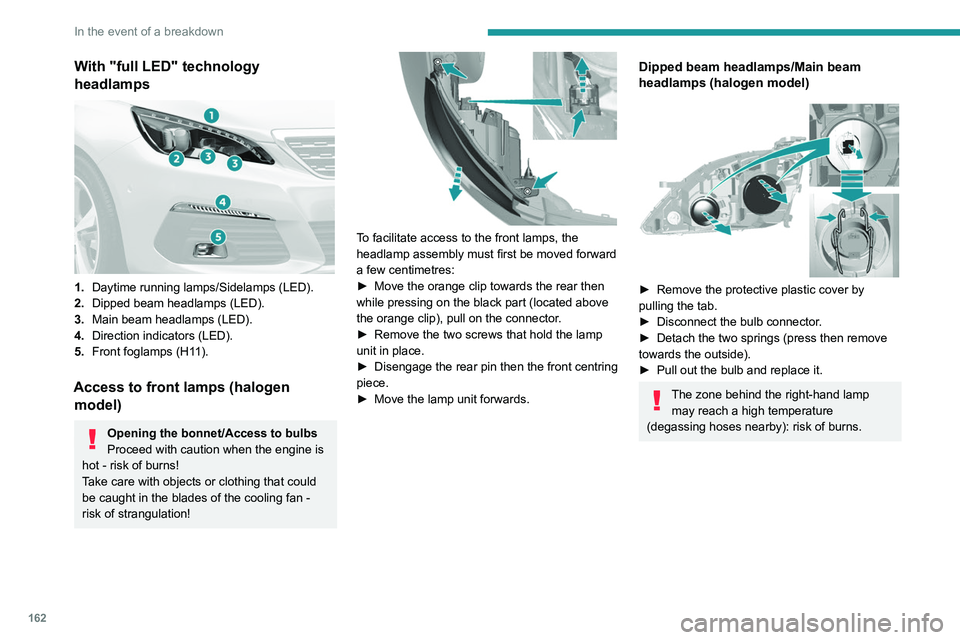
With "full LED" technology
headlamps
1.Daytime running lamps/Sidelamps (LED).
2. Dipped beam headlamps (LED).
3. Main beam headlamps (LED).
4. Direction indicators (LED).
5. Front foglamps (H11).
Access to front lamps (halogen
model)
Opening the bonnet/Access to bulbs
Proceed with caution when the engine is
hot - risk of burns!
Take care with objects or clothing that could
be caught in the blades of the cooling fan -
risk of strangulation!
To facilitate access to the front lamps, the
headlamp assembly must first be moved forward
a few centimetres:
►
Move the orange clip towards the rear then
while pressing on the black part (located above
the orange clip), pull on the connector
.
►
Remove the two screws that hold the lamp
unit in place.
►
Disengage the rear pin then the front centring
piece.
►
Move the lamp unit forwards.
Dipped beam headlamps/Main beam
headlamps (halogen model)
► Remove the protective plastic cover by
pulling the tab.
►
Disconnect the bulb connector
.
►
Detach the two springs (press then remove
towards the outside).
►
Pull out the bulb and replace it.
The zone behind the right-hand lamp may reach a high temperature
(degassing hoses nearby): risk of burns.
Front foglamps
► Unclip the trim by pulling at the top (notch).
► Unscrew the 2 screws to remove the unit
from its housing.