stop start Peugeot 308 2021 Owner's Guide
[x] Cancel search | Manufacturer: PEUGEOT, Model Year: 2021, Model line: 308, Model: Peugeot 308 2021Pages: 244, PDF Size: 8.21 MB
Page 100 of 244
98
Driving
vehicle has reached a speed of 5 mph
(8 km/h).
During parking manoeuvres, STOP mode
is not available for a few seconds after
coming out of reverse gear or turning the
steering wheel.
Engine restarting (START mode)
The engine automatically restarts as soon as the
driver indicates the intention of moving off again.
► With a manual gearbox: with the clutch
pedal fully depressed.
► With an automatic gearbox:
• With the selector in position D or M: with the
brake pedal released.
• With the selector in position N and the brake
pedal released: with the selector at D or M.
• With the selector in position P and the brake
pedal depressed: with the selector at R, N,
D or M.
• Reverse gear engaged.
Special cases
The engine will restart automatically if all
conditions for operation are met again and in the
following cases.
– The electric parking brake is being applied.
– Vehicle speed exceeds 2 mph (3 km/h).
– Some specific conditions (braking assistance,
air conditioning setting, etc.).
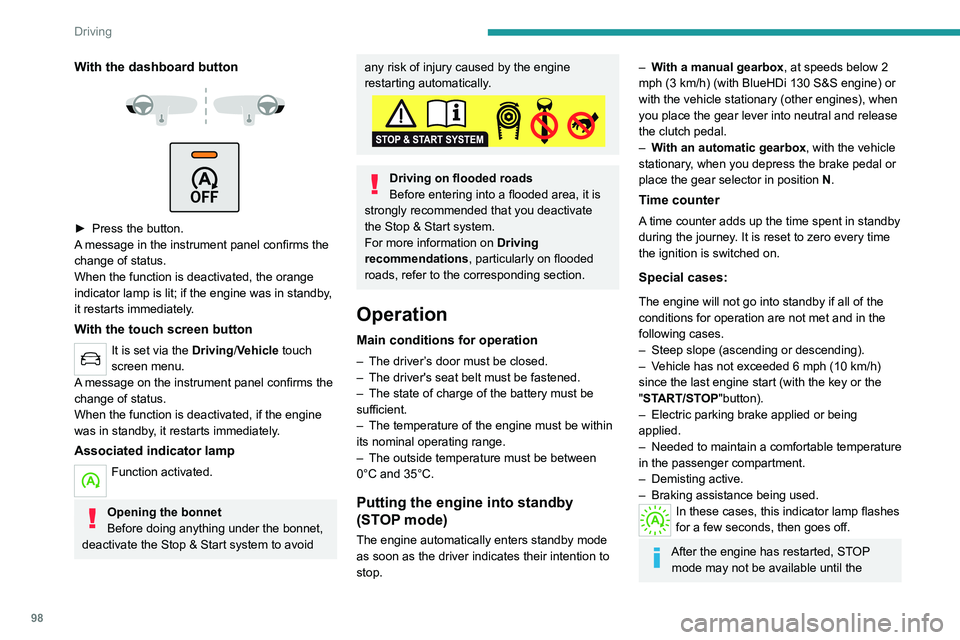
With the dashboard button
► Press the button.
A message in the instrument panel confirms the
change of status.
When the function is deactivated, the orange
indicator lamp is lit; if the engine was in standby,
it restarts immediately.
With the touch screen button
It is set via the Driving/Vehicle touch
screen menu.
A message on the instrument panel confirms the
change of status.
When the function is deactivated, if the engine
was in standby, it restarts immediately.
Associated indicator lamp
Function activated.
Opening the bonnet
Before doing anything under the bonnet,
deactivate the Stop & Start system to avoid
any risk of injury caused by the engine
restarting automatically.
Driving on flooded roads
Before entering into a flooded area, it is
strongly recommended that you deactivate
the Stop & Start system.
For more information on Driving
recommendations, particularly on flooded
roads, refer to the corresponding section.
Operation
Main conditions for operation
– The driver ’s door must be closed.
– The driver's seat belt must be fastened.
–
The state of charge of the battery must be
sufficient.
–
The temperature of the engine must be within
its nominal operating range.
–
The outside temperature must be between
0°C and 35°C.
Putting the engine into standby
(STOP mode)
The engine automatically enters standby mode
as soon as the driver indicates their intention to
stop.
– With a manual gearbox, at speeds below 2
mph (3 km/h) (with BlueHDi 130 S&S engine) or
with the vehicle stationary (other engines), when
you place the gear lever into neutral and release
the clutch pedal.
–
W
ith an automatic gearbox, with the vehicle
stationary, when you depress the brake pedal or
place the gear selector in position N.
Time counter
A time counter adds up the time spent in standby
during the journey. It is reset to zero every time
the ignition is switched on.
Special cases:
The engine will not go into standby if all of the
conditions for operation are not met and in the
following cases.
–
Steep slope (ascending or descending).
–
V
ehicle has not exceeded 6 mph (10 km/h)
since the last engine start (with the key or the
"START/STOP"button).
–
Electric parking brake applied or being
applied.
–
Needed
to maintain a comfortable temperature
in the passenger compartment.
–
Demisting active.
–
Braking assistance being used.
In these cases, this indicator lamp flashes
for a few seconds, then goes off.
After the engine has restarted, STOP mode may not be available until the
Page 101 of 244
99
Driving
6vehicle has reached a speed of 5 mph
(8 km/h).
During parking manoeuvres, STOP mode
is not available for a few seconds after
coming out of reverse gear or turning the
steering wheel.
Engine restarting (START mode)
The engine automatically restarts as soon as the
driver indicates the intention of moving off again.
►
W
ith a manual gearbox: with the clutch
pedal fully depressed.
►
W
ith an automatic gearbox:
•
With the selector in position D
or M: with the
brake pedal released.
•
With the selector in position N
and the brake
pedal released: with the selector at D or M.
•
With the selector in position P
and the brake
pedal depressed: with the selector at R, N,
D or M.
•
Reverse gear engaged.
Special cases
The engine will restart automatically if all
conditions for operation are met again and in the
following cases.
–
The electric parking brake is being applied.
–
V
ehicle speed exceeds 2 mph (3 km/h).
–
Some specific conditions (braking assistance,
air conditioning setting, etc.).
In these cases, this indicator lamp flashes
for a few seconds, then goes off.
Malfunctions
Depending on the vehicle’s equipment:In the event of a system malfunction, this
warning lamp flashes on the instrument
panel.
The warning lamp in this button flashes and a message appears, accompanied by
an audible signal.
Have the vehicle checked by a PEUGEOT
dealer or a qualified workshop.
The vehicle stalls in STOP mode
All of the instrument panel warning lamps come
on if there is a fault.
Depending on version, a warning message
may also be displayed, prompting you to place
the gear selector in position N and depress the
brake pedal.
►
Switch off the ignition then start the engine
again with the key or the " ST
ART/STOP" button.
The Stop & Start system requires a 12 V battery of specific technology and
specification.
All work concerning the battery must be
carried out only by a PEUGEOT dealer or a
qualified workshop.
Under-inflation detection
This system automatically checks the tyre pressures while driving.
It compares the information given by the wheel
speed sensors with reference values, which
must be reinitialised every time the tyre
pressures are adjusted or a wheel changed.
The system triggers an alert as soon as it
detects a drop in the inflation pressure of one or
more tyres.
Under-inflation detection does not
replace the need for vigilance on the part
of the driver.
This system does not avoid the need to
regularly check the tyre pressures (including
the spare wheel), especially before a long
journey.
Driving with under-inflated tyres, particularly
in adverse conditions (heavy load, high
speed, long journey):
–
worsens road-holding.
–
lengthens braking distances.
–
causes premature wear of the tyres.
–
increases energy consumption.
The inflation pressures defined for the vehicle can be found on the tyre pressure
label.
For more information on the Identification
markings, refer to the corresponding section.
Page 108 of 244
106
Driving
Modifying the cruise speed
setting
Cruise control must be active.
To modify the cruise speed setting, based on the
current speed of the vehicle:
► Briefly press button 2 or 3 to change the
value in steps of + or - 1 mph (km/h).
► Press and hold button 2 or 3 to change the
value in steps of + or - 5 mph (km/h).
Pressing and holding button 2 or
3 results in a rapid change in the speed
of the vehicle.
As a precaution, we recommend setting a cruise speed fairly close to the current
speed of your vehicle, to avoid any sudden
acceleration or deceleration of the vehicle.
To modify the cruise speed setting using memorised speed settings and from the touch
screen:
► press button 5 to display the memorised
speed settings,
► press the button for the desired speed
setting.
The selection screen closes after a few
moments.
This setting becomes the new cruise speed.
To modify the cruise speed setting using the speed suggested by the Speed Limit Recognition
and Recommendation shown on the instrument
panel:
– On winding or steep roads.
– On slippery or flooded roads.
–
In poor weather conditions.
–
Driving on a speed circuit.
–
Driving on a rolling road.
–
When using snow chains, non-slip covers
or studded tyres.
Cruise control
Refer to the General recommendations on the
use of driving and manoeuvring aids and to
Cruise control - particular recommendations.
This system automatically keeps the vehicle’s speed at the cruise value
programmed by the driver (speed setting),
without using the accelerator pedal.
Cruise control is switched on manually.
It requires a minimum vehicle speed of 19 mph
(30
km/h).
With a manual gearbox, third gear or higher must
be engaged.
With an automatic gearbox, mode
D
or second
gear or higher in mode
M
must be engaged.
Depending on engine, cruise control is
paused manually (button 4) or by
pressing the brake or clutch pedal or if the
electronic stability control (ESC) system is
triggered for safety reasons.
Depending on engine, with a manual gearbox
and Stop & Start, cruise control remains
active after changing gear.
Switching off the ignition cancels any
speed setting.
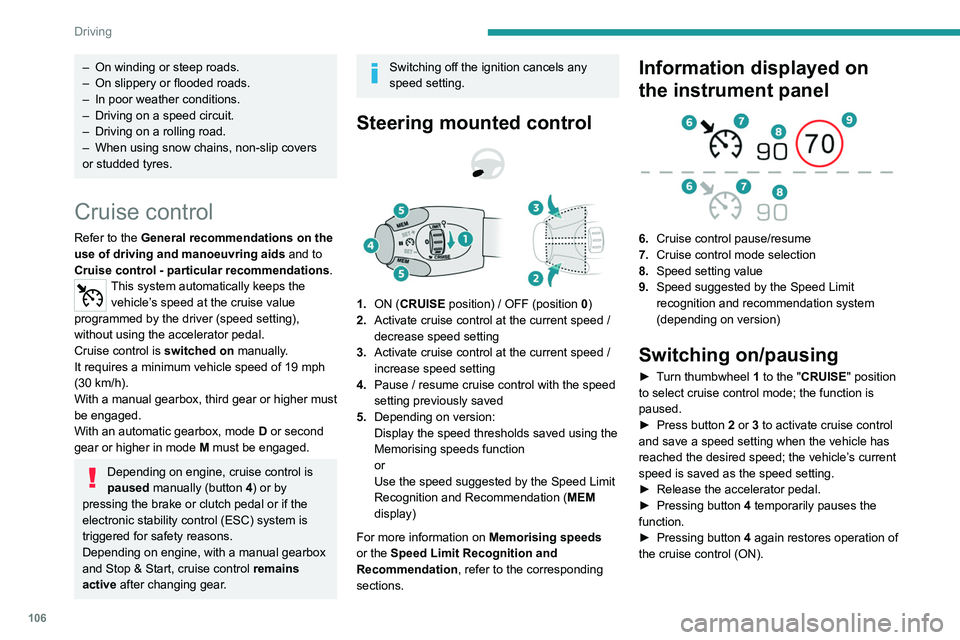
Steering mounted control
1. ON (CRUISE position) / OFF (position 0)
2. Activate cruise control at the current speed /
decrease speed setting
3. Activate cruise control at the current speed /
increase speed setting
4. Pause / resume cruise control with the speed
setting previously saved
5. Depending on version:
Display the speed thresholds saved using the
Memorising speeds function
or
Use the speed suggested by the Speed Limit
Recognition and Recommendation ( MEM
display)
For more information on Memorising speeds
or the Speed Limit Recognition and
Recommendation, refer to the corresponding
sections.
Information displayed on
the instrument panel
6. Cruise control pause/resume
7. Cruise control mode selection
8. Speed setting value
9. Speed suggested by the Speed Limit
recognition and recommendation system
(depending on version)
Switching on/pausing
► Turn thumbwheel 1 to the "CRUISE" position
to select cruise control mode; the function is
paused.
►
Press button
2 or 3 to activate cruise control
and save a speed setting when the vehicle has
reached the desired speed; the vehicle’s current
speed is saved as the speed setting.
►
Release the accelerator pedal.
►
Pressing button 4
temporarily pauses the
function.
►
Pressing button 4
again restores operation of
the cruise control (ON).
Page 111 of 244
109
Driving
6Mode D or M must be selected.
► With the vehicle moving, press one of the
buttons
2 or 3: the current speed of your vehicle
becomes the cruise speed setting.
–
the current speed of your vehicle, if it is over
19 mph (30 km/h),
–
19 mph (30
km/h), if it is below 19 mph
(30
km/h).
Saving your settings
Switching off the ignition cancels any speed
setting value chosen by the driver.
The inter-vehicle distance is set at " Normal"
(2 dashes) by default. Otherwise, the last
value selected will be used when the system is
switched on.
Pause
The cruise control can be paused manually:
– either by action by the driver:
•
On the button
4 (Pause).
•
On the brake pedal.
•
On the electric parking brake control.
•
On the clutch pedal, by pressing for
approximately 10 seconds or more.
•
When changing from mode
D
to N with an
automatic gearbox.
–
or automatically:
•
If the ESC system is activated, for safety
reasons.
•
When the speed of the vehicle goes below
19 mph (30
km/h) (1,100 rpm) with a manual
gearbox.
When cruise control is paused, it can
only be restarted when all the safety
conditions are satisfied once again. The
message "Activation not possible, conditions
unsuitable" is displayed until the system can
be restarted.
Reactivating the function
With a manual gearbox
To reactivate the function, the driver must
accelerate and reach at least 19 mph (30 km/h),
then press one of the buttons 2, 3 or 4.
With EAT8 automatic gearbox
Following braking of the vehicle bringing it to
a complete stop, the system holds the vehicle
stationary; the cruise control is paused.
The driver must press the accelerator pedal
to move off, then reactivate the function when
above 19 mph (30
km/h) by pressing one of the
buttons 2, 3 or 4.
If the driver takes no action after becoming
stationary, the electric parking brake is applied
automatically after a while (approximately 5
minutes).
As a safety measure, wait until the current speed approaches the speed
setting before reactivating the function by
pressing button 4.
Modification of the speed
setting
With the engine running and cruise control on
(green), you can modify the speed setting.
Modification using the current speed
► By successive short presses on button 2 or
3, the setting is raised or lowered in steps of 1
mph (km/h).
►
By pressing and holding button 2
or 3, the
setting is raised or lowered in steps of 5 mph
(km/h).
Take care: pressing and holding button 2
or 3 for an extended period of time will
result in a rapid change in the speed of your
vehicle.
Modification using the speed limit
sign recognition system
► The suggested speed is displayed on the
instrument panel.
►
Press button
5; a message is displayed
to confirm the request to save the suggested
speed.
►
Press button
5 again to save the suggested
speed.
This value is then immediately shown as the new
speed setting on the instrument panel.
For more information on the Speed Limit
Recognition and Recommendation , refer to
the corresponding section.
Page 116 of 244
11 4
Driving
Driver Attention Alert
The system triggers an alert as soon as it detects that the driver has not taken a
break after two hours of driving at a speed above
40 mph (65 km/h).
This alert is issued via the display of a message
encouraging the driver to take a break,
accompanied by an audible signal.
If the driver does not follow this advice, the alert
is repeated hourly until the vehicle is stopped.
The system resets itself if one of the following
conditions is met:
– With the engine running, the vehicle has been
stationary for more than 15 minutes.
– The ignition has been switched off for a few
minutes.
– The driver's seat belt is unfastened and their
door is opened.
As soon as the speed of the vehicle drops below 40 mph (65 km/h), the
system goes into standby.
Driving time starts being counted again once
the speed reaches above 40 mph (65 km/h).
Driver Attention Alert by
camera
Depending on version, the "Driver Attention Alert"
may be combined with the "Driver Attention Alert
by camera".
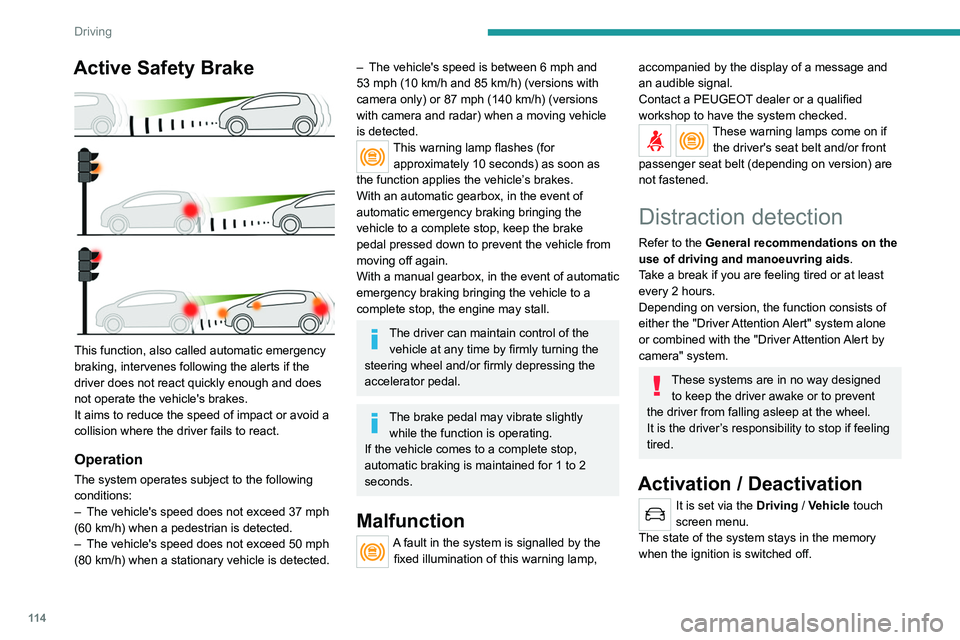
Active Safety Brake
This function, also called automatic emergency
braking, intervenes following the alerts if the
driver does not react quickly enough and does
not operate the vehicle's brakes.
It aims to reduce the speed of impact or avoid a
collision where the driver fails to react.
Operation
The system operates subject to the following
conditions:
–
The vehicle's speed does not exceed 37 mph
(60 km/h) when a pedestrian is detected.
–
The vehicle's speed does not exceed 50 mph
(80 km/h) when a stationary vehicle is detected.
– The vehicle's speed is between 6 mph and
53 mph (10 km/h and 85 km/h) (versions with
camera only) or 87 mph (140 km/h) (versions
with camera and radar) when a moving vehicle
is detected.
This warning lamp flashes (for approximately 10 seconds) as soon as
the function applies the vehicle’s brakes.
With an automatic gearbox, in the event of
automatic emergency braking bringing the
vehicle to a complete stop, keep the brake
pedal pressed down to prevent the vehicle from
moving off again.
With a manual gearbox, in the event of automatic
emergency braking bringing the vehicle to a
complete stop, the engine may stall.
The driver can maintain control of the vehicle at any time by firmly turning the
steering wheel and/or firmly depressing the
accelerator pedal.
The brake pedal may vibrate slightly while the function is operating.
If the vehicle comes to a complete stop,
automatic braking is maintained for 1 to 2
seconds.
Malfunction
A fault in the system is signalled by the fixed illumination of this warning lamp,
accompanied by the display of a message and
an audible signal.
Contact a PEUGEOT dealer or a qualified
workshop to have the system checked.
These warning lamps come on if the driver's seat belt and/or front
passenger seat belt (depending on version) are
not fastened.
Distraction detection
Refer to the General recommendations on the
use of driving and manoeuvring aids .
Take a break if you are feeling tired or at least
every 2 hours.
Depending on version, the function consists of
either the "Driver Attention Alert" system alone
or combined with the "Driver Attention Alert by
camera" system.
These systems are in no way designed to keep the driver awake or to prevent
the driver from falling asleep at the wheel.
It is the driver’s responsibility to stop if feeling
tired.
Activation / Deactivation
It is set via the Driving / Vehicle touch
screen menu.
The state of the system stays in the memory
when the ignition is switched off.
Page 117 of 244
11 5
Driving
6Driver Attention Alert
The system triggers an alert as soon as it detects that the driver has not taken a
break after two hours of driving at a speed above
40 mph (65
km/h).
This alert is issued via the display of a message
encouraging the driver to take a break,
accompanied by an audible signal.
If the driver does not follow this advice, the alert
is repeated hourly until the vehicle is stopped.
The system resets itself if one of the following
conditions is met:
–
With the engine running, the vehicle has been
stationary for more than 15 minutes.
–
The ignition has been switched off for a few
minutes.
–
The driver's seat belt is unfastened and their
door is opened.
As soon as the speed of the vehicle drops below 40 mph (65 km/h), the
system goes into standby.
Driving time starts being counted again once
the speed reaches above 40 mph (65
km/h).
Driver Attention Alert by
camera
Depending on version, the "Driver Attention Alert"
may be combined with the "Driver Attention Alert
by camera".
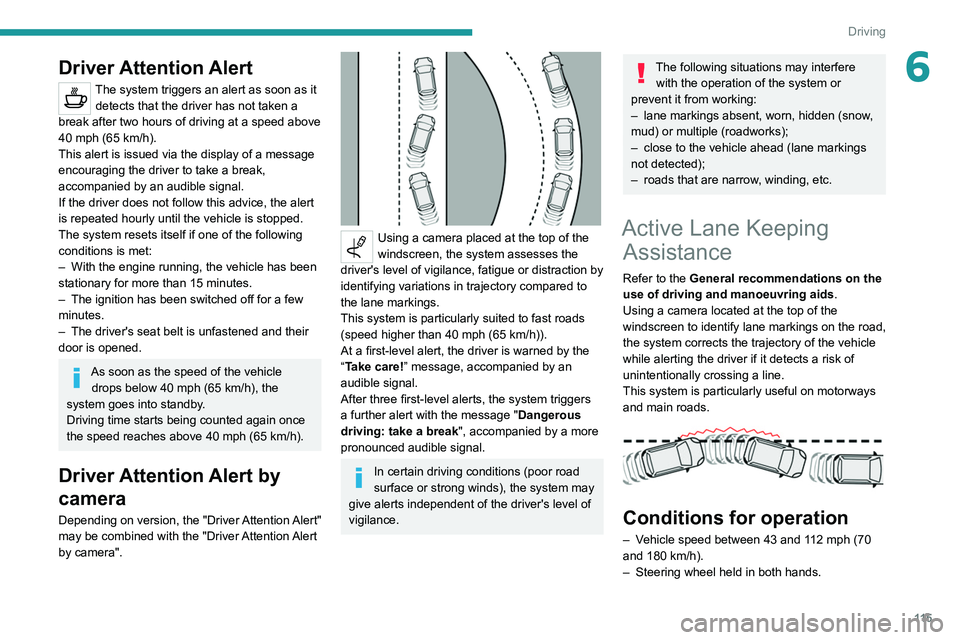
Using a camera placed at the top of the
windscreen, the system assesses the
driver's level of vigilance, fatigue or distraction by
identifying variations in trajectory compared to
the lane markings.
This system is particularly suited to fast roads
(speed higher than 40 mph (65
km/h)).
At a first-level alert, the driver is warned by the
“Take care! ” message, accompanied by an
audible signal.
After three first-level alerts, the system triggers
a further alert with the message " Dangerous
driving: take a break", accompanied by a more
pronounced audible signal.
In certain driving conditions (poor road
surface or strong winds), the system may
give alerts independent of the driver's level of
vigilance.
The following situations may interfere with the operation of the system or
prevent it from working:
–
lane markings absent, worn, hidden (snow
,
mud) or multiple (roadworks);
–
close to the vehicle ahead (lane markings
not detected);
–
roads that are narrow
, winding, etc.
Active Lane Keeping Assistance
Refer to the General recommendations on the
use of driving and manoeuvring aids .
Using a camera located at the top of the
windscreen to identify lane markings on the road,
the system corrects the trajectory of the vehicle
while alerting the driver if it detects a risk of
unintentionally crossing a line.
This system is particularly useful on motorways
and main roads.
Conditions for operation
– Vehicle speed between 43 and 112 mph (70
and 180 km/h).
–
Steering wheel held in both hands.
Page 126 of 244
124
Driving
Obstacles may appear further away than
they actually are.
It is important to monitor the sides of the
vehicle during the manoeuvre, using the
mirrors.
Parking sensors also provide additional
information about the area around the vehicle.
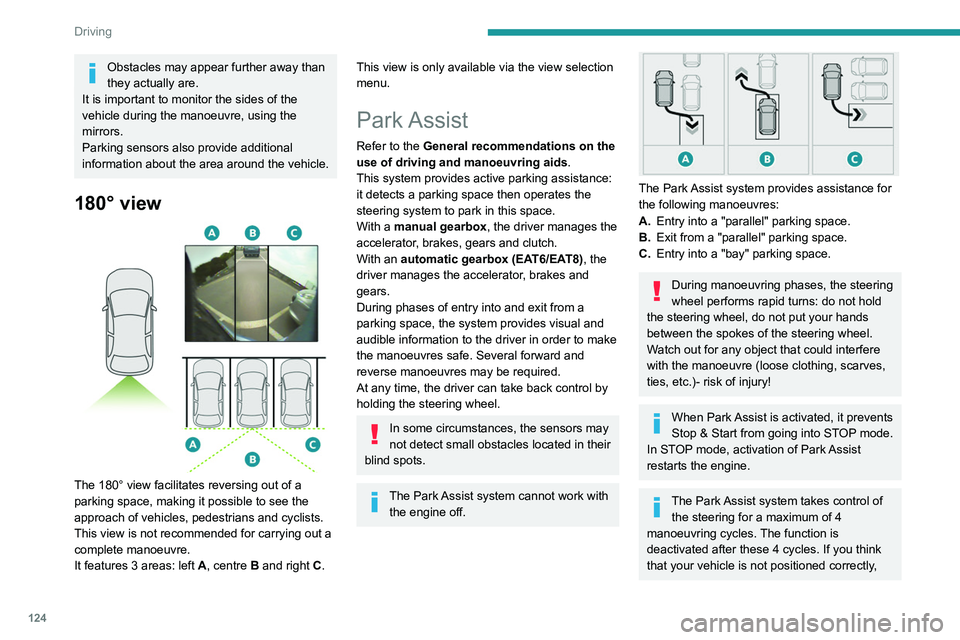
180° view
The 180° view facilitates reversing out of a
parking space, making it possible to see the
approach of vehicles, pedestrians and cyclists.
This view is not recommended for carrying out a
complete manoeuvre.
It features 3 areas: left A, centre B and right C.
This view is only available via the view selection
menu.
Park Assist
Refer to the General recommendations on the
use of driving and manoeuvring aids .
This system provides active parking
assistance:
it detects a parking space then operates the
steering system to park in this space.
With a manual gearbox, the driver manages the
accelerator, brakes, gears and clutch.
With an automatic gearbox (EAT6/EAT8), the
driver manages the accelerator, brakes and
gears.
During phases of entry into and exit from a
parking space, the system provides visual and
audible information to the driver in order to make
the manoeuvres safe. Several forward and
reverse manoeuvres may be required.
At any time, the driver can take back control by
holding the steering wheel.
In some circumstances, the sensors may
not detect small obstacles located in their
blind spots.
The Park Assist system cannot work with the engine off.
The Park Assist system provides assistance for
the following manoeuvres:
A. Entry into a "parallel" parking space.
B. Exit from a "parallel" parking space.
C. Entry into a "bay" parking space.
During manoeuvring phases, the steering
wheel performs rapid turns: do not hold
the steering wheel, do not put your hands
between the spokes of the steering wheel.
Watch out for any object that could interfere
with the manoeuvre (loose clothing, scarves,
ties, etc.)- risk of injury!
When Park Assist is activated, it prevents
Stop & Start from going into STOP mode.
In STOP mode, activation of Park Assist
restarts the engine.
The Park Assist system takes control of the steering for a maximum of 4
manoeuvring cycles. The function is
deactivated after these 4 cycles. If you think
that your vehicle is not positioned correctly,
Page 130 of 244
128
Driving
To switch the system off for a prolonged period,
contact a PEUGEOT dealer or a qualified
workshop.
Malfunctions
This warning lamp lights up on the instrument panel and a message appears,
accompanied by an audible signal.
If the lateral distance between your
vehicle and the space is too great, the
system may not be able to measure the
space.
Any object exceeding the dimensions of the
vehicle is not taken into account by the Park
Assist system during a manoeuvre.
In bad weather or in winter, ensure that
the sensors are not covered by dirt, ice
or snow.
In the event of a fault, have the system
checked by a PEUGEOT dealer or a qualified
workshop.
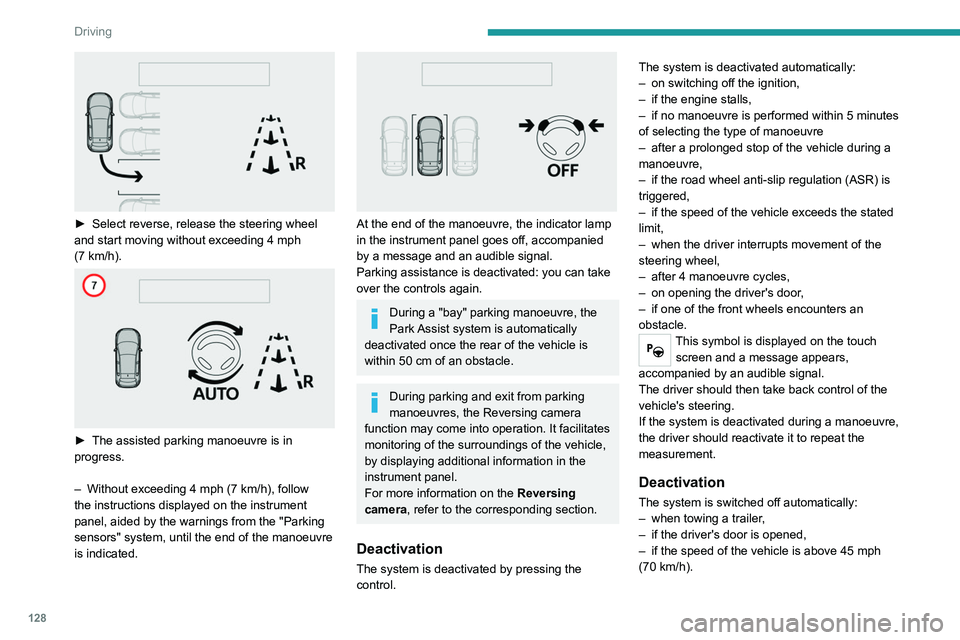
► Select reverse, release the steering wheel
and start moving without exceeding 4 mph
(7
km/h).
► The assisted parking manoeuvre is in
progress.
–
Without exceeding 4 mph (7
km/h), follow
the instructions displayed on the instrument
panel, aided by the warnings from the "Parking
sensors" system, until the end of the manoeuvre
is indicated.
At the end of the manoeuvre, the indicator lamp
in the instrument panel goes off, accompanied
by a message and an audible signal.
Parking assistance is deactivated: you can take
over the controls again.
During a "bay" parking manoeuvre, the
Park Assist system is automatically
deactivated once the rear of the vehicle is
within 50
cm of an obstacle.
During parking and exit from parking
manoeuvres, the Reversing camera
function may come into operation. It facilitates
monitoring of the surroundings of the vehicle,
by displaying additional information in the
instrument panel.
For more information on the Reversing
camera , refer to the corresponding section.
Deactivation
The system is deactivated by pressing the
control. The system is deactivated automatically:
–
on switching off the ignition,
–
if the engine stalls,
–
if no manoeuvre is performed within 5 minutes
of selecting the type of manoeuvre
–
after a prolonged stop of the vehicle during a
manoeuvre,
–
if the road wheel anti-slip regulation (ASR) is
triggered,
–
if the speed of the vehicle exceeds the stated
limit,
–
when the driver interrupts movement of the
steering wheel,
–
after 4 manoeuvre cycles,
–
on opening the driver's door
,
–
if one of the front wheels encounters an
obstacle.
This symbol is displayed on the touch screen and a message appears,
accompanied by an audible signal.
The driver should then take back control of the
vehicle's steering.
If the system is deactivated during a manoeuvre,
the driver should reactivate it to repeat the
measurement.
Deactivation
The system is switched off automatically:
– when towing a trailer ,
–
if the driver's door is opened,
–
if the speed of the vehicle is above 45 mph
(70 km/h).
Page 133 of 244
131
Practical information
7Compatibility of fuels
Petrol fuels conforming to the EN228 standard
containing up to 5% and 10% ethanol
respectively.
Diesel fuels conforming to the EN590, EN16734
and EN16709 standards and containing up to
7%, 10%, 20% and 30% fatty acid methyl ester
respectively. The use of B20 or B30 fuels, even
occasionally, imposes special maintenance
conditions referred to as "Arduous conditions".
Paraffinic Diesel fuel conforming to the EN15940
standard.
The use of any other type of (bio) fuel (vegetable or animal oils, pure or diluted,
domestic fuel, etc.) is strictly prohibited (risk
of damage to the engine and fuel system).
The only fuel additives authorised for use are those that meet the B715001 (petrol)
or B715000 (Diesel) standards.
Diesel at low temperature
At temperatures below 0 °C (+32 °F), the
formation of paraffins in summer-type Diesel fuels could prevent the engine from operating
correctly. In these temperature conditions, use
winter-type Diesel fuel and keep the fuel tank
more than 50
% full.
At temperatures below -15 °C (+5 °F) to avoid
problems starting, it is best to park the vehicle
under shelter (heated garage).
Travelling abroad
Certain fuels could damage your vehicle’s
engine.
In certain countries, the use of a particular
fuel may be required (specific octane rating,
specific trade name, etc.) to ensure correct
operation of the engine.
For all additional information, consult a dealer.
Refuelling
Fuel tank capacity: approximately 53 litres (or
45 litres depending on version).
Reserve level: approximately 6 litres.
Low fuel level
When the low fuel level is reached, this
warning lamp lights up on the instrument
panel, accompanied by the display of a message
and an audible signal. When it first comes on,
about 6 litres of fuel remain.
Until sufficient fuel is added, this warning lamp
appears every time the ignition is switched on,
accompanied by an onscreen message and
an audible signal. When driving, this message
and audible signal are repeated with increasing
frequency as the fuel level drops towards 0.
You must refuel as soon as possible to avoid
running out of fuel.
For more information on Running out of fuel
(Diesel), refer to the corresponding section.
A small arrow by the warning lamp indicates which side of the vehicle the
fuel filler flap is located on.
Stop & Start
Never refuel with the engine in STOP
mode; you must switch off the ignition.
Refuelling
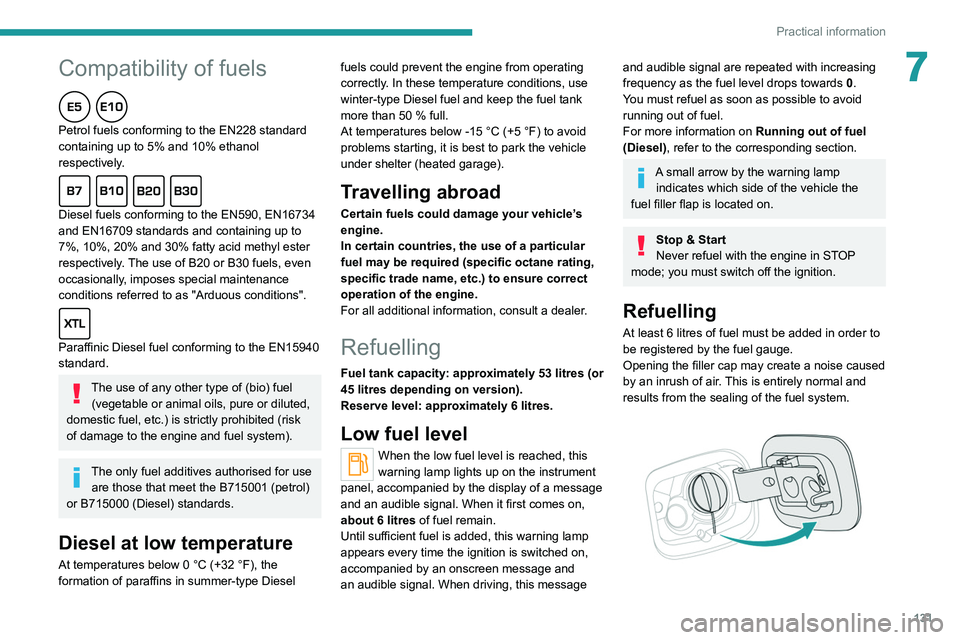
At least 6 litres of fuel must be added in order to
be registered by the fuel gauge.
Opening the filler cap may create a noise caused
by an inrush of air. This is entirely normal and
results from the sealing of the fuel system.
Page 134 of 244
132
Practical information
► Take care to select the pump that delivers the
correct fuel type for your vehicle's engine (see a
reminder label on the inside of the filler flap).
►
Insert the key into the filler cap, if your vehicle
has a standard key
.
►
T
urn the filler cap to the left.
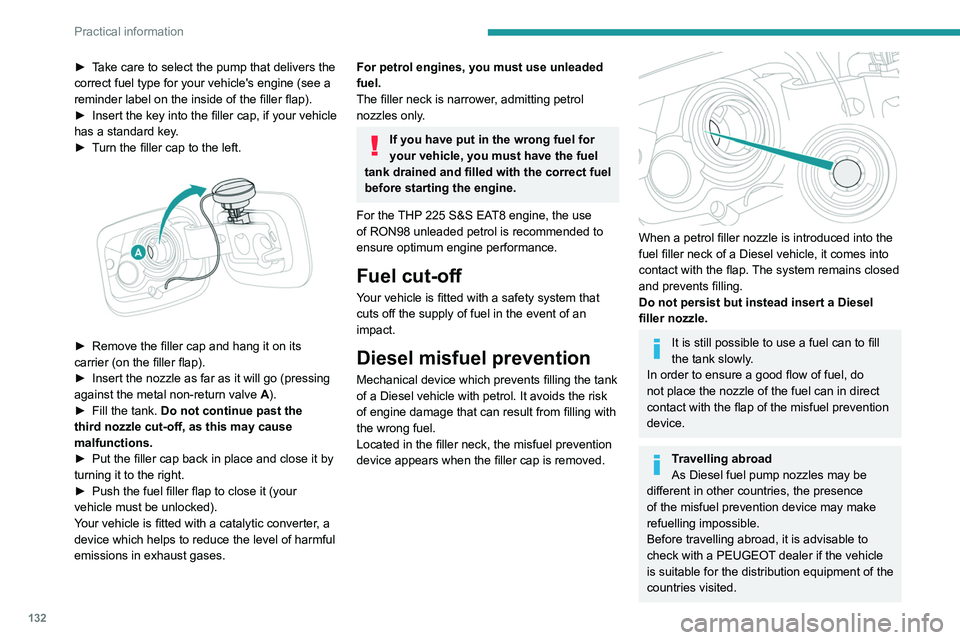
► Remove the filler cap and hang it on its
carrier (on the filler flap).
►
Insert the nozzle as far as it will go (pressing
against the metal non-return valve A
).
►
Fill the tank.
Do not continue past the
third nozzle cut-off, as this may cause
malfunctions.
►
Put the filler cap back in place and close it by
turning it to the right.
►
Push the fuel filler flap to close it (your
vehicle must be unlocked).
Y
our vehicle is fitted with a catalytic converter, a
device which helps to reduce the level of harmful
emissions in exhaust gases.
For petrol engines, you must use unleaded
fuel.
The filler neck is narrower, admitting petrol
nozzles only.
If you have put in the wrong fuel for
your vehicle, you must have the fuel
tank drained and filled with the correct fuel
before starting the engine.
For the THP 225 S&S EAT8 engine, the use
of RON98 unleaded petrol is recommended to
ensure optimum engine performance.
Fuel cut-off
Your vehicle is fitted with a safety system that
cuts off the supply of fuel in the event of an
impact.
Diesel misfuel prevention
Mechanical device which prevents filling the tank
of a Diesel vehicle with petrol. It avoids the risk
of engine damage that can result from filling with
the wrong fuel.
Located in the filler neck, the misfuel prevention
device appears when the filler cap is removed.
When a petrol filler nozzle is introduced into the
fuel filler neck of a Diesel vehicle, it comes into
contact with the flap. The system remains closed
and prevents filling.
Do not persist but instead insert a Diesel
filler nozzle.
It is still possible to use a fuel can to fill
the tank slowly.
In order to ensure a good flow of fuel, do
not place the nozzle of the fuel can in direct
contact with the flap of the misfuel prevention
device.
Travelling abroad
As Diesel fuel pump nozzles may be
different in other countries, the presence
of the misfuel prevention device may make
refuelling impossible.
Before travelling abroad, it is advisable to
check with a PEUGEOT dealer if the vehicle
is suitable for the distribution equipment of the
countries visited.
Snow chains
In wintry conditions, snow chains improve
traction as well as the behaviour of the vehicle
when braking.
Snow chains must be fitted only to the
front wheels. They must never be fitted to
"space-saver" type spare wheels.
Observe the legislation in force in your
country relating to the use of snow
chains and maximum authorised speeds.
Only use chains that have been designed for the
type of wheel fitted to your vehicle. Original tyre size Type of chain195/65 R15 9 mm link
205/55 R16
225/45 R17
225/40 R18 K-Summit K23
235/35 R19 Polaire Grip 70
For more information, contact a PEUGEOT
dealer or a qualified workshop.
Installation tips
► To fit the chains during a journey, stop the
vehicle on a flat surface on the side of the road.
► Apply the parking brake and position any
wheel chocks under the wheels to prevent
movement of the vehicle.