clock Peugeot 308 2021 Owner's Manual
[x] Cancel search | Manufacturer: PEUGEOT, Model Year: 2021, Model line: 308, Model: Peugeot 308 2021Pages: 244, PDF Size: 8.21 MB
Page 43 of 244
41
Ease of use and comfort
3
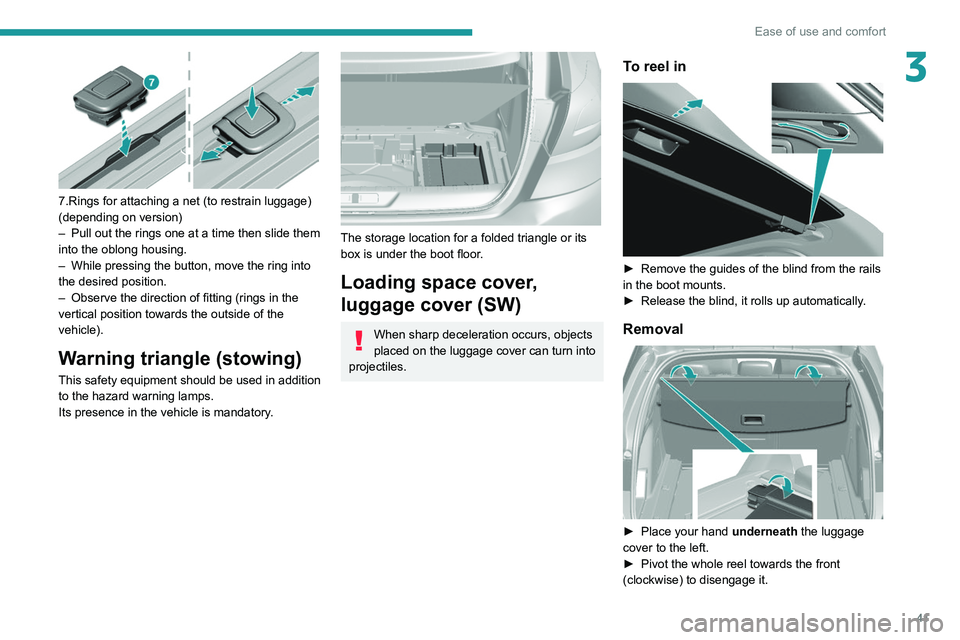
7.Rings for attaching a net (to restrain luggage)
(depending on version)
–
Pull out the rings one at a time then slide them
into the oblong housing.
–
While pressing the button, move the ring into
the desired position.
–
Observe the direction of fitting (rings in the
vertical position towards the outside of the
vehicle).
Warning triangle (stowing)
This safety equipment should be used in addition
to the hazard warning lamps.
Its presence in the vehicle is mandatory.
The storage location for a folded triangle or its
box is under the boot floor.
Loading space cover,
luggage cover (SW)
When sharp deceleration occurs, objects
placed on the luggage cover can turn into
projectiles.
To reel in
► Remove the guides of the blind from the rails
in the boot mounts.
►
Release the blind, it rolls up automatically
.
Removal
► Place your hand underneath the luggage
cover to the left.
►
Pivot the whole reel towards the front
(clockwise) to disengage it.
Page 44 of 244
42
Ease of use and comfort
► Proceed in the same way for the right side
(anti-clockwise).
Opening
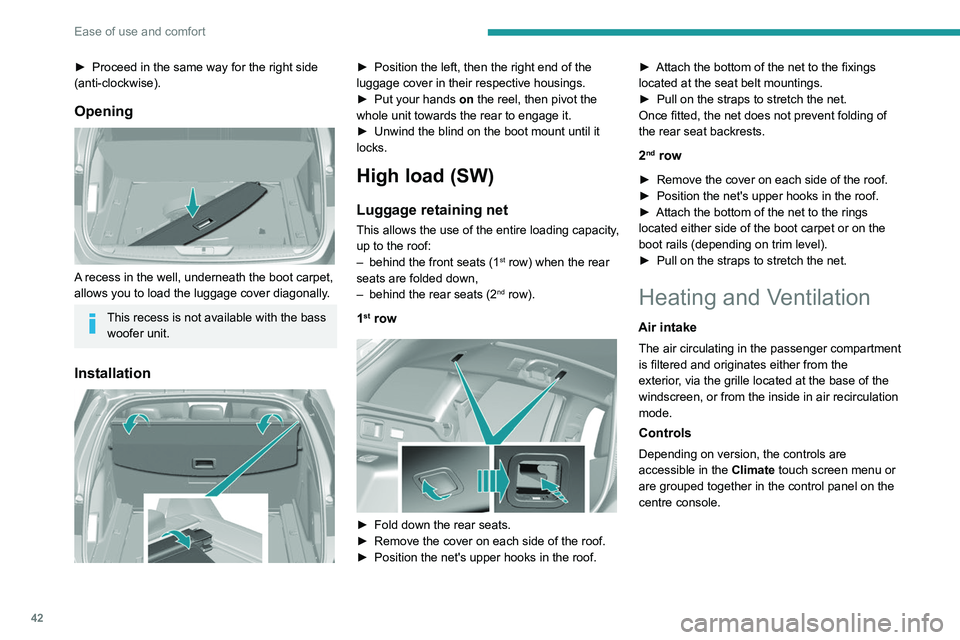
A recess in the well, underneath the boot carpet,
allows you to load the luggage cover diagonally.
This recess is not available with the bass woofer unit.
Installation
► Position the left, then the right end of the
luggage cover in their respective housings.
►
Put your hands
on the reel, then pivot the
whole unit towards the rear to engage it.
►
Unwind the blind on the boot mount until it
locks.
High load (SW)
Luggage retaining net
This allows the use of the entire loading capacity,
up to the roof:
–
behind the front seats (1st row) when the rear
seats are folded down,
–
behind the rear seats (2nd row).
1st row
► Fold down the rear seats.
► Remove the cover on each side of the roof.
►
Position the net's upper hooks in the roof. ►
Attach the bottom of the net to the fixings
located at the seat belt mountings.
►
Pull on the straps to stretch the net.
Once fitted, the net does not prevent folding of
the rear seat backrests.
2nd row
► Remove the cover on each side of the roof.
► Position the net's upper hooks in the roof.
►
Attach the bottom of the net to the rings
located either side of the boot carpet or on the
boot rails (depending on trim level).
►
Pull on the straps to stretch the net.
Heating and Ventilation
Air intake
The air circulating in the passenger compartment
is filtered and originates either from the
exterior, via the grille located at the base of the
windscreen, or from the inside in air recirculation
mode.
Controls
Depending on version, the controls are
accessible in the Climate touch screen menu or
are grouped together in the control panel on the
centre console.
Page 138 of 244
136
Practical information
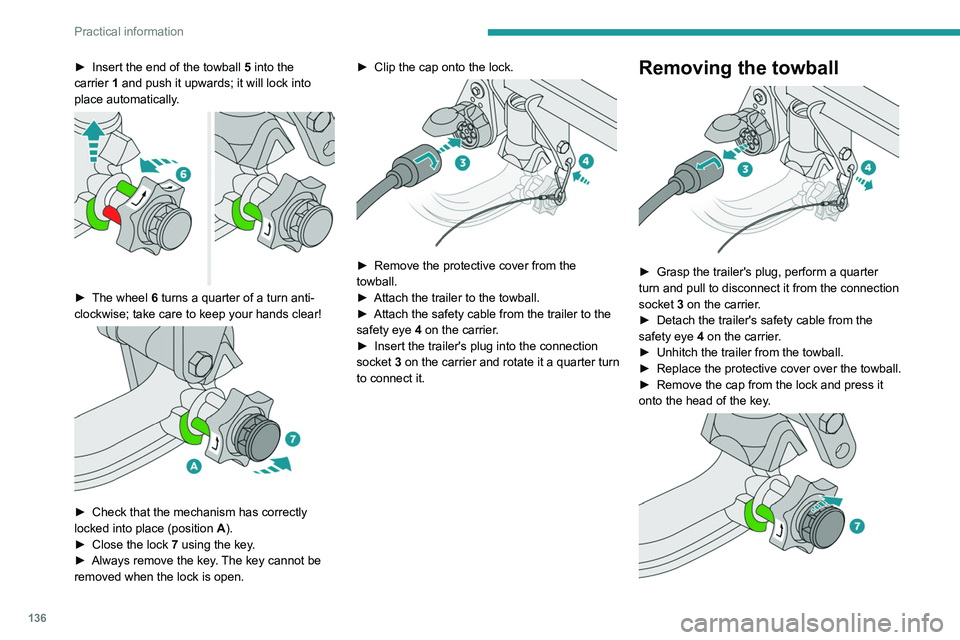
► Insert the end of the towball 5 into the
carrier 1 and push it upwards; it will lock into
place automatically.
► The wheel 6 turns a quarter of a turn anti-
clockwise; take care to keep your hands clear!
► Check that the mechanism has correctly
locked into place (position A
).
►
Close the lock 7
using the key.
►
Always remove the key
. The key cannot be
removed when the lock is open. ►
Clip the cap onto the lock.
► Remove the protective cover from the
towball.
►
Attach the trailer to the towball.
►
Attach the safety cable from the trailer to the
safety eye
4 on the carrier.
►
Insert the trailer's plug into the connection
socket
3 on the carrier and rotate it a quarter turn
to connect it.
Removing the towball
► Grasp the trailer's plug, perform a quarter
turn and pull to disconnect it from the connection
socket
3 on the carrier.
►
Detach the trailer's safety cable from the
safety eye
4 on the carrier.
►
Unhitch the trailer from the towball.
►
Replace the protective cover over the towball.
►
Remove the cap from the lock and press it
onto the head of the key
.
Page 139 of 244
137
Practical information
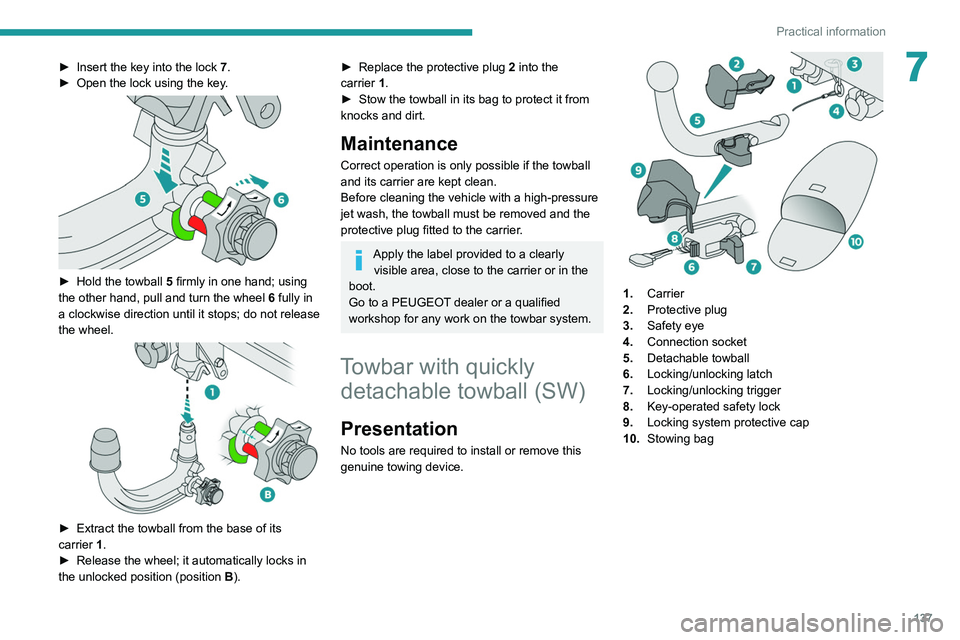
7► Insert the key into the lock 7.
► Open the lock using the key .
► Hold the towball 5 firmly in one hand; using
the other hand, pull and turn the wheel 6 fully in
a clockwise direction until it stops; do not release
the wheel.
► Extract the towball from the base of its
carrier 1.
►
Release the wheel; it automatically locks in
the unlocked position (position B
).
► Replace the protective plug 2 into the
carrier 1.
►
Stow the towball in its bag to protect it from
knocks and dirt.
Maintenance
Correct operation is only possible if the towball
and its carrier are kept clean.
Before cleaning the vehicle with a high-pressure
jet wash, the towball must be removed and the
protective plug fitted to the carrier.
Apply the label provided to a clearly visible area, close to the carrier or in the
boot.
Go to a PEUGEOT dealer or a qualified
workshop for any work on the towbar system.
Towbar with quickly detachable towball (SW)
Presentation
No tools are required to install or remove this
genuine towing device.
1. Carrier
2. Protective plug
3. Safety eye
4. Connection socket
5. Detachable towball
6. Locking/unlocking latch
7. Locking/unlocking trigger
8. Key-operated safety lock
9. Locking system protective cap
10. Stowing bag
Page 149 of 244
147
Practical information
7Never top up from an AdBlue® dispenser
reserved for heavy goods vehicles.
Storage recommendations
AdBlue® freezes at about -11°C and deteriorates
above +25°C. Containers should be stored in a
cool area and protected from direct sunlight.
Under these conditions, the fluid can be kept for
at least a year.
If the fluid has frozen, it can be used once it has
completely thawed out in the ambient air.
Never store AdBlue® containers in your
vehicle.
Precautions for use
AdBlue® is a urea-based solution. This fluid is
non-flammable, colourless and odourless (when
kept in a cool place).
In the event of contact with the skin, wash the
affected area with soap and running water. In the
event of contact with the eyes, immediately rinse
the eyes with large amounts of water or with an
eye wash solution for at least 15 minutes. Seek
medical attention if you feel a persistent burning
sensation or irritation.
If swallowed, immediately wash out the mouth
with clean water and then drink plenty of water.
In certain conditions (high temperature, for
example), the risk of release of ammonia cannot
be excluded: do not inhale the fluid. Ammonia
vapours have an irritant effect on mucous
membranes (eyes, nose and throat).
Store AdBlue® out of the reach of
children, in its original container.
Procedure
Before starting the top-up procedure, ensure that
the vehicle is parked on a flat and level surface.
In wintry conditions, ensure that the temperature
of the vehicle is above -11°C. Otherwise the
AdBlue
® may be frozen and so cannot be poured
into the tank. Park the vehicle in a warmer area
for a few hours to allow the top-up to be carried
out.
Never pour the AdBlue® into the Diesel
fuel tank.
For specific information about how to
access the AdBlue tank, refer to the
detailed descriptions below.
If any AdBlue® is splashed, or if there are
any spillages on the bodywork, rinse
immediately with cold water or wipe with a
damp cloth.
If the fluid has crystallised, clean it off using a
sponge and hot water.
Important: in the event of a top-up after
a breakdown because of a lack of
AdBlue, it is essential to wait around 5
minutes before switching on the ignition,
without opening the driver’s door,
unlocking the vehicle, introducing the key
into the ignition switch, or introducing the
key of the “
Keyless Entry and Starting
”
system into the passenger compartment
.
Switch on the ignition, then wait for 10
seconds before starting the engine.
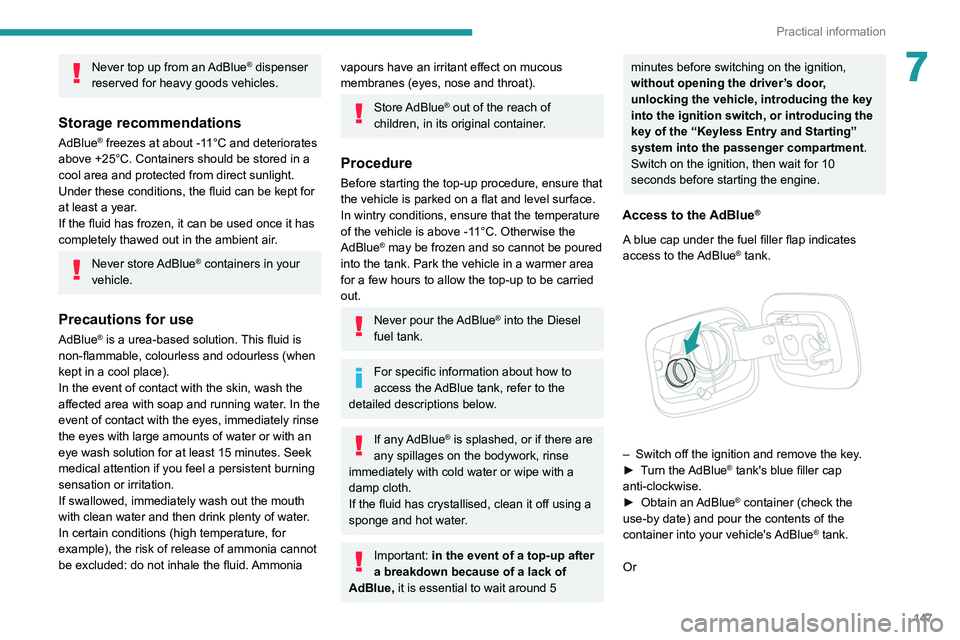
Access to the AdBlue®
A blue cap under the fuel filler flap indicates
access to the AdBlue® tank.
– Switch off the ignition and remove the key .
► T urn the AdBlue® tank's blue filler cap
anti-clockwise.
►
Obtain an
AdBlue
® container (check the
use-by date) and pour the contents of the
container into your vehicle's AdBlue
® tank.
Or
Page 158 of 244
156
In the event of a breakdown
► Remove the kit and stow it.
Drive at reduced speed (50 mph
(80 km/h) max.), limiting the distance
travelled to approximately 125 miles
(200
km).
Removing the pipe and
cartridge
► Turn the pipe assembly 2 to the left until it
comes into contact with the unit.
►
Disconnect the connector 1
from the cartridge
by turning it a quarter turn anti-clockwise.
►
Pull the pipe assembly 2
out slightly, then
disconnect the connector 3 from the air intake
pipe by turning it a quarter turn anti-clockwise.
– Remove the pipe assembly 2 .
– Keep the compressor vertical.
–
Unscrew the cartridge 4
from the bottom.
To fit the new cartridge and new pipe, carry out
these operations in reverse order.
Be careful of fluid discharge.
The expiry date of the fluid is indicated
on the cartridge.
The sealant cartridge is designed for single
use; it must be replaced even if only partly
used.
After use, do not discard the cartridge into the
environment, take it to an authorised waste
disposal site or a PEUGEOT dealer.
Do not forget to obtain a new sealant
cartridge, available from PEUGEOT dealers
or from a qualified workshop.
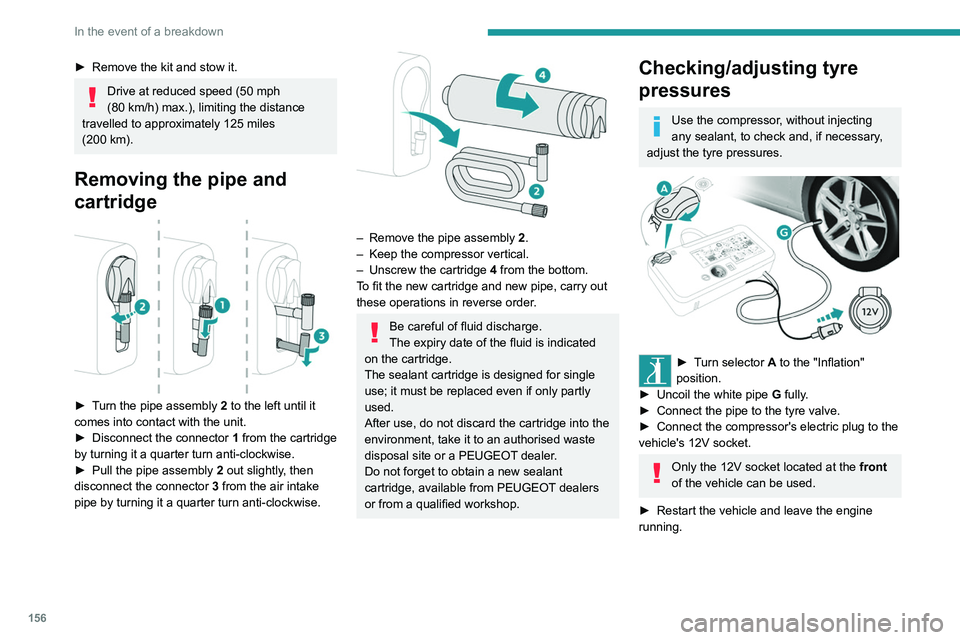
Checking/adjusting tyre
pressures
Use the compressor, without injecting
any sealant, to check and, if necessary,
adjust the tyre pressures.
► Turn selector A to the "Inflation"
position.
►
Uncoil the white pipe G
fully.
►
Connect the pipe to the tyre valve.
►
Connect the compressor's electric plug to the
vehicle's 12V socket.
Only the 12V socket located at the front
of the vehicle can be used.
►
Restart the vehicle and leave the engine
running.
Tyre inflation pressures are indicated on this label.
► Adjust the pressure using the compressor
(to inflate: set switch B to position "I"; to deflate:
set switch B to position "O" and press button C),
following the vehicle's tyre pressure label.
If, after approximately seven minutes,
this pressure is not reached, this
indicates that the tyre is irreparable; contact a
PEUGEOT dealer or a qualified workshop for
assistance.
► Remove the kit and stow it.
Do not drive more than 125 miles
(200 km) with a repaired tyre; see a
PEUGEOT dealer or a qualified workshop to
have the tyre changed.
Should the pressure of one or more tyres
be adjusted, it is necessary to reinitialise
the under-inflation detection system.
For more information on Tyre under-inflation
detection, refer to the corresponding section.