brake Peugeot 308 SW BL 2013 - RHD (UK. Australia) Owner's Guide
[x] Cancel search | Manufacturer: PEUGEOT, Model Year: 2013, Model line: 308 SW BL, Model: Peugeot 308 SW BL 2013Pages: 382, PDF Size: 17.71 MB
Page 162 of 382
9
160
DRIVING
STOP & START
The Stop & Start system puts the engine
temporarily on standby - STOP mode -
during stops in the traffi c (red lights, traf-
fi c jams, or other...). The engine restarts
automatically - START mode - as soon as
you want to move off. The restart takes
place instantly, quickly and silently.
Perfect for urban use, the Stop & Start
system reduces fuel consumption and
exhaust emissions as well as the noise
level when stationary.
Operation
Going into engine STOP mode
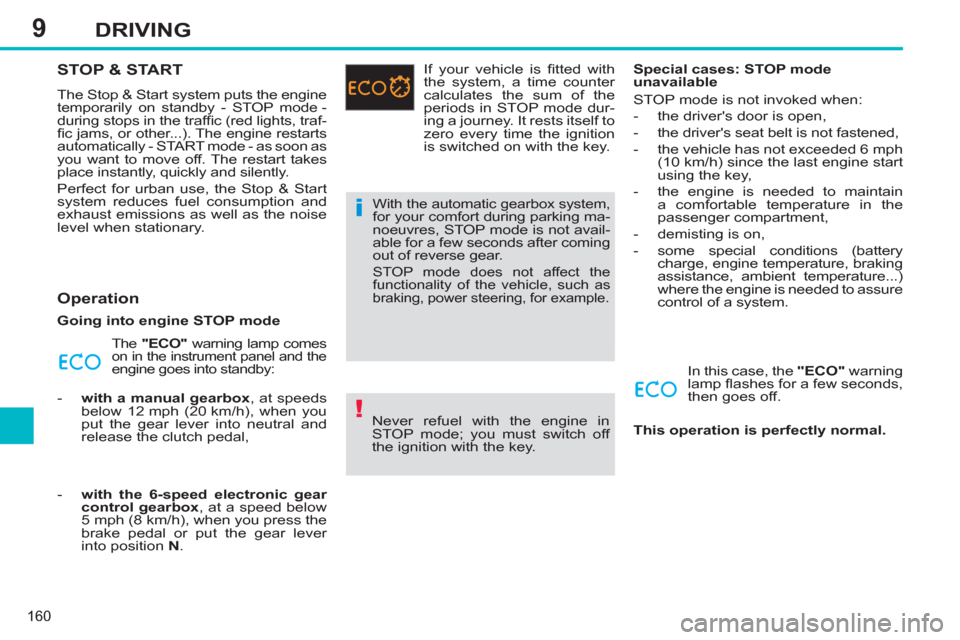
The "ECO"
warning lamp comes
on in the instrument panel and the engine goes into standby:
- with a manual gearbox
, at speeds
below 12 mph (20 km/h), when you
put the gear lever into neutral and
release the clutch pedal,
- with the 6-speed electronic gear
control gearbox
, at a speed below
5 mph (8 km/h), when you press the
brake pedal or put the gear lever
into position N
. If your vehicle is fi tted with
the system, a time counter
calculates the sum of the
periods in STOP mode dur-
ing a journey. It rests itself to
zero every time the ignition
is switched on with the key.
With the automatic gearbox system, for your comfort during parking ma-
noeuvres, STOP mode is not avail-
able for a few seconds after coming
out of reverse gear.
STOP mode does not affect the
functionality of the vehicle, such as
braking, power steering, for example.
Never refuel with the engine in
STOP mode; you must switch off
the ignition with the key.
Special cases: STOP mode
unavailable
STOP mode is not invoked when:
- the driver's door is open,
- the driver's seat belt is not fastened,
- the vehicle has not exceeded 6 mph
(10 km/h) since the last engine start
using the key,
- the engine is needed to maintain
a comfortable temperature in the
passenger compartment,
- demisting is on,
- some special conditions (battery
charge, engine temperature, braking
assistance, ambient temperature...)
where the engine is needed to assure
control of a system.
In this case, the "ECO"
warning
lamp fl ashes for a few seconds,
then goes off.
This operation is perfectly normal.
Page 163 of 382
9
161
DRIVING
Going into engine START mode
The "ECO"
warning lamp goes
off and the engine starts:
- with a manual gearbox
, when you
fully depress the clutch pedal,
- with the 6-speed electronic gear
control gearbox
:
●
gear lever in position A
or M
, when
you release the brake pedal,
●
or gear lever in position N
and the
brake pedal released, when you
move the gear lever to position A
or M
,
●
or when you engage reverse gear.
Special cases: START invoked
automatically
For your safety and comfort, START is
invoked automatically when:
- you open the driver's door,
- you unfasten the driver's seat belt,
- the speed of the vehicle exceeds
15 mph (25 km/h) with a manual
gearbox or 7 mph (11 km/h) with the
6-speed electronic gearbox system,
- some special conditions (battery
charge, engine temperature, braking
assistance, ambient temperature...)
where the engine is needed to assure
control of a system.
In this case the "ECO"
warning
lamp fl ashes for few seconds,
then goes off.
This operation is perfectly normal.
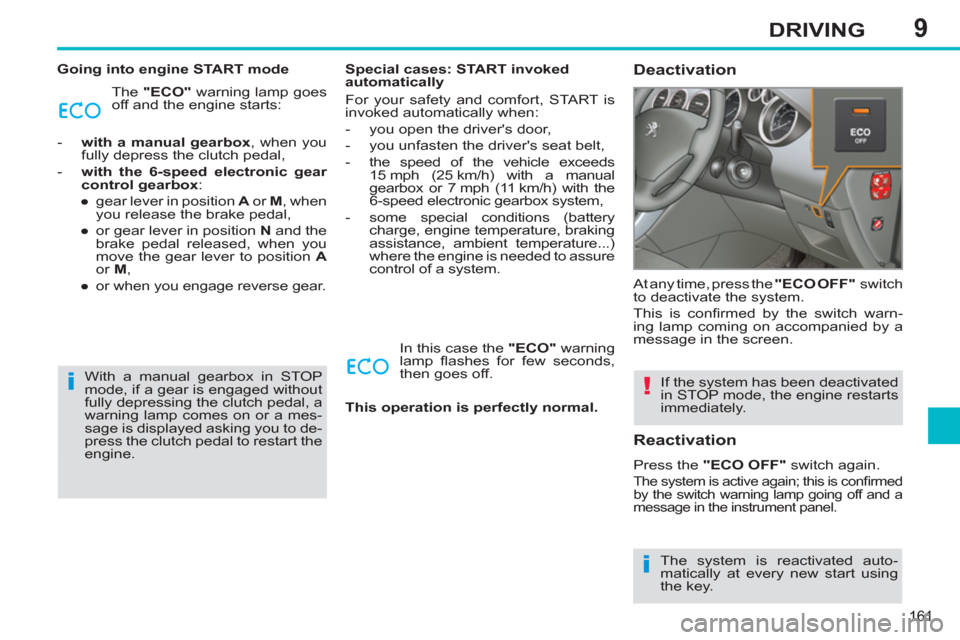
Deactivation
If the system has been deactivated
in STOP mode, the engine restarts
immediately. At any time, press the "ECO OFF"
switch
to deactivate the system.
This is confi rmed by the switch warn-
ing lamp coming on accompanied by a
message in the screen.
Reactivation
Press the "ECO OFF"
switch again.
The system is active again; this is confi rmed
by the switch warning lamp going off and a
message in the instrument panel.
The system is reactivated auto-
matically at every new start using
the key. With a manual gearbox in STOP
mode, if a gear is engaged without
fully depressing the clutch pedal, a
warning lamp comes on or a mes-
sage is displayed asking you to de-
press the clutch pedal to restart the
engine.
Page 167 of 382
9DRIVING
CRUISE CONTROL
System which automatically maintains
the speed of the vehicle at the value
programmed by the driver, without any
action on the accelerator pedal.
The cruise control is switched on
manually: it requires a minimum vehicle
speed of 25 mph (40 km/h) and the en-
gagement of:
- fourth gear on the manual gearbox,
- second gear in sequential mode on
the electronic gear control gearbox
or automatic gearbox,
- position A
on the electronic gear
control gearbox or D
on the
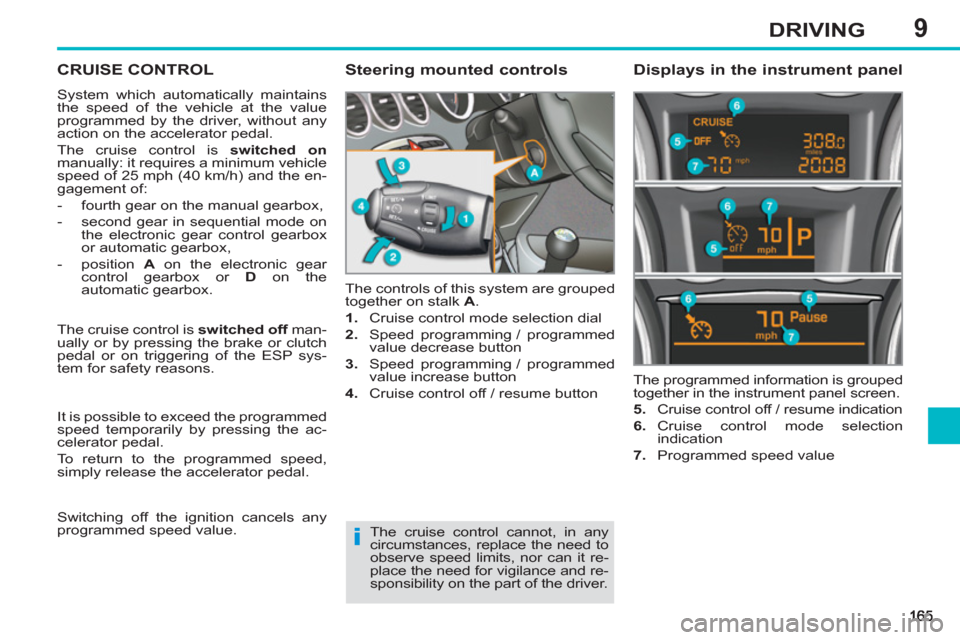
automatic gearbox. The controls of this system are grouped
together on stalk A
.
1.
Cruise control mode selection dial
2.
Speed programming / programmed
value decrease button
3.
Speed programming / programmed
value increase button
4.
Cruise control off / resume button The programmed information is grouped
together in the instrument panel screen.
5.
Cruise control off / resume indication
6.
Cruise control mode selection
indication
7.
Programmed speed value
Steering mounted controls
Displays in the instrument panel
The cruise control cannot, in any
circumstances, replace the need to
observe speed limits, nor can it re-
place the need for vigilance and re-
sponsibility on the part of the driver. The cruise control is switched off
man-
ually or by pressing the brake or clutch
pedal or on triggering of the ESP sys-
tem for safety reasons.
It is possible to exceed the programmed
speed temporarily by pressing the ac-
celerator pedal.
To return to the programmed speed,
simply release the accelerator pedal.
Switching off the ignition cancels any
programmed speed value.
Page 174 of 382
10
172
CHECKS
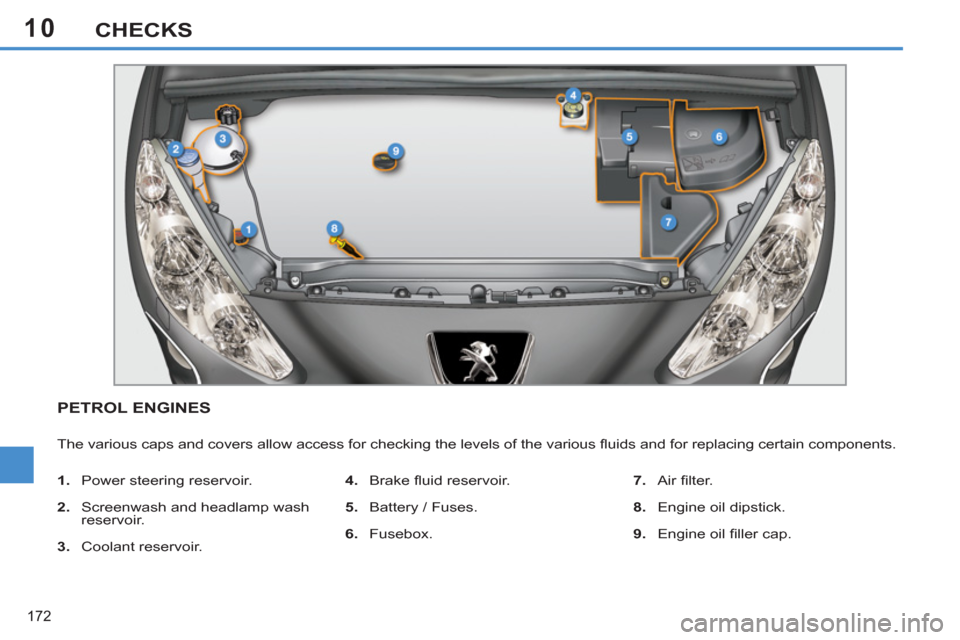
PETROL ENGINES
The various caps and covers allow access for checking the levels of the various fl uids and for replacing certain components.
1.
Power steering reservoir.
2.
Screenwash and headlamp wash
reservoir.
3.
Coolant reservoir.
4.
Brake fl uid reservoir.
5.
Battery / Fuses.
6.
Fusebox.
7.
Air fi lter.
8.
Engine oil dipstick.
9.
Engine oil fi ller cap.
Page 175 of 382
10
173
CHECKS
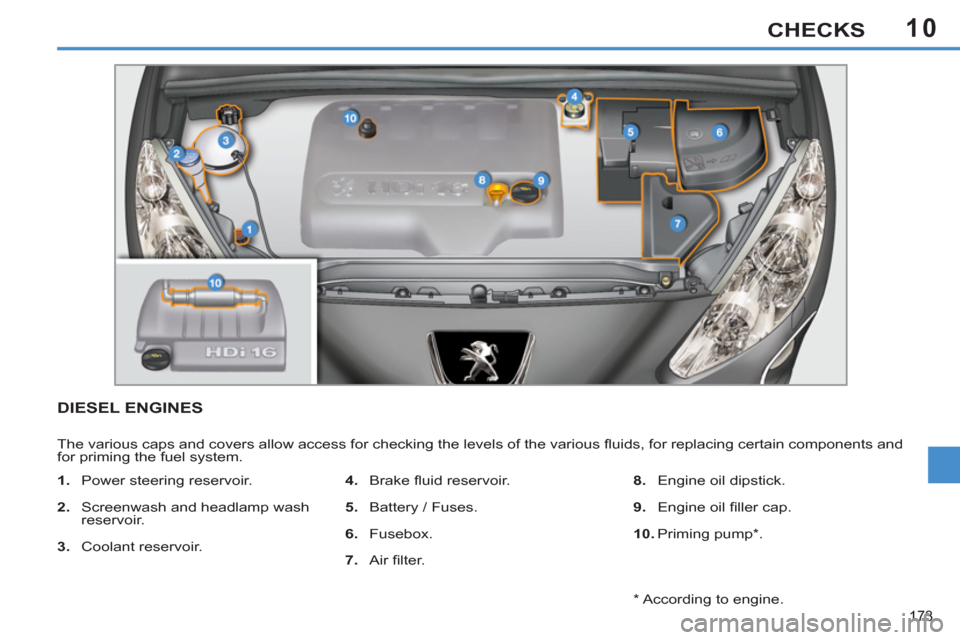
DIESEL ENGINES
The various caps and covers allow access for checking the levels of the various fl uids, for replacing certain components and
for priming the fuel system.
1.
Power steering reservoir.
2.
Screenwash and headlamp wash
reservoir.
3.
Coolant reservoir.
4.
Brake fl uid reservoir.
5.
Battery / Fuses.
6.
Fusebox.
7.
Air fi lter.
8.
Engine oil dipstick.
9.
Engine oil fi ller cap.
10.
Priming pump * .
*
According to engine.
Page 176 of 382
10
174
CHECKS
CHECKING LEVELS
Check all of these levels regularly and
top them up if necessary, unless other-
wise indicated.
If a level drops signifi cantly, have the
corresponding system checked by a
PEUGEOT dealer or a qualifi ed work-
shop.
Brake fluid level
On vehicles which are fi tted with a par-
ticle emission fi lter, the fan may operate
after the vehicle has been switched off,
even if the engine is cold.
In addition, as the cooling system is
pressurised, wait at least one hour after
switching off the engine before carrying
out any work.
To avoid any risk of scalding, unscrew the
cap by two turns to allow the pressure to
drop. When the pressure has dropped,
remove the cap and top up the level.
Oil level
The check is carried out either
when the ignition is switched on
using the oil level indicator on
the instrument panel, or using
the dipstick.
This manual check will only be correct
if the vehicle is on level ground and
the engine has been off for more than
30 minutes.
After topping up the oil, the check when
switching on the ignition with the oil level
indicator in the instrument panel will only
be valid 30 minutes after topping up. The brake fl uid level should be
close to the "MAX" mark. If it is
not, check the brake pad wear.
Changing the fl uid
Refer to the servicing booklet for details
of the interval for this operation.
Power steering fluid level
The power steering fl uid level
should be close to the "MAX"
mark. Unscrew the cap, with the
engine cold, to check the level.
Engine oil change
Refer to the servicing booklet for details
of the interval for this operation.
In order to maintain the reliability of the
engine and emission control system,
the use of additives in the engine oil is
prohibited.
It is normal to top up the oil level
between services. PEUGEOT re-
commends that you check the oil
level and top up if necessary every
3 000 miles (5 000 kilometres).
Fluid specifi cation
The brake fl uid must conform to the
manufacturer's recommendations and
meet the DOT4 standard.
Changing the coolant
The coolant does not have to be changed.
Coolant level
The coolant level should be
close to the "MAX" mark but
should never exceed it.
When the engine is warm, the tempera-
ture of the coolant is regulated by the fan.
This can operate with the ignition off.
Fluid specifi cation
The coolant must conform to the manu-
facturer's recommendations.
When working under the bonnet,
take care, as certain areas of the
engine may be extremely hot (risk
of burns).
Oil specifi cation
The oil must be the correct grade for
your engine and conform to the manu-
facturer's recommendations.
Page 179 of 382
10
177
CHECKS
Brake disc wear
Brake pads
Brake wear depends on the
style of driving, particularly in
the case of vehicles used in
town, over short distances. It
may be necessary to have the
condition of the brakes checked, even
between vehicle services.
Unless there is a leak in the circuit, a
drop in the brake fl uid level indicates
that the brake pads are worn.
For information on checking
brake disc wear, contact a
PEUGEOT dealer or a quali-
fi ed workshop.
Manual gearbox
The gearbox does not re-
quire any maintenance (no oil
change).
Refer to the servicing book-
let for the details of the level
checking interval for this com-
ponent.
6-speed electronic gearbox
The gearbox does not re-
quire any maintenance (no oil
change).
Refer to the servicing booklet
for details of the checking in-
terval for this component.
Automatic gearbox
The gearbox does not re-
quire any maintenance (no oil
change).
Refer to the servicing booklet
for details of the level checking
interval for this component.
Only use products recommended
by PEUGEOT or products of equi-
valent quality and specifi cation.
In order to optimise the operation
of units as important as the braking
system, PEUGEOT selects and
offers very specifi c products.
To avoid damaging the electrical
units, the use of a high pressure
washer in the engine compartment
is strictly prohibited
.
Parking brake
If excessive travel or a loss of
effectiveness of this system
is noticed, the parking brake
must be checked, even be-
tween two services.
Checking this system must be done by
a PEUGEOT dealer or a qualifi ed work-
shop.
Page 194 of 382
11
192
PRACTICAL INFORMATION
Parking the vehicle
Immobilise the vehicle where it
does not block traffi c: the ground
must be level, stable and non-slip-
pery ground.
Apply the parking brake, switch off
the ignition and engage fi rst gear *
to lock the wheels.
If necessary, place a chock under
the wheel diagonally opposite the
wheel to be changed.
It is imperative that you ensure that
the occupants get out of the vehicle
and wait where they are safe.
Never go underneath a vehicle
raised using a jack; use an axle
stand.
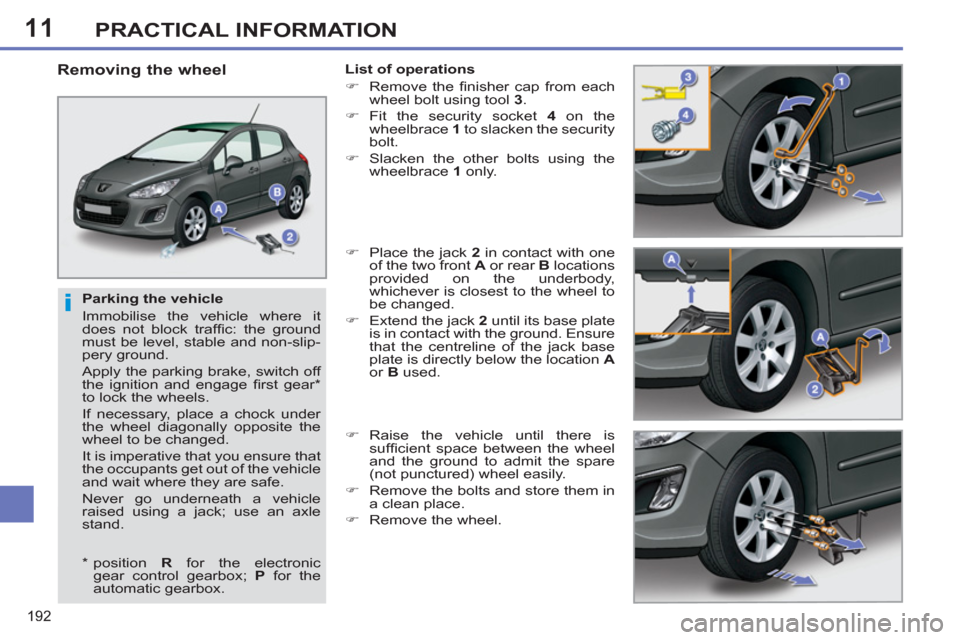
Removing the wheel
List of operations
�)
Remove the fi nisher cap from each
wheel bolt using tool 3
.
�)
Fit the security socket 4
on the
wheelbrace 1
to slacken the security
bolt.
�)
Slacken the other bolts using the
wheelbrace 1
only.
�)
Place the jack 2
in contact with one
of the two front A
or rear B
locations
provided on the underbody,
whichever is closest to the wheel to
be changed.
�)
Extend the jack 2
until its base plate
is in contact with the ground. Ensure
that the centreline of the jack base
plate is directly below the location A
or B
used.
�)
Raise the vehicle until there is
suffi cient space between the wheel
and the ground to admit the spare
(not punctured) wheel easily.
�)
Remove the bolts and store them in
a clean place.
�)
Remove the wheel.
*
position R
for the electronic
gear control gearbox; P
for the
automatic gearbox.
Page 199 of 382
11
197
PRACTICAL INFORMATION
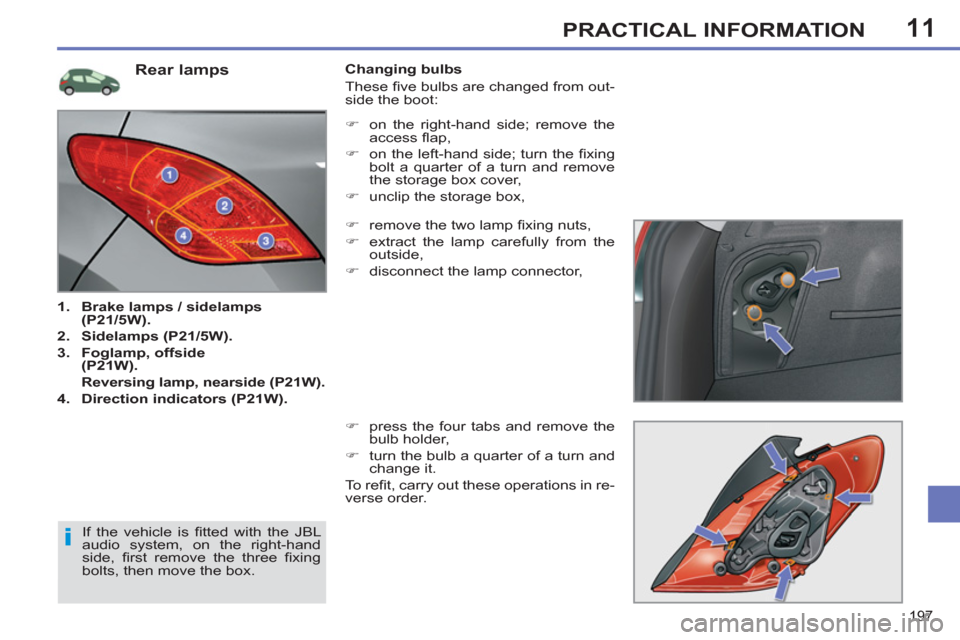
Rear lamps
1.
Brake lamps / sidelamps
(P21/5W).
2.
Sidelamps (P21/5W).
3.
Foglamp, offside
(P21W).
Reversing lamp, nearside (P21W).
4.
Direction indicators (P21W).
Changing bulbs
These fi ve bulbs are changed from out-
side the boot:
�)
remove the two lamp fi xing nuts,
�)
extract the lamp carefully from the
outside,
�)
disconnect the lamp connector,
�)
press the four tabs and remove the
bulb holder,
�)
turn the bulb a quarter of a turn and
change it.
To r efi t, carry out these operations in re-
verse order.
If the vehicle is fi tted with the JBL
audio system, on the right-hand
side, fi rst remove the three fi xing
bolts, then move the box.
�)
on the right-hand side; remove the
access fl ap,
�)
on the left-hand side; turn the fi xing
bolt a quarter of a turn and remove
the storage box cover,
�)
unclip the storage box,
Page 200 of 382
11
198
PRACTICAL INFORMATION
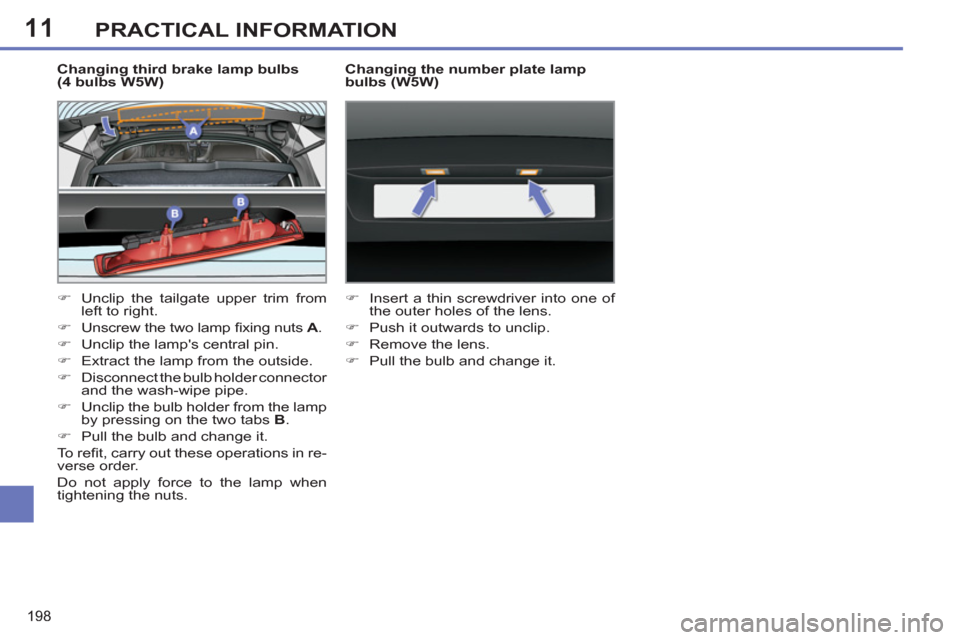
Changing third brake lamp bulbs
(4 bulbs W5W)
�)
Unclip the tailgate upper trim from
left to right.
�)
Unscrew the two lamp fi xing nuts A
.
�)
Unclip the lamp's central pin.
�)
Extract the lamp from the outside.
�)
Disconnect the bulb holder connector
and the wash-wipe pipe.
�)
Unclip the bulb holder from the lamp
by pressing on the two tabs B
.
�)
Pull the bulb and change it.
To r efi t, carry out these operations in re-
verse order.
Do not apply force to the lamp when
tightening the nuts.
Changing the number plate lamp
bulbs (W5W)
�)
Insert a thin screwdriver into one of
the outer holes of the lens.
�)
Push it outwards to unclip.
�)
Remove the lens.
�)
Pull the bulb and change it.