warning PEUGEOT 4008 2015 Owners Manual
[x] Cancel search | Manufacturer: PEUGEOT, Model Year: 2015, Model line: 4008, Model: PEUGEOT 4008 2015Pages: 389, PDF Size: 15.89 MB
Page 3 of 389
Welcome
We draw your attention to the following points:
- th e fitting of electrical equipment or accessories not listed by
P
e
uge
Ot
may cause faults and failures with the electrical
system of your vehicle. Contact a P
e
uge
Ot
dealer or a
qualified workshop for information on the range of recommended
accessories.
-
A
ny modification or adaptation not intended or authorised by
Automobiles P
e
uge
Ot
or carried out without meeting the
technical requirements defined by the manufacturer would lead
to the suspension of the new vehicle warranty.
Thank you for choosing a 4008, a symbol of
confidence, passion and inspiration
this handbook has been designed to help to make the most of your
4008 in all circumstances and in complete safety.
ta
ke the time to read through it so as to familiarise yourself with your
vehicle.
th
e descriptions and illustrations are given as indications only.
Automobiles P
e
uge
Ot
reserves the right to modify the technical
characteristics, equipment and accessories without having to update
this edition of the handbook.
th
is handbook covers all of the variations in equipment available
across the whole 4008 range.
Your vehicle will be fitted with only some of the equipment described
in this document, depending on its trim level, version and the
specification for the country in which it was sold. For any work on your vehicle, use a qualified workshop that has the
technical information, competence and equipment required, which a
Pe
ugeOt d ealer is able to provide.
th
is document forms an integral part of your vehicle. Remember to
pass it on to the new owner in the event of the sale of the vehicle.
Key
Warning:
this symbol is for warnings that you must
observe for your own safety, the safety of
others, and to avoid the risk of damage to
your vehicle.
Information:
this symbol draws your attention to
additional information for the best use of
your vehicle.
Protection of the environment:
this symbol accompanies advice related to
the protection of the environment.
Page 4 of 389
4008_en_Chap00a_sommaire_ed01-2014
Instrument panel 12
Warning and indicator lamps
1
3
Instrument panel screen
1
9
tr
ip computer
3
2
Distance recorder
3
2
tr
ip distance recorder
3
2
Service indicator
3
3
Adjusting vehicle settings
3
7
Audio- CD system screen
4
4
Audio- CD system touch screen
4
6
Audio-
te
lematic system touch screen
4
8
Lighting dimmer
5
1
MonitoringOver view
Remote control key 5
2
"Keyless e
n
try and Starting" system
5
6
Doors
62
Boot
6
3
Alarm
65
el
ectric windows
6
8
Panoramic sunroof
7
0
Access
Front seats 7 1
Rear seats
7
5
Mirrors
77
Steering wheel adjustment
7
9
Ventilation
80
Manual heating / air conditioning
8
2
Automatic air conditioning
8
4
Rear screen demist - defrost
8
9
Interior fittings
9
0
Boot fittings
9
6
Comfort
Starting - stopping the engine with the key 98
Starting - stopping the engine with
the Keyless
e
n
try and Starting system
9
9
Parking brake
1
02
Manual gearbox
1
03
ge
ar shift indicator
1
04
CV
t
gearbox
1
05
Hill start assist
1
10
Stop & Start (Auto Stop &
g
o
) function
1
11
Under-inflation detection
1
14
Four wheel drive system
1
18
Cruise control
1
20
Parking sensors
1
23
Reversing camera
1
26
Driving
Lighting controls 1 27
Daytime running lamps
1
30
Automatic illumination of headlamps
1
30
Manual guide-me-home lighting
1
31
Welcome lighting
1
32
Headlamp adjustment
1
33
Wiper controls
1
34
Automatic rain sensitive wipers
1
36
Courtesy lamps
1
38
Boot lamp
1
40
Panoramic roof lighting
1
40
Visibility
e
co-driving
Contents
Page 5 of 389
4008_en_Chap00a_sommaire_ed01-2014
Direction indicators 141
Hazard warning lamps
1
41
H o r n
141
Braking assistance systems
1
42
tr
ajectory control systems
1
44
Front seat belts
1
46
Airbags
150
Child seats
1
55
Deactivating the passenger's front airbag
1
57
ISOFIX child seats
1
64
Child lock
1
70
Safety
temporary puncture repair kit 1 71
Changing a wheel
1
75
Snow chains
1
81
Changing a bulb
1
82
Changing a fuse
1
88
12 V battery
1
94
Automatic power cut-off
to accessories
1
97
Changing a wiper blade
1
97
Recovering the vehicle
1
98
to
wing a trailer
2
01
Fitting roof bars
2
03
Accessories
204
Practical information
Bonnet 207
Petrol engines
2
08
Diesel engines
2
09
Fuel tank
2
10
Running out of fuel (Diesel)
2
12
Checking levels
2
13
Checks
216
Checks
Petrol engines 2 19
Petrol weights
2
20
Diesel engines
2
26
Diesel weights
2
27
Dimensions
233
Identification markings
2
35
technical data
Bluetooth® telephone with voice
recognition 237
to
uch screen A
uD
IO-
teLeM
A
tI
C
system
249
tOuC
H SCR
e
e
N AuD
IO - CD system
2
89
A
uD
IO - CD system
3
11
Audio equipment and telematics
Alphabetical index
Contents
Page 8 of 389
6
4008_en_Chap00b_vue-ensemble_ed01-2014
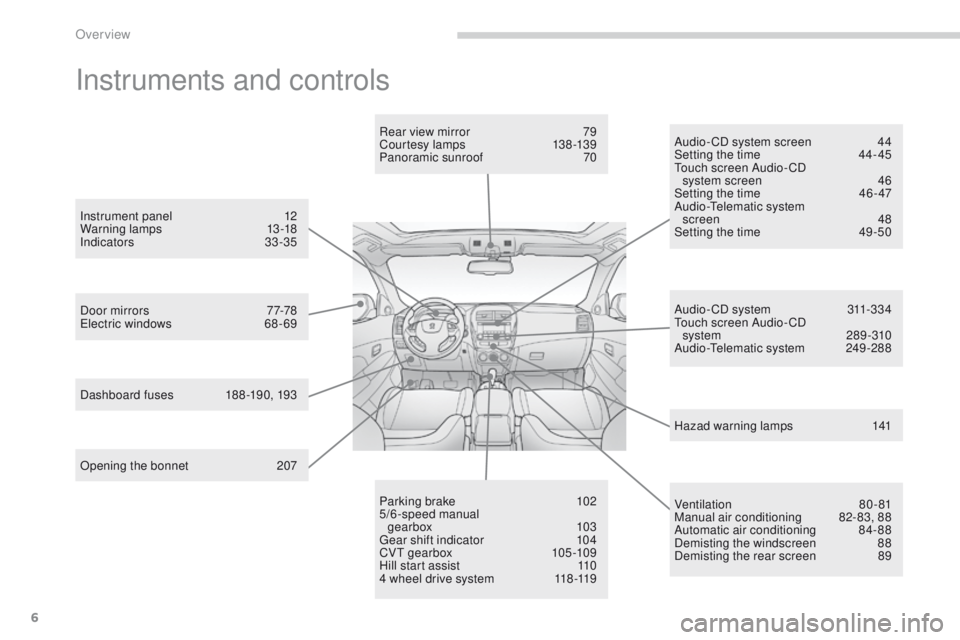
Instruments and controls
Opening the bonnet 207
Door mirrors
7
7-78
el
ectric windows
6
8 - 69Rear view mirror
7
9
Courtesy lamps
1
38 -139
Panoramic sunroof
7
0
Dashboard fuses
1
88 -190, 193
Instrument panel
1
2
Warning lamps
1
3-18
Indicators
33-35
Audio- CD system screen
4
4
Setting the time
4
4- 45
to
uch screen Audio- CD
system screen
4
6
Setting the time
4
6 - 47
Audio-
te
lematic system
screen
48
Setting the time
4
9 -50
Parking brake
1
02
5/6-speed manual gearbox
10
3
ge
ar shift indicator
1
04
CV
t g
earbox
10
5 -109
Hill start assist
1
10
4 wheel drive system
1
18 -119Audio- CD system
3
11-334
to
uch screen Audio- CD
system 289 -310
Audio-
te
lematic system
2
49-288
Ventilation
8
0-81
Manual air conditioning
8
2-83, 88
Automatic air conditioning
8
4- 88
Demisting the windscreen
8
8
Demisting the rear screen
8
9
Hazad warning lamps
1
41
Over view
Page 10 of 389
8
4008_en_Chap00b_vue-ensemble_ed01-2014
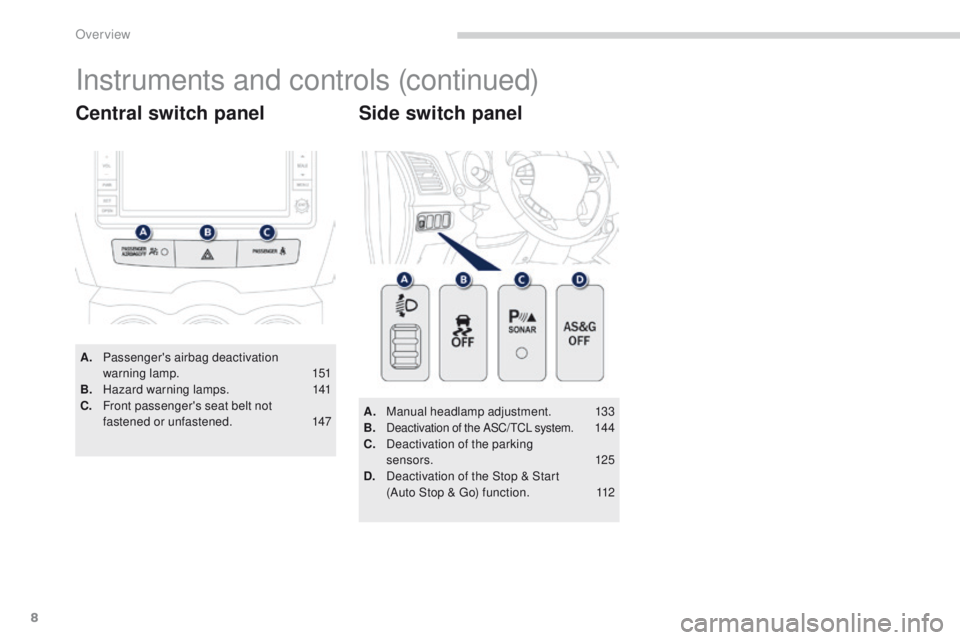
A. Passenger's airbag deactivation warning lamp. 1 51
B.
H
azard warning lamps.
1
41
C.
F
ront passenger's seat belt not
fastened or unfastened.
1
47
Central switch panel
Instruments and controls (continued)
A. Manual headlamp adjustment. 133
B. Deactivation of the ASC/tC L system. 14 4
C. D
eactivation of the parking
sensors.
125
D.
D
eactivation of the Stop & Start
(Auto Stop &
g
o
) function.
1
12
Side switch panel
Over view
Page 14 of 389
12
Instrument panel
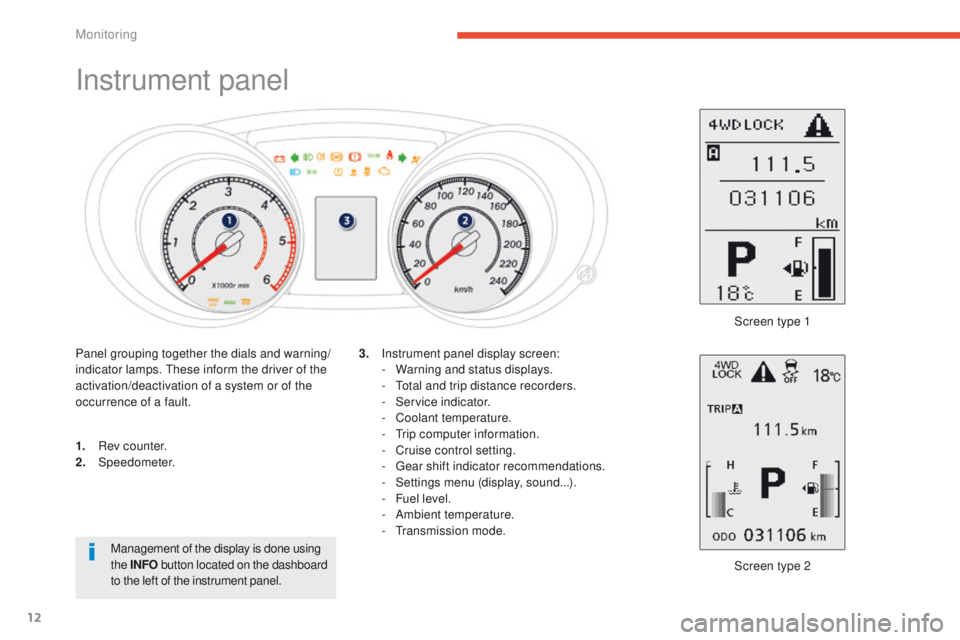
1. Rev counter.
2. Speedometer.
Screen type 2
3.
I
nstrument panel display screen:
-
W
arning and status displays.
- t
o
tal and trip distance recorders.
-
S
ervice indicator.
-
C
oolant temperature.
- tr ip computer information.
- C ruise control setting.
-
g
e
ar shift indicator recommendations.
-
S
ettings menu (display, sound...).
-
F
uel level.
-
A
mbient temperature.
-
t
r
ansmission mode.
Panel grouping together the dials and warning/
indicator lamps.
t
h
ese inform the driver of the
activation/deactivation of a system or of the
occurrence of a fault. Screen type 1
Management of the display is done using
the INFO button located on the dashboard
to the left of the instrument panel.
Monitoring
Page 15 of 389
13
4008_en_Chap01_controle-de-marche_ed01-2014
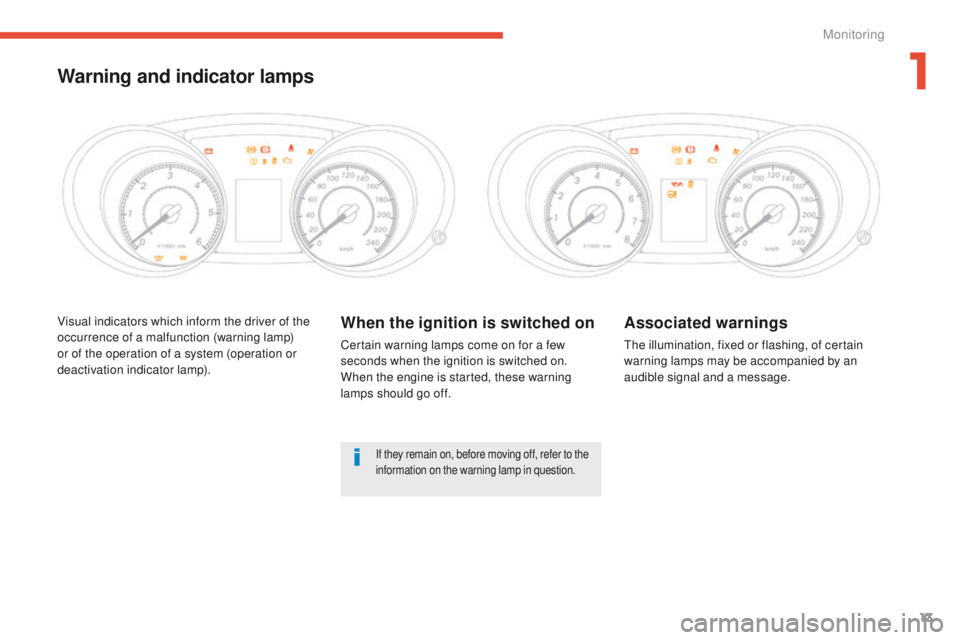
Visual indicators which inform the driver of the
occurrence of a malfunction (warning lamp)
or of the operation of a system (operation or
deactivation indicator lamp).When the ignition is switched on
Certain warning lamps come on for a few
seconds when the ignition is switched on.
When the engine is started, these warning
lamps should go off.
Associated warnings
the illumination, fixed or flashing, of certain
warning lamps may be accompanied by an
audible signal and a message.
Warning and indicator lamps
If they remain on, before moving off, refer to the
information on the warning lamp in question.
1
Monitoring
Page 16 of 389
14
Warning lamps
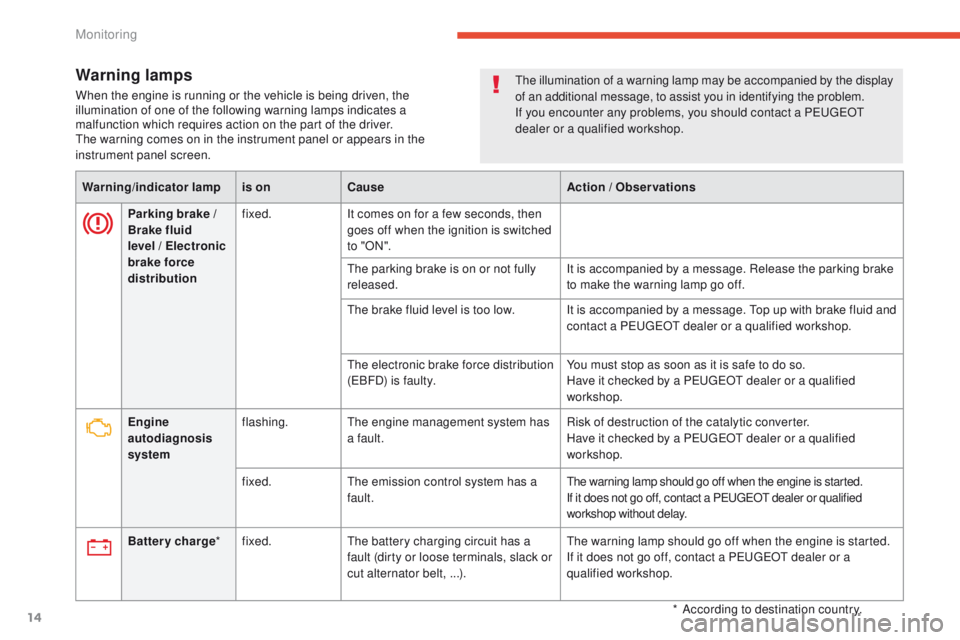
When the engine is running or the vehicle is being driven, the
illumination of one of the following warning lamps indicates a
malfunction which requires action on the part of the driver.
th
e warning comes on in the instrument panel or appears in the
instrument panel screen.
Warning /indicator lampis on Cause Action / Observations
Parking brake
/
Brake fluid
level
/ Electronic
brake force
distribution fixed.
It comes on for a few seconds, then
goes off when the ignition is switched
to " O N ".
th
e parking brake is on or not fully
released. It is accompanied by a message. Release the parking brake
to make the warning lamp go off.
th
e brake fluid level is too low. It is accompanied by a message. t
o
p up with brake fluid and
contact a P
e
uge
Ot
dealer or a qualified workshop.
th
e electronic brake force distribution
(
eB
FD) is faulty.You must stop as soon as it is safe to do so.
Have it checked by a P
e
uge
Ot
dealer or a qualified
workshop.
Engine
autodiagnosis
system flashing.
the
engine management system has
a fault. Risk of destruction of the catalytic converter.
Have it checked by a P
e
uge
Ot
dealer or a qualified
workshop.
fixed.
th
e emission control system has a
fault.
the warning lamp should go off when the engine is started.
If it does not go off, contact a Pe ugeOt dealer or qualified
workshop without delay.
Battery charge *fixed.th e battery charging circuit has a
fault (dirty or loose terminals, slack or
cut alternator belt, ...).th e warning lamp should go off when the engine is started.
If it does not go off, contact a Pe ugeOt dealer or a
qualified workshop.
th
e illumination of a warning lamp may be accompanied by the display
of an additional message, to assist you in identifying the problem.
If you encounter any problems, you should contact a P
e
uge
Ot
dealer or a qualified workshop.
*
A
ccording to destination country.
Monitoring
Page 17 of 389
15
4008_en_Chap01_controle-de-marche_ed01-2014
Warning/indicator lampis on Cause Action / Observations
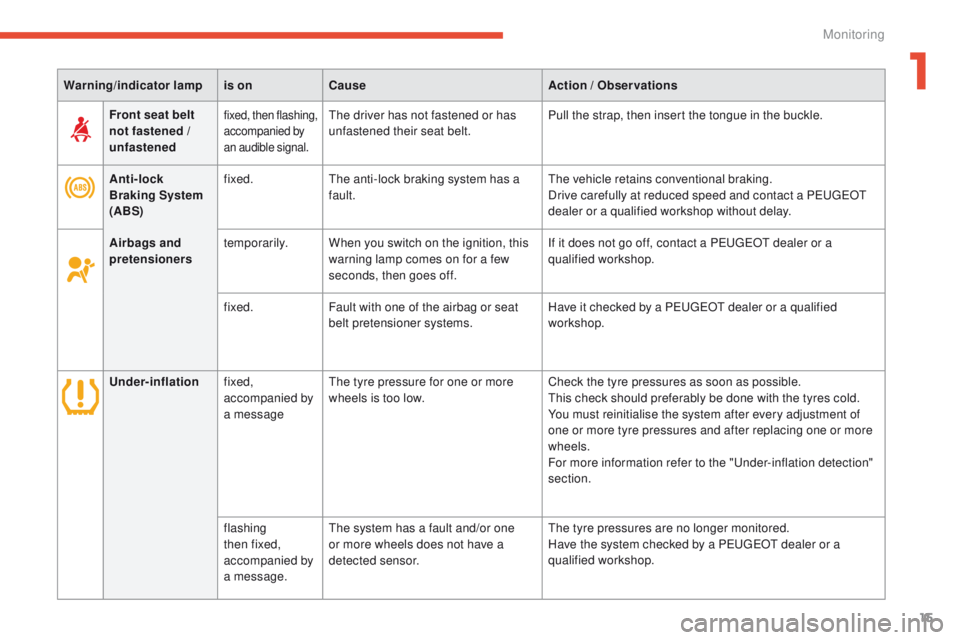
Anti-lock
Braking System
(ABS) fixed.
th
e anti-lock braking system has a
fault.
th
e vehicle retains conventional braking.
Drive carefully at reduced speed and contact a P
e
uge
Ot
dealer or a qualified workshop without delay.
Front seat belt
not fastened /
unfastened
fixed, then flashing,
accompanied by
an audible signal.the driver has not fastened or has
unfastened their seat belt.
Pull the strap, then insert the tongue in the buckle.
Airbags and
pretensioners temporarily.
When you switch on the ignition, this
warning lamp comes on for a few
seconds, then goes off. If it does not go off, contact a P
e
uge
Ot
dealer or a
qualified workshop.
fixed. Fault with one of the airbag or seat
belt pretensioner systems. Have it checked by a P
e
uge
Ot
dealer or a qualified
workshop.
Under-inflation fixed,
accompanied by
a message
th
e tyre pressure for one or more
wheels is too low. Check the tyre pressures as soon as possible.
th
is check should preferably be done with the tyres cold.
You must reinitialise the system after every adjustment of
one or more tyre pressures and after replacing one or more
wheels.
For more information refer to the "
un
der-inflation detection"
section.
flashing
then fixed,
accompanied by
a message.
th
e system has a fault and/or one
or more wheels does not have a
detected sensor.
th
e tyre pressures are no longer monitored.
Have the system checked by a Peuge
O
t dealer or a
qualified workshop.
1
Monitoring
Page 18 of 389
16
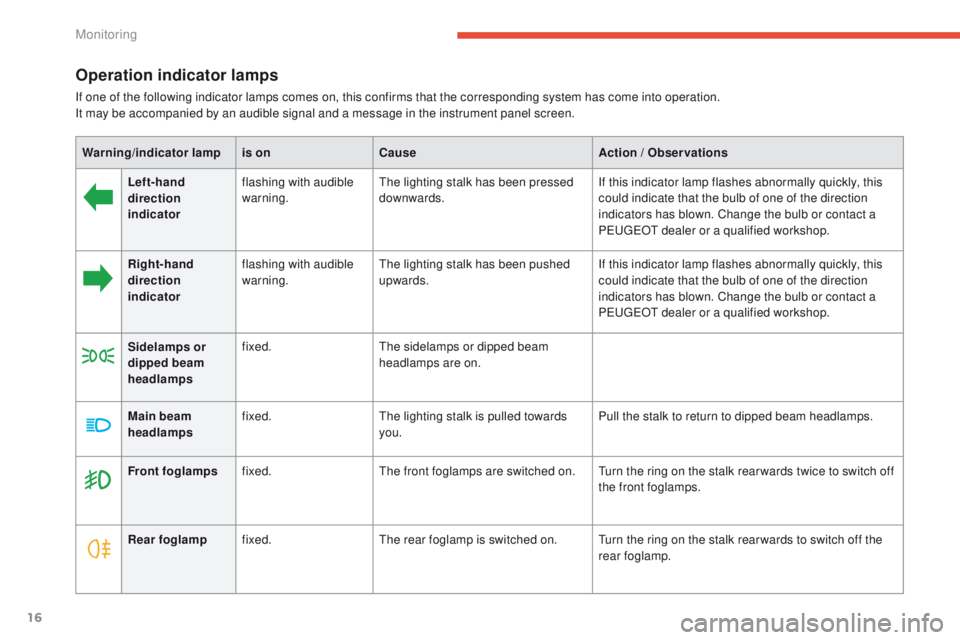
Operation indicator lamps
If one of the following indicator lamps comes on, this confirms that the corresponding system has come into operation.
It may be accompanied by an audible signal and a message in the instrument panel screen.Warning /indicator lampis on Cause Action / Observations
Left-hand
direction
indicator flashing with audible
warning.
th
e lighting stalk has been pressed
downwards. If this indicator lamp flashes abnormally quickly, this
could indicate that the bulb of one of the direction
indicators has blown. Change the bulb or contact a
P
e
uge
Ot
dealer or a qualified workshop.
Right-hand
direction
indicator flashing with audible
warning.
th
e lighting stalk has been pushed
upwards. If this indicator lamp flashes abnormally quickly, this
could indicate that the bulb of one of the direction
indicators has blown. Change the bulb or contact a
P
e
uge
Ot
dealer or a qualified workshop.
Sidelamps or
dipped beam
headlamps fixed.
th
e sidelamps or dipped beam
headlamps are on.
Main beam
headlamps fixed.
th
e lighting stalk is pulled towards
you. Pull the stalk to return to dipped beam headlamps.
Front foglamps fixed.
th
e front foglamps are switched on.
tu
rn the ring on the stalk rear wards twice to switch off
the front foglamps.
Rear foglamp fixed.
th
e rear foglamp is switched on.
tu
rn the ring on the stalk rear wards to switch off the
rear foglamp.
Monitoring