key Peugeot 406 C 2003 User Guide
[x] Cancel search | Manufacturer: PEUGEOT, Model Year: 2003, Model line: 406 C, Model: Peugeot 406 C 2003Pages: 141, PDF Size: 1.99 MB
Page 84 of 141

24-03-2003
YOUR 406 COUPE IN DETAIL
86
Make a careful note of the number on each key. The key number is coded on the label attached to the key. If the keys are lost, your PEUGEOT dealer can rapidly supply you with new keys.The high frequency remote control is a sensitive system; do not operate it while it is in your pocket as there is a
possibility that it may unlock your vehicle, without you being aware of it.The remote control does not operate when the key is in the ignition, even when the ignition is switched off, except for reprogramming.
However, do not operate the deadlocking function if there is anyone inside the vehicle.Driving with the doors locked may make access to the passenger compartment by the emergency services more difficult
in an emergency. As a safety precaution (with children on board), remove the ignition key when you leave the vehicle, even for a short time.Do not repeatedly press the button of your remote control out of range of your vehicle. Y ou run the risk of stopping it from working and the remote control would have to be reprogrammed.
When purchasing a second-hand vehicle:- ensure that you are given the confidential card;
- have the key codes memorised by a PEUGEOT dealer, to ensure that the keys in your possession are the only ones which can start the vehicle.
Do not make any modifications to the electronic engine immobiliser system.
Page 85 of 141
24-03-2003
YOUR 406 COUPE IN DETAIL87
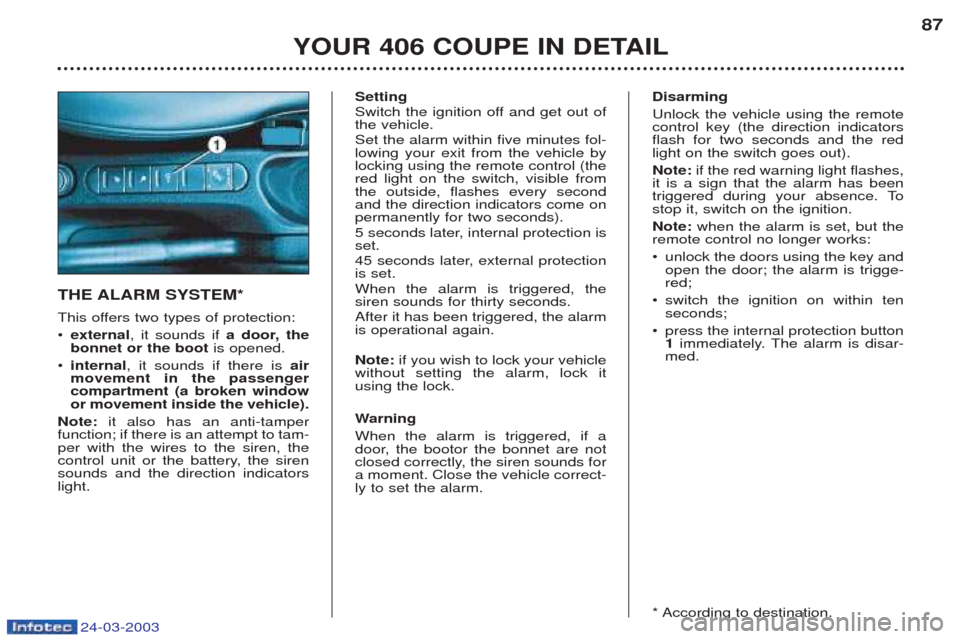
THE ALARM SYSTEM*
This offers two types of protection: ¥
external , it sounds if a door, the
bonnet or the boot is opened.
¥ internal , it sounds if there is air
movement in the passenger compartment (a broken windowor movement inside the vehicle).
Note: it also has an anti-tamper
function; if there is an attempt to tam-per with the wires to the siren, the
control unit or the battery, the sirensounds and the direction indicatorslight. Setting
Switch the ignition off and get out of the vehicle. Set the alarm within five minutes fol- lowing your exit from the vehicle bylocking using the remote control (thered light on the switch, visible fromthe outside, flashes every secondand the direction indicators come onpermanently for two seconds).
5 seconds later, internal protection is set.
45 seconds later, external protection is set. When the alarm is triggered, the siren sounds for thirty seconds. After it has been triggered, the alarm is operational again. Note:
if you wish to lock your vehicle
without setting the alarm, lock it using the lock. W arning
When the alarm is triggered, if a
door, the bootor the bonnet are not
closed correctly, the siren sounds fora moment. Close the vehicle correct-ly to set the alarm. Disarming Unlock the vehicle using the remote control key (the direction indicatorsflash for two seconds and the redlight on the switch goes out). Note:
if the red warning light flashes,
it is a sign that the alarm has been
triggered during your absence. Tostop it, switch on the ignition. Note: when the alarm is set, but the
remote control no longer works:¥ unlock the doors using the key and open the door; the alarm is trigge-red;
¥ switch the ignition on within tenseconds;
¥ press the internal protection button1 immediately. The alarm is disar-
med.
* According to destination.
Page 89 of 141
24-03-2003
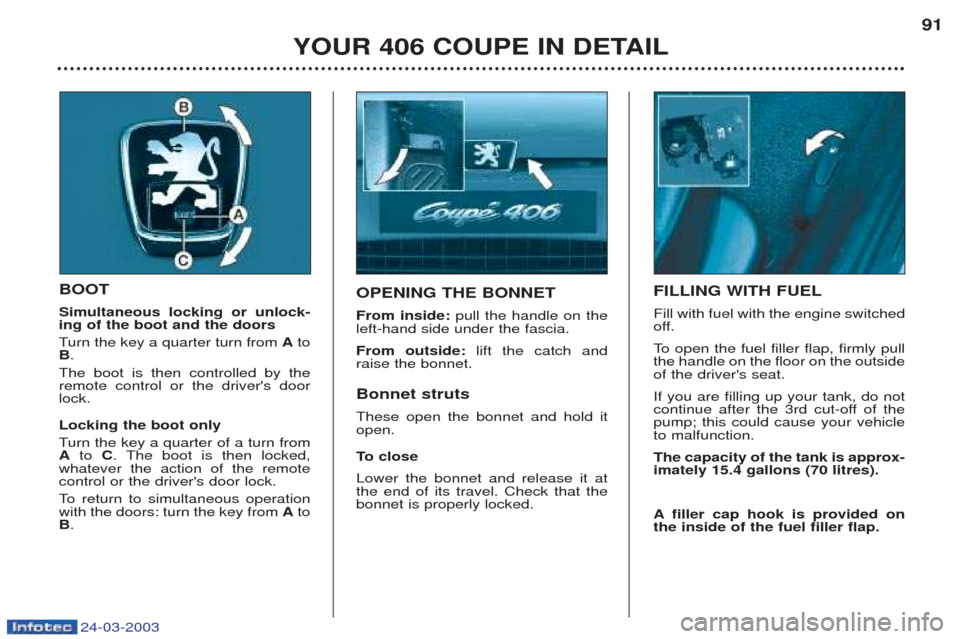
YOUR 406 COUPE IN DETAIL91
BOOT Simultaneous locking or unlock- ing of the boot and the doors T
urn the key a quarter turn from Ato
B .
The boot is then controlled by the remote control or the driver's doorlock. Locking the boot only T urn the key a quarter of a turn from
A to C. The boot is then locked,
whatever the action of the remote control or the driver's door lock.
To return to simultaneous operation
with the doors: turn the key from Ato
B .OPENING THE BONNET From inside: pull the handle on the
left-hand side under the fascia.From outside: lift the catch and
raise the bonnet. Bonnet struts These open the bonnet and hold it open.
To close
Lower the bonnet and release it at the end of its travel. Check that thebonnet is properly locked. FILLING WITH FUEL Fill with fuel with the engine switched
off.
To
open the fuel filler flap, firmly pull
the handle on the floor on the outside of the driver's seat. If you are filling up your tank, do not
continue after the 3rd cut-off of thepump; this could cause your vehicleto malfunction. The capacity of the tank is approx- imately 15.4 gallons (70 litres). A filler cap hook is provided on
the inside of the fuel filler flap.
Page 91 of 141
24-03-2003
AUTOMATIC SWITCHING ON OF THE LIGHTS Side lights and dipped beam head- lamps switch on automatically if the
light is poor, or during continuousoperation of the windscreen wipers.
They switch off as soon as the lightbecomes bright enough or the wind-screen wipers stop. This function is active when the vehi-
cle is supplied to the customer.
To disarm or activate the function:
☞ Place the key in the accessories position (1st notch),
☞ Press the end of the lights stalkfor more than two seconds.
Note: In foggy weather, the bright-
ness sensor can detect sufficientlight. Because of this, the lights do
not come on automatically. Do not cover the brightness sen-
sor connected to the rain sensor,located in the windscreen behind
the mirror. It is used for automaticswitching on of the lights. Operating check Activation Activation of this function is accom- panied by an audible signal and themessage
"Automatic lighting of
the headlamps activated" on the
multifunction display. Note: Always operate the lighting
controls manually where this is pos- sible. Disarming Disarming of the function is accom- panied by an audible signal and themessage "Automatic lighting of
the headlamps deactivated" on the
multifunction display. When driving, if this function is
switched off when the headlampswould switch on in automatic mode,the lights remain on. It is however possible to disarm this
function and switch off the lights by: - manually switching off the lights using the lights stalk,
- switching off the engine. If the brightness sensor does not
function correctly,
the system acti-
vates the function (the lights comeon). The driver is alerted by the flashingof the ''dipped beam'' warning lighton the instrument panel.
Contact a PEUGEOT dealer to have the system checked. Follow me Home When there is a low level of bright- ness or at night, if you leave yourvehicle, the side lights and thedipped beam lights may remain onfor approximately one minute.
To do this:
☞ place the lights stalk in the AUTO
position,
☞ place the key in the accessories position (first notch),
☞ press the end of the lights stalk formore than two seconds,
☞ place the lights stalk in the 0posi-
tion,
☞ flash the headlamps,
☞ get out of the car and lock it.
YOUR 406 COUPE IN DETAIL 103
Page 95 of 141

Always remove the key from the ignition whenleaving the vehicle, evenfor a short time.
In the event of contact when ope-rating the windows, you mustreverse the movement of the win-
dow. To do this, press the switchconcerned. When the driver operates the passenger window switches, hemust ensure that no one is pre-venting correct closing of the win-
dow. The driver must ensure that pas- sengers use the electric windows
correctly. Be aware of children when opera- ting the windows.
ELECTRIC WINDOWS
1 - Driver's electric window switch
Y ou have two options:
- Manual operation: Press or pull switch 1gently. The
windows stops as soon as the swit- ch is released.
- Automatic operation*: Press or pull switch 1fully. The
window opens or closes complete- ly when the switch is released.Pressing the switch again stops
the movement of the window.
Note: In the case of unwanted opening of the window on closing (for examplein the case of frost), if the window willnot rise, lower it completely and raise
it again immediately, by pulling theswitch until the window closes com-
pletely. Continue to press the switch for approximately one second after clo-sing. Following reconnection of the batte-
ry, in the event of a malfunction, youmust reinitialise the driver's electricwindow: -
it is essential to close the doors,
- open the window completely, then close it, it will rise in stages of a fewcentimetres with each press,repeat the operation until the win-dow is completely closed,
- continue to press the switch for atleast one second after reachingthis position.
2 - Passenger's electric window switch
YOUR 406 COUPE IN DETAIL
118
* According to country24-03-2003
Page 99 of 141

24-03-2003
Sun visor with illuminated courtesy mirror With the ignition on, the mirror is automatically lit up when the flap isopened.
YOUR 406 COUPE IN DETAIL
122
COURTESY LIGHTS Off. On when one of the doors is opened. Permanently on when the ignition key is in the accessories position or the ignition is on.
1 - Front courtesy light.
2 - Rear courtesy light.
3 - Map-reading lights. With the key in the accessories position or the ignition on, operate the rele- vant switch.
Coat hook Press the lower section to extract the hook from its housing.
Page 108 of 141

24-03-2003
DRIVING YOUR 406 COUPE
130
Operating check This is confirmed by an indi- cator light, accompanied byan audible signal and a
message on the multifunction dis-
play. With the ignition on (2nd notch), illu- mination of this warning light accom-panied by an audible signal and themessage "Passenger air bag dis-
armed" on the multifunction display,
indicates that the passenger air bagis disarmed (switch in the "OFF"
position).
Disarming the passenger air bag*
To
ensure the safety of your child,
it is essential to disarm the pas- senger air bag when you install arear-facing child seat on the frontpassenger seat. ☞ With the ignition switched off, insert the key into the passengerair bag disarming switch 1, turn it
to the "OFF"position, then
remove the key keeping the slot inthis position.
The air bag warning light on theinstrument panel is lit throughout thedisarming process. In the "OFF" position, the passenger
air bag will not be triggered in the event of an impact. As soon as the child seat is removed, turn the air bag slot to the"ON" position to re-activate the air
bag and thus ensure the safety ofyour passenger in the event of animpact.
* According to destination. SIDE AIR BAGS The side air bags are incorporated into the backs of the front seats, onthe door side. They are deployed independently of
each other, on whichever side thecollision occurs.
Operating check This is confirmed by an indicator light, accompanied by an audiblesignal and a message on the
multifunction display.
If this indicator light comeson, accompanied by an audi-ble signal and the message"Air bag fault" on the
multifunction display, contact
a PEUGEOT dealer to have the system checked.
Page 110 of 141

24-03-2003
DRIVING YOUR 406 COUPE
130
Operating check This is confirmed by an indi- cator light, accompanied byan audible signal and a
message on the multifunction dis-
play. With the ignition on (2nd notch), illu- mination of this warning light accom-panied by an audible signal and themessage "Passenger air bag dis-
armed" on the multifunction display,
indicates that the passenger air bagis disarmed (switch in the "OFF"
position).
Disarming the passenger air bag*
To
ensure the safety of your child,
it is essential to disarm the pas- senger air bag when you install arear-facing child seat on the frontpassenger seat. ☞ With the ignition switched off, insert the key into the passengerair bag disarming switch 1, turn it
to the "OFF"position, then
remove the key keeping the slot inthis position.
The air bag warning light on theinstrument panel is lit throughout thedisarming process. In the "OFF" position, the passenger
air bag will not be triggered in the event of an impact. As soon as the child seat is removed, turn the air bag slot to the"ON" position to re-activate the air
bag and thus ensure the safety ofyour passenger in the event of animpact.
* According to destination. SIDE AIR BAGS The side air bags are incorporated into the backs of the front seats, onthe door side. They are deployed independently of
each other, on whichever side thecollision occurs.
Operating check This is confirmed by an indicator light, accompanied by an audiblesignal and a message on the
multifunction display.
If this indicator light comeson, accompanied by an audi-ble signal and the message"Air bag fault" on the
multifunction display, contact
a PEUGEOT dealer to have the system checked.
Page 121 of 141
24-03-2003
MAINTENANCE OF YOUR 406 COUPE
34
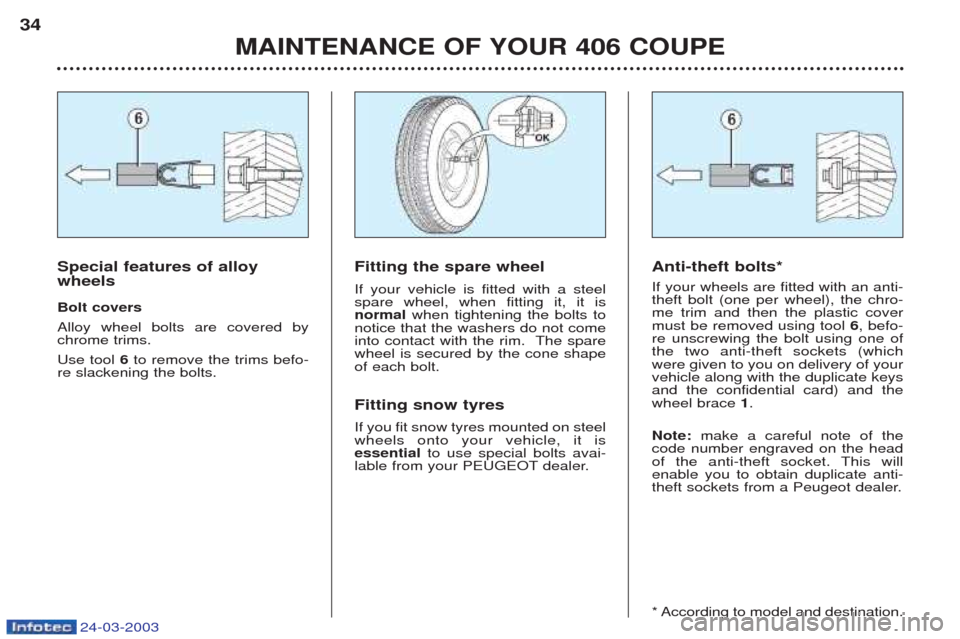
Anti-theft bolts* If your wheels are fitted with an anti- theft bolt (one per wheel), the chro-me trim and then the plastic covermust be removed using tool
6, befo-
re unscrewing the bolt using one ofthe two anti-theft sockets (whichwere given to you on delivery of yourvehicle along with the duplicate keysand the confidential card) and thewheel brace 1.
Note: make a careful note of the
code number engraved on the head
of the anti-theft socket. This willenable you to obtain duplicate anti-
theft sockets from a Peugeot dealer.
* According to model and destination. Special features of alloy wheels Bolt covers Alloy wheel bolts are covered by chrome trims. Use tool 6to remove the trims befo-
re slackening the bolts.Fitting the spare wheel If your vehicle is fitted with a steel spare wheel, when fitting it, it is normal when tightening the bolts to
notice that the washers do not come
into contact with the rim. The sparewheel is secured by the cone shapeof each bolt. Fitting snow tyres If you fit snow tyres mounted on steel wheels onto your vehicle, it isessential to use special bolts avai-
lable from your PEUGEOT dealer.
Page 130 of 141
24-03-2003
MAINTENANCE OF YOUR 406 COUPE
42
BATTERY
To
charge the battery using a battery charger:
- Disconnect the battery,
- Follow the instructions for use given by the battery charger manufacturer,
- Reconnect starting with the negative (-) terminal,
- Check that the terminals and connectors are clean. If they are covered with sul- phate (white or greenish deposit), disconnect them and clean them.
To start the vehicle from another battery:
- Connect the red cable to the positive (+) terminals of the two batteries,
- Connect one end of the green or black cable to the negative (-) terminal of the
slave battery,
- Connect the other end of the green or black cable to an earth point on the bro-
ken down vehicle, as far as possible from the battery,
Operate the starter, let the engine run. W ait for the engine to return to idle, then disconnect the cables.
-Never disconnect a terminal when the engine is running.
- Never charge a battery without first disconnecting the terminals.
- Close the sunroof before disconnecting the battery. If it does not opera-
te normally following re-connection of the battery, you must re-initialise it by turning the control to the maximum tilt position and pressing it for a fewseconds.
- After every reconnection of the battery, switch on the ignition and wait 1minute before starting to allow the electronic systems to be initialised. If slight
difficulties are experienced after this, please contact a PEUGEOT dealer.
It is advisable to disconnect the battery if the vehicle is not to be used
for a period of more than one month.
Economy mode
With the engine switched off and the ignition key in the "running" or"accessories" position for about half
an hour, certain electrical equipment(displays, instrument panel, warninglights, courtesy lights, electric win-
dows, wipers etc.) will switch offautomatically to avoid draining the
battery. Once the electrical equipment goes into economy mode, it is necessaryto start the engine to enable theequipment to work again.