instrument panel PEUGEOT 5008 2011.5 Owners Manual
[x] Cancel search | Manufacturer: PEUGEOT, Model Year: 2011.5, Model line: 5008, Model: PEUGEOT 5008 2011.5Pages: 340, PDF Size: 16.4 MB
Page 4 of 340
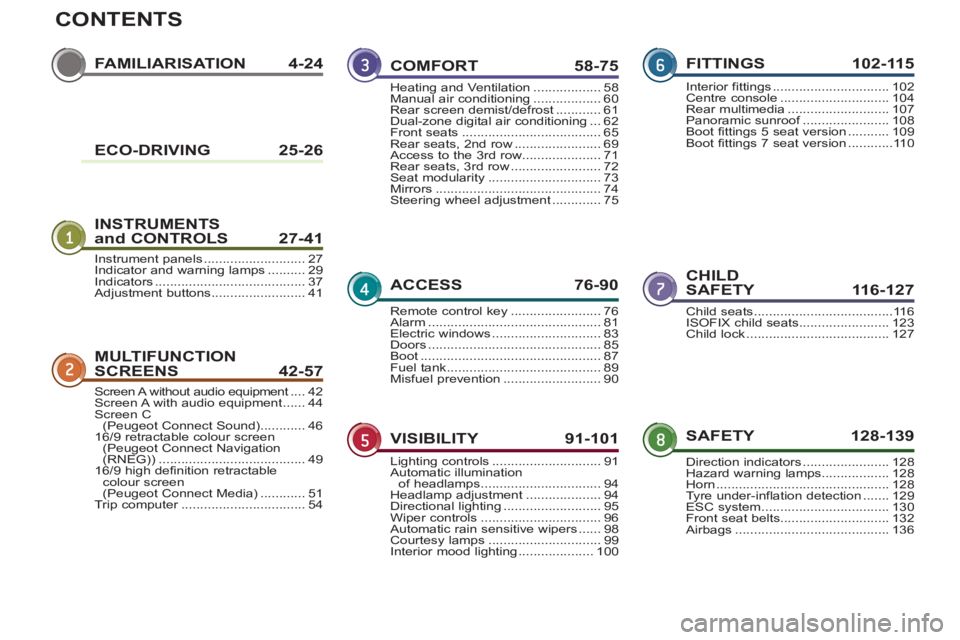
CONTENTS
FAMILIARISATION4-24
INSTRUMENTS and CONTROLS 27-41
CHILD
SAFETY 116-127
MULTIFUNCTION
SCREEN
S42-57
SAFETY 128-139
COMFORT 58-75
ACCESS 76-90
VISIBILITY 91-101
FITTINGS 102-115
Instrument panels ...........................27Indicator and warning lamps ..........29Indicators........................................37Adjustment buttons.........................41
Child seats.....................................116ISOFIX child seats........................123Child lock......................................127
Screen A without audio equipment....t42Screen A with audio equipment......44Screen C (Peugeot Connect Sound)............4616/9 retractable colour screen(Peugeot Connect Navigation (RNEG)) .......................................4916/9 high definition retractable colour screen (Peugeot Connect Media)............51Trip computer.................................r54
Direction indicators.......................128Hazard warning lamps..................128Horn..............................................128Tyre under-inflation detection .......129ESC system..................................130Front seat belts.............................132Airbags .........................................136
Heating and Ventilation ..................58Manual air conditioning ..................60Rear screen demist/defrost............61Dual-zone digital air conditioning...62Front seats.....................................65Rear seats, 2nd row.......................69Access to the 3rd row.....................71Rear seats, 3rd row........................72Seat modularity..............................73Mirrors............................................74Steering wheel adjustment .............75
Remote control key........................76Alarm..............................................81Electric windows.............................83Doors ..............................................85Boot................................................87Fuel tank.........................................89Misfuel prevention..........................90
Lighting controls.............................91Automatic illumination
of headlamps................................94Headlamp adjustment ....................94Directional lighting ..........................95Wiper controls................................96Automatic rain sensitive wipers......98Courtesy lamps ..............................99Interior mood lighting ....................100
Interior fittings ...............................102Centre console .............................104Rear multimedia...........................107Panoramic sunroof.......................f108Boot fittings 5 seat version ...........109Boot fittings 7 seat version ............110ECO-DRIVING 25-26
Page 11 of 340
FA
M
9
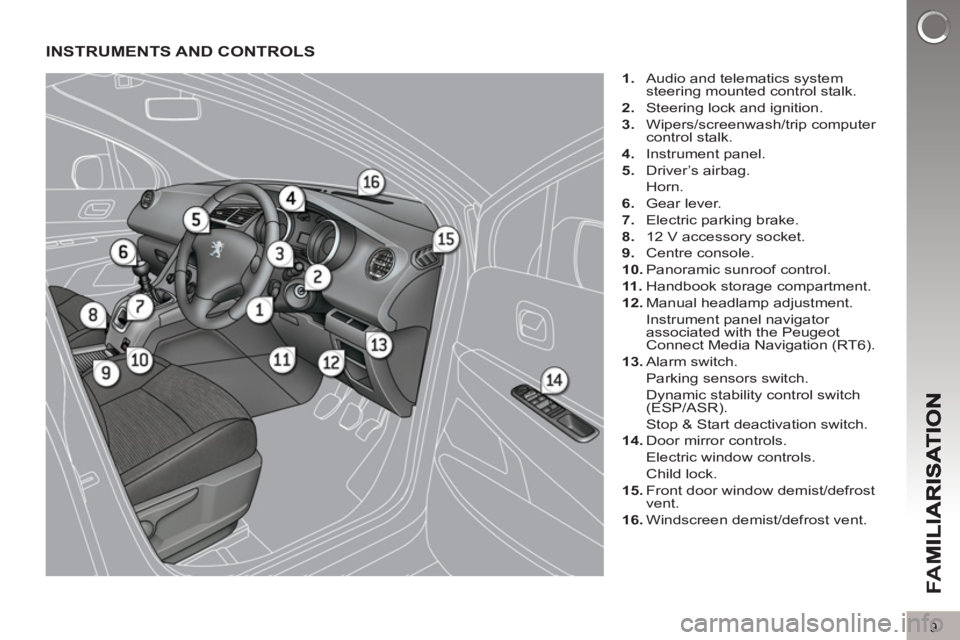
INSTRUMENTS AND CONTROLS
1.
Audio and telematics system
steering mounted control stalk.
2.
Steering lock and ignition.
3.
Wipers/screenwash/trip computer
control stalk.
4.
Instrument panel.
5.
Driver’s airbag.
Horn.
6.
Gear lever.
7.
Electric parking brake.
8.
12 V accessory socket.
9.
Centre console.
10.
Panoramic sunroof control.
11 .
Handbook storage compartment.
12.
Manual headlamp adjustment.
Instrument panel navigator
associated with the Peugeot
Connect Media Navigation (RT6).
13.
Alarm switch.
Parking sensors switch.
Dynamic stability control switch
(ESP/ASR).
Stop & Start deactivation switch.
14.
Door mirror controls.
Electric window controls.
Child lock.
15.
Front door window demist/defrost
vent.
16.
Windscreen demist/defrost vent.
Page 18 of 340
FA
M
16
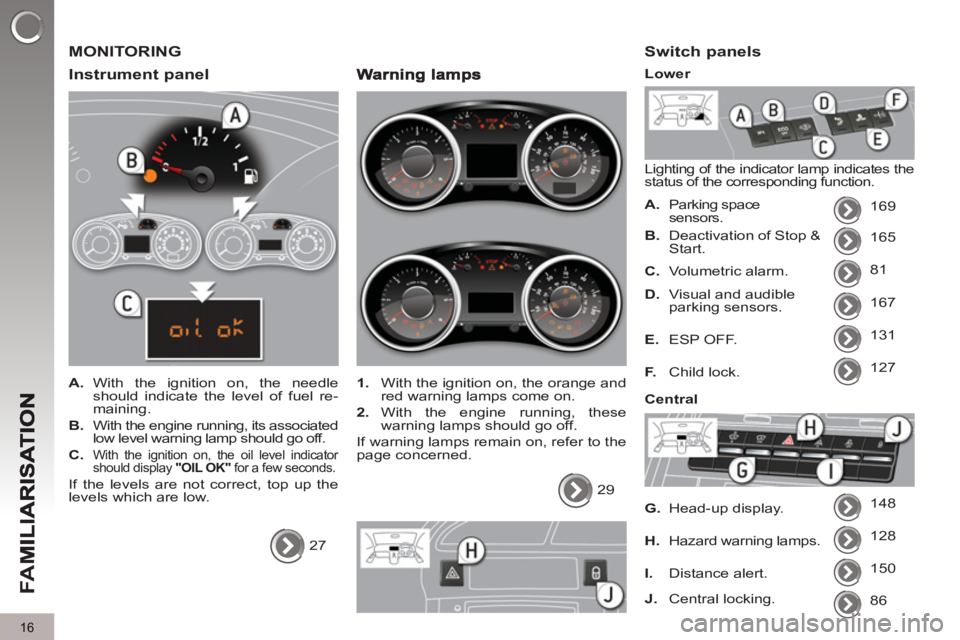
MONITORING
Instrument
panel
A.
With the ignition on, the needle
should indicate the level of fuel re-
maining.
B.
With the engine running, its associated
low level warning lamp should go off.
C.
With the ignition on, the oil level indicator
should display "OIL OK"
for a few seconds.
If the levels are not correct, top up the
levels which are low.
27
1.
With the ignition on, the orange and
red warning lamps come on.
2.
With the engine running, these
warning lamps should go off.
If warning lamps remain on, refer to the
page concerned.
29
Switch panels
Lighting of the indicator lamp indicates the
status of the corresponding function.
A.
Parking space
sensors. 169
165
81
167
131
127
148
128
B.
Deactivation of Stop &
Start.
C.
Volumetric alarm.
D.
Visual and audible
parking sensors.
E.
ESP OFF.
F.
Child lock.
G.
Head-up display.
H.
Hazard warning lamps.
Lower
Central
150
I.
Distance alert.
86
J.
Central locking.
Page 22 of 340
FA
M
20
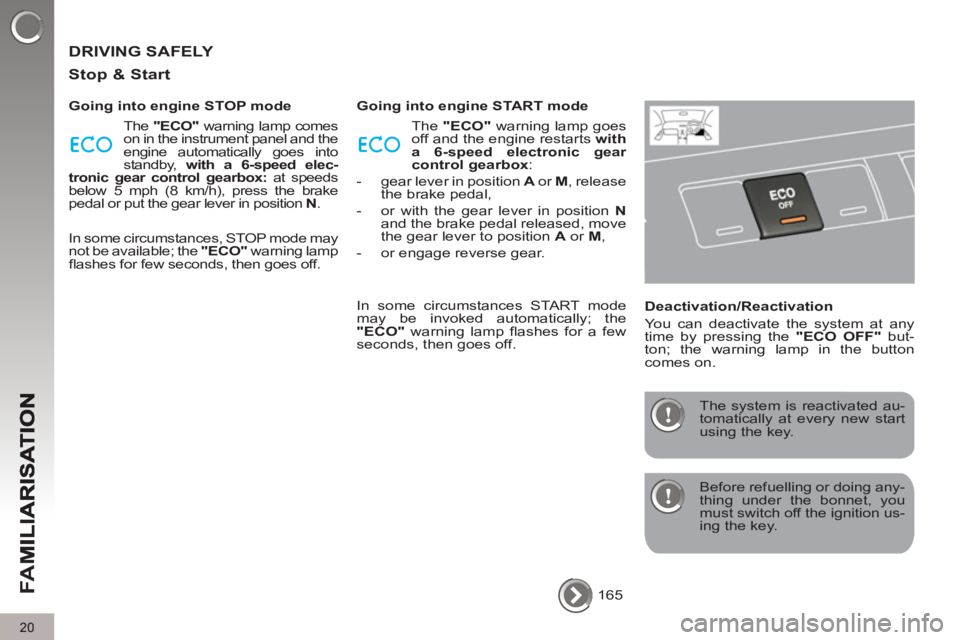
DRIVING SAFELY
Sto
p & Start
Going into engine STOP mode
The "ECO"
warning lamp comes
on in the instrument panel and the
engine automatically goes into
standby, with a 6-speed elec-
tronic gear control gearbox: at speeds
below 5 mph (8 km/h), press the brake
pedal or put the gear lever in position N
.
In some circumstances, STOP mode may
not be available; the "ECO"
warning lamp
fl ashes for few seconds, then goes off.
Going into engine START mode
The "ECO" warning lamp goes
off and the engine restarts with
a 6-speed electronic gear
control gearbox
:
- gear lever in position A
or M
, release
the brake pedal,
- or with the gear lever in position N
and the brake pedal released, move
the gear lever to position A
or M
,
- or engage reverse gear.
In some circumstances START mode
may be invoked automatically; the
"ECO"
warning lamp fl ashes for a few
seconds, then goes off.
Deactivation/Reactivation
You can deactivate the system at any
time by pressing the "ECO OFF"
but-
ton; the warning lamp in the button
comes on.
Before refuelling or doing any-
thing under the bonnet, you
must switch off the ignition us-
ing the key.
The system is reactivated au-
tomatically at every new start
using the key.
165
Page 23 of 340
FA
M
21
DRIVING SAFELY
Electric parkin
g brake
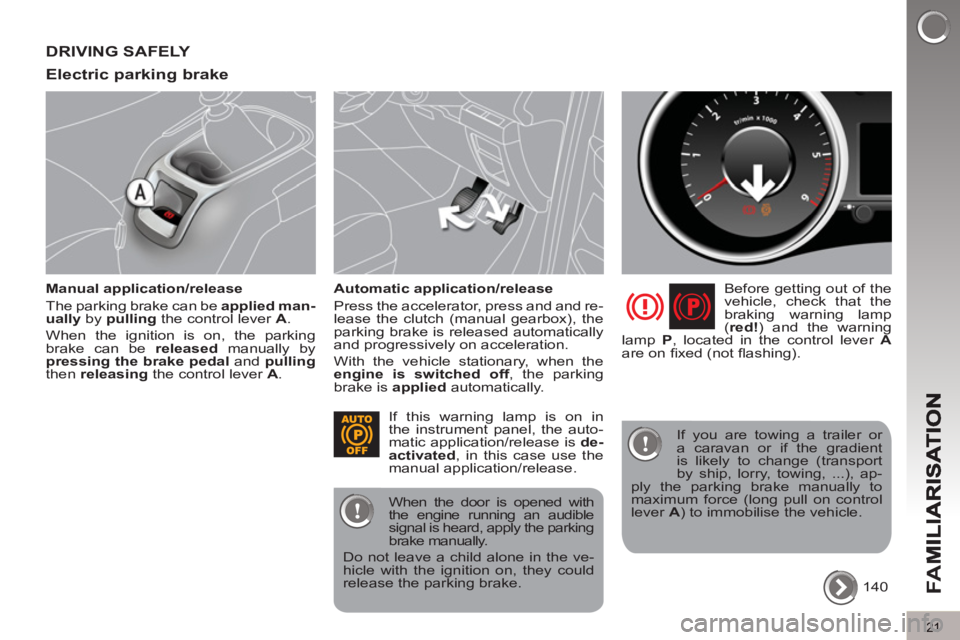
Manual application/release
The parking brake can be applied man-
ually
by pulling
the control lever A
.
When the ignition is on, the parking
brake can be released
manually by
pressing the brake pedal
and pulling
then releasing
the control lever A
.
Automatic application/release
Press the accelerator, press and and re-
lease the clutch (manual gearbox), the
parking brake is released automatically
and progressively on acceleration.
With the vehicle stationary, when the
engine is switched off
, the parking
brake is applied
automatically.
Before getting out of the
vehicle, check that the
braking warning lamp
( red!
) and the warning
lamp P
, located in the control lever A
are on fi xed (not fl ashing).
140 If this warning lamp is on in
the instrument panel, the auto-
matic application/release is de-
activated
, in this case use the
manual application/release.
When the door is opened with
the engine running an audible
signal is heard, apply the parking
brake manually.
Do not leave a child alone in the ve-
hicle with the ignition on, they could
release the parking brake.
If you are towing a trailer or
a caravan or if the gradient
is likely to change (transport
by ship, lorry, towing, ...), ap-
ply the parking brake manually to
maximum force (long pull on control
lever A
) to immobilise the vehicle.
Page 25 of 340
FA
M
23
DRIVING SAFELY
S
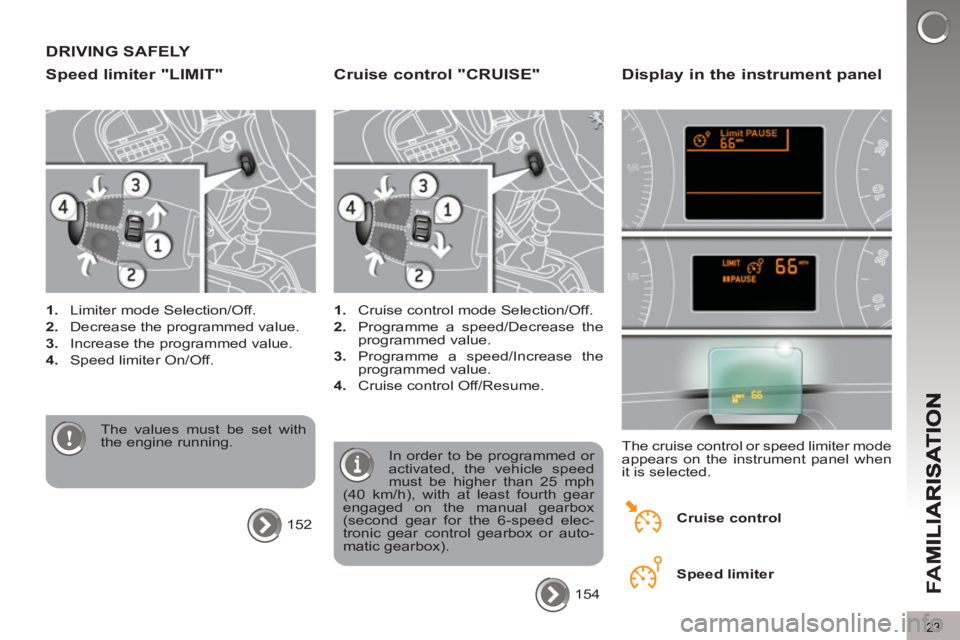
peed limiter "LIMIT"
1.
Limiter mode Selection/Off.
2.
Decrease the programmed value.
3.
Increase the programmed value.
4.
Speed limiter On/Off.
The values must be set with
the engine running.
152
Cruise control "CRUISE"
1.
Cruise control mode Selection/Off.
2.
Programme a speed/Decrease the
programmed value.
3.
Programme a speed/Increase the
programmed value.
4.
Cruise control Off/Resume.
In order to be programmed or
activated, the vehicle speed
must be higher than 25 mph
(40 km/h), with at least fourth gear
engaged on the manual gearbox
(second gear for the 6-speed elec-
tronic gear control gearbox or auto-
matic gearbox).
154
Display in the instrument panel
The cruise control or speed limiter mode
appears on the instrument panel when
it is selected.
Cruise control
Speed limiter
Page 27 of 340
Optimise the use of your gearbox
With a manual gearbox, move off gently,
change up without waiting and drive by
changing up quite soon. If your vehicle
has the system, the gear effi ciency indi-
cator invites you to change up; it is dis-
played in the instrument panel, follow its
instructions.
With an automatic or electronic gear-
box, stay in Drive "D"
or Auto "A"
, ac-
cording to the type of gearbox, without
pressing the accelerator pedal heavily
or suddenly.
Drive smoothly
Maintain a safe distance between ve-
hicles, use engine braking rather than
the brake pedal, and press the accel-
erator progressively. These practices
contribute towards a reduction in fuel
consumption and CO
2 emissions and
also helps reduce the background traf-
fi c noise.
If your vehicle has cruise control, make
use of the system at speeds above 25 mph
(40 km/h) when the traffi c is fl owing well.
Control the use of your electrical equipment
Before moving off, if the passenger
compartment is too warm, ventilate it by
opening the windows and air vents be-
fore using the air conditioning.
Above 30 mph (50 km/h), close the win-
dows and leave the air vents open.
Remember to make use of equipment
that can help keep the temperature in
the passenger compartment down (sun
roof and window blinds...).
Switch off the air conditioning, unless
it has automatic digital regulation, as
soon as the desired temperature is at-
tained.
Switch off the demisting and defrosting
controls, if not automatic.
Switch off the heated seat as soon as
possible.
Switch off the headlamps and front
foglamps when the level of light does
not require their use.
Avoid running the engine before moving
off, particularly in winter; your vehicle will
warm up much faster while driving.
As a passenger, if you avoid connect-
ing your multimedia devices (fi lm, music,
video game...), you will contribute towards
limiting the consumption of electrical en-
ergy, and so of fuel.
Disconnect your portable devices be-
fore leaving the vehicle.
ECO-DRIVING
2525
Eco-driving is a range of everyday practices that allow the motorist to optimise their fuel consumption and CO2 emissions.
Page 29 of 340
27
IN
S
INSTRUMENT PANELS
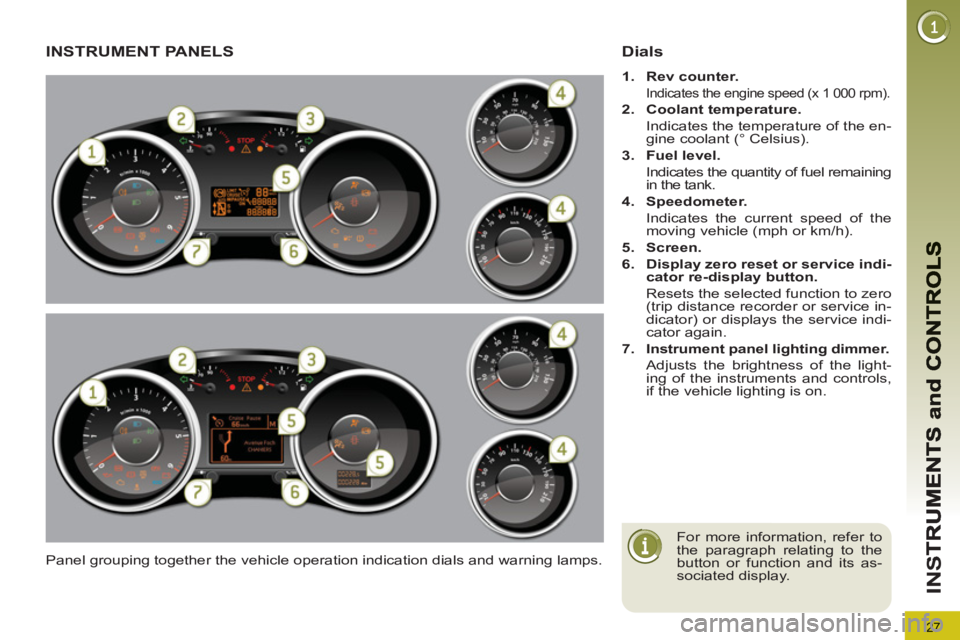
Panel grouping together the vehicle operation indication dials and warning lamps.
Dials
1.
Rev counter.
Indicates the engine speed (x 1 000 rpm).
2.
Coolant temperature.
Indicates the temperature of the en-
gine coolant (° Celsius).
3.
Fuel level.
Indicates the quantity of fuel remaining
in the tank.
4.
Speedometer.
Indicates the current speed of the
moving vehicle (mph or km/h).
5.
Screen.
6.
Display zero reset or service indi-
cator re-display button.
Resets the selected function to zero
(trip distance recorder or service in-
dicator) or displays the service indi-
cator again.
7.
Instrument panel lighting dimmer.
Adjusts the brightness of the light-
ing of the instruments and controls,
if the vehicle lighting is on.
For more information, refer to
the paragraph relating to the
button or function and its as-
sociated display.
Page 30 of 340
IN
S
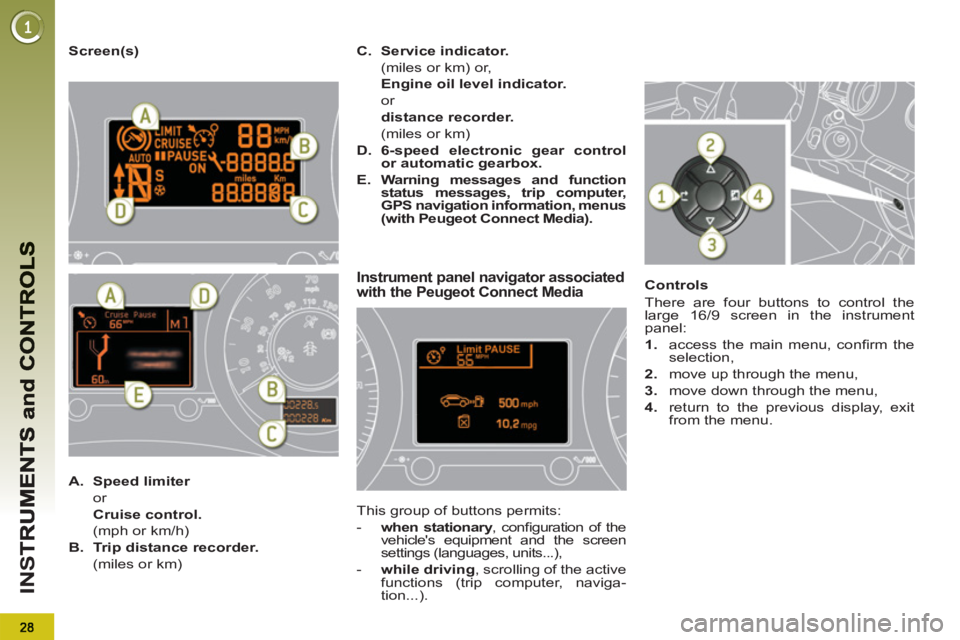
Screen(s)
Instrument panel navigator associatedwith the Peugeot Connect Media
This group of buttons permits:
- when stationary
, confi guration of the
vehicle's equipment and the screen
settings (languages, units...),
- while driving
, scrolling of the active
functions (trip computer, naviga-
tion...).
Controls
There are four buttons to control the
large 16/9 screen in the instrument
panel:
1.
access the main menu, confi rm the
selection,
2.
move up through the menu,
3.
move down through the menu,
4.
return to the previous display, exit
from the menu.
A.
Speed limiter
or
Cruise control.
(mph or km/h)
B.
Trip distance recorder.
(miles or km)
C.
Service indicator.
(miles or km) or,
Engine oil level indicator.
or
distance recorder.
(miles or km)
D.
6-speed electronic gear control
or automatic gearbox.
E.
Warning messages and function
status messages, trip computer,
GPS navigation information, menus
(with Peugeot Connect Media).
Page 43 of 340
41
IN
S
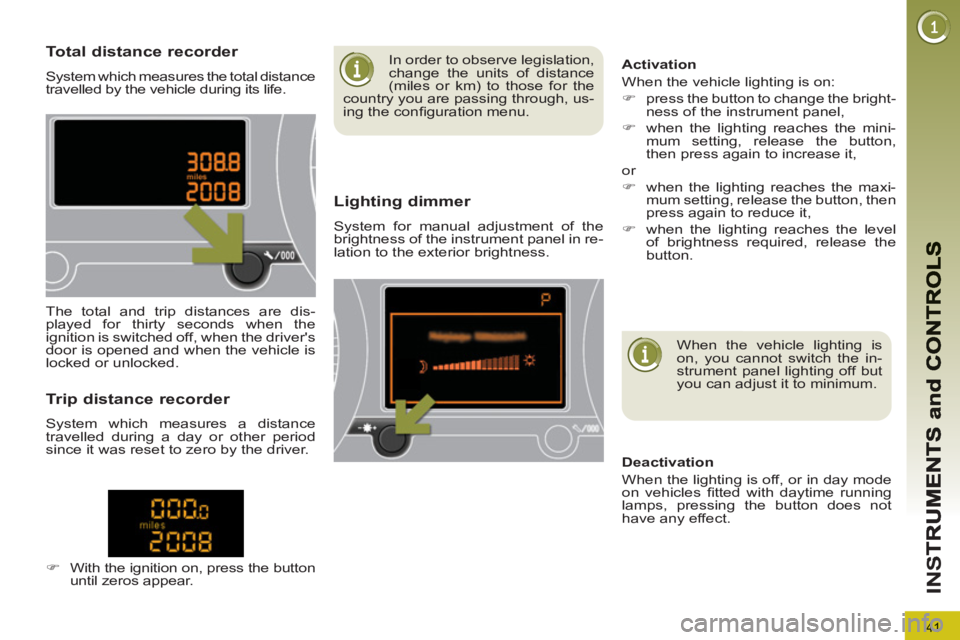
Total distance recorder
System which measures the total distance
travelled by the vehicle during its life.
Lighting dimmer
System for manual adjustment of the
brightness of the instrument panel in re-
lation to the exterior brightness.
The total and trip distances are dis-
played for thirty seconds when the
ignition is switched off, when the driver's
door is opened and when the vehicle is
locked or unlocked.
Trip distance recorder
System which measures a distance
travelled during a day or other period
since it was reset to zero by the driver.
�)
With the ignition on, press the button
until zeros appear.
When the vehicle lighting is
on, you cannot switch the in-
strument panel lighting off but
you can adjust it to minimum.
Deactivation
When the lighting is off, or in day mode
on vehicles fi tted with daytime running
lamps, pressing the button does not
have any effect.
Activation
When the vehicle lighting is on:
�)
press the button to change the bright-
ness of the instrument panel,
�)
when the lighting reaches the mini-
mum setting, release the button,
then press again to increase it,
or
�)
when the lighting reaches the maxi-
mum setting, release the button, then
press again to reduce it,
�)
when the lighting reaches the level
of brightness required, release the
button.
In order to observe legislation,
change the units of distance
(miles or km) to those for the
country you are passing through, us-
ing the confi guration menu.