tow PEUGEOT 5008 2011 User Guide
[x] Cancel search | Manufacturer: PEUGEOT, Model Year: 2011, Model line: 5008, Model: PEUGEOT 5008 2011Pages: 340, PDF Size: 16.4 MB
Page 74 of 340
CO
72
3 RDROW SEATS(7 SEAT VERSION)
Concertina boards
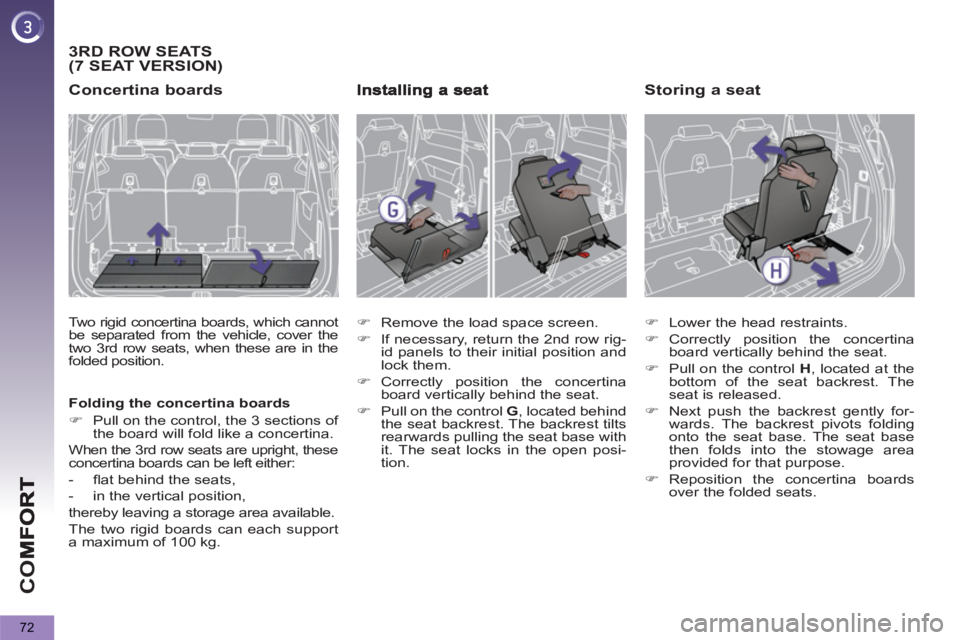
Two rigid concertina boards, which cannot
be separated from the vehicle, cover the
two 3 rd row seats, when these are in the
folded position.
Folding the concertina boards
�)
Pull on the control, the 3 sections of
the board will fold like a concertina.
When the 3 rd row seats are upright, these
concertina boards can be left either:
- fl at behind the seats,
- in the vertical position,
thereby leaving a storage area available.
The two rigid boards can each support
a maximum of 100 kg.
�)
Remove the load space screen.
�)
If necessary, return the 2 nd row rig-
id panels to their initial position and
lock them.
�)
Correctly position the concertina
board vertically behind the seat.
�)
Pull on the control G
, located behind
the seat backrest. The backrest tilts
rearwards pulling the seat base with
it. The seat locks in the open posi-
tion.
Storing a seat
�)
Lower the head restraints.
�)
Correctly position the concertina
board vertically behind the seat.
�)
Pull on the control H
, located at the
bottom of the seat backrest. The
seat is released.
�)
Next push the backrest gently for-
wards. The backrest pivots folding
onto the seat base. The seat base
then folds into the stowage area
provided for that purpose.
�)
Reposition the concertina boards
over the folded seats.
Page 80 of 340
AC
C
78
Electronic engine immobiliser
The key contains an electronic chip
which has a special code. When the
ignition is switched on, this code must
be recognised in order for starting to be
possible.
This electronic engine immobiliser locks
the engine management system a few
minutes after the ignition is switched off
and prevents starting of the engine by
anyone who does not have the key.
Anti-theft protection
In the event of a fault, you are
informed by illumination of this
warning lamp, an audible signal
and a message in the screen.
In this case, your vehicle will not start;
contact a PEUGEOT dealer as soon as
possible.
Keep safely the label attached to the
keys given to you on acquisition of the
vehicle.
For more information, refer
to the "Practical information - Energy economy mode" section.
Starting the vehicle
�)
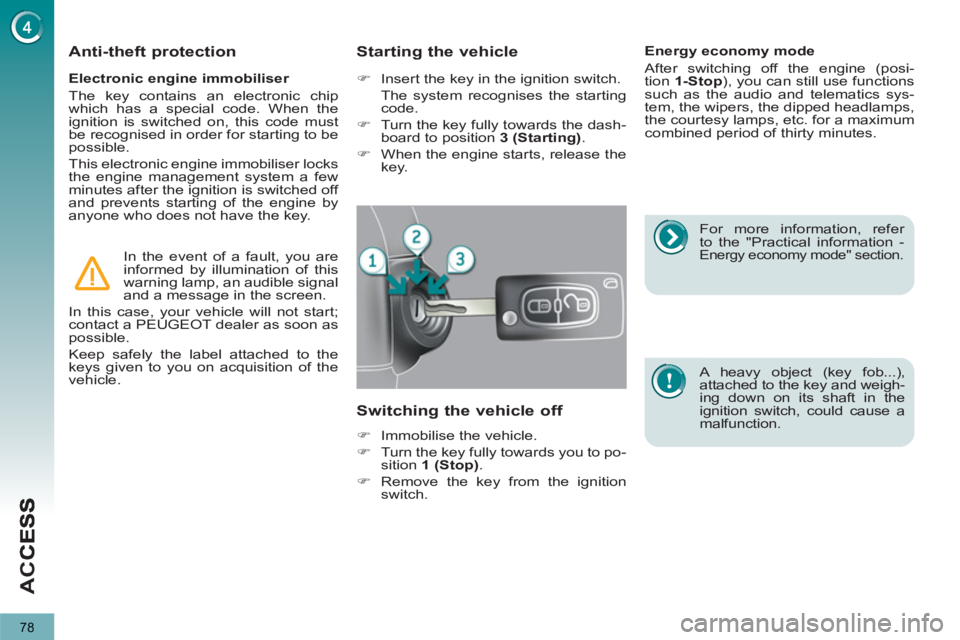
Insert the key in the ignition switch.
The system recognises the starting
code.
�)
Turn the key fully towards the dash-
board to position 3 (Starting)
.
�)
When the engine starts, release the
key.
Switching the vehicle off
�)
Immobilise the vehicle.
�)
Turn the key fully towards you to po-
sition 1 (Stop)
.
�)
Remove the key from the ignition
switch.
Energy economy mode
After switching off the engine (posi-
tion 1-Stop
), you can still use functions
such as the audio and telematics sys-
tem, the wipers, the dipped headlamps,
the courtesy lamps, etc. for a maximum
combined period of thirty minutes.
A heavy object (key fob...),
attached to the key and weigh-
ing down on its shaft in the
ignition switch, could cause a
malfunction.
Page 91 of 340
AC
89
The key cannot be removed
from the lock until the cap is
put back on the tank.
Opening the cap may trigger an in-
rush of air. This vacuum, which is
completely normal, is caused by the
sealing of the fuel system.
FUEL TANK
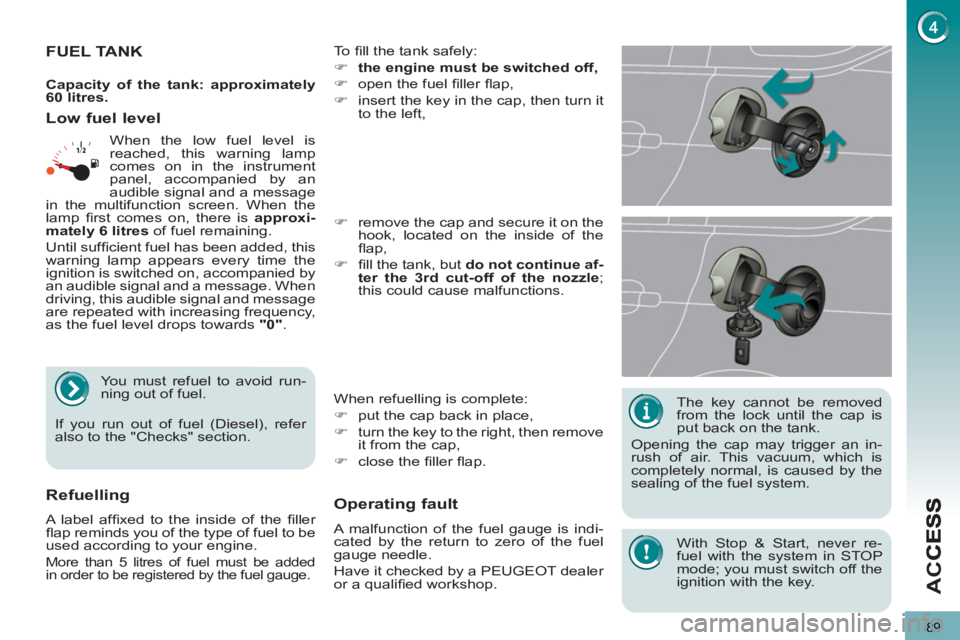
To fi ll the tank safely:
�)
the engine must be switched off,
�)
open the fuel fi ller fl ap,
�)
insert the key in the cap, then turn it
to the left,
When refuelling is complete:
�)
put the cap back in place,
�)
turn the key to the right, then remove
it from the cap,
�)
close the fi ller fl ap.
�)
remove the cap and secure it on the
hook, located on the inside of the
fl ap,
�)
fi ll the tank, but do not continue af-
ter the 3rd cut-off of the nozzle
;
this could cause malfunctions.
Low fuel level
Operatin
g fault
A malfunction of the fuel gauge is indi-
cated by the return to zero of the fuel
gauge needle.
Have it checked by a PEUGEOT dealer
or a qualifi ed workshop.
Refuelling
A label affi xed to the inside of the fi ller
fl ap reminds you of the type of fuel to be
used according to your engine.
More than 5 litres of fuel must be added
in order to be registered by the fuel gauge.
When the low fuel level is
reached, this warning lamp
comes on in the instrument
panel, accompanied by an
audible signal and a message
in the multifunction screen. When the
lamp fi rst comes on, there is approxi-
mately
6 litres
of fuel remaining.
Until suffi cient fuel has been added, this
warning lamp appears every time the
ignition is switched on, accompanied by
an audible signal and a message. When
driving, this audible signal and message
are repeated with increasing frequency,
as the fuel level drops towards "0"
.
You must refuel to avoid run-
ning out of fuel.
If you run out of fuel (Diesel), refer
also to the "Checks" section.
Capacity of the tank: approximately
60 litres.
With Stop & Start, never re-
fuel with the system in STOP
mode; you must switch off the
ignition with the key.
Page 93 of 340
VIS
91
LIGHTING CONTROLS
System for selection and control of the
various front and rear lamps providing
the vehicle's lighting.
Main lighting
The various front and rear lamps of
the vehicle are designed to adapt the
lighting progressively in relation to the
climatic conditions and so improve the
driver's visibility:
- sidelamps, to be seen,
- dipped beam headlamps to see
without dazzling other drivers,
- main beam headlamps to see clearly
when the road is clear,
- directional headlamps for improved
visibility when cornering.
Additional lighting
Other lamps are installed to fulfi l the
requirements of particular driving con-
ditions:
- a rear foglamp to be seen from a
distance,
- front foglamps for even better visibility,
- daytime running lamps to be seen
during the day.
Programming
Various automatic lighting control
modes are also available according to
the following options:
- guide-me-home lighting,
- automatic lighting,
- directional headlamps.
Model without AUTO lighting
Model with AUTO lighting
Automatic illumination of
headlamps.
Manual controls
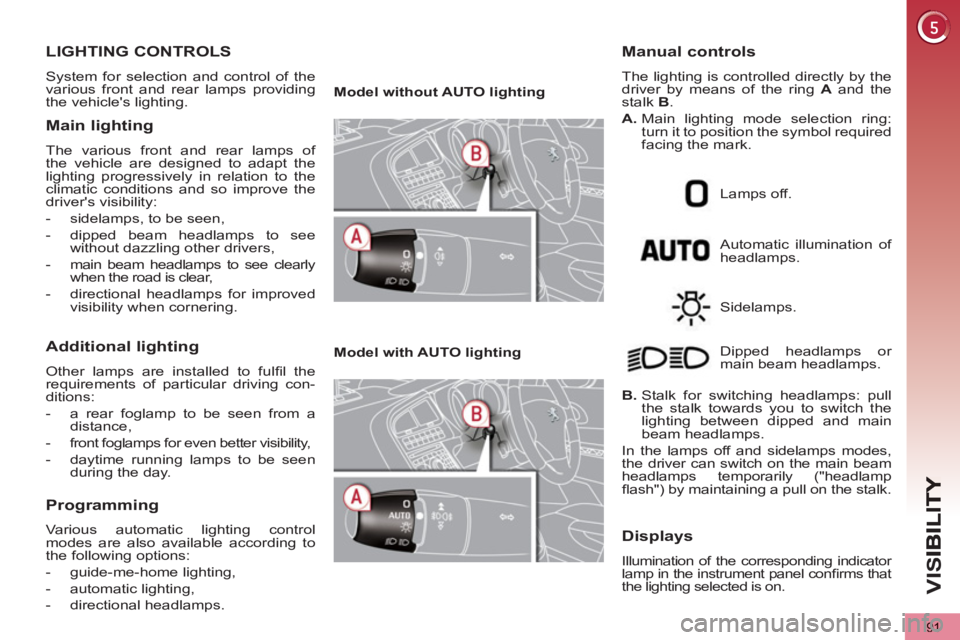
The lighting is controlled directly by the
driver by means of the ring A
and the
stalk B
.
A.
Main lighting mode selection ring:
turn it to position the symbol required
facing the mark.
Lamps off.
Sidelamps.
B.
Stalk for switching headlamps: pull
the stalk towards you to switch the
lighting between dipped and main
beam headlamps.
In the lamps off and sidelamps modes,
the driver can switch on the main beam
headlamps temporarily ("headlamp
fl ash") by maintaining a pull on the stalk. Dipped headlamps or
main beam headlamps.
Displays
Illumination of the corresponding indicator
lamp in the instrument panel confi rms that
the lighting selected is on.
Page 111 of 340
FITTINGS
109
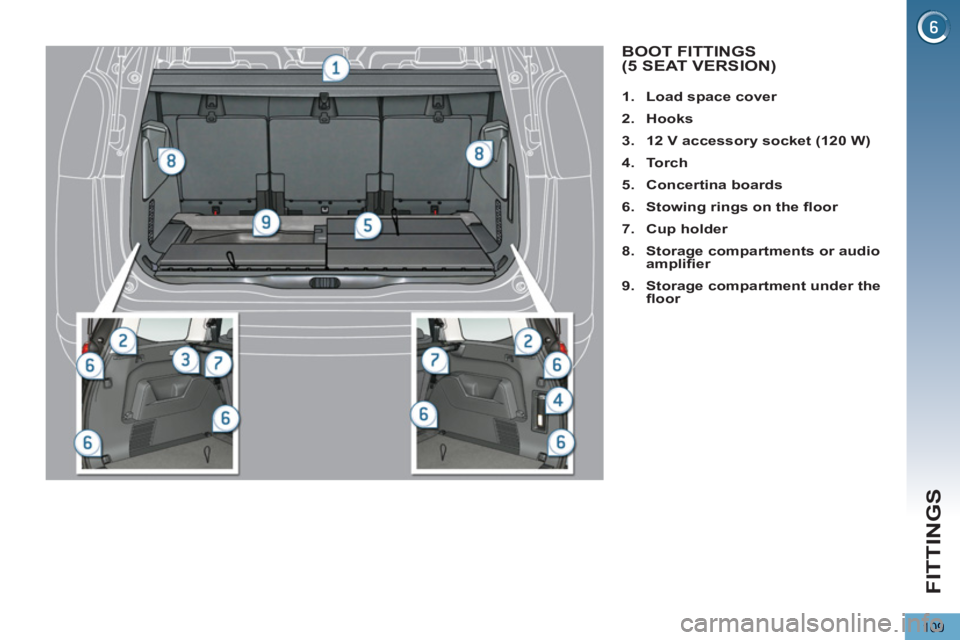
BOOT FITTINGS (5 SEAT VERSION)
1.
Load space cover
2.
Hooks
3.
12 V accessory socket (120 W)
4.
To r c h
5.
Concertina boards
6.
Stowing rings on the fl oor
7.
Cup holder
8.
Storage compartments or audio
amplifi er
9.
Storage compartment under the
fl oor
Page 112 of 340
FITTINGS
110
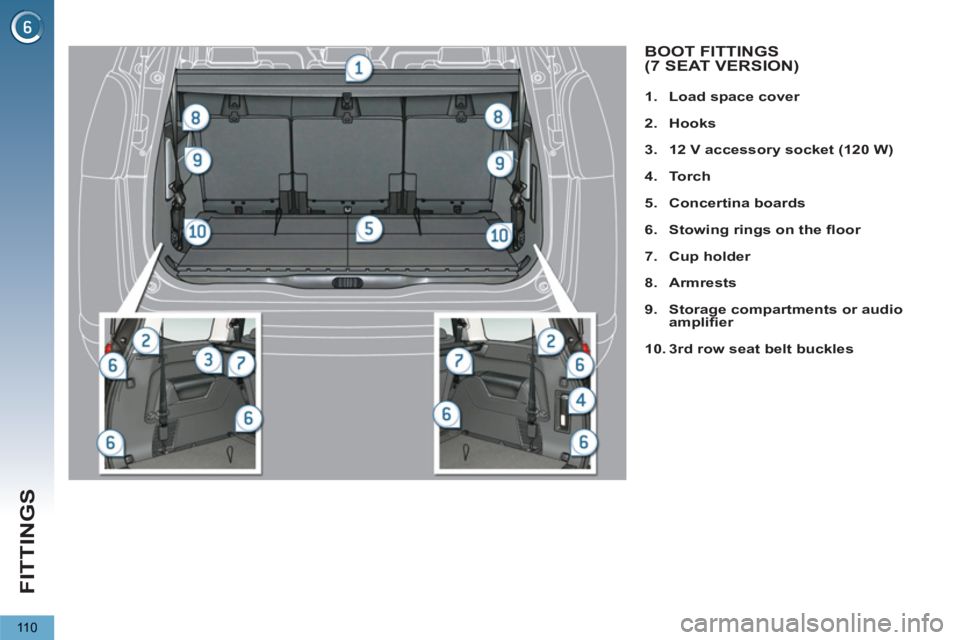
1.
Load space cover
2.
Hooks
3.
12 V accessory socket (120 W)
4.
Torch
5.
Concertina boards
6.
Stowing rings on the fl oor
7.
Cup holder
8.
Armrests
9.
Storage compartments or audio
amplifi er
10.
3 rd row seat belt buckles
BOOT FITTINGS(7 SEAT VERSION)
Page 113 of 340
FITTINGS
111
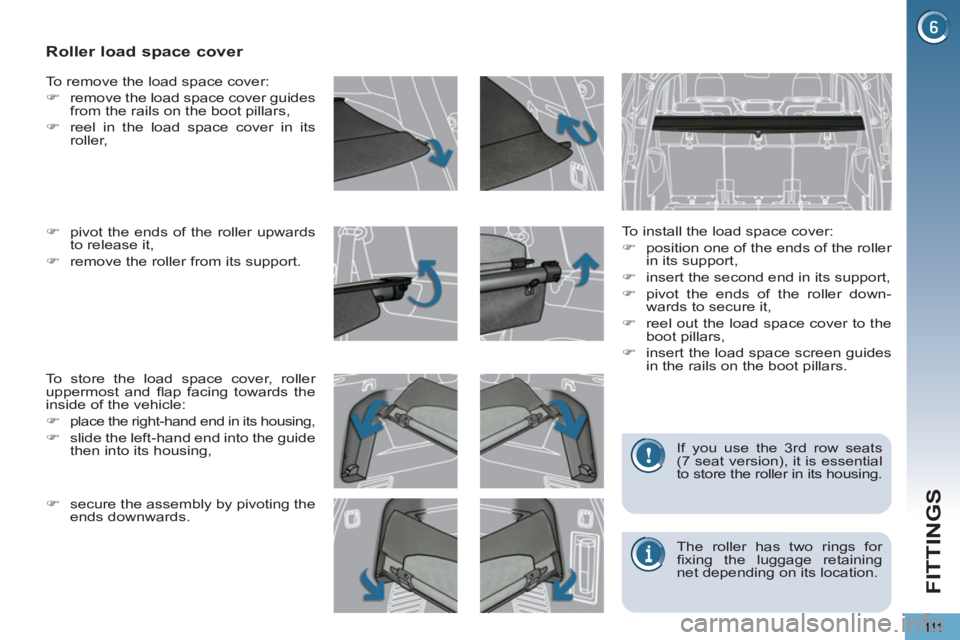
Roller load space cover
To install the load space cover:
�)
position one of the ends of the roller
in its support,
�)
insert the second end in its support,
�)
pivot the ends of the roller down-
wards to secure it,
�)
reel out the load space cover to the
boot pillars,
�)
insert the load space screen guides
in the rails on the boot pillars.
To remove the load space cover:
�)
remove the load space cover guides
from the rails on the boot pillars,
�)
reel in the load space cover in its
roller,
To store the load space cover, roller
uppermost and fl ap facing towards the
inside of the vehicle:
�)
place the right-hand end in its housing,
�)
slide the left-hand end into the guide
then into its housing,
�)
pivot the ends of the roller upwards
to release it,
�)
remove the roller from its support.
The roller has two rings for
fi xing the luggage retaining
net depending on its location. If you use the 3 rd row seats
(7 seat version), it is essential
to store the roller in its housing.
�)
secure the assembly by pivoting the
ends downwards.
Page 114 of 340
FITTINGS
11 2
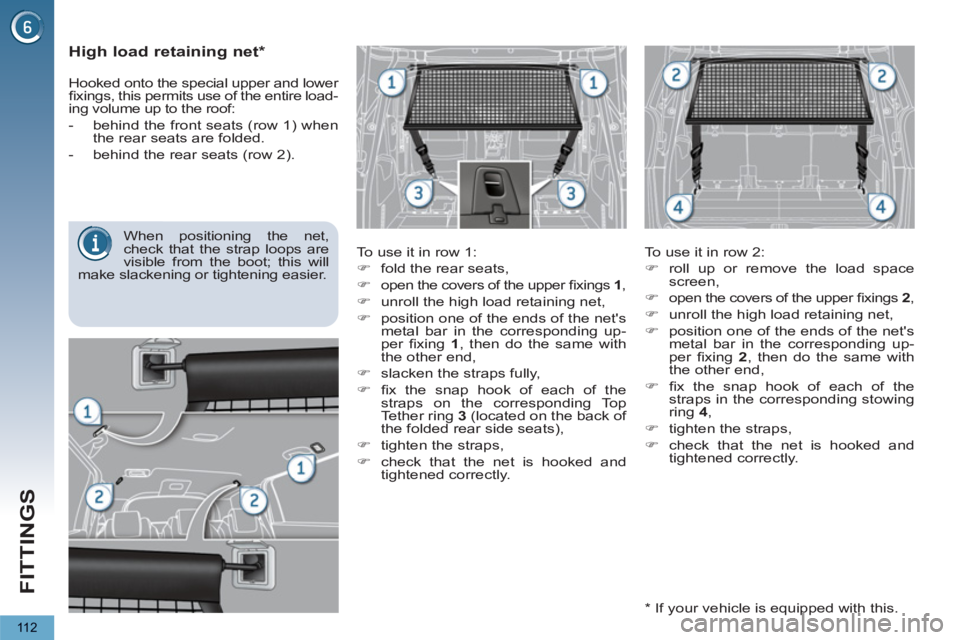
High load retaining net *
To use it in row 1:
�)
fold the rear seats,
�)
open the covers of the upper fi xings 1
,
�)
unroll the high load retaining net,
�)
position one of the ends of the net's
metal bar in the corresponding up-
per fi xing 1
, then do the same with
the other end,
�)
slacken the straps fully,
�)
fi x the snap hook of each of the
straps on the corresponding Top
Tether ring 3
(located on the back of
the folded rear side seats),
�)
tighten the straps,
�)
check that the net is hooked and
tightened correctly.
To use it in row 2:
�)
roll up or remove the load space
screen,
�)
open the covers of the upper fi xings 2
,
�)
unroll the high load retaining net,
�)
position one of the ends of the net's
metal bar in the corresponding up-
per fi xing 2
, then do the same with
the other end,
�)
fi x the snap hook of each of the
straps in the corresponding stowing
ring 4
,
�)
tighten the straps,
�)
check that the net is hooked and
tightened correctly.
When positioning the net,
check that the strap loops are
visible from the boot; this will
make slackening or tightening easier.
Hooked onto the special upper and lower
fi xings, this permits use of the entire load-
ing volume up to the roof:
- behind the front seats (row 1) when
the rear seats are folded.
- behind the rear seats (row 2).
*
If your vehicle is equipped with this.
Page 115 of 340
FITTINGS
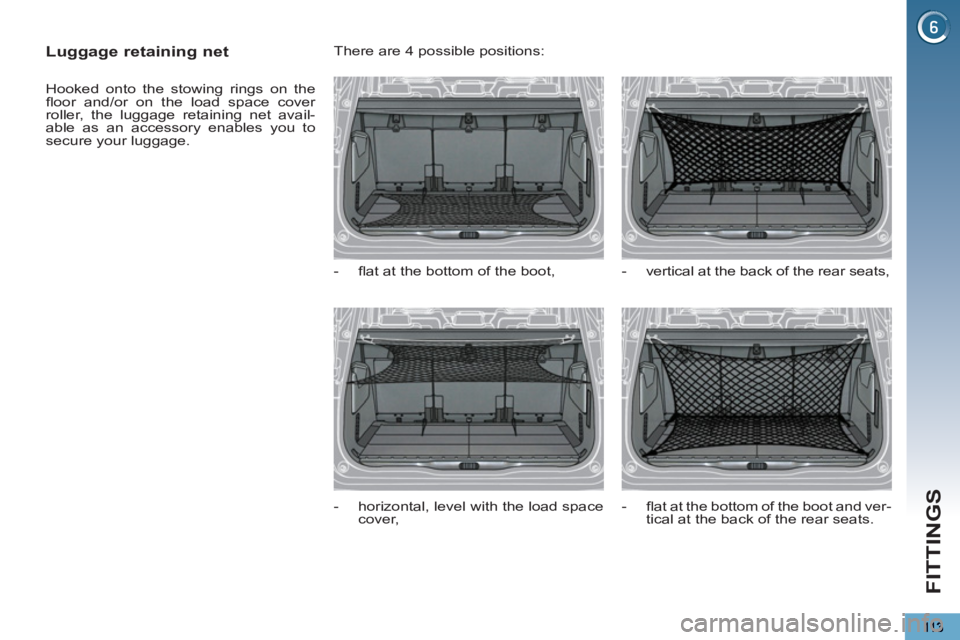
Luggage retaining net
Hooked onto the stowing rings on the
fl oor and/or on the load space cover
roller, the luggage retaining net avail-
able as an accessory enables you to
secure your luggage. There are 4 possible positions:
- fl at at the bottom of the boot,
- horizontal, level with the load space
cover,
- vertical at the back of the rear seats,
- fl at at the bottom of the boot and ver-
tical at the back of the rear seats.
Page 130 of 340
SA
F
128
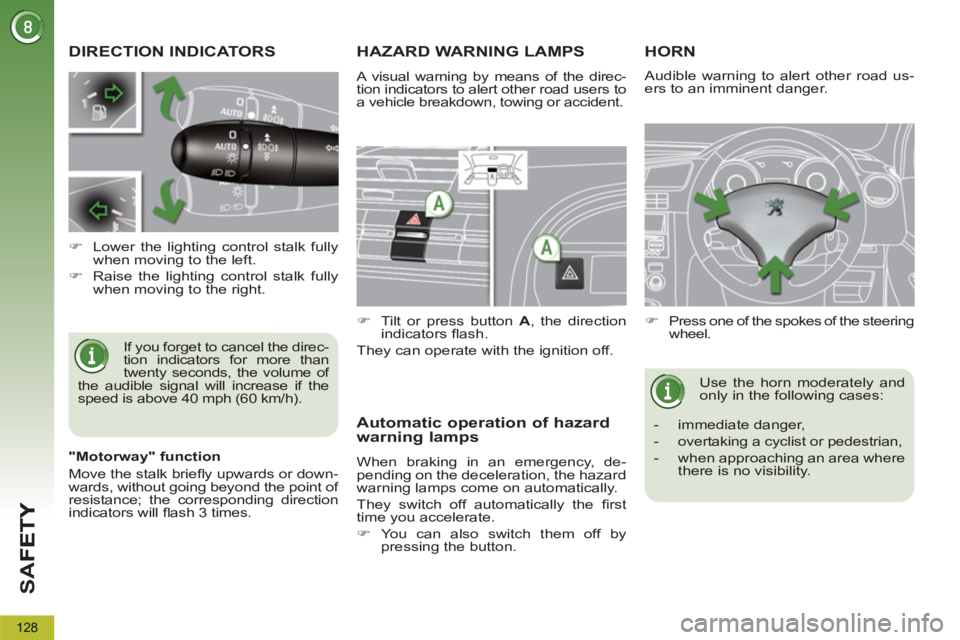
DIRECTION INDICATORS
If you forget to cancel the direc-
tion indicators for more than
twenty seconds, the volume of
the audible signal will increase if the
speed is above 40 mph (60 km/h).
�)
Lower the lighting control stalk fully
when moving to the left.
�)
Raise the lighting control stalk fully
when moving to the right.
HAZARD WARNING LAMPS
A visual warning by means of the direc-
tion indicators to alert other road users to
a vehicle breakdown, towing or accident.
�)
Tilt or press button A
, the direction
indicators fl ash.
They can operate with the ignition off.
Automatic operation of hazard
warning lamps
When braking in an emergency, de-
pending on the deceleration, the hazard
warning lamps come on automatically.
They switch off automatically the fi rst
time you accelerate.
�)
You can also switch them off by
pressing the button.
HORN
�)
Press one of the spokes of the steering
wheel.
Use the horn moderately and
only in the following cases:
- immediate danger,
- overtaking a cyclist or pedestrian,
- when approaching an area where
there is no visibility.
Audible warning to alert other road us-
ers to an imminent danger.
"Motorway" function
Move the stalk briefl y upwards or down-
wards, without going beyond the point of
resistance; the corresponding direction
indicators will fl ash 3 times.