Front light PEUGEOT 5008 2013.5 Owners Manual
[x] Cancel search | Manufacturer: PEUGEOT, Model Year: 2013.5, Model line: 5008, Model: PEUGEOT 5008 2013.5Pages: 404, PDF Size: 23.45 MB
Page 4 of 404

.
.
Contents
Interior fi ttings 117Centre console 119Rear multimedia 122Panoramic sunroof 124Boot fi ttings 5 seat version 125Boot fi ttings 7 seat version 126
Fittings
Child seats 132Deactivating the passenger's front airbag 134ISOFIX mountings 144Child lock 151
Child safety
Instrument panels 27Indicator and warning lamps 30Indicators 39Adjustment buttons 43
Monitoring
Familiarisation
Screen A without audio equipment 44Screen A with audio equipment
46Screen C (PEUGEOT Connect Sound (RD5)) 4816/9 retractable colour screen (PEUGEOT Connect Navigation (RT6) or PEUGEOT Connect Media Navigation (NG4 3D)) 51Trip computer 54
Multifunction screens
Heating and Ventilation 58Manual air conditioning 60Rear screen demist - defrost 62Dual-zone digital air conditioning 63Front seats 66Rear seats, 2nd row 72Access to the 3rd row 74Rear seats, 3rd row 75Seat modularity 77Mirrors 78Steering wheel adjustment 80
Comfort
Remote control key 81Alarm 87Electric windows 89Doors 91Boot 94Fuel tank 96Misfuel prevention (Diesel) 99
Access
Lighting controls 100Daytime running lamps 104Automatic illumination of headlamps 106Headlamp adjustment 107Directional lighting 108Wiper controls 109Automatic rain sensitive wipers 112Courtesy lamps 114Interior mood lighting 115
Visibility
Eco-driving
Page 16 of 404

101
102152
109
11 0
Familiarisation
14
Seeing clearly
Lighting
Ring A
Lighting off.
Ring B
Sidelamps.
Dipped / main beam headlamps.
Rear foglamp.
or
Front and rear foglamps.
Automatic illumination of headlamps.
Direction indicators
Raise or lower the lighting stalk passing the point of resistance; the corresponding direction indicators will flash for as long as the stalk remains in this position.
"Three fl ashes" function
Press the lighting stalk up or down once, without passing the point of resistance; the corresponding direction indicators will flash three times. This function can be used at any speed, but it is particularly useful when changing lane on
high-speed roads.
Wipers
Stalk A: windscreen wipers
Switching on "AUTO"
Press the stalk down and release it.
Switching off "AUTO"
Push the stalk up and return it to position "0" .
Ring B: rear wiper
Park.
Intermittent wipe.
Wash-wipe.
Page 19 of 404

.
163
159
151
Familiarisation17
Passenger safety
Passenger's front airbag
1. Insert the key. 2. Select the position: "OFF" (deactivation), with "rear facing" child seat, "ON" (activation), with front passenger or "for wards facing" child seat.
3. Remove the key keeping the switch in the new position.
Seat belts and passenger's
front airbag
A. Front and/or rear seat belts not fastened / unfastened warning lamp. B. Front left seat belt warning lamp. C. Front right seat belt warning lamp. D. Rear right seat belt warning lamp.
E. Rear centre seat belt warning lamp. F. Rear left seat belt warning lamp. G. Passenger's front airbag deactivated warning lamp. H. Passenger's front airbag activated warning lamp.
Electric child lock
Lighting of the indicator lamp indicates the status of the corresponding function. Locking of the rear doors and deactivation of the rear electric window controls.
7 seat version (3rd row)I. Rear right seat belt warning lamp. J. Rear left seat belt warning lamp.
Page 27 of 404

.Familiarisation25
Eco-driving
Optimise the use of your
gearbox
With a manual gearbox, move off gently and change up without waiting. During acceleration change up early.
With an automatic or electronic gearbox, give preference to automatic mode and avoid pressing the accelerator pedal heavily or suddenly.
The gear shift indicator invites you engage the most suitable gear: as soon as the indication is displayed in the instrument panel, follow it straight away. With an electronic or automatic gearbox, this indicator appears only in manual mode.
Drive smoothly
Maintain a safe distance between vehicles, use engine braking rather than the brake pedal, and press the accelerator progressively. These practices contribute towards a reduction in fuel consumption and CO2 emissions and also helps reduce the background traffic noise.
If your vehicle has cruise control, make use of the system at speeds above 25 mph (40 km/h) when the traffic is flowing well.
Remember to make use of equipment that can help keep the temperature in the passenger compartment down (sunroof and window blinds...). Switch off the air conditioning, unless it has
automatic regulation, as soon as the desired temperature is attained. Switch off the demisting and defrosting controls, if not automatic. Switch off the heated seat as soon as possible.
Switch off the headlamps and front foglamps when the level of light does not require their use.
Avoid running the engine before moving off, particularly in winter; your vehicle will warm up much faster while driving.
Eco-driving is a range of everyday practices that allow the motorist to optimise their fuel consumption and CO2 emissions.
As a passenger, if you avoid connecting your multimedia devices (film, music, video game...), you will contribute towards limiting the consumption of electrical energy, and so of fuel. Disconnect your portable devices before leaving the vehicle.
Control the use of your
electrical equipment
Before moving off, if the passenger compartment is too warm, ventilate it by opening the windows and air vents before using the air conditioning. Above 30 mph (50 km/h), close the windows and leave the air vents open.
Page 33 of 404
1
Monitoring31
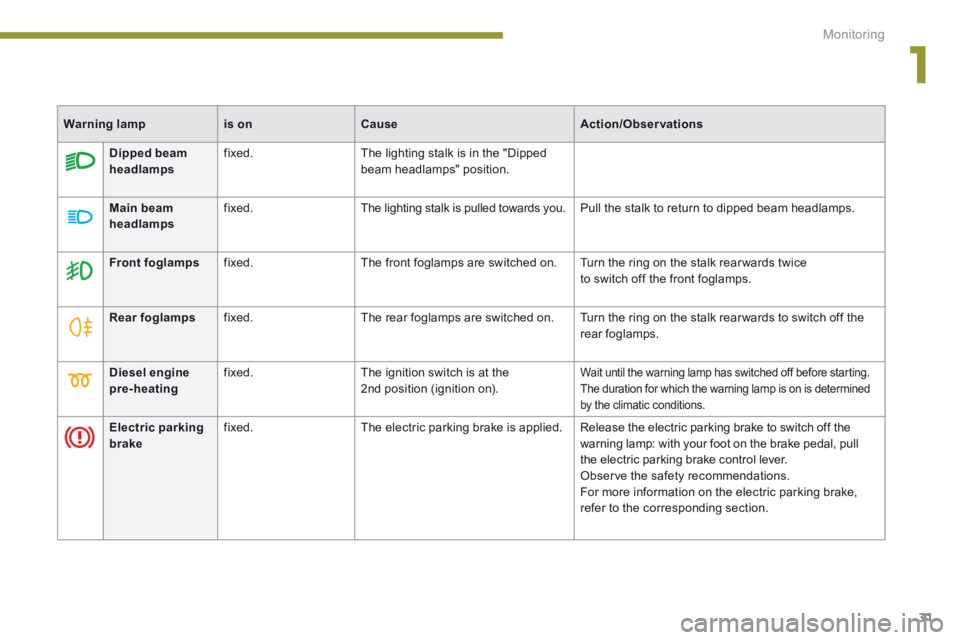
Diesel engine pre-heating fixed. The ignition switch is at the 2nd position (ignition on). Wait until the warning lamp has switched off before starting. The duration for which the warning lamp is on is determined by the climatic conditions.
Dipped beam headlamps fixed. The lighting stalk is in the "Dipped beam headlamps" position.
Main beam
headlamps
fixed. The lighting stalk is pulled towards you. Pull the stalk to return to dipped beam headlamps.
Front foglamps fixed. The front foglamps are switched on. Turn the ring on the stalk rear wards twiceto switch off the front foglamps.
Rear foglamps fixed. The rear foglamps are switched on. Turn the ring on the stalk rear wards to switch off the rear foglamps.
Electric parking brake fixed. The electric parking brake is applied. Release the electric parking brake to switch off the warning lamp: with your foot on the brake pedal, pull the electric parking brake control lever. Observe the safety recommendations. For more information on the electric parking brake, refer to the corresponding section.
Warning lampis onCauseAction/Observations
Page 62 of 404
Comfort
60
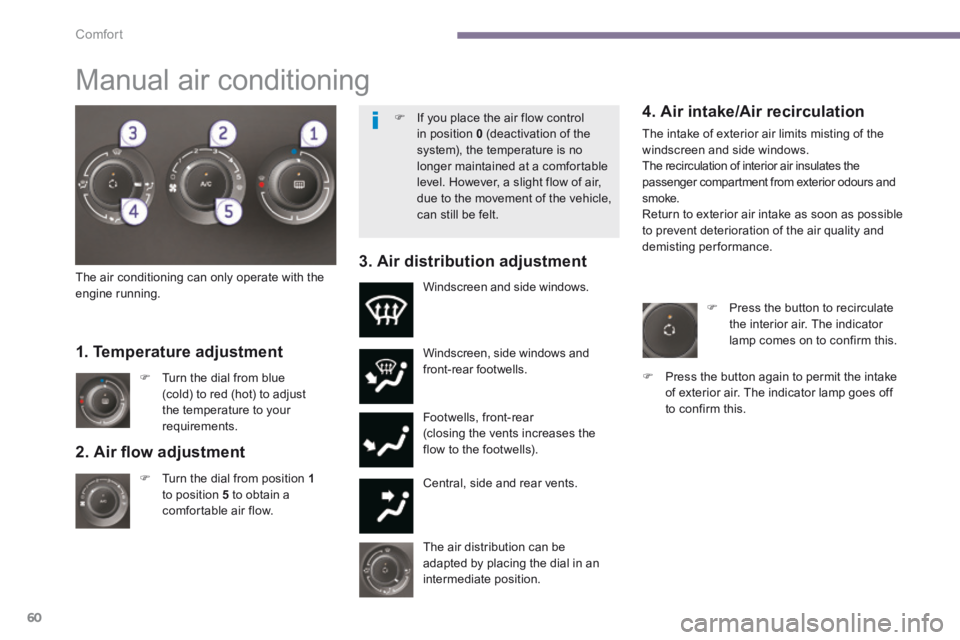
2. Air fl ow adjustment
Turn the dial from position 1to position 5 to obtain a comfortable air flow.
Windscreen, side windows and front-rear footwells.
Footwells, front-rear (closing the vents increases the flow to the footwells).
Central, side and rear vents.
Turn the dial from blue (cold) to red (hot) to adjust the temperature to your requirements.
Windscreen and side windows.
1. Temperature adjustment
The air distribution can be adapted by placing the dial in an intermediate position.
The air conditioning can only operate with the engine running.
4. Air intake/Air recirculation
The intake of exterior air limits misting of the windscreen and side windows. The recirculation of interior air insulates the passenger compartment from exterior odours and smoke. Return to exterior air intake as soon as possible to prevent deterioration of the air quality and demisting performance. 3. Air distribution adjustment
Press the button to recirculate the interior air. The indicator lamp comes on to confirm this.
Press the button again to permit the intake of exterior air. The indicator lamp goes off to confirm this.
Manual air conditioning
If you place the air flow control in position 0 (deactivation of the system), the temperature is no longer maintained at a comfortable level. However, a slight flow of air, due to the movement of the vehicle, can still be felt.
Page 74 of 404

Comfort
72
2 nd row seats
Forwards-backwards adjustment
Lift the control A Lift the control A Lift the control , located at the front of the seat, then adjust the seat to the position desired.
"Comfort" position
The three 2 nd row seats are independent of each other and all the same width. They all have a "comfort" position. Placing a seat in the "comfort" position
Pull on the control B and guide the seat rearwards. The backrest reclines and the seat base moves for ward slightly.
Returning the seat to the initial position
Pull on the control B and allow the seat to come for wards.
Always supervise any movements of seats by children.
Page 102 of 404

Visibility
100
Lighting controls
Main lighting
The various front and rear lamps of the vehicle are designed to adapt the lighting progressively in relation to the climatic conditions and so improve the driver's visibility: - sidelamps, to be seen, - dipped beam headlamps to see without dazzling other drivers, - main beam headlamps to see clearly when the road is clear, - directional headlamps for improved visibility when cornering.
Additional lighting
Other lamps are installed to fulfil the requirements of particular driving conditions: - a rear foglamp to be seen from a distance, - front foglamps for even better visibility, - daytime running lamps to be seen during the day.
Programming
Various automatic lighting control modes are also available according to the following options: - guide-me-home lighting, - automatic lighting, - directional headlamps.
System for selection and control of the various front and rear lamps providing the vehicle's lighting.
Travelling abroad
If using your vehicle in a country that drives on the other side of the road, the headlamps must be adjusted to avoid dazzling on-coming drivers. Contact an official dealer or a qualified workshop.
Page 104 of 404

Visibility
102
Model with rear foglamp only
Rear foglamp
This operates with dipped and main beam headlamps. To switch on the foglamp, turn the ring Cforwards. To switch off the foglamp, turn the ring Crearwards. When the lighting is switched on automatically (with AUTO model), the dipped beam headlamps and sidelamps remain on until the rear foglamp is switched off.
Model with front and rear foglamps
Front and rear foglamps
The rear foglamp operates with the dipped and main beam headlamps. The front foglamps also operate with the sidelamps. To switch on the rear foglamp, turn the ring C forwards. To switch on the front foglamps, turn the ring C forwards again. To switch off the rear foglamp, turn the ring C rearwards. To switch off the front foglamps, turn the ring C rearwards again. When the lighting is switched on automatically
(with AUTO model), the dipped beam headlamps and sidelamps remain on until the rear foglamp is switched off. When the lighting is switched off automatically (with AUTO model) or when the dipped beam headlamps are switched off manually, the foglamps and the sidelamps will remain on.
C. Fog lamps selection ring.
Page 105 of 404
5
Visibility103
Switching off the lighting when switching off the ignition
When the ignition is switched off, all of the lamps switch off immediately, except for the dipped beam headlamps if automatic guide-me-home lighting is activated.
In good or rainy weather, by both day and night, the front foglamps and the rear foglamps are prohibited. In these situations, the power of their beams may dazzle other drivers. They should
only be used in fog or falling snow. In these weather conditions, you should switch on the foglamps and dipped beam headlamps manually, as the sunshine sensor may detect sufficient light. Do not forget to switch off the front and rear foglamps when they are no longer necessary.
Switching on the lighting when switching on the ignition
To reactivate the lighting control stalk, turn the ring A to position "0" - lighting off, then to the position of your choice.
If the lighting is switched on manually after switching off the ignition, there is an audible signal when a front door is opened to warn the driver that they have forgotten to switch off the vehicle's lighting, with the ignition off. They switch off automatically after a period which depends on the state of charge of the battery (entry to energy economy mode).