towing PEUGEOT 5008 2015.5. Owners Manual
[x] Cancel search | Manufacturer: PEUGEOT, Model Year: 2015.5., Model line: 5008, Model: PEUGEOT 5008 2015.5.Pages: 364, PDF Size: 12.82 MB
Page 5 of 364
.
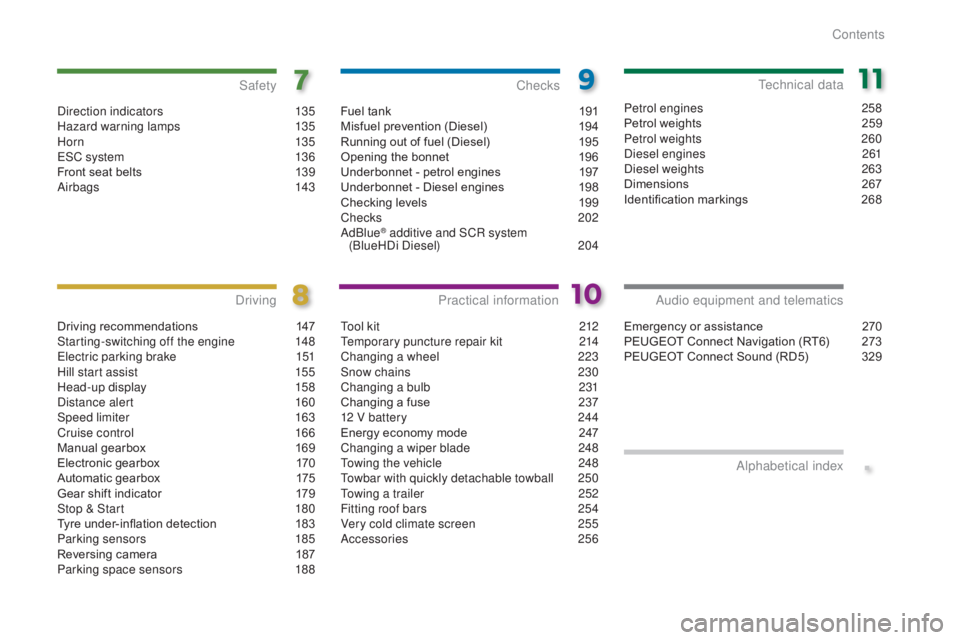
Direction indicators 135
Hazard warning lamps 1 35
H or n
13 5
ESC system
1
36
Front seat belts
1
39
Airbags
1
43
Safety
Driving recommendations 1 47
Starting-switching off the engine 1 48
Electric parking brake
1
51
Hill start assist
1
55
Head-up display
1
58
Distance alert
1
60
Speed limiter
1
63
Cruise control
1
66
Manual gearbox
1
69
Electronic gearbox
1
70
Automatic gearbox
1
75
Gear shift indicator
1
79
Stop & Start
1
80
Tyre under-inflation detection
1
83
Parking sensors
1
85
Reversing camera
1
87
Parking space sensors
1
88
Driving
Emergency or assistance 2 70
PEUGEOT Connect Navigation (RT6) 2 73
PEUGEOT Connect Sound (RD5)
3
29
Audio equipment and telematics
Alphabetical index
Fuel tank 1 91
Misfuel prevention (Diesel) 1 94
Running out of fuel (Diesel)
1
95
Opening the bonnet
1
96
Underbonnet - petrol engines
1
97
Underbonnet - Diesel engines
1
98
Checking levels
1
99
Checks
20
2
AdBlue
® additive and SCR system
(BlueHDi Diesel) 20 4
Checks
Tool kit 2 12
Temporary puncture repair kit 2 14
Changing a wheel
2
23
Snow chains
2
30
Changing a bulb
2
31
Changing a fuse
2
37
12 V battery
2
44
Energy economy mode
2
47
Changing a wiper blade
2
48
Towing the vehicle
2
48
Towbar with quickly detachable towball
2
50
Towing a trailer
2
52
Fitting roof bars
2
54
Very cold climate screen
2
55
Accessories
2
56
Practical information
Petrol engines 2 58
Petrol weights 2 59
Petrol weights
2
60
Diesel engines
2
61
Diesel weights
26
3
Dimensions
2
67
Identification markings
2
68
Technical data
Contents
Page 6 of 364
4
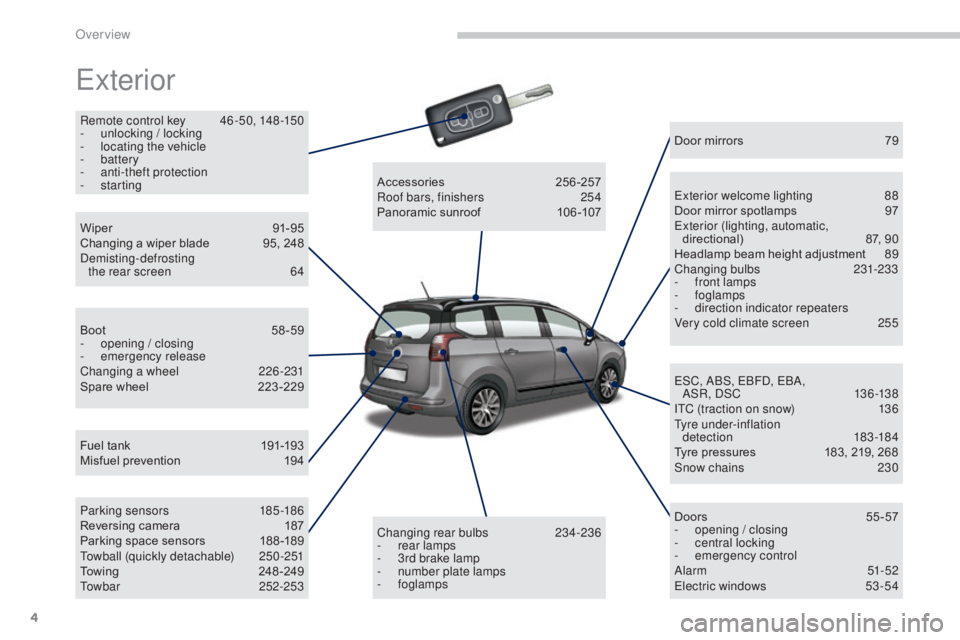
Exterior
Remote control key 46 -50, 148 -150
- u nlocking / locking
-
l
ocating the vehicle
-
battery
-
a
nti-theft protection
-
starting
Fuel tank
1
91-193
Misfuel prevention
1
94
Wiper
91
-95
Changing a wiper blade
9
5, 248
Demisting-defrosting the rear screen
6
4
Boot
5
8-59
-
ope
ning / closing
-
em
ergency release
Changing a wheel
2
26-231
Spare wheel
2
23 -229
Parking sensors
1
85-186
Reversing camera
1
87
Parking space sensors
1
88 -189
Towball (quickly detachable)
2
50 -251
Towing
24
8-249
Towbar
252-253Accessories
2
56-257
Roof bars, finishers
2
54
Panoramic sunroof
1
06 -107Door mirrors
7
9
Exterior welcome lighting
8
8
Door mirror spotlamps
9
7
Exterior (lighting, automatic, directional)
87
, 90
Headlamp beam height adjustment
8
9
Changing bulbs
2
31-233
-
f
ront lamps
-
foglamps
-
d
irection indicator repeaters
Very cold climate screen
2
55
Doors
5
5 -57
-
ope
ning / closing
-
c
entral locking
-
em
ergency control
Alarm
51-52
Electric windows
5
3 -54
ESC, ABS, EBFD, EBA,
AS R , DSC
13
6 -13 8
ITC (traction on snow)
1
36
Tyre under-inflation detection
18
3 -18 4
Tyre pressures
1
83, 219, 268
Snow chains
2
30
Changing rear bulbs
2
34-236
-
r
ear lamps
-
3
rd brake lamp
-
n
umber plate lamps
-
foglamps
Over view
Page 63 of 364
61
The air conditioning system does not
contain chlorine and does not present
any danger to the ozone layer.Recommendations for ventilation and air conditioning
In order for these systems to be fully effective, follow the operation and maintenance
guidelines below:
F
I
f the interior temperature remains very high after the vehicle has been parked in the sun
for a considerable time, first ventilate the passenger compartment for a few minutes.
P
lace the air flow control at a sufficient level to provide an adequate renewal of air in the
passenger compartment.
F
T
o obtain an even air distribution, take care not to obstruct the exterior air intake grilles
located at the base of the windscreen, the nozzles, the vents and the air outlets, as well
as the air extractor located in the boot.
F
I
n normal conditions, use the intake of exterior air as prolonged use of the air
recirculation may cause misting of the windows and side windows.
F
D
o not cover the sunshine sensor, located on the dashboard; this is used for regulation
of the automatic air conditioning system.
F
O
perate the air conditioning system for 5 to 10 minutes, once or twice a month to keep it
in good working order.
F
E
nsure that the passenger compartment filter is in good condition and have the filter
elements replaced regularly (refer to the "Checks" section).
W
e recommend the use of a combined passenger compartment filter. Thanks to its
second special active filter, it contributes to the purification of the air breathed by the
occupants and the cleanliness of the passenger compartment (reduction of allergic
symptoms, bad odours and greasy deposits).
F
T
he air conditioning uses power from the engine while operating. This results in an
increase in the vehicle's fuel consumption.
W
hen towing at or near maximum capacity or on steep slopes in high ambient
temperatures, switching off the air conditioning saves engine power and so improves
towing capacity.
C
ondensation created by the air conditioning results in a discharge of water under the
vehicle when stationary, which is per fectly normal.
F
T
o ensure correct operation of the air conditioning system, you are also advised to have
it checked regularly.
F
I
f the system does not produce cold air, do not use it and contact a PEUGEOT dealer or
a qualified workshop.
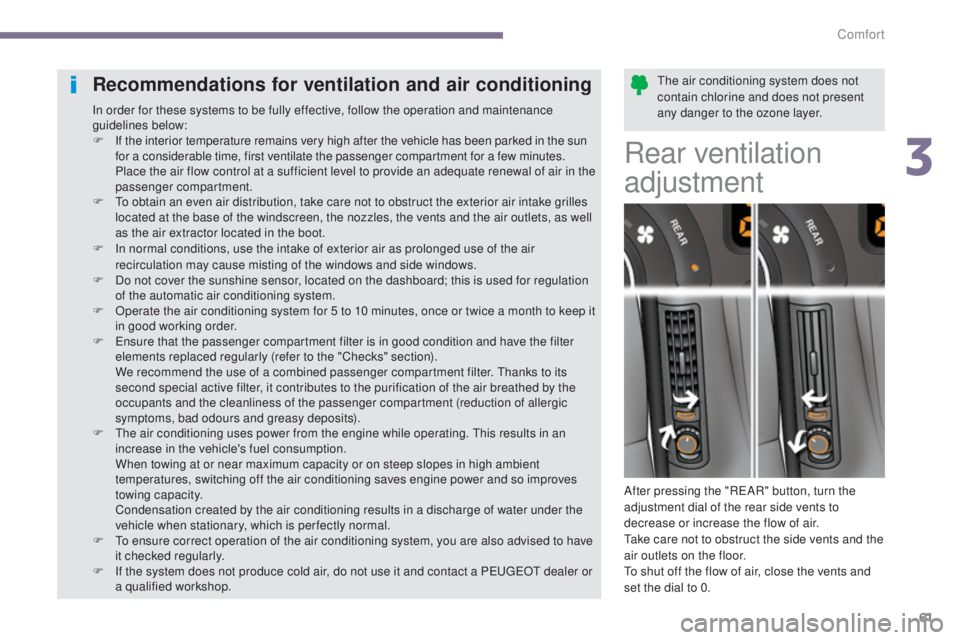
Rear ventilation
adjustment
After pressing the "REAR" button, turn the
adjustment dial of the rear side vents to
decrease or increase the flow of air.
Take care not to obstruct the side vents and the
air outlets on the floor.
To shut off the flow of air, close the vents and
set the dial to 0.
3
Comfort
Page 110 of 364
108
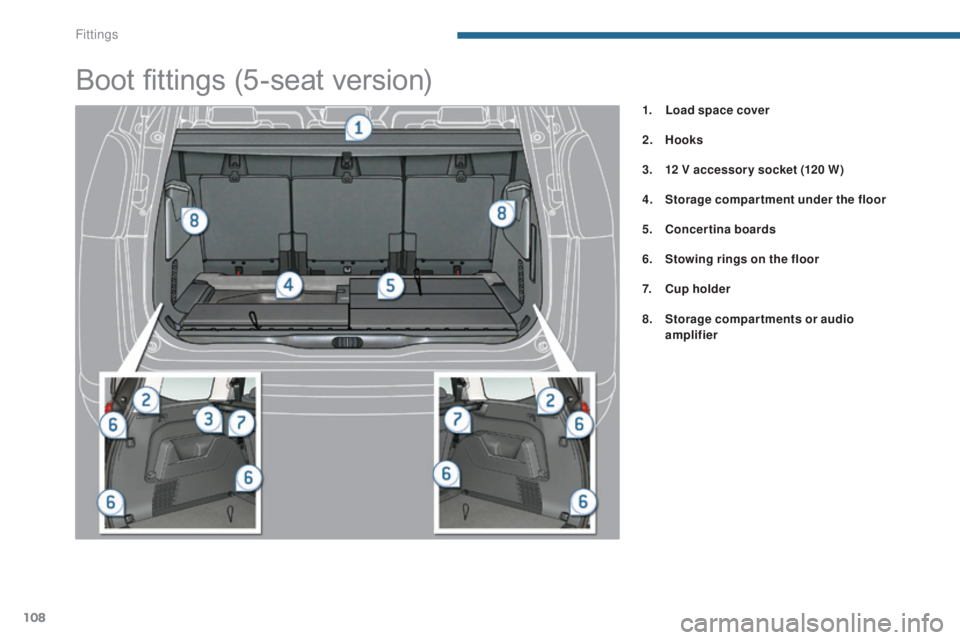
Boot fittings (5-seat version)
1. Load space cover
2.
Hoo
ks
3.
1
2 V accessor y socket (120 W)
4.
S
torage compartment under the floor
5.
C
oncertina boards
6.
S
towing rings on the floor
7.
C
up holder
8.
S
torage compartments or audio
amplifier
Fittings
Page 111 of 364
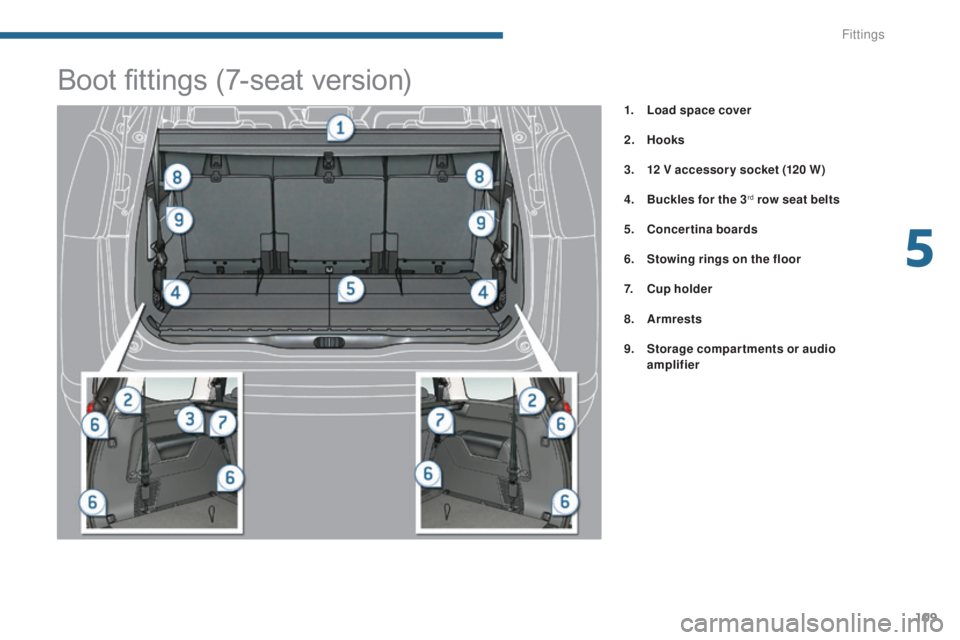
109
1. Load space cover
2.
Hoo
ks
3.
1
2 V accessor y socket (120 W)
4.
B
uckles for the 3
rd row seat belts
5.
C
oncertina boards
6.
S
towing rings on the floor
7.
C
up holder
8.
A
rmrests
9.
S
torage compartments or audio
amplifier
Boot fittings (7-seat version)
5
Fittings
Page 113 of 364
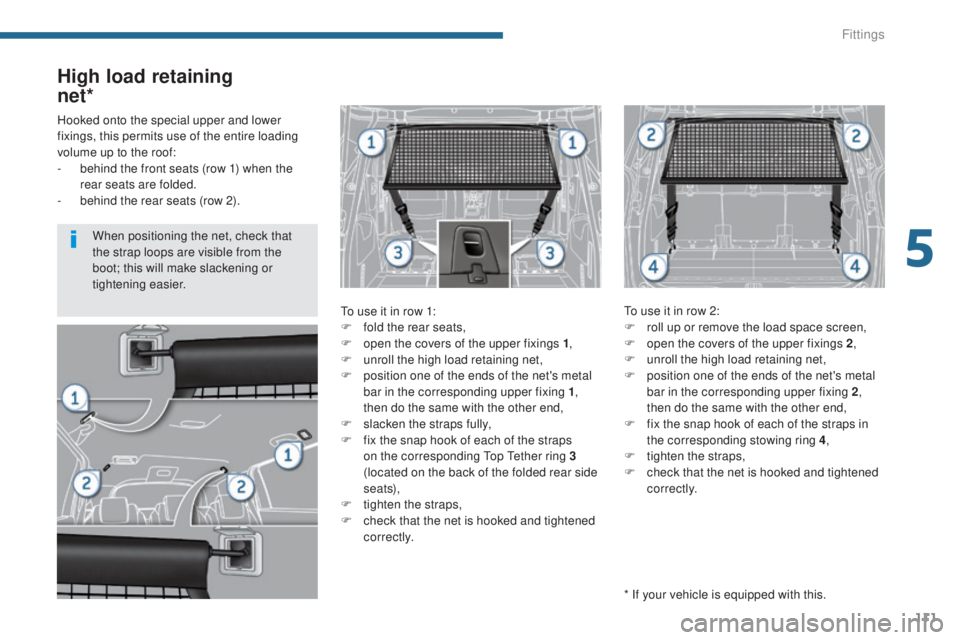
111
High load retaining
net*
To use it in row 1:
F
f old the rear seats,
F
o
pen the covers of the upper fixings 1 ,
F
u
nroll the high load retaining net,
F
p
osition one of the ends of the net's metal
bar in the corresponding upper fixing 1 ,
then do the same with the other end,
F
s
lacken the straps fully,
F
f
ix the snap hook of each of the straps
on the corresponding Top Tether ring 3
(located on the back of the folded rear side
seats),
F
t
ighten the straps,
F
c
heck that the net is hooked and tightened
c o r r e c t l y. To use it in row 2:
F
r oll up or remove the load space screen,
F
o
pen the covers of the upper fixings 2,
F
u
nroll the high load retaining net,
F
p
osition one of the ends of the net's metal
bar in the corresponding upper fixing 2 ,
then do the same with the other end,
F
f
ix the snap hook of each of the straps in
the corresponding stowing ring 4 ,
F
t
ighten the straps,
F
c
heck that the net is hooked and tightened
c o r r e c t l y.
Hooked onto the special upper and lower
fixings, this permits use of the entire loading
volume up to the roof:
-
b
ehind the front seats (row 1) when the
rear seats are folded.
-
b
ehind the rear seats (row 2).
* If your vehicle is equipped with this.
When positioning the net, check that
the strap loops are visible from the
boot; this will make slackening or
tightening easier.
5
Fittings
Page 114 of 364
112
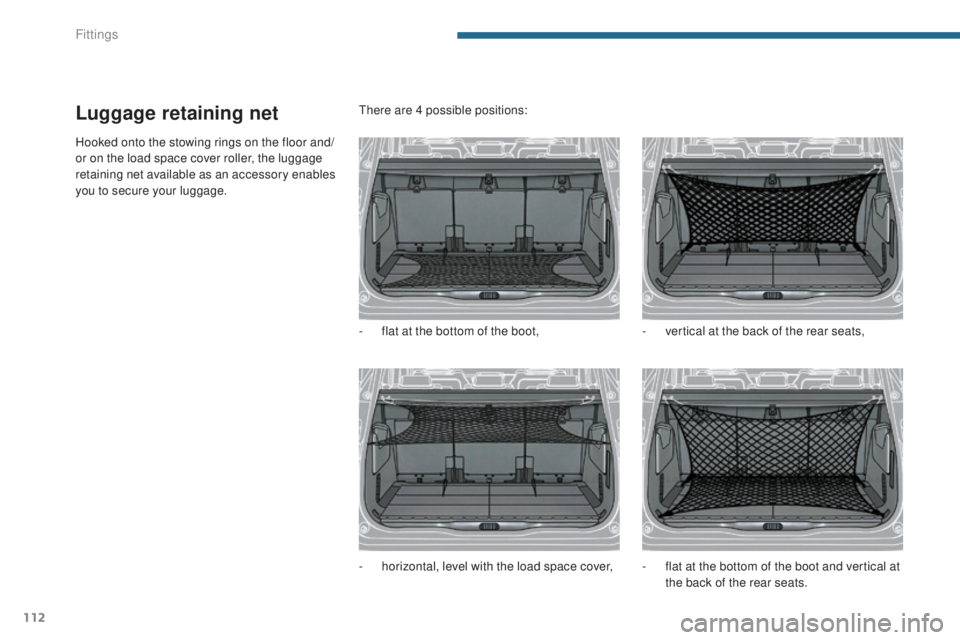
Luggage retaining net
Hooked onto the stowing rings on the floor and/
or on the load space cover roller, the luggage
retaining net available as an accessory enables
you to secure your luggage.There are 4 possible positions:
-
f
lat at the bottom of the boot,
-
h
orizontal, level with the load space cover,-
v
ertical at the back of the rear seats,
-
f
lat at the bottom of the boot and vertical at
the back of the rear seats.
Fittings
Page 137 of 364
135
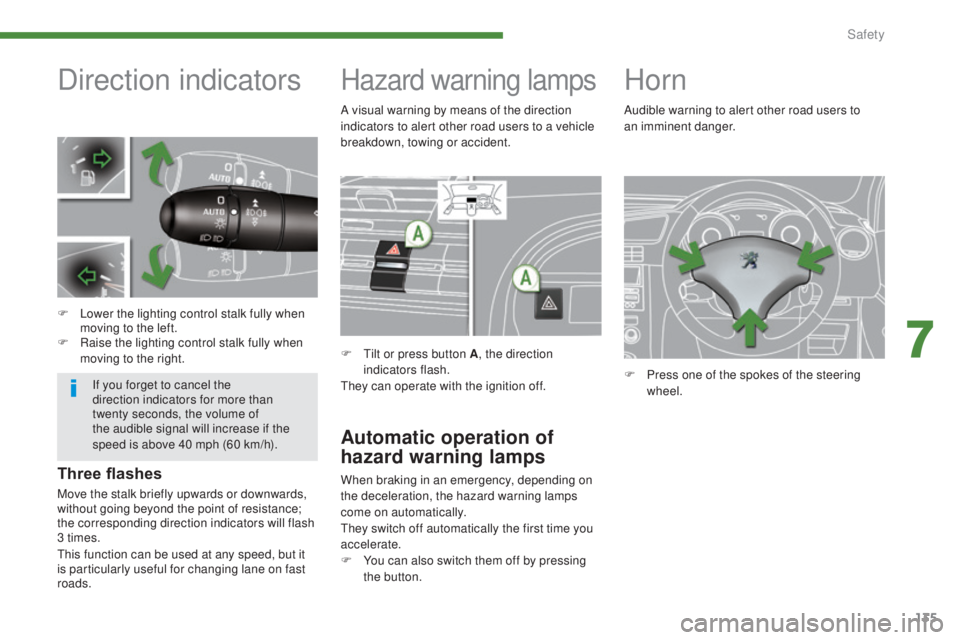
Direction indicators
F Lower the lighting control stalk fully when moving to the left.
F
R
aise the lighting control stalk fully when
moving to the right.
Hazard warning lamps
F Tilt or press button A , the direction
indicators flash.
They can operate with the ignition off.
Automatic operation of
hazard warning lamps
When braking in an emergency, depending on
the deceleration, the hazard warning lamps
come on automatically.
They switch off automatically the first time you
accelerate.
F
Y
ou can also switch them off by pressing
the button.
Horn
F Press one of the spokes of the steering wheel.
Audible warning to alert other road users to
an
imminent danger.
Three flashes
Move the stalk briefly upwards or downwards,
without going beyond the point of resistance;
the corresponding direction indicators will flash
3 times.
If you forget to cancel the
direction indicators for more than
twenty
seconds, the volume of
the audible signal will increase if the
speed is above 40 mph (60 km/h). A visual warning by means of the direction
indicators to alert other road users to a vehicle
breakdown, towing or accident.
This function can be used at any speed, but it
is particularly useful for changing lane on fast
roads.
7
Safety
Page 153 of 364
151
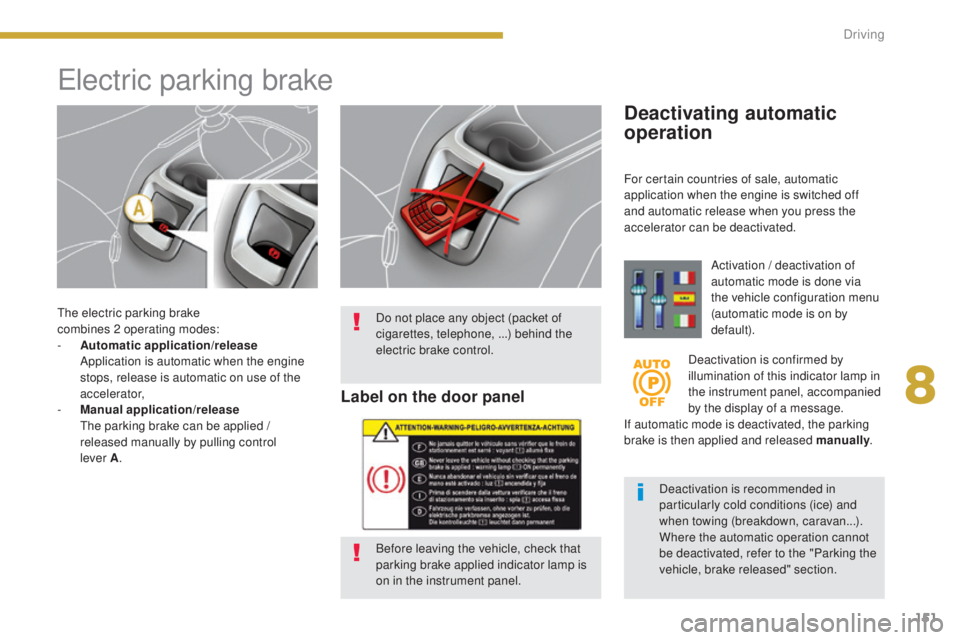
The electric parking brake
combines 2 operating modes:
-
A
utomatic application/release
A
pplication is automatic when the engine
stops, release is automatic on use of the
accelerator,
-
M
anual application/release
T
he parking brake can be applied /
released manually by pulling control
lever
A.
Electric parking brake
Deactivating automatic
operation
Activation / deactivation of
automatic mode is done via
the vehicle configuration menu
(automatic mode is on by
default).
Deactivation is confirmed by
illumination of this indicator lamp in
the instrument panel, accompanied
by the display of a message.
If automatic mode is deactivated, the parking
brake is then applied and released manually .
Deactivation is recommended in
particularly cold conditions (ice) and
when towing (breakdown, caravan...).
Where the automatic operation cannot
be deactivated, refer to the "Parking the
vehicle, brake released" section.
For certain countries of sale, automatic
application when the engine is switched off
and automatic release when you press the
accelerator can be deactivated.
Label on the door panel
Before leaving the vehicle, check that
parking brake applied indicator lamp is
on in the instrument panel. Do not place any object (packet of
cigarettes, telephone,
...) behind the
electric brake control.
8
Driving
Page 155 of 364
153
Automatic application,
engine off
With the vehicle stationary, the parking brake
is automatically applied when the engine is
switched off.
-
i
llumination of the parking brake
applied indicator lamp,
-
i
llumination of the P indicator
lamp in the control lever A ,
Automatic release
The electric parking brake releases
automatically and progressively when you
press the accelerator:
F
M
anual gearbox : press down fully on the
clutch pedal, engage first gear or reverse,
press on the accelerator pedal and move
of f.
F
E
lectronic gearbox : select position A, M
or R then press the accelerator pedal.
F
A
utomatic gearbox : select position D, M
or R then press the accelerator pedal.
-
t
he parking brake application
indicator lamp going off,
-
the P indicator lamp in the
control lever A going of f,
-
d
isplay of the "Parking brake applied"
message.
The characteristic noise of operation confirms
the application of the electric parking brake. Full release of the parking brake is confirmed
by:
When stationary, with the engine running, do
not press the accelerator pedal unnecessarily,
as you may release the parking brake.
Before leaving the vehicle, check that
parking brake indicator lamp is on in the
instrument panel.
Never leave a child alone inside the
vehicle with the ignition on, as they
could release the parking brake.
In the case of towing, a loaded vehicle
or parking on a gradient, turn the front
wheels towards the pavement and
engage a gear when you park.
Maximum application
If necessary, you can make a maximum
application
of the parking brake. It is obtained
by means of a long pull on the control lever
A,
until you see the message "Parking brake
applied" and a beep is heard.
Maximum application is essential:
-
i
n the case of a vehicle towing a caravan
or a trailer, if the automatic functions are
activated but you are applying the parking
brake manually,
-
w
hen the gradient you are parked on is
variable in its effect (e.g. on a ferry, in a
lorry, during towing).
In the case of towing, a loaded vehicle
or parking on a gradient, make a
maximum application of the parking
brake then turn the front wheels
towards the pavement and engage a
gear when you park.
After a maximum application, the
release time will be longer. -
t
he display of the "Parking brake released"
message.
The application of the parking brake is
confirmed by:
8
Driving