roof PEUGEOT 5008 2015 Owners Manual
[x] Cancel search | Manufacturer: PEUGEOT, Model Year: 2015, Model line: 5008, Model: PEUGEOT 5008 2015Pages: 364, PDF Size: 12.82 MB
Page 4 of 364
.
.
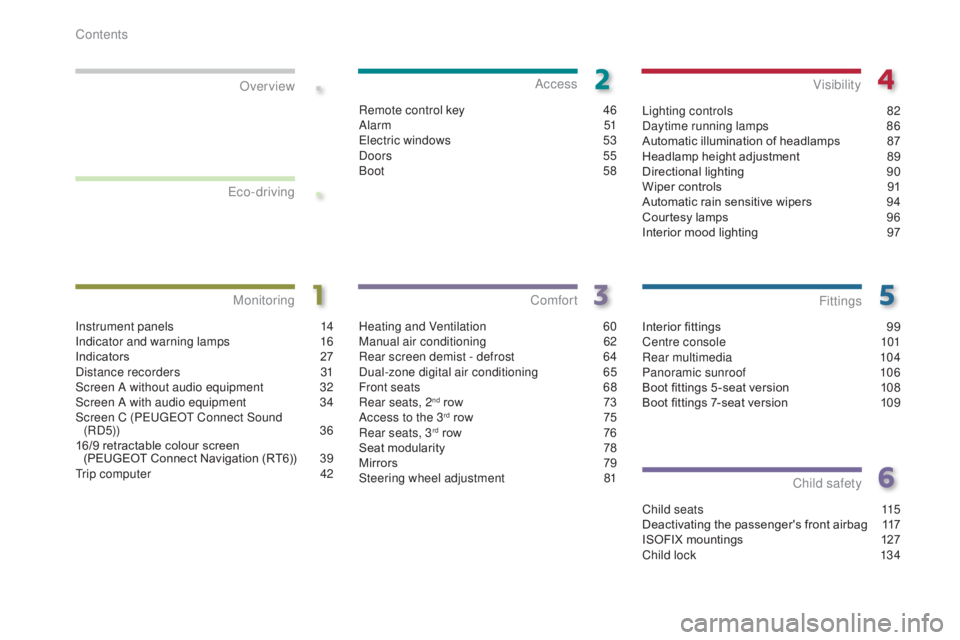
Interior fittings 99
Centre console 1 01
Rear multimedia
1
04
Panoramic sunroof
1
06
Boot fittings 5 -seat version
1
08
Boot fittings 7-seat version
1
09
Fittings
Child seats 1 15
Deactivating the passenger's front airbag 1 17
ISOFIX mountings
1
27
Child lock
1
34
Child safety
Over view
Instrument panels 1
4
Indicator and warning lamps 1 6
Indicators
2
7
Distance recorders
3
1
Screen A without audio equipment
3
2
Screen A with audio equipment
3
4
Screen C (PEUGEOT Connect Sound (RD5))
3
6
16/9 retractable colour screen (PEUGEOT Connect Navigation (RT6))
3
9
Trip computer
4
2
Monitoring
Heating and Ventilation 60
Manual air conditioning 6 2
Rear screen demist - defrost
6
4
Dual-zone digital air conditioning
6
5
Front seats
6
8
Rear seats, 2
nd row 7 3
Access to the 3rd row 7 5
Rear seats, 3rd row 7 6
Seat modularity 7 8
Mirrors
7
9
Steering wheel adjustment
8
1
Comfort
Remote control key 4 6
Alarm 5 1
Electric windows
5
3
Doors
55
Boot
5
8
Access
Lighting controls 8 2
Daytime running lamps 8 6
Automatic illumination of headlamps
87
H
eadlamp height adjustment
8
9
Directional lighting
9
0
Wiper controls
9
1
Automatic rain sensitive wipers
9
4
Courtesy lamps
9
6
Interior mood lighting
9
7
Visibility
Eco-driving
Contents
Page 5 of 364
.
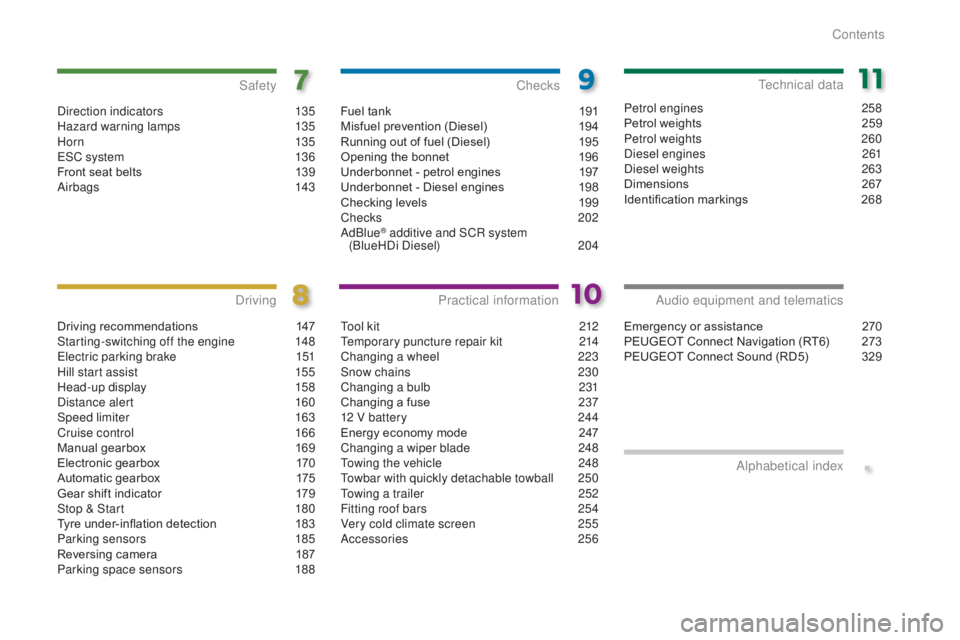
Direction indicators 135
Hazard warning lamps 1 35
H or n
13 5
ESC system
1
36
Front seat belts
1
39
Airbags
1
43
Safety
Driving recommendations 1 47
Starting-switching off the engine 1 48
Electric parking brake
1
51
Hill start assist
1
55
Head-up display
1
58
Distance alert
1
60
Speed limiter
1
63
Cruise control
1
66
Manual gearbox
1
69
Electronic gearbox
1
70
Automatic gearbox
1
75
Gear shift indicator
1
79
Stop & Start
1
80
Tyre under-inflation detection
1
83
Parking sensors
1
85
Reversing camera
1
87
Parking space sensors
1
88
Driving
Emergency or assistance 2 70
PEUGEOT Connect Navigation (RT6) 2 73
PEUGEOT Connect Sound (RD5)
3
29
Audio equipment and telematics
Alphabetical index
Fuel tank 1 91
Misfuel prevention (Diesel) 1 94
Running out of fuel (Diesel)
1
95
Opening the bonnet
1
96
Underbonnet - petrol engines
1
97
Underbonnet - Diesel engines
1
98
Checking levels
1
99
Checks
20
2
AdBlue
® additive and SCR system
(BlueHDi Diesel) 20 4
Checks
Tool kit 2 12
Temporary puncture repair kit 2 14
Changing a wheel
2
23
Snow chains
2
30
Changing a bulb
2
31
Changing a fuse
2
37
12 V battery
2
44
Energy economy mode
2
47
Changing a wiper blade
2
48
Towing the vehicle
2
48
Towbar with quickly detachable towball
2
50
Towing a trailer
2
52
Fitting roof bars
2
54
Very cold climate screen
2
55
Accessories
2
56
Practical information
Petrol engines 2 58
Petrol weights 2 59
Petrol weights
2
60
Diesel engines
2
61
Diesel weights
26
3
Dimensions
2
67
Identification markings
2
68
Technical data
Contents
Page 6 of 364
4
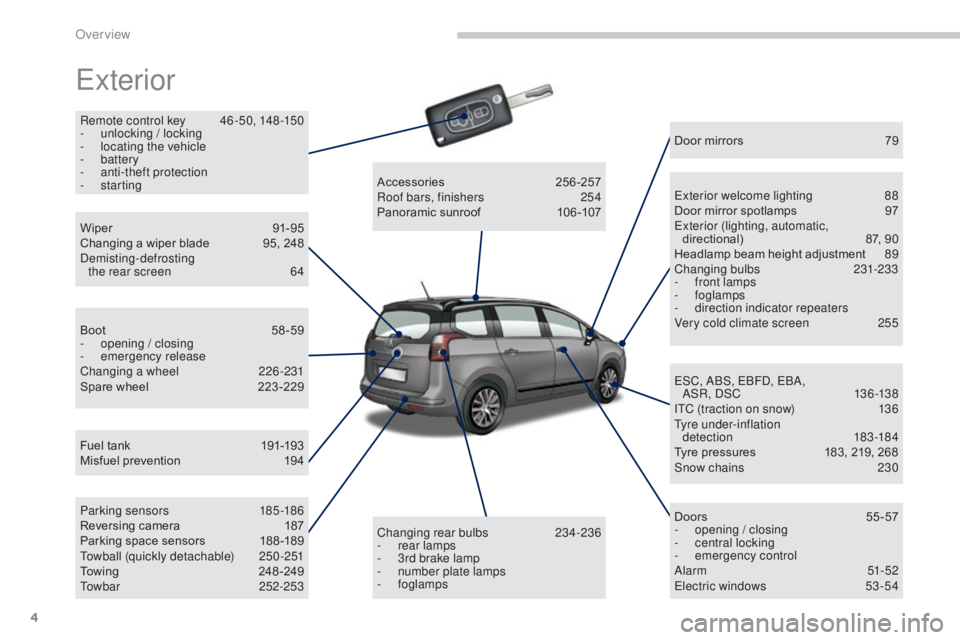
Exterior
Remote control key 46 -50, 148 -150
- u nlocking / locking
-
l
ocating the vehicle
-
battery
-
a
nti-theft protection
-
starting
Fuel tank
1
91-193
Misfuel prevention
1
94
Wiper
91
-95
Changing a wiper blade
9
5, 248
Demisting-defrosting the rear screen
6
4
Boot
5
8-59
-
ope
ning / closing
-
em
ergency release
Changing a wheel
2
26-231
Spare wheel
2
23 -229
Parking sensors
1
85-186
Reversing camera
1
87
Parking space sensors
1
88 -189
Towball (quickly detachable)
2
50 -251
Towing
24
8-249
Towbar
252-253Accessories
2
56-257
Roof bars, finishers
2
54
Panoramic sunroof
1
06 -107Door mirrors
7
9
Exterior welcome lighting
8
8
Door mirror spotlamps
9
7
Exterior (lighting, automatic, directional)
87
, 90
Headlamp beam height adjustment
8
9
Changing bulbs
2
31-233
-
f
ront lamps
-
foglamps
-
d
irection indicator repeaters
Very cold climate screen
2
55
Doors
5
5 -57
-
ope
ning / closing
-
c
entral locking
-
em
ergency control
Alarm
51-52
Electric windows
5
3 -54
ESC, ABS, EBFD, EBA,
AS R , DSC
13
6 -13 8
ITC (traction on snow)
1
36
Tyre under-inflation detection
18
3 -18 4
Tyre pressures
1
83, 219, 268
Snow chains
2
30
Changing rear bulbs
2
34-236
-
r
ear lamps
-
3
rd brake lamp
-
n
umber plate lamps
-
foglamps
Over view
Page 9 of 364
7
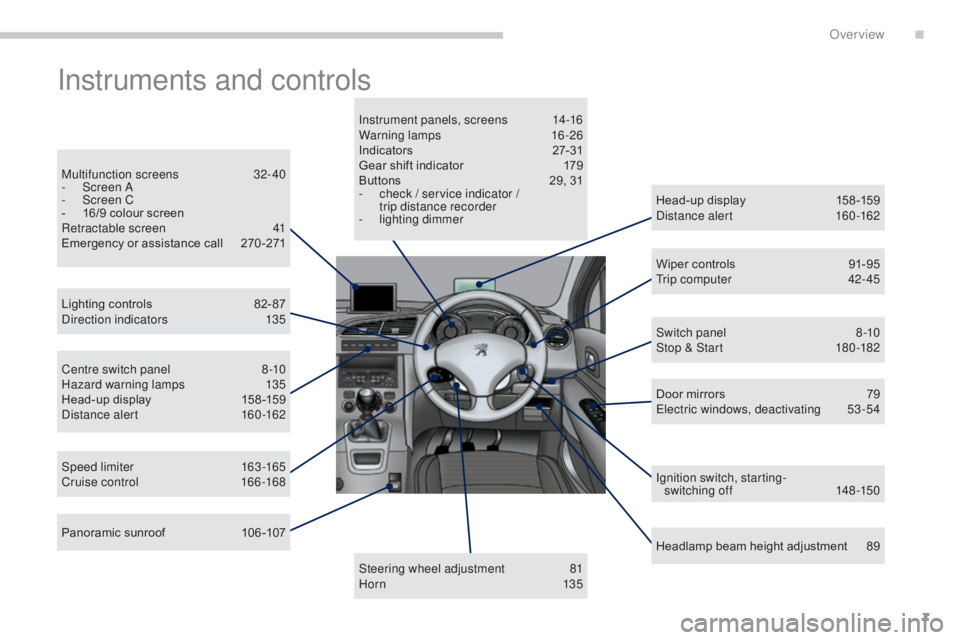
Instruments and controls
Head-up display 158 -159
Distance alert 1 60-162
Lighting controls
8
2- 87
Direction indicators
1
35
Speed limiter
1
63-165
Cruise control
16
6 -168 Door mirrors
7
9
Electric windows, deactivating
5
3-54
Switch panel
8
-10
Stop & Start
1
80 -182
Headlamp beam height adjustment
8
9
Instrument panels, screens
1
4-16
Warning lamps
1
6-26
Indicators
2
7-31
Gear shift indicator
1
79
Buttons
2
9, 31
-
c
heck / service indicator /
trip distance recorder
-
l
ighting dimmer
Steering wheel adjustment
8
1
H or n
13 5
Multifunction screens
3
2- 40
-
S
creen A
-
S
creen C
-
1
6/9 colour screen
Retractable screen
4
1
Emergency or assistance call
2
70 -271
Centre switch panel
8
-10
Hazard warning lamps
1
35
Head-up display
1
58 -159
Distance alert
1
60-162 Wiper controls
9
1-95
Trip computer
4
2- 45
Ignition switch, starting-
switching off
1
48 -150
Panoramic sunroof
1
06 -107
.
Over view
Page 14 of 364
12
Eco-driving
Eco-driving is a range of everyday practices that allow the motorist to optimise their fuel consumption and CO2 emissions.
Optimise the use of your gearbox
With a manual gearbox, move off gently and change up without waiting.
During acceleration change up early.
With an automatic or electronic gearbox, give preference to automatic
mode and avoid pressing the accelerator pedal heavily or suddenly.
The gear shift indicator invites you engage the most suitable gear: as
soon as the indication is displayed in the instrument panel, follow it
straight away.
For vehicles fitted with an electronic or automatic gearbox, this
indicator appears only in manual mode.
Drive smoothly
Maintain a safe distance between vehicles, use engine braking rather
than the brake pedal, and press the accelerator progressively. These
practices contribute towards a reduction in fuel consumption and CO
2
emissions and also helps reduce the background traffic noise.
If your vehicle has cruise control, make use of the system at speeds
above 25 mph (40 km/h) when the traffic is flowing well.
Control the use of your electrical
equipment
Before moving off, if the passenger compartment is too warm, ventilate it
by opening the windows and air vents before using the air conditioning.
Above 30 mph (50 km/h), close the windows and leave the air vents
open.
Remember to make use of equipment that can help keep the
temperature in the passenger compartment down (sunroof and window
blinds...).
Switch off the air conditioning, unless it has automatic regulation, as
soon as the desired temperature is attained.
Switch off the demisting and defrosting controls, if not automatic.
Switch off the heated seat as soon as possible.
Switch off the headlamps and front foglamps when the level of light
does not require their use.
Avoid running the engine before moving off, particularly in winter; your
vehicle will warm up much faster while driving.
As a passenger, if you avoid connecting your multimedia devices
(film, music, video game...), you will contribute towards limiting the
consumption of electrical energy, and so of fuel.
Disconnect your portable devices before leaving the vehicle.
Eco-driving
Page 15 of 364
13
Limit the causes of excess consumption
Spread loads throughout the vehicle; place the heaviest items in the
bottom of the boot, as close as possible to the rear seats.
Limit the loads carried in the vehicle and reduce wind resistance (roof
bars, roof rack, bicycle carrier, trailer...). Use a roof box in preference.
Remove roof bars and roof racks after use.
At the end of winter, remove snow tyres and refit your summer tyres.
Observe the recommendations on
maintenance
Check the tyre pressures regularly, when cold, referring to the label in
the door aperture, driver's side.
Carry out this check in particular:
-
b
efore a long journey,
-
a
t each change of season,
-
a
fter a long period out of use.
Don't forget the spare wheel and the tyres on any trailer or caravan.
Have your vehicle serviced regularly (engine oil, oil filter, air filter,
passenger compartment filter...) and observe the schedule of
operations recommended in the manufacturer's service schedule.
With a BlueHDi Diesel engine, if the SCR system is faulty your vehicle
becomes polluting; go to a PEUGEOT dealer or a qualified workshop
without delay to have the emissions of nitrous oxides brought back to
the legal level.
When refuelling, do not continue after the third cut-off of the nozzle to
avoid any over flow.
At the wheel of your new vehicle, it is only after the first 1 800 miles
(3
000 kilometres) that you will see the fuel consumption settle down to
a consistent average.
.
Eco-driving
Page 108 of 364
106
Panoramic sunroof
Motorised blind
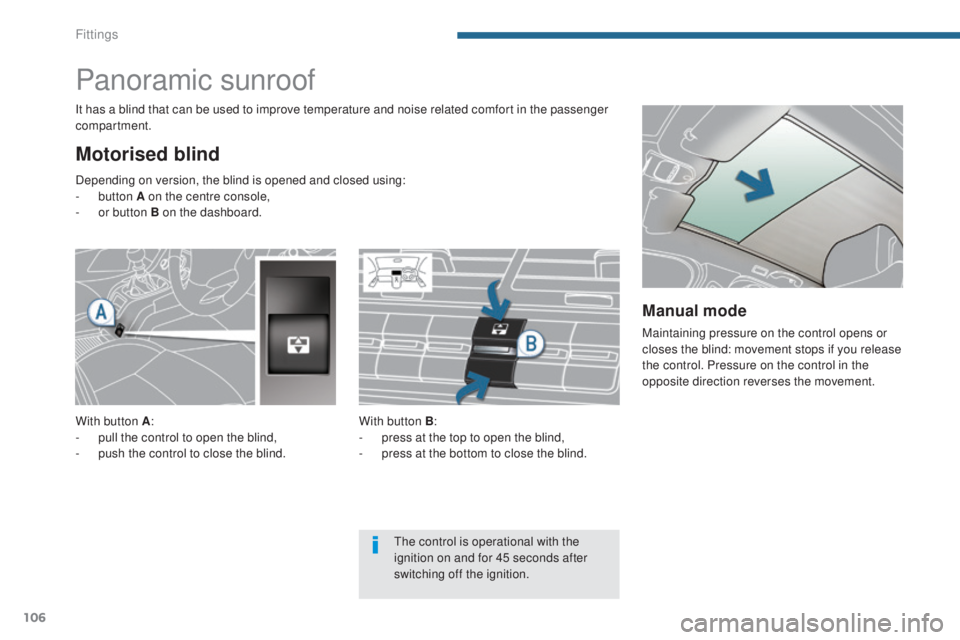
It has a blind that can be used to improve temperature and noise related comfort in the passenger
compartment.With button B:
-
p
ress at the top to open the blind,
-
p
ress at the bottom to close the blind.
With button A
:
-
p
ull the control to open the blind,
-
p
ush the control to close the blind.
Depending on version, the blind is opened and closed using:
-
button A on the centre console,
-
o
r button B on the dashboard.
Manual mode
Maintaining pressure on the control opens or
closes the blind: movement stops if you release
the control. Pressure on the control in the
opposite direction reverses the movement.
The control is operational with the
ignition on and for 45 seconds after
switching off the ignition.
Fittings
Page 113 of 364
111
High load retaining
net*
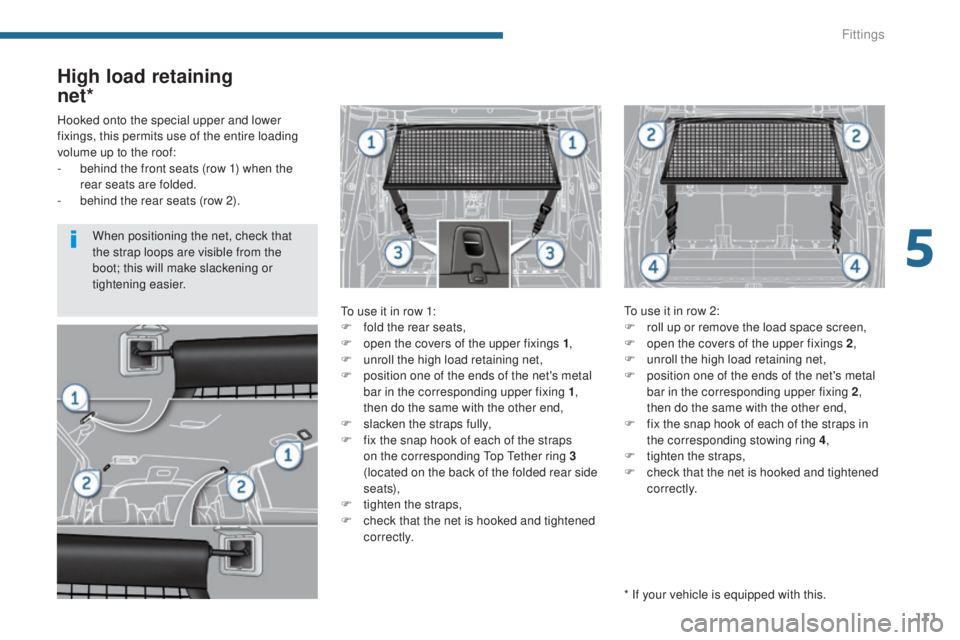
To use it in row 1:
F
f old the rear seats,
F
o
pen the covers of the upper fixings 1 ,
F
u
nroll the high load retaining net,
F
p
osition one of the ends of the net's metal
bar in the corresponding upper fixing 1 ,
then do the same with the other end,
F
s
lacken the straps fully,
F
f
ix the snap hook of each of the straps
on the corresponding Top Tether ring 3
(located on the back of the folded rear side
seats),
F
t
ighten the straps,
F
c
heck that the net is hooked and tightened
c o r r e c t l y. To use it in row 2:
F
r oll up or remove the load space screen,
F
o
pen the covers of the upper fixings 2,
F
u
nroll the high load retaining net,
F
p
osition one of the ends of the net's metal
bar in the corresponding upper fixing 2 ,
then do the same with the other end,
F
f
ix the snap hook of each of the straps in
the corresponding stowing ring 4 ,
F
t
ighten the straps,
F
c
heck that the net is hooked and tightened
c o r r e c t l y.
Hooked onto the special upper and lower
fixings, this permits use of the entire loading
volume up to the roof:
-
b
ehind the front seats (row 1) when the
rear seats are folded.
-
b
ehind the rear seats (row 2).
* If your vehicle is equipped with this.
When positioning the net, check that
the strap loops are visible from the
boot; this will make slackening or
tightening easier.
5
Fittings
Page 143 of 364
141
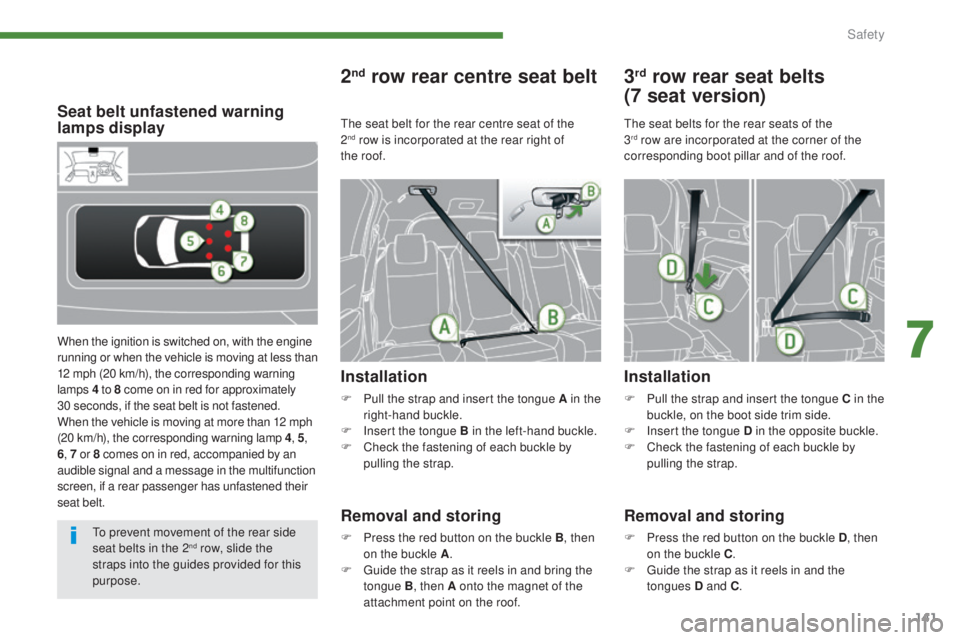
Seat belt unfastened warning
lamps display
When the ignition is switched on, with the engine
running or when the vehicle is moving at less than
12 mph (20 km/h), the corresponding warning
lamps 4 to 8 come on in red for approximately
30
seconds, if the seat belt is not fastened.
When the vehicle is moving at more than 12 mph
(20 km/h), the corresponding warning lamp 4 , 5 ,
6 , 7 or 8 comes on in red, accompanied by an
audible signal and a message in the multifunction
screen, if a rear passenger has unfastened their
seat belt.
2nd row rear centre seat belt
Installation
F Pull the strap and insert the tongue A in the right-hand buckle.
F
I
nsert the tongue B in the left-hand buckle.
F
C
heck the fastening of each buckle by
pulling the strap.
Removal and storing
F Press the red button on the buckle B, then on the buckle A .
F
G
uide the strap as it reels in and bring the
tongue B , then A
onto the magnet of the
attachment point on the roof.
3rd row rear seat belts
(7
seat version)
Installation
F Pull the strap and insert the tongue C in the
buckle, on the boot side trim side.
F
I
nsert the tongue D in the opposite buckle.
F
C
heck the fastening of each buckle by
pulling the strap.
The seat belts for the rear seats of the
3
rd row are incorporated at the corner of the
c
orresponding boot pillar and of the roof.
Removal and storing
F Press the red button on the buckle D , then
on the buckle C .
F
G
uide the strap as it reels in and the
tongues D and C .
The seat belt for the rear centre seat of the
2
nd row is incorporated at the rear right of
t
he roof.
To prevent movement of the rear side
seat belts in the 2
nd row, slide the
straps into the guides provided for this
purpose.
7
Safety
Page 148 of 364
146
Guidelines to follow:
Sit in a normal upright position.
Wear a correctly adjusted seat belt.
Do not allow anything to come between
the occupants and the airbags (a child, pet,
object...), do not attach or fix anything near to
the airbags or their trajectories when inflating
as this could cause injuries when the airbags
are deployed.
Never modify the original definition of your
vehicle, particularly in the area directly
around the airbags.
After an accident or if the vehicle has been
stolen or broken into, have the airbag systems
checked.
All work on the airbag system must be carried
out by a PEUGEOT dealer or a qualified
workshop.
Even if all of the precautions mentioned
are observed, a risk of injury or of minor
burns to the head, chest or arms when an
airbag is deployed cannot be ruled out. The
bag inflates almost instantly (within a few
milliseconds) then deflates within the same
time discharging the hot gas via openings
provided for this purpose.
Lateral airbags
Use only approved covers on the seats,
compatible with the deployment the lateral
airbags. For information on the range of seat
covers suitable for your vehicle, you can
contact a PEUGEOT dealer.
Refer to the "Accessories" section.
Do not fix or attach anything to the seat backs
(clothing...). This could cause injury to the
chest or arms if the lateral airbag is deployed.
Do not sit with the upper part of the body any
nearer to the door than necessary.
Front airbags
Do not drive holding the steering wheel by its
spokes or resting your hands on the centre
part of the wheel.
Passengers must not place their feet on the
dashboard.
Do not smoke as deployment of the airbags
can cause burns or the risk of injury from a
cigarette or pipe.
Never remove or pierce the steering wheel or
hit it violently.
Do not fit or attach anything to the steering
wheel or dashboard, this could cause injuries
with deployment of the airbags.
Curtain airbags
Do not fix or attach anything to the roof. This
could cause injury to the head if the curtain
airbag is deployed.
If fitted on your vehicle, do not remove the
grab handles installed on the roof, they play a
part in securing the curtain airbags.
Safety