child lock PEUGEOT 5008 2018 Owners Manual
[x] Cancel search | Manufacturer: PEUGEOT, Model Year: 2018, Model line: 5008, Model: PEUGEOT 5008 2018Pages: 364, PDF Size: 13.03 MB
Page 4 of 364
2
.
.
Head-up digital screen 8
W arning and indicator lamps 1 1
Indicators
29
Manual test
3
5
Distance recorders
3
5
Lighting dimmer
3
6
Ambient lighting
3
6
Trip computer
3
7
Monochrome screen C
3
8
Touch screen
4
0
Remote control
4
6
K
eyless Entry and Starting
4
8
Back-up procedures
5
2
Central locking
5
5
Anti-intrusion security
5
6
Alarm
56
Doors
58
Boot
59
Hands-free tailgate
6
0
Electric windows
6
3
Panoramic opening sunroof
6
4Driving position
6
8
Front seats
6
9
Steering wheel adjustment
7
4
M i r r o r s
74
Second row seats
7
6
Third row seats
7
9
Seat modularity
8
2
i- Cockpit Amplify function 8 3
Heating and Ventilation 8 4
Manual air conditioning
8
6
Semi-automatic mono-zone
air conditioning
87
A
utomatic dual-zone air conditioning
8
9
Recirculation of the interior air
9
2
Front demist – defrost
9
3
Heated windscreen
9
3
Rear screen demist – defrost
9
4
Programmable heating
9
4
Front fittings
9
9
Courtesy lamps
1
04
Interior ambient lighting
1
05
Rear fittings
1
06
Boot fittings
1
08Exterior lighting control stalk
1
11
Direction indicators
1
13
Headlamp adjustment
1
14
Automatic illumination of headlamps
1
14
Automatic headlamp dipping
1
16
Cornering lighting
1
18
Wiper control stalk
1
19
Automatic windscreen wipers 1 21
General safety recommendations
1
22
Hazard warning lamps
1
23
H or n
123
Emergency or assistance call
1
23
Electronic stability control (ESC)
1
25
Advanced Grip Control
1
28
Hill Assist Descent Control
1
29
Seat belts
1
30
Airbags
1
34
Child seats
1
38
Deactivating the front passenger airbag
1
39
ISOFIX mountings and child seats
1
46
i-Size child seats
1
50
Child lock
1
53
Over view
Instruments Ease of use and comfort
Safety
Access Lighting and visibility
Eco-driving
Instruments and controls 4
Contents
Page 7 of 364
5
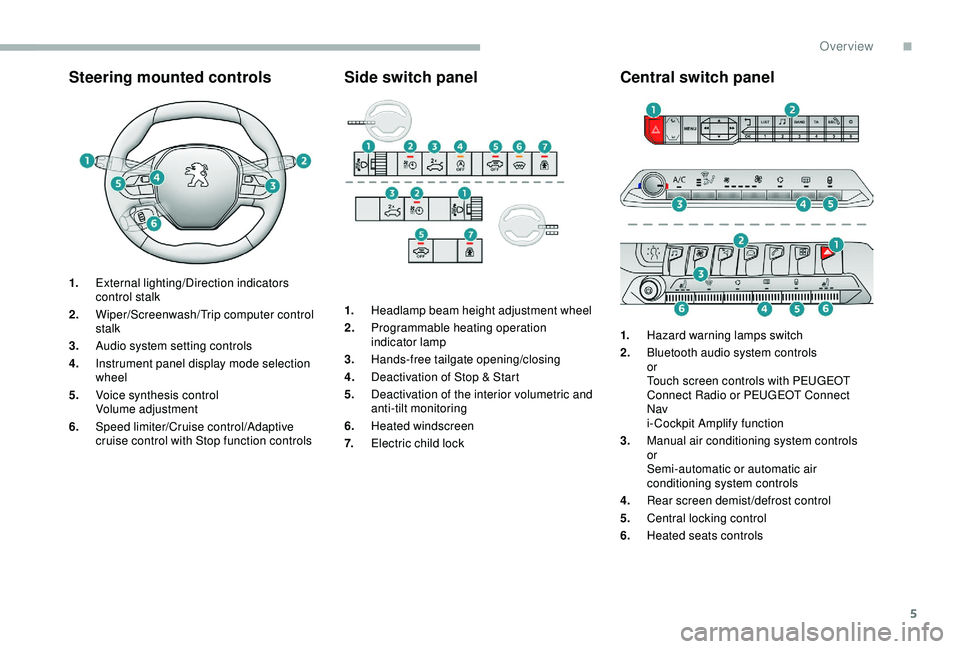
Steering mounted controls
1.External lighting/Direction indicators
control stalk
2. Wiper/Screenwash/ Trip computer control
stalk
3. Audio system setting controls
4. Instrument panel display mode selection
wheel
5. Voice synthesis control
Volume adjustment
6. Speed limiter/Cruise control/Adaptive
cruise control with Stop function controls
Side switch panel
1.Headlamp beam height adjustment wheel
2. Programmable heating operation
indicator lamp
3. Hands-free tailgate opening/closing
4. Deactivation of Stop & Start
5. Deactivation of the interior volumetric and
anti-tilt monitoring
6. Heated windscreen
7. Electric child lock
Central switch panel
1.Hazard warning lamps switch
2. Bluetooth audio system controls
or
Touch screen controls with PEUGEOT
Connect Radio or PEUGEOT Connect
Nav
i- Cockpit Amplify function
3. Manual air conditioning system controls
or
Semi-automatic or automatic air
conditioning system controls
4. Rear screen demist/defrost control
5. Central locking control
6. Heated seats controls
.
Over view
Page 48 of 364
46
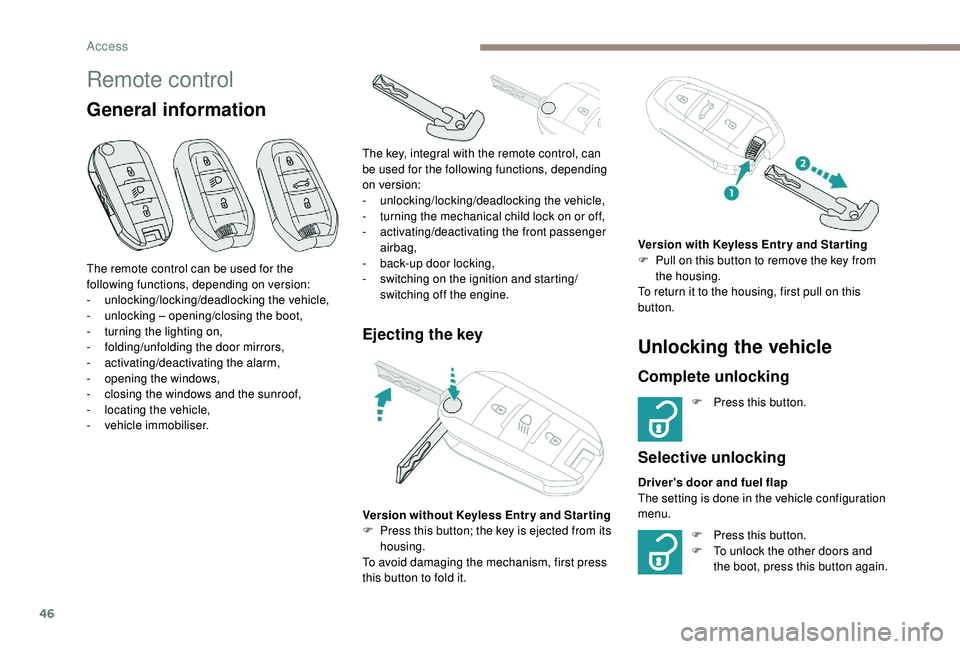
Remote control
General information
Ejecting the key
The remote control can be used for the
following functions, depending on version:
-
u
nlocking/locking/deadlocking the vehicle,
-
u
nlocking – opening/closing the boot,
-
t
urning the lighting on,
-
fo
lding/unfolding the door mirrors,
-
a
ctivating/deactivating the alarm,
-
o
pening the windows,
-
c
losing the windows and the sunroof,
-
l
ocating the vehicle,
-
v
ehicle immobiliser. The key, integral with the remote control, can
be used for the following functions, depending
on version:
-
u
nlocking/locking/deadlocking the vehicle,
-
t
urning the mechanical child lock on or off,
-
a
ctivating/deactivating the front passenger
airbag,
- b ack-up door locking,
- s witching on the ignition and starting/
switching off the engine.
Version without
K
eyless Entr y and Star ting
F
P
ress this button; the key is ejected from its
housing.
To avoid damaging the mechanism, first press
this button to fold it.
Unlocking the vehicle
Complete unlocking
F Press this button.
Selective unlocking
Driver's door and fuel flap
The setting is done in the vehicle configuration
menu. Version with
K
eyless Entr y and Star ting
F
P
ull on this button to remove the key from
the housing.
To return it to the housing, first pull on this
button.
F
P
ress this button.
F
T
o unlock the other doors and
the boot, press this button again.
Access
Page 51 of 364
49
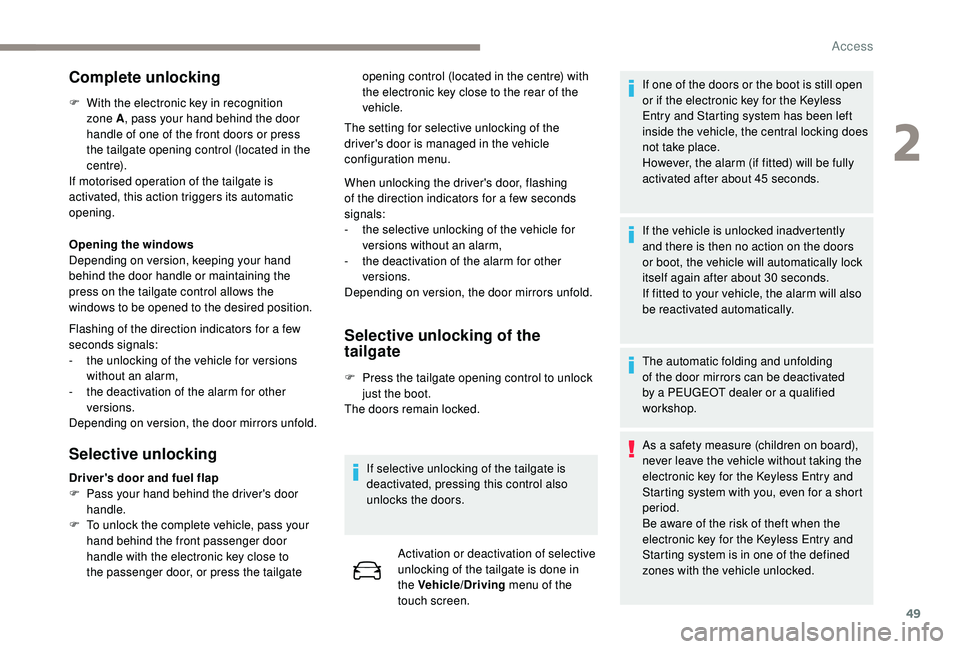
Complete unlocking
F With the electronic key in recognition zone A , pass your hand behind the door
handle of one of the front doors or press
the tailgate opening control (located in the
c e nt r e).
If motorised operation of the tailgate is
activated, this action triggers its automatic
opening.
Opening the windows
Depending on version, keeping your hand
behind the door handle or maintaining the
press on the tailgate control allows the
windows to be opened to the desired position.
Flashing of the direction indicators for a
few
seconds signals:
-
t
he unlocking of the vehicle for versions
without an alarm,
-
t
he deactivation of the alarm for other
versions.
Depending on version, the door mirrors unfold.
Selective unlocking Selective unlocking of the
tailgate
F Press the tailgate opening control to unlock
just the boot.
The doors remain locked.
If selective unlocking of the tailgate is
deactivated, pressing this control also
unlocks the doors. Activation or deactivation of selective
unlocking of the tailgate is done in
the Vehicle/Driving menu of the
touch screen. If one of the doors or the boot is still open
or if the electronic key for the
K
eyless
Entry and Starting system has been left
inside the vehicle, the central locking does
not take place.
However, the alarm (if fitted) will be fully
activated after about 45
seconds.
If the vehicle is unlocked inadvertently
and there is then no action on the doors
or boot, the vehicle will automatically lock
itself again after about 30
seconds.
If fitted to your vehicle, the alarm will also
be reactivated automatically.
The automatic folding and unfolding
of the door mirrors can be deactivated
by a PEUGEOT dealer or a qualified
workshop.
As a
safety measure (children on board),
never leave the vehicle without taking the
electronic key for the
K
eyless Entry and
Starting system with you, even for a
short
period.
Be aware of the risk of theft when the
electronic key for the
K
eyless Entry and
Starting system is in one of the defined
zones with the vehicle unlocked.
Driver's door and fuel flap
F
P
ass your hand behind the driver's door
handle.
F
T
o unlock the complete vehicle, pass your
hand behind the front passenger door
handle with the electronic key close to
the passenger door, or press the tailgate The setting for selective unlocking of the
driver's door is managed in the vehicle
configuration menu.
When unlocking the driver's door, flashing
of the direction indicators for a
few seconds
signals:
-
t
he selective unlocking of the vehicle for
versions without an alarm,
-
t
he deactivation of the alarm for other
versions.
Depending on version, the door mirrors unfold. opening control (located in the centre) with
the electronic key close to the rear of the
vehicle.
2
Access
Page 52 of 364
50
In order to preser ve the battery in the
electronic key and the vehicle's battery,
the "hands-free" functions are put into
long-term standby after 21 days without
use. To restore these functions, press
one of the remote control buttons or start
the engine with the electronic key in the
reader.
For more information on starting with
K
eyless Entr y and Star ting , refer to the
corresponding section.
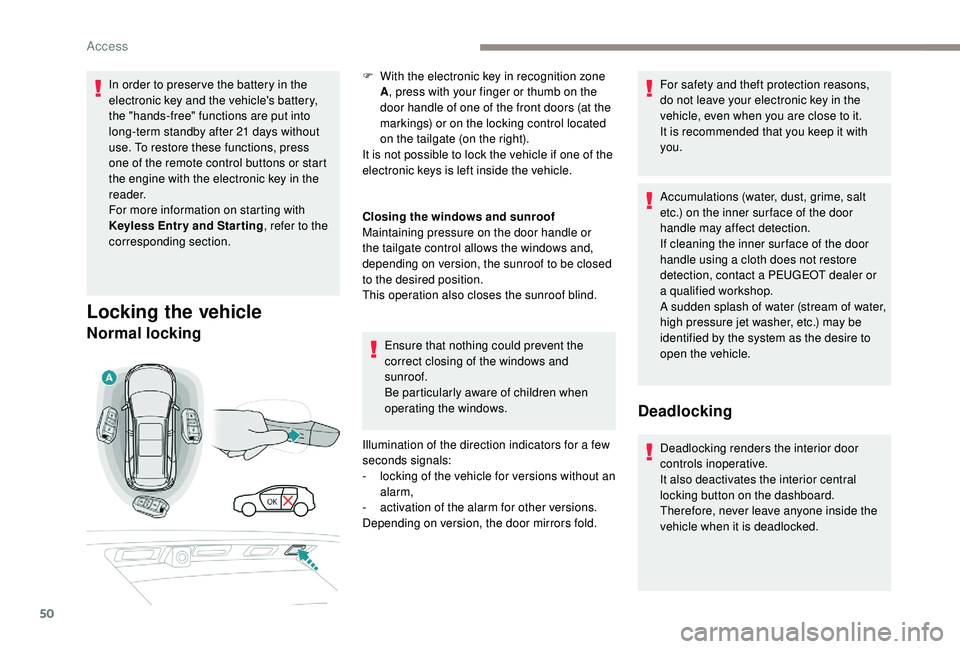
Locking the vehicle
Normal locking
Closing the windows and sunroof
Maintaining pressure on the door handle or
the tailgate control allows the windows and,
depending on version, the sunroof to be closed
to the desired position.
This operation also closes the sunroof blind.
Ensure that nothing could prevent the
correct closing of the windows and
sunroof.
Be particularly aware of children when
operating the windows.
Illumination of the direction indicators for a
few
seconds signals:
-
l
ocking of the vehicle for versions without an
alarm,
-
a
ctivation of the alarm for other versions.
Depending on version, the door mirrors fold. For safety and theft protection reasons,
do not leave your electronic key in the
vehicle, even when you are close to it.
It is recommended that you keep it with
you.
Accumulations (water, dust, grime, salt
etc.) on the inner sur face of the door
handle may affect detection.
If cleaning the inner sur face of the door
handle using a
cloth does not restore
detection, contact a
PEUGEOT dealer or
a
qualified workshop.
A sudden splash of water (stream of water,
high pressure jet washer, etc.) may be
identified by the system as the desire to
open the vehicle.
Deadlocking
Deadlocking renders the interior door
controls inoperative.
It also deactivates the interior central
locking button on the dashboard.
Therefore, never leave anyone inside the
vehicle when it is deadlocked.
F
W
ith the electronic key in recognition zone
A , press with your finger or thumb on the
door handle of one of the front doors (at the
markings) or on the locking control located
on the tailgate (on the right).
It is not possible to lock the vehicle if one of the
electronic keys is left inside the vehicle.
Access
Page 54 of 364
52
Lost keys, remote control, electronic key
Visit a PEUGEOT dealer with the vehicle's
registration certificate, your personal
identification documents and if possible, the
label bearing the key code.
The PEUGEOT dealer will be able to retrieve
the key code and the transponder code
required to order a
new key. Do not throw away the remote control
batteries, they contain metals which are
harmful to the environment.
Take them to an approved collection
point.
Electrical interference
The
K eyless Entry and Starting electronic
key may not operate if close to certain
electronic devices: telephone, laptop
computer, strong magnetic fields, etc.
Remote control
The high frequency remote control is
a
sensitive system; do not operate it while it
is in your pocket as there is a
possibility that
it may unlock the vehicle, without you being
aware of it.
Do not repeatedly press the buttons of your
remote control out of range and out of sight
of your vehicle. The remote control may stop
working and need to be reinitialised.
The remote control does not operate when
the key is in the ignition, even when the
ignition is switched off.
Locking the vehicle
Driving with the doors locked may make
access to the passenger compartment by
the emergency ser vices more difficult in an
emergency.
As a
safety precaution (with children on board),
remove the key from the ignition or take the
electronic key when you leave the vehicle, even
for a
short time. Anti-theft protection
Do not make any modifications to the
electronic engine immobiliser system; this
could cause malfunctions.
For vehicles with an ignition switch, do
not forget to remove the key and turn the
steering to engage the steering lock.
When purchasing a
second-hand vehicle
Have the key codes memorised by
a
PEUGEOT dealer, to ensure that the keys
in your possession are the only ones which
can start the vehicle.
Back-up procedures
Complete unlocking/locking
of the vehicle with the key
These procedures should be used in the
following cases:
-
r
emote control cell battery flat,
-
r
emote control fault,
-
v
ehicle in an area subject to strong
electromagnetic interference.
In the first case, you can also replace the
remote control cell battery.
Refer to the corresponding section.
In the second case, you can also reinitialise the
remote control.
Refer to the corresponding section.
Access
Page 56 of 364
54
Locking
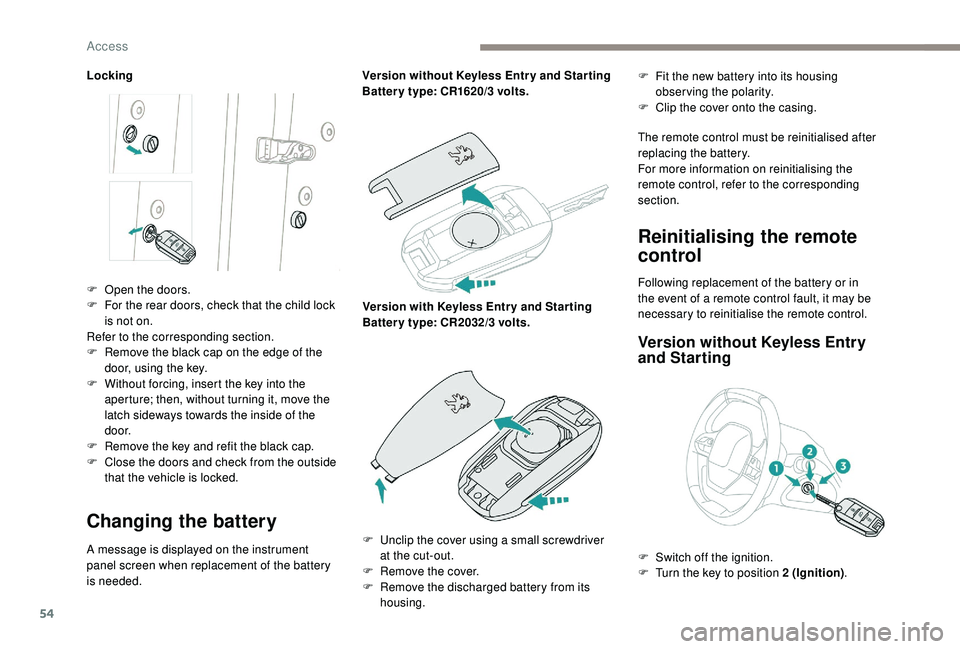
Changing the battery
A message is displayed on the instrument
panel screen when replacement of the battery
is needed.Version without
K
eyless Entr y and Star ting
Batter y type: CR1620/3 volts.
Version with
K
eyless Entr y and Star ting
Batter y type: CR2032/3 volts.F
F
it the new battery into its housing
observing the polarity.
F
C
lip the cover onto the casing.
The remote control must be reinitialised after
replacing the battery.
For more information on reinitialising the
remote control, refer to the corresponding
section.
Reinitialising the remote
control
F Open the doors.
F F or the rear doors, check that the child lock
is not on.
Refer to the corresponding section.
F
R
emove the black cap on the edge of the
door, using the key.
F
W
ithout forcing, insert the key into the
aperture; then, without turning it, move the
latch sideways towards the inside of the
d o o r.
F
R
emove the key and refit the black cap.
F
C
lose the doors and check from the outside
that the vehicle is locked. Following replacement of the battery or in
the event of a
remote control fault, it may be
necessary to reinitialise the remote control.
Version without K eyless Entry
and Starting
F Unclip the cover using a small screwdriver
at the cut-out.
F
R
emove the cover.
F
R
emove the discharged battery from its
housing. F
S
witch off the ignition.
F
T
urn the key to position 2 (Ignition).
Access
Page 62 of 364
60
Hands-free tailgate
General points
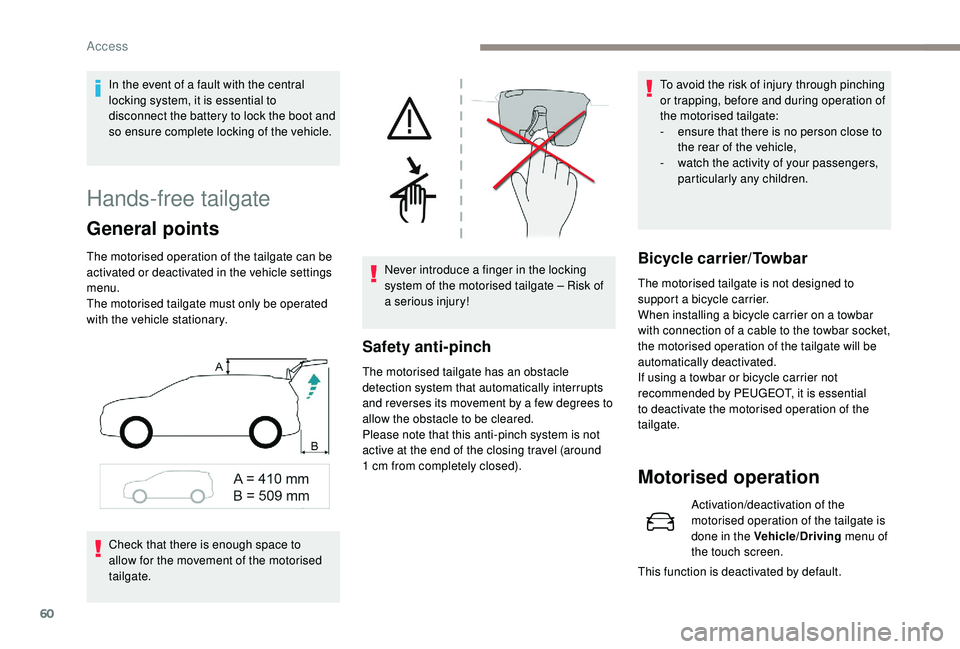
The motorised operation of the tailgate can be
activated or deactivated in the vehicle settings
menu.
The motorised tailgate must only be operated
with the vehicle stationary.Check that there is enough space to
allow for the movement of the motorised
tailgate. Never introduce a
finger in the locking
system of the motorised tailgate – Risk of
a
serious injury!
Safety anti-pinch
The motorised tailgate has an obstacle
detection system that automatically interrupts
and reverses its movement by a few degrees to
allow the obstacle to be cleared.
Please note that this anti-pinch system is not
active at the end of the closing travel (around
1
cm from completely closed). To avoid the risk of injury through pinching
or trapping, before and during operation of
the motorised tailgate:
-
e
nsure that there is no person close to
the rear of the vehicle,
-
w
atch the activity of your passengers,
particularly any children.
Bicycle carrier/Towbar
The motorised tailgate is not designed to
support a bicycle carrier.
When installing a
bicycle carrier on a towbar
with connection of a
cable to the towbar socket,
the motorised operation of the tailgate will be
automatically deactivated.
If using a
towbar or bicycle carrier not
recommended by PEUGEOT, it is essential
to deactivate the motorised operation of the
tailgate.
In the event of a
fault with the central
locking system, it is essential to
disconnect the battery to lock the boot and
so ensure complete locking of the vehicle.
Motorised operation
Activation/deactivation of the
motorised operation of the tailgate is
done in the Vehicle/Driving menu of
the touch screen.
This function is deactivated by default.
Access
Page 80 of 364
78
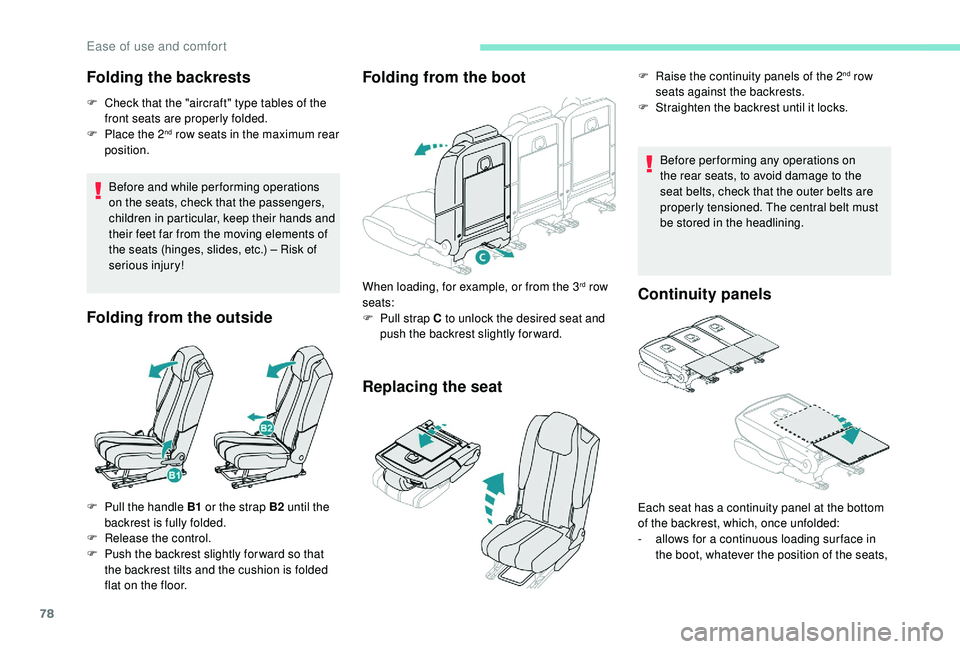
Folding the backrests
F Check that the "aircraft" type tables of the front seats are properly folded.
F
P
lace the 2
nd row seats in the maximum rear
position.
Before and while per forming operations
on the seats, check that the passengers,
children in particular, keep their hands and
their feet far from the moving elements of
the seats (hinges, slides, etc.) – Risk of
serious injury!
Folding from the outside Folding from the boot
Replacing the seat
Before performing any operations on
the rear seats, to avoid damage to the
seat belts, check that the outer belts are
properly tensioned. The central belt must
be stored in the headlining.
Continuity panels
F Pull the handle B1
or the strap B2 until the
backrest is fully folded.
F
R
elease the control.
F
P
ush the backrest slightly for ward so that
the backrest tilts and the cushion is folded
flat on the floor. When loading, for example, or from the 3
rd row
seats:
F
P
ull strap C to unlock the desired seat and
push the backrest slightly for ward. F
R
aise the continuity panels of the 2
nd row
seats against the backrests.
F
S
traighten the backrest until it locks.
Each seat has a
continuity panel at the bottom
of the backrest, which, once unfolded:
-
a
llows for a
continuous loading sur face in
the boot, whatever the position of the seats,
Ease of use and comfort
Page 81 of 364
79
These continuity panels are not designed
to support a weight greater than 30 kg.
Before deploying the continuity panels,
check that the 2
nd row seats are pulled as
far back as possible.
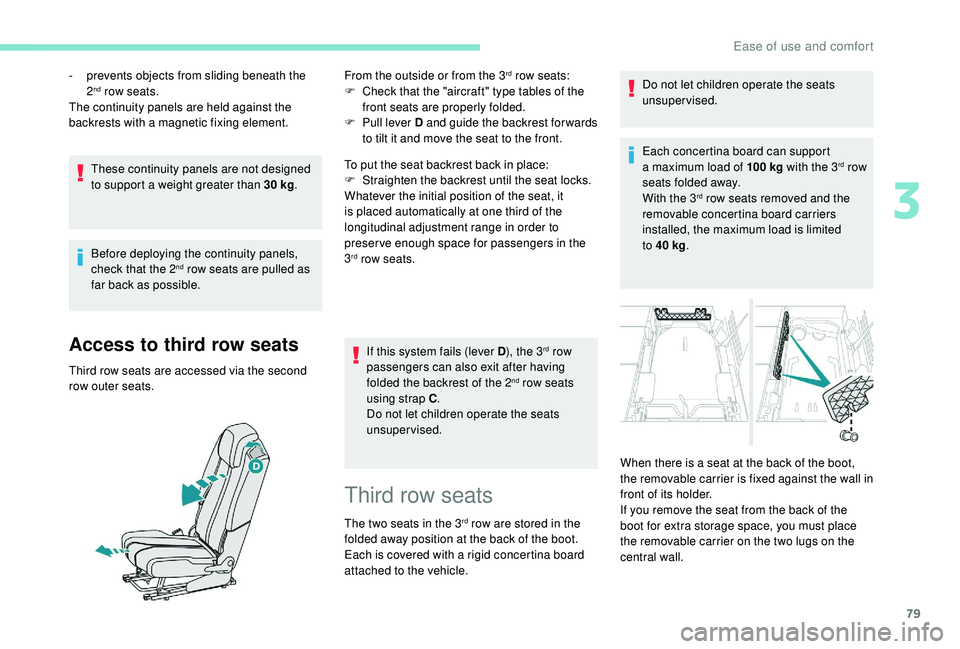
Access to third row seats
Third row seats are accessed via the second
row outer seats. From the outside or from the 3
rd row seats:
F
C
heck that the "aircraft" type tables of the
front seats are properly folded.
F
P
ull lever D and guide the backrest for wards
to tilt it and move the seat to the front.
To put the seat backrest back in place:
F
S
traighten the backrest until the seat locks.
Whatever the initial position of the seat, it
is placed automatically at one third of the
longitudinal adjustment range in order to
preserve enough space for passengers in the
3
rd row seats.
If this system fails (lever D ), the 3
rd row
passengers can also exit after having
folded the backrest of the 2
nd row seats
using strap C .
Do not let children operate the seats
unsupervised.
-
p
revents objects from sliding beneath the
2
nd row seats.
The continuity panels are held against the
backrests with a
magnetic fixing element.
Third row seats
The two seats in the 3rd row are stored in the
folded away position at the back of the boot.
Each is covered with a
rigid concertina board
attached to the vehicle. Do not let children operate the seats
unsupervised.
Each concertina board can support
a
maximum load of 100
kg
with the 3
rd row
seats folded away.
With the 3
rd row seats removed and the
removable concertina board carriers
installed, the maximum load is limited
to 40
kg .
When there is a
seat at the back of the boot,
the removable carrier is fixed against the wall in
front of its holder.
If you remove the seat from the back of the
boot for extra storage space, you must place
the removable carrier on the two lugs on the
central wall.
3
Ease of use and comfort