bluetooth PEUGEOT 5008 2020 Owners Manual
[x] Cancel search | Manufacturer: PEUGEOT, Model Year: 2020, Model line: 5008, Model: PEUGEOT 5008 2020Pages: 308, PDF Size: 10.1 MB
Page 5 of 308
3
Contents
bit.ly/helpPSA
Lane positioning assist 143
Active Safety Brake with Distance Alert and
Intelligent emergency braking assistance
146
Distraction detection 149
Lane Departure Warning System 150
Active Lane Keeping Assistance 150
Blind Spot Monitoring System 154
Active Blind Spot Monitoring System 155
Parking sensors 155
Visiopark 1 - Visiopark 2 157
Park Assist 161
7Practical information
Compatibility of fuels 166
Refuelling 166
Misfuel prevention (Diesel) 167
Hybrid system 167
Charging the traction battery (Hybrid) 171
Towing device 173
Towing device with quickly detachable
towball
174
Roof bars 176
Snow chains 177
Very cold climate screen 178
Energy economy mode 179
Bonnet 179
Engine compartment 180
Checking levels 181
Checks 183
AdBlue® (BlueHDi) 185
Free-wheeling 187
Advice on care and maintenance 187
8In the event of a breakdown
Warning triangle 190
Running out of fuel (Diesel) 190
Tool kit 191
Temporary puncture repair kit 193
Spare wheel 196
Changing a bulb 201
Changing a fuse 205
12
V battery 210
Accessory batteries (Hybrid) 213
Towing the vehicle 215
9Technical data
Engine technical data and towed loads 219
Petrol engines 220
Diesel engines 222
Hybrid engines 225
Dimensions 226
Identification markings 227
10Bluetooth® audio system
First steps 228
Steering mounted controls 229
Menus 229
Radio 230
DAB (Digital Audio Broadcasting) radio 231
Media 232
Telephone 234
Frequently asked questions 237
11PEUGEOT Connect Radio
First steps 240
Steering mounted controls 241
Menus 242
Applications 243
Radio 243
DAB (Digital Audio Broadcasting) radio 245
Media 245
Telephone 247
Settings 250
Frequently asked questions 252
12PEUGEOT Connect Nav
First steps 254
Steering mounted controls 255
Menus 255
Voice commands 257
Navigation 260
Connected navigation 263
Applications 265
Radio 268
DAB (Digital Audio Broadcasting) radio 269
Media 270
Telephone 271
Settings 274
Frequently asked questions 275
■
Alphabetical index
Access to additional videos
Page 6 of 308
4
Overview
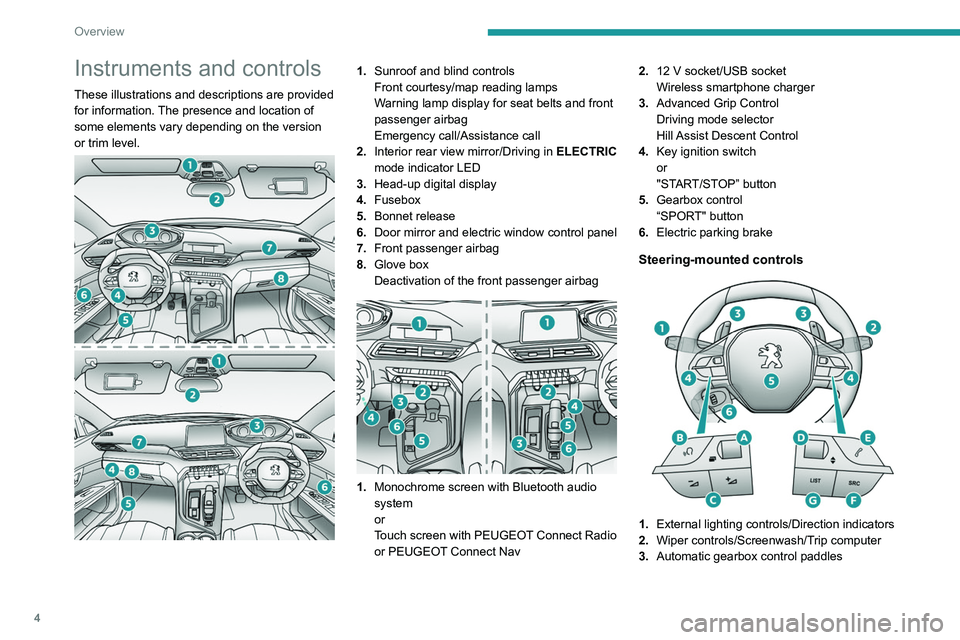
Instruments and controls
These illustrations and descriptions are provided
for information. The presence and location of
some elements vary depending on the version
or trim level.
1.Sunroof and blind controls
Front courtesy/map reading lamps
Warning lamp display for seat belts and front
passenger airbag
Emergency call/Assistance call
2. Interior rear view mirror/Driving in ELECTRIC
mode indicator LED
3. Head-up digital display
4. Fusebox
5. Bonnet release
6. Door mirror and electric window control panel
7. Front passenger airbag
8. Glove box
Deactivation of the front passenger airbag
1.Monochrome screen with Bluetooth audio
system
or
Touch screen with PEUGEOT Connect Radio
or PEUGEOT Connect Nav 2.
12 V socket/USB socket
Wireless smartphone charger
3. Advanced Grip Control
Driving mode selector
Hill Assist Descent Control
4. Key ignition switch
or
"START/STOP” button
5. Gearbox control
“SPORT" button
6. Electric parking brake
Steering-mounted controls
1.External lighting controls/Direction indicators
2. Wiper controls/Screenwash/Trip computer
3. Automatic gearbox control paddles
Page 7 of 308
5
Overview
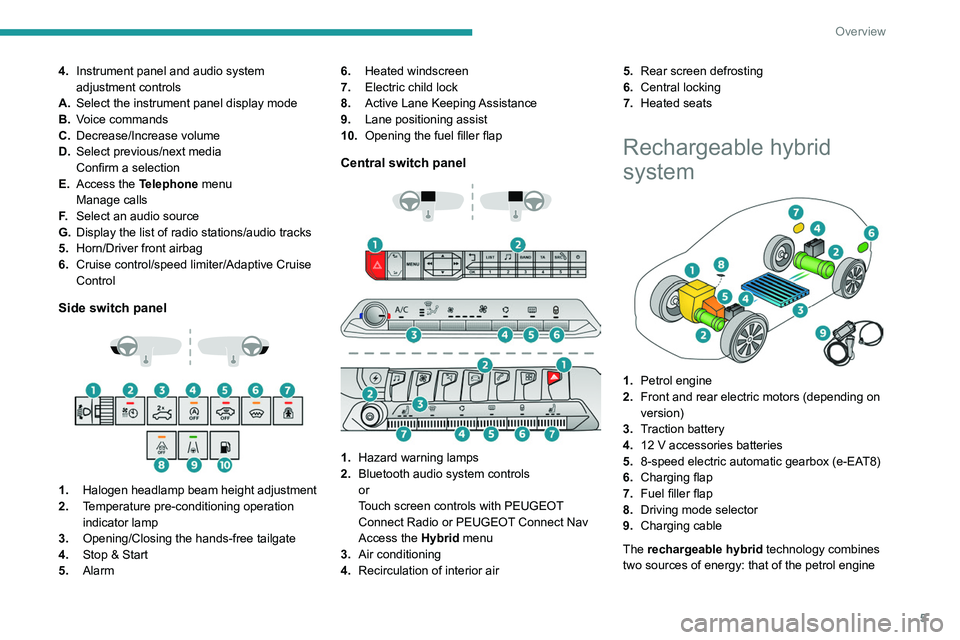
4.Instrument panel and audio system
adjustment controls
A. Select the instrument panel display mode
B. Voice commands
C. Decrease/Increase volume
D. Select previous/next media
Confirm a selection
E. Access the Telephone menu
Manage calls
F. Select an audio source
G. Display the list of radio stations/audio tracks
5. Horn/Driver front airbag
6. Cruise control/speed limiter/Adaptive Cruise
Control
Side switch panel
1. Halogen headlamp beam height adjustment
2. Temperature pre-conditioning operation
indicator lamp
3. Opening/Closing the hands-free tailgate
4. Stop & Start
5. Alarm 6.
Heated windscreen
7. Electric child lock
8. Active Lane Keeping Assistance
9. Lane positioning assist
10. Opening the fuel filler flap
Central switch panel
1. Hazard warning lamps
2. Bluetooth audio system controls
or
Touch screen controls with PEUGEOT
Connect Radio or PEUGEOT Connect Nav
Access the Hybrid menu
3. Air conditioning
4. Recirculation of interior air 5.
Rear screen defrosting
6. Central locking
7. Heated seats
Rechargeable hybrid
system
1.Petrol engine
2. Front and rear electric motors (depending on
version)
3. Traction battery
4. 12 V accessories batteries
5. 8-speed electric automatic gearbox (e-EAT8)
6. Charging flap
7. Fuel filler flap
8. Driving mode selector
9. Charging cable
The rechargeable hybrid technology combines
two sources of energy: that of the petrol engine
Page 26 of 308
24
Instruments
For more information on the "Multimedia"
application, refer to the "Audio equipment and
telematics" section.
"Telephone" menu
With the audio system switched on, this
menu allows you to make a call, view the
calls log or the various telephone directories.
For more information on the "Telephone"
application, refer to the "Audio equipment and
telematics" section.
"Connections" menu
With the audio system on, this menu
allows a Bluetooth device (telephone,
media player) to be paired and the connection
mode
to be defined (hands-free, playing audio
files).
For more information on the "Connections"
application, refer to the "Audio equipment and
telematics" section.
"Personalisation-
configuration" menu
This menu gives access to the following functions:
– "Define
the vehicle parameters",
–
"Choice of language",
–
"Display configuration".
Defining the vehicle parameters
This menu allows the activation or deactivation
of the following equipment, depending on
version:
–
"Access to the vehicle" :
•
"Plip action".
For more information on the Remote control
,
and in particular the selective unlocking of the
driver's door, refer to the "Access" section.
–
"Comfort"
:
• “Rear
wipe in reverse gear".
• “Parking
assistance".
•
"Fatigue Detection System".
For more information on the
W
iper control
stalk,
refer to the “Lighting and visibility” section.
For more information on the
Parking sensors
or the Fatigue detection system, refer to the
“Driving”
section.
–
"Driving assistance" :
•
"Auto. emergency braking" (Active Safety
Brake).
•
"Speed recommendation" (Road signs
recognition).
•
"Tyre inflation" (Tyre under-inflation
detection).
For more information on the
Active Safety
Brake ,
the Road signs recognition or the
Tyre
under-inflation detection ,
refer to the “Driving”
section.
Choice of language
This menu allows selection of the language used
by the screen and the instrument panel.
Display configuration
This menu gives access to the following settings:
– "Choice of units",
–
"Date and time adjustment",
–
"Display parameters",
–
"Brightness".
Adjusting the date and time
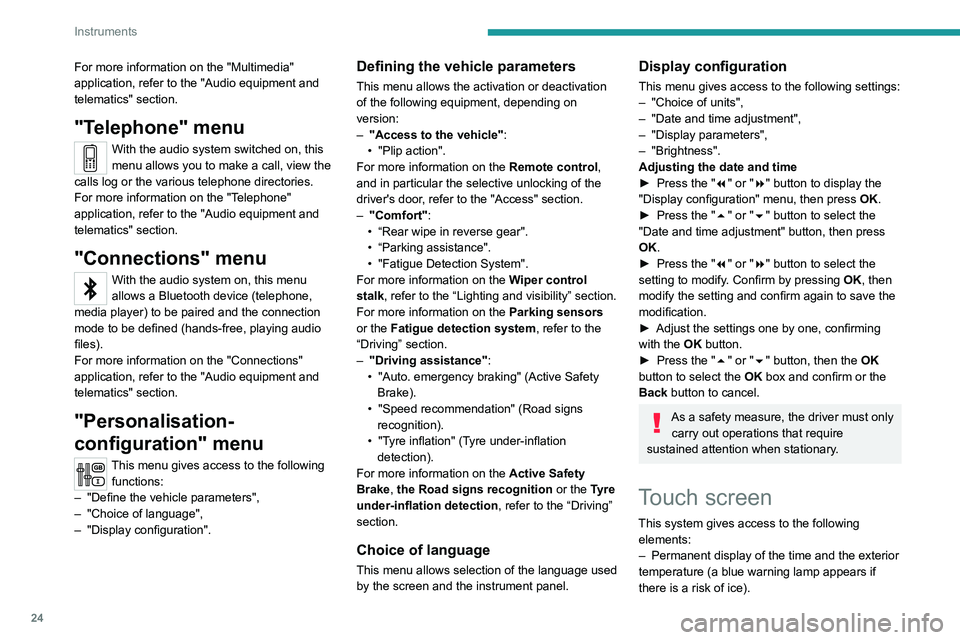
► Press
the "7" or "8" button to display the
"Display
configuration" menu, then press
OK
.
► Press
the "5" or "6" button to select the
"Date and time adjustment" button, then press
OK.
► Press
the "7" or "8" button to select the
setting
to modify. Confirm by pressing
OK
, then
modify
the setting and confirm again to save the
modification.
►
Adjust the settings one by one, confirming
with the
OK button.
► Press
the "5" or "6" button, then the OK
button to select the OK
box and confirm or the
Back button to cancel.
As a safety measure, the driver must only
carry out operations that require
sustained attention when stationary.
Touch screen
This system gives access to the following elements:
–
Permanent display of the time and the exterior
temperature (a blue warning lamp appears if
there is a risk of ice).
Page 230 of 308
228
Bluetooth® audio system
Bluetooth® audio system
The different functions and settings described vary according to the version
and configuration of your vehicle.
As a safety measure and because it requires sustained attention by the driver,
the pairing of a Bluetooth mobile telephone
with the Bluetooth hands-free system of your
audio system must be done with the vehicle
stationary and the ignition on.
Your audio system is coded in such a way that it will only operate in your
vehicle.
All work on the system must be carried out
exclusively by a dealer or qualified workshop,
to avoid any risk of electrocution, fire or
mechanical faults.
To avoid discharging the battery, the audio system may switch off after a few
minutes if the engine is not running.
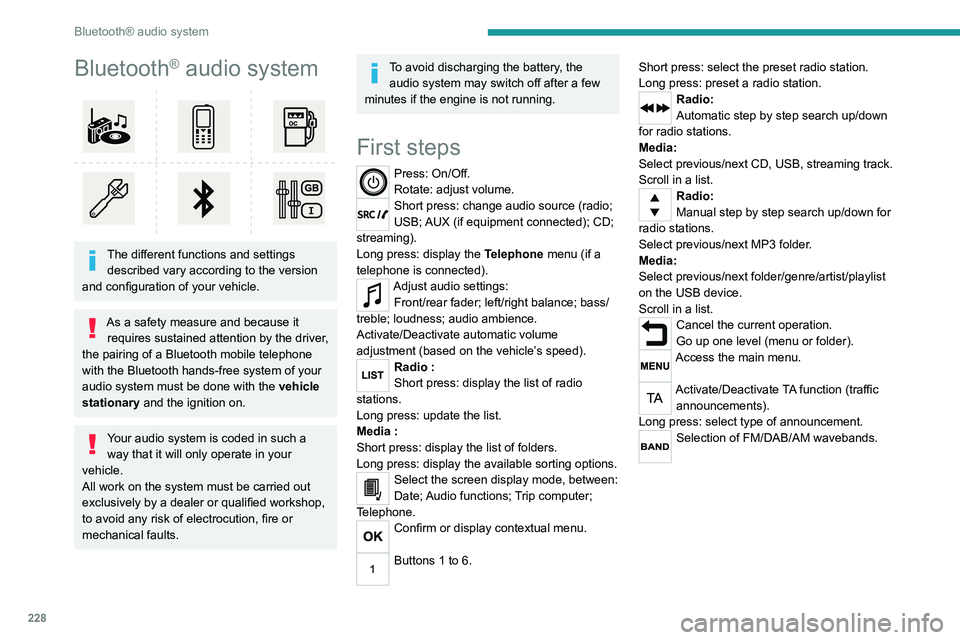
First steps
Press: On/Off.
Rotate: adjust volume.
Short press: change audio source (radio;
USB; AUX (if equipment connected); CD;
streaming).
Long press: display the Telephone menu (if a
telephone is connected).
Adjust audio settings: Front/rear fader; left/right balance; bass/
treble; loudness; audio ambience.
Activate/Deactivate automatic volume
adjustment (based on the vehicle’s speed).
Radio :
Short press: display the list of radio
stations.
Long press: update the list.
Media
:
Short press: display the list of folders.
Long press: display the available sorting options.
Select the screen display mode, between:
Date; Audio functions; Trip computer;
Telephone.
Confirm or display contextual menu.
Buttons 1 to 6. Short press: select the preset radio station.
Long press: preset a radio station.
Radio:
Automatic step by step search up/down
for radio stations.
Media:
Select previous/next CD, USB, streaming track.
Scroll in a list.
Radio:
Manual step by step search up/down for
radio stations.
Select previous/next MP3 folder.
Media:
Select previous/next folder/genre/artist/playlist
on the USB device.
Scroll in a list.
Cancel the current operation.
Go up one level (menu or folder).
Access the main menu.
Activate/Deactivate TA function (traffic announcements).
Long press: select type of announcement.
Selection of FM/DAB/AM wavebands.
Steering mounted controls
Steering mounted controls -
Type 1
Radio:
Select the previous / next preset radio
station.
Select the previous / next item in a menu or a
list.
Media:
Select the previous / next track.
Select the previous / next item in a menu or a
list.
Radio:
Short press: display the list of radio
stations.
Long press: update the list.
Media:
Short press: display the list of folders.
Long press: display the available sorting options.
Other than telephone call:
Short press: changing audio source
(radio; USB; AUX (if equipment connected); CD;
streaming), confirmation if the "Telephone"
menu is open.
Long press: open the " Telephone" menu.
In the event of a telephone call:
Short press: accept the call.
Long press: reject the call.
Page 231 of 308
229
Bluetooth® audio system
10Steering mounted controls
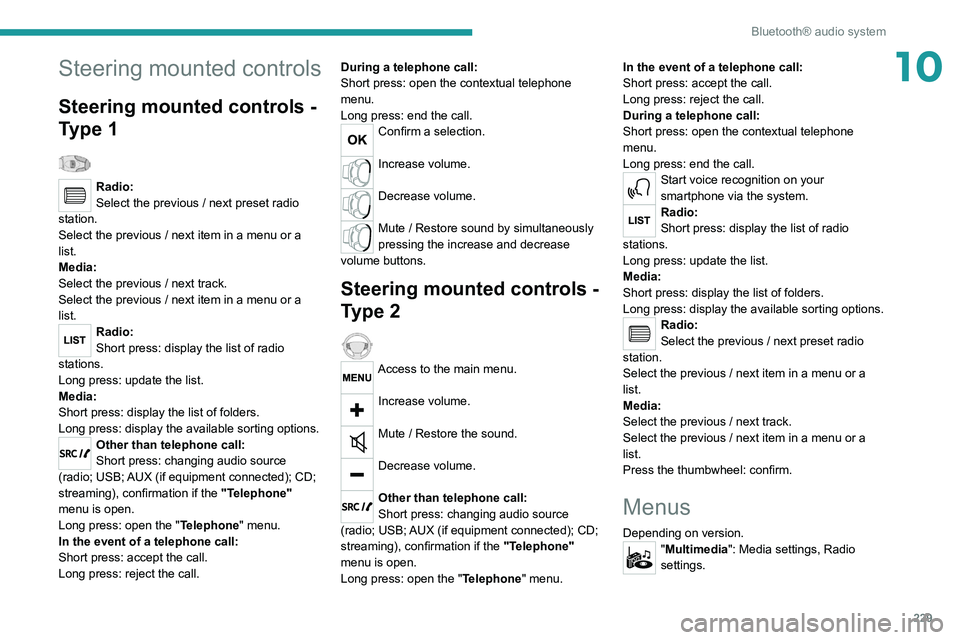
Steering mounted controls -
Type 1
Radio:
Select the previous / next preset radio
station.
Select the previous / next item in a menu or a
list.
Media:
Select the previous / next track.
Select the previous / next item in a menu or a
list.
Radio:
Short press: display the list of radio
stations.
Long press: update the list.
Media:
Short press: display the list of folders.
Long press: display the available sorting options.
Other than telephone call:
Short press: changing audio source
(radio; USB; AUX (if equipment connected); CD;
streaming), confirmation if the "Telephone"
menu is open.
Long press: open the " Telephone" menu.
In the event of a telephone call:
Short press: accept the call.
Long press: reject the call. During a telephone call:
Short press: open the contextual telephone
menu.
Long press: end the call.
Confirm a selection.
Increase volume.
Decrease volume.
Mute / Restore sound by simultaneously
pressing the increase and decrease
volume buttons.
Steering mounted controls -
Type 2
Access to the main menu.
Increase volume.
Mute / Restore the sound.
Decrease volume.
Other than telephone call:
Short press: changing audio source
(radio; USB; AUX (if equipment connected); CD;
streaming), confirmation if the "Telephone"
menu is open.
Long press: open the " Telephone" menu. In the event of a telephone call:
Short press: accept the call.
Long press: reject the call.
During a telephone call:
Short press: open the contextual telephone
menu.
Long press: end the call.
Start voice recognition on your
smartphone via the system.
Radio:
Short press: display the list of radio
stations.
Long press: update the list.
Media:
Short press: display the list of folders.
Long press: display the available sorting options.
Radio:
Select the previous / next preset radio
station.
Select the previous / next item in a menu or a
list.
Media:
Select the previous / next track.
Select the previous / next item in a menu or a
list.
Press the thumbwheel: confirm.
Menus
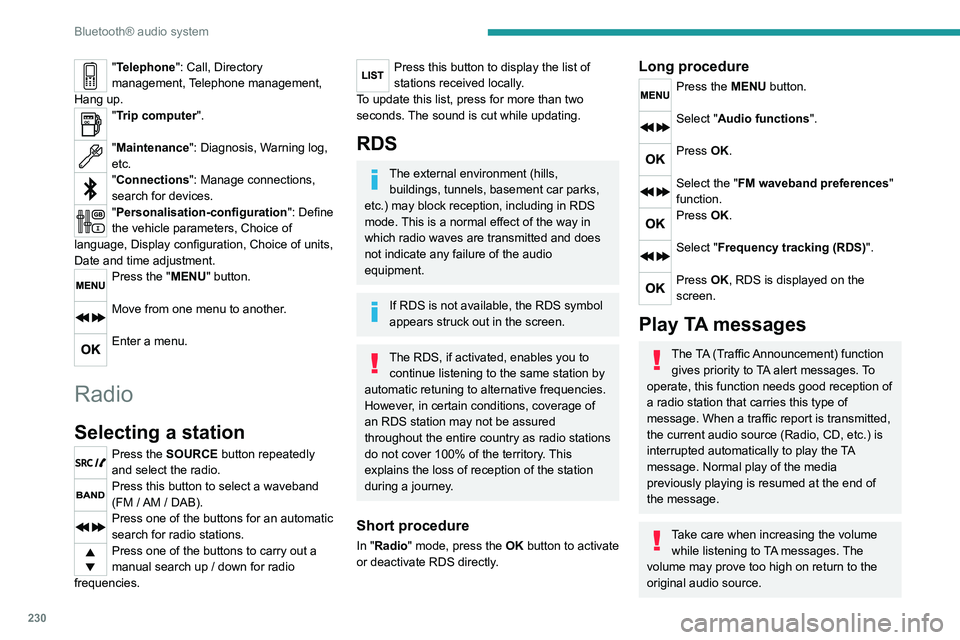
Depending on version."Multimedia": Media settings, Radio
settings.
Page 232 of 308
230
Bluetooth® audio system
"Telephone": Call, Directory
management, Telephone management,
Hang up.
"Trip computer".
"Maintenance": Diagnosis, Warning log,
etc.
"Connections": Manage connections,
search for devices.
"Personalisation-configuration ": Define
the vehicle parameters, Choice of
language, Display configuration, Choice of units,
Date and time adjustment.
Press the "MENU" button.
Move from one menu to another.
Enter a menu.
Radio
Selecting a station
Press the SOURCE button repeatedly
and select the radio.
Press this button to select a waveband
(FM / AM / DAB).
Press one of the buttons for an automatic
search for radio stations.
Press one of the buttons to carry out a
manual search up / down for radio
frequencies.
Press this button to display the list of
stations received locally.
To update this list, press for more than two
seconds. The sound is cut while updating.
RDS
The external environment (hills, buildings, tunnels, basement car parks,
etc.) may block reception, including in RDS
mode. This is a normal effect of the way in
which radio waves are transmitted and does
not indicate any failure of the audio
equipment.
If RDS is not available, the RDS symbol
appears struck out in the screen.
The RDS, if activated, enables you to continue listening to the same station by
automatic retuning to alternative frequencies.
However, in certain conditions, coverage of
an RDS station may not be assured
throughout the entire country as radio stations
do not cover 100% of the territory. This
explains the loss of reception of the station
during a journey.
Short procedure
In "Radio" mode, press the OK button to activate
or deactivate RDS directly.
Long procedure
Press the MENU button.
Select "Audio functions ".
Press OK.
Select the "FM waveband preferences"
function.
Press OK.
Select "Frequency tracking (RDS)".
Press OK, RDS is displayed on the
screen.
Play TA messages
The TA (Traffic Announcement) function
gives priority to TA alert messages. To
operate, this function needs good reception of
a radio station that carries this type of
message. When a traffic report is transmitted,
the current audio source (Radio, CD, etc.) is
interrupted automatically to play the TA
message. Normal play of the media
previously playing is resumed at the end of
the message.
Take care when increasing the volume while listening to TA messages. The
volume may prove too high on return to the
original audio source.
Press the TA button to activate or
deactivate traffic messages.
Receiving INFO messages
The INFO function gives priority to TA alert messages. To be active, this
function needs good reception of a radio
station that transmits this type of message.
When a message is transmitted, the current
audio source (Radio, CD, USB, etc.) is
interrupted automatically to receive the INFO
message. Normal play of the media
previously playing is resumed at the end of
the message.
Make a long press on this button to
display the list of categories.
Select or deselect categories.
Activate or deactivate the reception of the corresponding messages.
Display TEXT INFOS
Radio text is information transmitted by
the radio station related to the station's
current programme or song.
When the radio station is displayed in the
screen, press OK to display the
contextual menu.
Select "RadioText (TXT) display" and
confirm OK to save.
Page 233 of 308
231
Bluetooth® audio system
10Press the TA button to activate or
deactivate traffic messages.
Receiving INFO messages
The INFO function gives priority to TA alert messages. To be active, this
function needs good reception of a radio
station that transmits this type of message.
When a message is transmitted, the current
audio source (Radio, CD, USB, etc.) is
interrupted automatically to receive the INFO
message. Normal play of the media
previously playing is resumed at the end of
the message.
Make a long press on this button to
display the list of categories.
Select or deselect categories.
Activate or deactivate the reception of the corresponding messages.
Display TEXT INFOS
Radio text is information transmitted by
the radio station related to the station's
current programme or song.
When the radio station is displayed in the
screen, press OK to display the
contextual menu.
Select "RadioText (TXT) display" and
confirm OK to save.
DAB (Digital Audio
Broadcasting) radio
Terrestrial Digital Radio
Depending on version
If the current DAB radio station is not
available on FM, "DAB FM" is struck out.
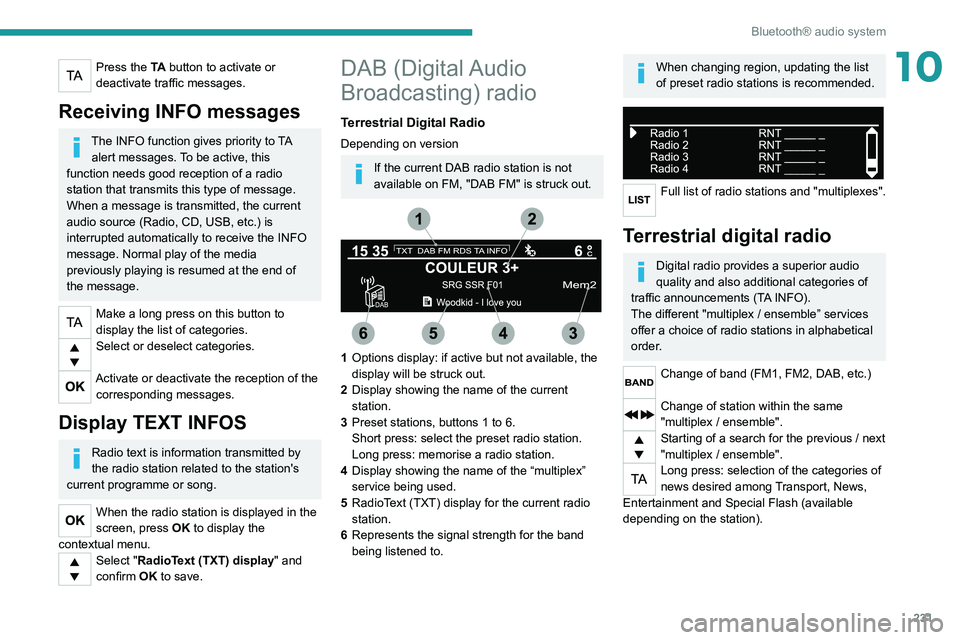
1 Options display: if active but not available, the
display will be struck out.
2 Display showing the name of the current
station.
3 Preset stations, buttons 1 to 6.
Short press: select the preset radio station.
Long press: memorise a radio station.
4 Display showing the name of the “multiplex”
service being used.
5 RadioText (TXT) display for the current radio
station.
6 Represents the signal strength for the band
being listened to.
When changing region, updating the list
of preset radio stations is recommended.
Full list of radio stations and "multiplexes".
Terrestrial digital radio
Digital radio provides a superior audio
quality and also additional categories of
traffic announcements (TA INFO).
The different "multiplex / ensemble” services
offer a choice of radio stations in alphabetical
order.
Change of band (FM1, FM2, DAB, etc.)
Change of station within the same
"multiplex / ensemble".
Starting of a search for the previous / next
"multiplex / ensemble".
Long press: selection of the categories of
news desired among Transport, News,
Entertainment and Special Flash (available
depending on the station).
Page 234 of 308
232
Bluetooth® audio system
When the radio station is displayed in the
screen , press "OK" to display the
contextual menu.
(Frequency search (RDS), DAB
/ FM auto
tracking, RadioText (TXT) display, Information
on the station, etc.)
DAB / FM station tracking
"DAB" does not have 100% coverage of
the country.
When the digital signal is weak, "DAB
/ FM
auto tracking" allows you to continue
listening to the same station, by automatically
switching to the corresponding analogue FM
station (if it exists).
When the "DAB
/ FM auto tracking" is active,
the DAB station will be selected automatically.
Press the MENU button.
Select "Multimedia" and confirm.
Select "DAB / FM auto tracking" and
confirm.
If "DAB / FM auto tracking" tracking is
enabled, there is a lag of a few seconds
when the system switches to the analogue
FM station sometimes with a change in
volume.
If the "DAB" station you are listening to is
not available on FM (" DAB/FM" option
struck out), or if "DAB
/ FM auto tracking" is
not on, the sound will be cut when the digital
signal is too weak.
Media
USB port
Insert the USB memory stick into the USB
port or connect the USB device to the
USB port using a suitable cable (not supplied).
The system changes automatically to "USB"
source.
To protect the system, do not use a USB hub.
Any additional devices connected to the system must comply with the standard
applicable to the product and/or the standard
IEC 60950-1.
The system builds playlists (in temporary
memory); this operation can take from a
few seconds to several minutes at the first
connection.
Reduce the number of non-music files and the
number of folders to reduce the waiting time.
Playlists are updated every time a new USB
memory stick is connected.
When the USB port is used, the portable
device charges automatically.
Play mode
The play modes available are:
– Normal : the tracks are played in order,
depending on the classification of the selected
files.
–
Random
: the tracks in an album or folder are
played in a random order.
–
Random on all media : all of the tracks saved
in the media are played in random order
.
–
Repeat
: the tracks played are only those from
the current album or folder.
Press this button to display the contextual
menu for the Media function.
Press this button to select the chosen
play mode.
Press this button to confirm.
The choice made is displayed at the top of the
screen.
Choosing a track to play
Press one of these buttons to go to the
previous / next track.
Press one of these buttons to go to the
previous / next folder.
File classification
Make a long press on this button to
display the different classifications.
Select by "Folder" / " Artist" / "Genre" /
"Playlist".
Depending on availability and type of device
used.
Press OK to select the desired
classification, then press OK again to
confirm.
Playing files
Make a short press on this button to
display the chosen classification.
Navigate in the list using the left / right
and up / down buttons.
Confirm the selection by pressing OK.
Press one of these buttons to go to the
previous / next track in the list.
Press and hold one of these buttons for fast
forward or rewind.
Press one of these buttons to go to the
previous / next "Folder" / " Artist" /
"Genre" / "Playlist"* in the list.
Input AUX socket (AUX)
Depending on equipmentConnect a portable device (MP3 player,
etc.) to the auxiliary jack socket using an
audio cable (not supplied).
Any additional devices connected to the system must comply with the standard
* Depending on availability and the type of device used.
Page 235 of 308
233
Bluetooth® audio system
10Select by "Folder" / "Artist" / "Genre" /
"Playlist".
Depending on availability and type of device
used.
Press OK to select the desired
classification, then press OK again to
confirm.
Playing files
Make a short press on this button to
display the chosen classification.
Navigate in the list using the left / right
and up / down buttons.
Confirm the selection by pressing OK.
Press one of these buttons to go to the
previous / next track in the list.
Press and hold one of these buttons for fast
forward or rewind.
Press one of these buttons to go to the
previous / next "Folder" / " Artist" /
"Genre" / "Playlist"* in the list.
Input AUX socket (AUX)
Depending on equipmentConnect a portable device (MP3 player,
etc.) to the auxiliary jack socket using an
audio cable (not supplied).
Any additional devices connected to the system must comply with the standard
* Depending on availability and the type of device used.
applicable to the product and/or the standard
IEC 60950-1.
Press the SOURCE button several times
in succession and select " AUX".
First adjust the volume on your portable device
(to a high level). Then adjust the volume on your
audio system. Controls are managed via the
portable device.
Do not connect the same device to both
the auxiliary jack socket and the USB
port at the same time.
CD player
Insert circular compact discs only.
Some anti-pirating systems, on original discs
or CDs copied using a personal recorder, may
cause faults which are no reflection on the
quality of the original player.
Insert a CD in the player, play begins
automatically.
External CD players connected via the
USB port are not recognised by the
system.
To play a disc which has already been inserted, press the SOURCE button
several times in succession and select " CD".
Press one of the buttons to select a track
on the CD.
Press the LIST button to display the list of
tracks on the CD.
Press and hold one of these buttons for
fast forward or rewind.
Playing an MP3 compilation
Insert an MP3 compilation in the CD player.
The audio equipment searches for all of the
music tracks, which may take anything between
a few seconds and several tens of seconds,
before play begins.
On a single disc, the CD player can read
up to 255 MP3 files spread over 8
directory levels.
However, it is advisable to keep to a limit of
two levels to reduce the access time before
the CD is played.
The folder structure is not observed during
playback.
All of the files are displayed on a single level.
To play a disc which has already been inserted, press the SOURCE button
several times in succession and select " CD".
Press one of the buttons to select a folder
on the CD.
Press one of the buttons to select a track
on the CD.
Press the LIST button to display the list of
directories of the MP3 compilation.