fuel PEUGEOT 5008 2022 Owner's Manual
[x] Cancel search | Manufacturer: PEUGEOT, Model Year: 2022, Model line: 5008, Model: PEUGEOT 5008 2022Pages: 292, PDF Size: 9.65 MB
Page 183 of 292

181
Practical information
7Diesel fuel system
This system is under very high pressure.
All work must be carried out only by a
PEUGEOT dealer or a qualified workshop.
Checking levels
Check all of the following levels regularly in
accordance with the manufacturer's service
schedule. Top them up if required, unless
otherwise indicated.
If a level drops significantly, have the
corresponding system checked by a PEUGEOT
dealer or a qualified workshop.
The fluids must comply with the manufacturer's requirements and with
the vehicle's engine.
Take care when working under the bonnet, as certain areas of the engine
may be extremely hot (risk of burns) and the
cooling fan could start at any time (even with
the ignition off).
Used products
Avoid prolonged contact of used oil or fluids with the skin.
Most of these fluids are harmful to health and
very corrosive.
Do not discard used oil or fluids into
sewers or onto the ground.
Empty used oil into the containers reserved
for this purpose at a PEUGEOT dealer or a
qualified workshop.
Engine oil
The level is checked, with the engine having been switched off for at least 30
minutes and on level ground, either using the oil
level indicator in the instrument panel when the
ignition is switched on (for vehicles equipped
with an electric gauge), or using the dipstick.
It is normal to top up the oil level between two
services (or oil changes). It is recommended
that you check the level, and top up if necessary,
every 3,000 miles (5,000 km).
In order to maintain the reliability of the
engine and emissions control system,
never use additives in the engine oil.
Checking using the dipstick
For the location of the dipstick, please refer
to the illustration of the corresponding engine
compartment.
►
Grasp the dipstick by its coloured grip and
pull it out completely
.
►
Wipe the end of the dipstick using a clean,
lint-free cloth.
► Reinsert the dipstick and push fully down,
then pull it out again to visually check the oil
level: the correct level is between marks A
(max)
and B (min).
Do not start the engine if the level is:
–
above mark
A: contact a PEUGEOT dealer or
a qualified workshop.
–
below mark B
: top up the engine oil
immediately.
Oil grade
Before topping up or changing the
engine oil, check that the oil is suitable
for your engine and complies with the
recommendations in the service schedule
supplied with the vehicle (or available
from your PEUGEOT dealer or qualified
workshop).
Use of non-recommended oil may invalidate
your warranty in the event of engine failure.
Topping up the engine oil level
For the location of the engine oil filler cap, please
refer to the corresponding engine compartment
illustration.
►
Add oil in small quantities, avoiding any spills
on engine components (risk of fire).
Page 184 of 292
182
Practical information
► Wait a few minutes before checking the level
again using the dipstick.
►
T
op up the level if necessary.
►
After checking the level, carefully screw the
oil filler cap back on
and replace the dipstick in
its tube.
The oil level indication displayed on the instrument panel when the ignition is
switched on is not valid for 30 minutes
following an addition of oil.
Brake fluid
The level of this fluid should be close to the "MAX" mark. If not, check the brake
pads for wear.
To know how often the brake fluid should be
replaced, refer to the manufacturer's servicing
schedule.
Clean the cap before removing it to refill.
Use only DOT4 brake fluid from a sealed
container.
Engine coolant
It is normal to top up this fluid between
two services.
The check and top-up must only be done with
the engine cold.
A level of coolant that is too low risks causing
major damage to the engine; the coolant level must be close to the "MAX" mark without ever
going above it.
If the level is close to or below the "
MIN" mark, it
is essential to top it up.
When the engine is hot, the temperature of the
coolant is regulated by the fan.
As the cooling system is pressurised, wait at
least one hour after switching off the engine
before carrying out any work.
In order to avoid the risk of scalding if you need
to top up in an emergency, wrap a cloth around
the cap and unscrew the cap by two turns to
allow the pressure to drop.
Once the pressure has dropped, remove the cap
and top up to the required level.
Screenwash fluid
Top up to the required level when necessary.
Capacity of the tank:
–
5.3 litres for "very cold climate" versions.
–
2.2 litres for other versions.
Fluid specification
The fluid must be topped up with a pre-mixed
product.
In winter (temperatures below zero), a fluid
containing an anti-freeze agent which is
appropriate for the temperature conditions
must be used in order to protect the system's
components (pump, tank, ducts, jets).
Filling with pure water is prohibited in all
circumstances (risk of freezing,
limescale, etc.).
Diesel fuel additive (Diesel
with particle filter)
On reaching the minimum level in the
particle filter additive tank, this warning
lamp comes on fixed, accompanied by an
audible signal and a warning message.
Topping up
The topping up of this additive must be carried
out quickly.
Go to a PEUGEOT dealer or a qualified
workshop.
AdBlue® (BlueHDi)
An alert is triggered when the reserve level is
reached.
For more information on the Indicators and in
particular the AdBlue range indicators, refer to
the corresponding section.
To avoid the vehicle being immobilised in
accordance with regulations, you must top up the
AdBlue tank.
For more information on AdBlue
® (BlueHDi),
and in particular the supply of AdBlue, refer to
the corresponding section.
Checks
Unless otherwise indicated, check these
components in accordance with the
manufacturer's service schedule and according
to your engine.
Otherwise, have them checked by a PEUGEOT
dealer or a qualified workshop.
Only use products recommended by
PEUGEOT or products of equivalent
quality and specification.
In order to optimise the operation of
components as important as those in the
braking system, PEUGEOT selects and offers
very specific products.
12 V battery
The battery does not require any maintenance.
Check regularly that the terminals are correctly
tightened (versions without quick-release
terminals) and that the connections are clean.
For more information on the precautions
to take before any work on the 12 V
battery, refer to the corresponding section.
Versions equipped with Stop & Start are
fitted with a 12 V lead-acid battery of
specific technology and specification.
Its replacement should be carried out only by
a PEUGEOT dealer or a qualified workshop.
Page 186 of 292

184
Practical information
checked by a PEUGEOT dealer or a qualified
workshop.
For more information on the Electric
parking brake, refer to the
corresponding section.
Brake pads
Brake wear depends on the style of
driving, particularly in the case of vehicles
used in town, over short distances. It may be
necessary to have the condition of the brakes
checked, even between vehicle services.
Unless there is a leak in the circuit, a drop in the
brake fluid level indicates that the brake pads
are worn.
After washing the vehicle, moisture, or in wintry conditions, ice can form on the
brake discs and pads: braking efficiency may
be reduced. Gently dab the brakes to dry and
defrost them.
Brake disc wear
For information on checking brake disc
wear, contact a PEUGEOT dealer or a
qualified workshop.
Wheels and tyres
The inflation pressure of all tyres, including the spare wheel, must be
checked on "cold” tyres.
The pressures indicated on the tyre pressure
label are valid for "cold" tyres. If you have driven
for more than 10 minutes or more than 6 miles
(10 kilometres) at over 31 mph (50
km/h), add
0.3 bar (30 kPa) to the values indicated on the
label.
Under-inflation increases energy
consumption. Non-compliant tyre
pressures cause tyres to wear prematurely
and have an adverse effect on the vehicle's
road holding - risk of accident!
Driving with worn or damaged tyres reduces the
braking and road holding performance of the
vehicle. Regularly check the condition of the
tyres (tread and sidewalls) and rims as well as
the presence of the valve caps.
When the wear indicators no longer appear set
back from the tread, the depth of the grooves is
less than 1.6 mm; replace the tyres as soon as
possible.
Using different size wheels and tyres from those
specified can affect the lifetime of tyres, wheel
rotation, ground clearance, the speedometer
reading and have an adverse effect on road
holding.
Fitting different tyres on the front and rear axles
can cause the ESC to mistime.
Always mark the direction of rotation on the tyres
that will be stored when fitting winter or summer
tyres. Store them in a cool, dry place and away
from direct exposure to the sun's rays.
Winter or 4-seasons tyres can be
identified by this symbol on their
sidewalls.
Shock absorbers
It is not easy for drivers to detect when
shock absorbers are worn. Nevertheless,
the shock absorbers have a major impact on
road holding and braking performance.
For your safety and driving comfort, it is
important to have them regularly checked by a
PEUGEOT dealer or a qualified workshop.
Timing and accessory kits
The timing and accessory kits are used
from the time the engine is started until it
is switched off. It is normal for them to wear over
time.
A
faulty timing or accessory kit can damage
the engine, rendering it unusable. Observe the
recommended replacement frequency, stated in
distance travelled or time elapsed, whichever is
reached first.
AdBlue® (BlueHDi)
To respect the environment and ensure compliance with the Euro 6 standard, without
adversely affecting the performance or fuel
consumption of its Diesel engines, PEUGEOT
has taken the decision to equip its vehicles with
a system that combines SCR (Selective Catalytic
Reduction) with a Diesel Particle Filter (DPF) for
the treatment of exhaust gases.
SCR system
Using a liquid called AdBlue® that contains
urea, a catalytic converter turns up to 85% of
the nitrogen oxides (NOx) into nitrogen and
water, which are harmless to health and the
environment.
The AdBlue® is contained in a special
tank holding about 17 litres.
Its capacity allows a driving range of
approximately 4,000 miles (6,500 km), which
may vary considerably depending on your
driving style.
An alert system is triggered once the reserve
level is reached: it is then possible to drive for a
further 1,500 miles (2,400 km) before the tank is
empty and the vehicle is immobilised.
For more information on the Warning
and indicator lamps and the associated
alerts, or the Indicators, please refer to the
corresponding sections.
Once the AdBlue® tank is empty, a device
required by law prevents the engine from
being restarted.
If the SCR system is faulty, the level of
emissions from the vehicle will no longer meet
the Euro 6 standard and the vehicle starts
polluting the environment.
Page 188 of 292
186
Practical information
Store AdBlue® out of the reach of
children, in its original container.
Procedure
Before starting the top-up procedure, ensure that
the vehicle is parked on a flat and level surface.
In wintry conditions, ensure that the temperature
of the vehicle is above -11°C. Otherwise the
AdBlue
® may be frozen and so cannot be poured
into the tank. Park the vehicle in a warmer area
for a few hours to allow the top-up to be carried
out.
Never pour the AdBlue® into the Diesel
fuel tank.
If any AdBlue® is splashed, or if there are
any spillages on the bodywork, rinse
immediately with cold water or wipe with a
damp cloth.
If the fluid has crystallised, clean it off using a
sponge and hot water.
Important: in the event of a top-up after
an AdBlue breakdown, you must wait
about 5
minutes before switching on the
ignition, without opening the driver's door,
unlocking the vehicle or bringing the
electronic key into the passenger
compartment.
Switch on the ignition, then wait for 10
seconds before starting the engine. ►
Press the "
START/STOP" button to switch off
the engine.
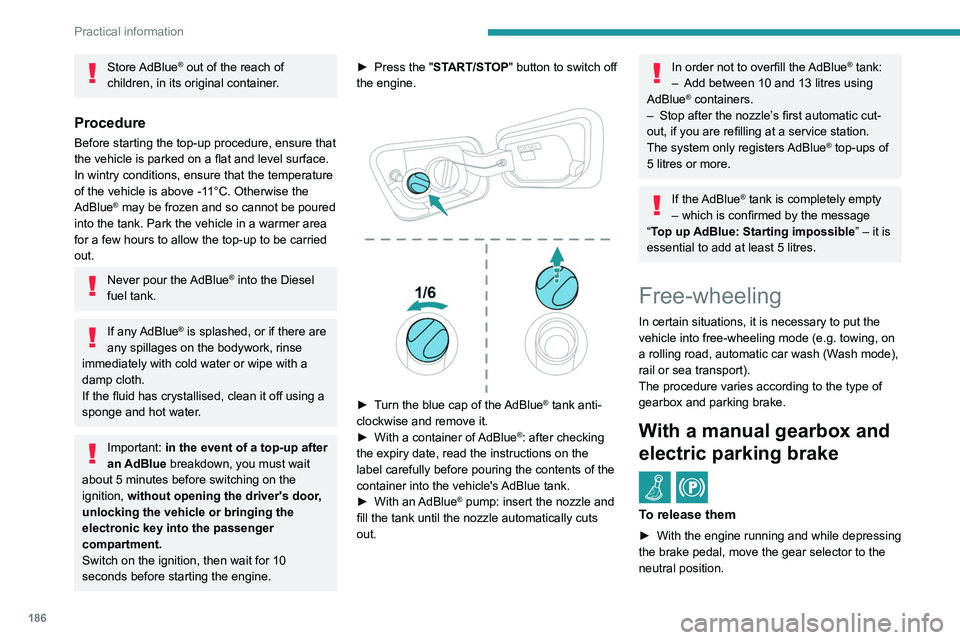
► Turn the blue cap of the AdBlue® tank anti-
clockwise and remove it.
►
With a container of
AdBlue
®: after checking
the expiry date, read the instructions on the
label carefully before pouring the contents of the
container into the vehicle's AdBlue tank.
►
With an
AdBlue® pump: insert the nozzle and
fill the tank until the nozzle automatically cuts
out.
In order not to overfill the AdBlue® tank:
–
Add between 10 and 13 litres using
AdBlue® containers.
–
Stop after the nozzle’ s first automatic cut-
out, if you are refilling at a service station.
The system only registers AdBlue
® top-ups of
5
litres or more.
If the AdBlue® tank is completely empty
– which is confirmed by the message
“Top up
AdBlue: Starting impossible ” – it is
essential to add at least 5 litres.
Free-wheeling
In certain situations, it is necessary to put the
vehicle into free-wheeling mode (e.g. towing, on
a rolling road, automatic car wash (Wash mode),
rail or sea transport).
The procedure varies according to the type of
gearbox and parking brake.
With a manual gearbox and
electric parking brake
/
To release them
► With the engine running and while depressing
the brake pedal, move the gear selector to the
neutral position.
► While depressing the brake pedal, switch off
the ignition.
► Release the brake pedal, then switch on the
ignition again.
► While depressing the brake pedal, press the
control lever to release the parking brake.
► Release the brake pedal, then switch off the
ignition.
Reverting to normal operation
► While depressing the brake pedal, restart the
engine.
With an automatic gearbox
and electric parking brake
/
Release procedure
► With the vehicle stationary and the engine
running, select mode N and switch off the
ignition.
Within 5 seconds:
► Switch on the ignition again.
► While depressing the brake pedal, move the
push selector forwards or backwards to confirm
mode N.
► While depressing the brake pedal, press the
control lever to release the parking brake.
► Release the brake pedal, switch off the
ignition.
Page 190 of 292
188
Practical information
the controls located on the centre console. Be
vigilant!
Bodywork
High-gloss paint
Do not use abrasive products, solvents,
petrol or oil to clean the bodywork.
Never use an abrasive sponge to clean
stubborn stains - risk of scratching the
paintwork!
Do not apply polish in strong sunshine, or to
plastic or rubber parts.
Use a soft cloth and soapy water or a pH
neutral product.
Gently wipe the bodywork with a clean
microfibre cloth.
Apply polish with the vehicle clean and dry.
Comply with the instructions for use stated on
the product.
Textured paint
This type of paint reacts under the effect of
light, through variations in appearance and
finish that highlight the lines and contours of the
vehicle. Its varnish is enriched with particles that
remain visible and create a unique satin effect
with relief. Its slightly granular texture gives it a
surprising touch.
Never attempt to clean without water.
Never clean your vehicle in an automatic
roller-brush car wash.
Never select the programme with hot wax
finish.
Never use high-pressure lances equipped
with brushes - risk of scratching paint!
Never apply glossy polish or preservatives to
the bodywork or alloy wheels; these products
irreversibly reveal glossy or spotted areas.
Choose high-pressure wash, or at least
high-flow water jet.
Rinse the vehicle with demineralised water.
Only a clean microfibre cloth
is recommended
for wiping the vehicle; pass it over the vehicle
without rubbing.
Carefully wipe off any fuel spilt on the
bodywork using a soft cloth, then allow to dry.
Clean off minor marks (for example, finger
marks), using a maintenance product
recommended by PEUGEOT.
Decals
(Depending on version)
Do not use a high-pressure washer to
clean the vehicle - risk of damaging or
detaching the decals!
Use a high-flow hose (temperature
between 25°C and 40°C).
Place the jet of water perpendicular to the
surface to be cleaned.
Rinse the vehicle with demineralised water.
Leather
Leather is a natural product. Appropriate regular
care is essential for its durability.
It must be protected and nourished using a
specific leather product, to keep it supple and
preserve its original appearance.
Do not clean leather using unsuitable
cleaning agents such as solvents,
detergents, petrol or pure alcohol.
When cleaning items partly made from
leather, take care not to damage the other
materials with the specific leather product.
Before cleaning greasy stains or liquids,
quickly mop up any surplus.
Before cleaning, wipe off any residues liable
to scuff the leather, using a cloth that has
been dampened with demineralised water
and thoroughly wrung out.
Clean leather using a soft cloth moistened
with soapy water or a pH-neutral product.
Dry with a soft, dry cloth.
Page 191 of 292

189
In the event of a breakdown
8Warning triangle
This reflective and dismantlable device is to be
installed on the side of the road when a vehicle
is broken down or damaged.
Before getting out of the vehicle
Turn on the hazard warning lamps, then
put on the safety vest to assemble and install
the triangle.
Storage compartment
There is a compartment in the interior trim of the
tailgate to store a warning triangle.
►
After opening the tailgate, release the cover
by turning the screw a quarter turn to the left.
Assembling and placing the triangle
For versions supplied with a triangle as original
equipment, refer to the illustration above.
For other versions, refer to the assembly
instructions provided with the triangle.
►
Put the triangle in place behind the vehicle,
as required by local legislation.
Running out of fuel
(Diesel)
With Diesel engines, the fuel system must be
primed if you run out of fuel.
Before starting to prime the system, it is
essential to put at least 5 litres of Diesel into the
fuel tank.
For more information on Refuelling and
on Misfuel prevention (Diesel), refer to
the corresponding section.
For non-BlueHDi versions, the fuel system
components are located in the engine
compartment, possibly under the removable
cover.
For more information on the Engine
compartment, in particular the location
of these components under the bonnet, refer
to the corresponding section.
1.5 BlueHDi engines
► Switch on the ignition (without starting the
engine).
►
W
ait around 1 minute and switch off the
ignition.
►
Operate the starter motor to start the engine.
If the engine does not start at the first attempt,
do not keep trying, but restart the procedure.
2.0 BlueHDi engines
► Switch on the ignition (without starting the
engine).
►
W
ait around 6 seconds and switch off the
ignition.
►
Repeat the operation 10
times.
►
Operate the starter motor to start the engine.
If the engine does not start at the first attempt,
do not keep trying, but restart the procedure.
Page 192 of 292

190
In the event of a breakdown
Accessing the tools
Some of the tools are stored beneath the floor
against the boot sill.
The left-hand box contains the wheelbrace and
its extension piece.
The right-hand box contains the wheel chocks
and the towing eye.
To access it:
► Open the boot.
► Fold the concertina panels.
► Install the third row seats.
► Unclip the required tools from the boot sill
trim.
2.0 HDi engines
► Open the bonnet and then, if necessary ,
unclip the cover to access the priming pump.
►
Loosen the degassing bolt.
► Operate the priming pump until fuel
appears in the transparent tube.
►
Retighten the degassing bolt.
►
Operate the starter motor until the engine
starts (if the engine does not start at the first
attempt, wait around 15
seconds before trying
again).
►
If the engine does not start after a few
attempts, operate the priming pump again, then
the starter motor
.
►
Put the cover back in place and clip it in, then
close the bonnet.
Tool kit
Set of tools supplied with the vehicle.
Its content depends on your vehicle's equipment:
–
T
emporary puncture repair kit.
–
Spare wheel.
Accessing the tools
The tool kit is stored in the boot, under the floor.
To access it:
Versions with 2-position boot floor:
►
Open the boot.
►
Place the adjustable boot floor in the high
position.
►
Lift the boot floor past the two retractable
stops.
►
Place the boot floor onto these two stops to
hold it up.
V
ersions with articulated boot mat
(Rechargeable hybrid):
►
Open the boot.
►
Unfold the articulated boot mat by pulling its
handle until it is fully opened.
With temporary puncture repair kit
► Unclip the two fixings to open its cover .
With spare wheel
► Unclip the storage box by pulling it upwards.
► Unclip the two fixings to open its cover .
Page 218 of 292

216
Technical data
Engines and towed loads - Petrol
EnginesPureTech 130 S&S BVM6PureTech 130 S&S EAT8
Gearboxes BVM6
(Manual 6-speed) EAT8
(Auto. 8-speed)
Codes EB2ADTS MB6 STTEB2ADTS ATN8 STT
Model codes HNSM/CHNSM/SHNSU/CHNSU/S
Body styles 3008500830085008
Cubic capacity (cc) 1,1991,199
Max. power: EC standard (kW) 9696
Fuel UnleadedUnleaded
Braked trailer (within the GTW limit) (kg)
on a 10% or 12% gradient 1,400
1,2801,150 950
Unbraked trailer (kg) 690690690750
Maximum authorised nose weight (kg) 80728072
Engines THP 150 EAT6THP 165 EAT6PureTech 180 S&S EAT8
Gearboxes EAT6
(Auto. 6-speed) EAT6
(Auto. 6-speed) EAT8
(Auto. 8-speed)
Codes EP6FDTMD AT6IIIEP6FDTM AT6IIIEP6FADTXD ATN8 STT
Model codes 5GXV/C
5GXW/C 5GXV/S
5GXW/S 5GYV/C
5GYW/C 5GYV/S
5GYW/S 5GFR/C 5GFR/S
Body styles 300850083008500830085008
Cubic capacity (cc) 1,5981,5981,598
Max. power: EC standard (kW) 11 0121.4 133
Page 219 of 292

217
Technical data
9EnginesTHP 150 EAT6THP 165 EAT6PureTech 180 S&S EAT8
Gearboxes EAT6
(Auto. 6-speed) EAT6
(Auto. 6-speed) EAT8
(Auto. 8-speed)
Codes EP6FDTMD AT6IIIEP6FDTM AT6IIIEP6FADTXD ATN8 STT
Model codes 5GXV/C
5GXW/C 5GXV/S
5GXW/S 5GYV/C
5GYW/C 5GYV/S
5GYW/S 5GFR/C 5GFR/S
Body styles 300850083008500830085008
Fuel UnleadedUnleadedUnleaded
Braked trailer (within the GTW limit) (kg)
on a 10% or 12% gradient 600
600600
1,550* 600
1,350* 1,500
1,400
Unbraked trailer (kg) 600600600600750750
Maximum authorised nose weight (kg) 807280728072
* For Australia only.
Page 220 of 292

218
Technical data
Engines and towed loads – BlueHDi Diesel
EnginesBlueHDi 130 S&S BVM6 BlueHDi 130 S&S EAT8 BlueHDi 180 S&S EAT8
Gearboxes BVM6
(Manual 6-speed) EAT8
(Auto. 8-speed) EAT8
(Auto. 8-speed)
Codes DV5RC ML6C STTDV5RC ATN8 STT DW10FC AMN8 STT
Model codes YHZJ/C YHZJ/S YHZR/C YHZR/S EHZR/C EHZR/S
Body styles 3008 50083008 5008 3008 5008
Cubic capacity (cc) 1,4991,4991,997
Max. power: EC standard (kW) 9696130
Fuel DieselDieselDiesel
Braked trailer (within the GTW limit) (kg)
on a 10% or 12% gradient 1,500 1,300
1,300 1,200 2,000 1,800
Unbraked trailer (kg) 745 750750750745750
Maximum authorised nose weight (kg) 80 7280728072
Engines BlueHDi 180 S&S EAT8HDi 150 EAT8
Gearboxes EAT8
(Auto. 8-speed) EAT8
(Auto. 8-speed)
Codes DW10FC AMN8 STTDW10FD AMN8
Model codes EHZR/CAHXN/CAHXN/S
Body styles 500830085008
Cubic capacity (cc) 1,9971,997
Max. power: EC standard (kW) 13011 0
Fuel DieselDiesel