steering wheel PEUGEOT 5008 2022 Owners Manual
[x] Cancel search | Manufacturer: PEUGEOT, Model Year: 2022, Model line: 5008, Model: PEUGEOT 5008 2022Pages: 292, PDF Size: 9.65 MB
Page 4 of 292
2
Contents
■
Overview
■
Eco-driving
1InstrumentsDigital instrument panels 9
Warning and indicator lamps 11
Indicators 17
Manual test 21
Distance recorders 21
Lighting dimmer 21
Trip computer 22
Touch screen 23
Remote functions (Rechargeable hybrid) 25
2AccessRemote control / Key 26
Keyless Entry and Starting 28
Central locking 30
Back-up procedures 30
Doors 32
Boot 32
Hands-free tailgate 33
Alarm 36
Electric windows 38
Panoramic sunroof 39
3Ease of use and comfortDriving position 42
Front seats 43
Steering wheel adjustment 47
Mirrors 47
Rear bench seat 49
Rear seats 50
Seat modularity 55
Heating and Ventilation 56
Dual-zone automatic air conditioning 57
Front demisting - defrosting 60
Heated windscreen 60
Rear screen demisting/defrosting 61
Temperature pre-conditioning
(Rechargeable hybrid)
61
Front fittings 62
Courtesy lamps 65
Interior ambient lighting 66
Rear fittings 66
Boot fittings 68
4Lighting and visibilityLighting control stalk 74
Direction indicators 75
Headlamp beam height adjustment 76
Automatic illumination of headlamps 76
Guide-me-home and welcome lighting 77
Automatic lighting systems - General
recommendations
77
Automatic headlamp dipping 77
Static cornering lighting 78
Night Vision 79
Wiper control stalk 80
Automatic wipers 81
Changing a wiper blade 83
5SafetyGeneral safety recommendations 84
Hazard warning lamps 84
Horn 85
Pedestrian horn (Rechargeable hybrid) 85
Emergency or assistance 85
Electronic stability control (ESC) 87
Advanced Grip Control 89
Hill Assist Descent Control 90
Seat belts 91
Airbags 95
Child seats 97
Deactivating the front passenger airbag 99
ISOFIX child seats 102
i-Size child seats 107
Child lock 108
6DrivingDriving recommendations 11 0
Starting/Switching off the engine 111
Starting rechargeable hybrid vehicles 11 2
Electric parking brake 11 4
6-speed manual gearbox 11 6
Automatic gearbox 11 6
Electric automatic gearbox
(Rechargeable hybrid)
11 9
Hill start assist 121
Driving modes 121
Gear shift indicator 123
Stop & Start 123
Tyre under-inflation detection 125
Driving and manoeuvring aids - General
recommendations
126
Memorising speeds 128
Speed Limit Recognition and
Recommendation
128
Speed limiter 132
Cruise control - Specific recommendations 133
Cruise control 134
Drive Assist Plus 135
Adaptive Cruise Control 136
Page 5 of 292
3
Contents
Lane positioning assist 140
Lane Departure Warning System 143
Active Lane Keeping Assistance 144
Active Safety Brake with Distance Alert and
Intelligent emergency braking assistance
147
Distraction detection 150
Blind Spot Monitoring 151
Active Blind Spot Monitoring System 152
Parking sensors 153
Visiopark 1 - Visiopark 2 154
Park Assist 158
7Practical informationCompatibility of fuels 163
Refuelling 163
Misfuel prevention (Diesel) 164
Rechargeable hybrid system 165
Charging the traction battery
(Rechargeable hybrid engine)
171
Towing device 173
Towing device with quickly detachable
towball
174
Tetőcsomagtartó rudak 176
Snow chains 177
Very cold climate screen 178
Energy economy mode 178
Motorháztető 179
Engine compartment 180
Checking levels 181
Checks 183
AdBlue® (BlueHDi) 184
Free-wheeling 186
Advice on care and maintenance 187
8In the event of a breakdownWarning triangle 189
Running out of fuel (Diesel) 189
Tool kit 190
Temporary puncture repair kit 192
Spare wheel 195
Changing a bulb 200
Changing a fuse 201
12
V battery 206
Accessory battery (Rechargeable hybrid) 209
Towing the vehicle 2 11
9Technical dataEngine technical data and towed loads 215
Petrol engines 216
Diesel engines 218
Rechargeable hybrid engines 220
Dimensions 221
Identification markings 222
10PEUGEOT Connect RadioFirst steps 223
Steering mounted controls 224
Menus 225
Applications 226
Radio 226
DAB (Digital Audio Broadcasting) radio 228
Media 228
Telephone 230
Settings 233
Frequently asked questions 234
11PEUGEOT Connect NavFirst steps 236
Steering mounted controls 237
Menus 237
Voice commands 239
Navigation 242
Connected navigation 245
Applications 247
Radio 250
DAB (Digital Audio Broadcasting) radio 251
Media 251
Telephone 253
Settings 255
Frequently asked questions 257
■
Alphabetical index
bit.ly/helpPSA
Access to additional videos
Page 12 of 292
10
Instruments
• "Navigation".
• "Trip computer".
• "Rev counter".
• "Energy flow" (depending on version).
• "Power indicator" (depending on version).
• "Energy consumption" (depending on
version).
► Confirm to save and exit.
"PERSONAL" mode is displayed immediately.
Warning and indicator
lamps
Displayed as symbols, the warning and indicator
lamps inform the driver of the occurrence of a
malfunction (warning lamps) or of the operating
status of a system (operation or deactivation
indicator lamps). Certain lamps light up in two
ways (fixed or flashing) and/or in several colours.
Associated warnings
The illumination of a lamp may be accompanied
by an audible signal and/or a message displayed
in a screen.
Relating the type of alert to the operating status
of the vehicle allows you to determine whether
the situation is normal or whether a fault has
occurred: refer to the description of each lamp
for further information.
When the ignition is switched on
Certain red or orange warning lamps come on
for a few seconds when the ignition is switched
– Driving aid functions.
– Speed limiter or cruise control.
–
Media currently playing.
–
Navigation instructions.
–
Engine information from the Dynamic Pack.
–
Power flow (Rechargeable hybrid).
Customising the instrument
panel
Depending on version, the appearance of the
instrument panel may be customisable (colour
and/or display mode).
Display language and units
These depend on the multifunction
screen settings (configuration menu).
When travelling abroad, the speed must be
shown in the official units of the country you
are driving in (mph, miles or km/h, km).
As a safety measure, these adjustments must be carried out with the vehicle
stationary.
Choosing the display colour
Depending on version, the instrument panel
display colour depends on the colour scheme
chosen in this system.
This function is set via the Settings touch screen menu.
Choosing the display mode
In each mode, specific types of information are
displayed on the instrument panel.
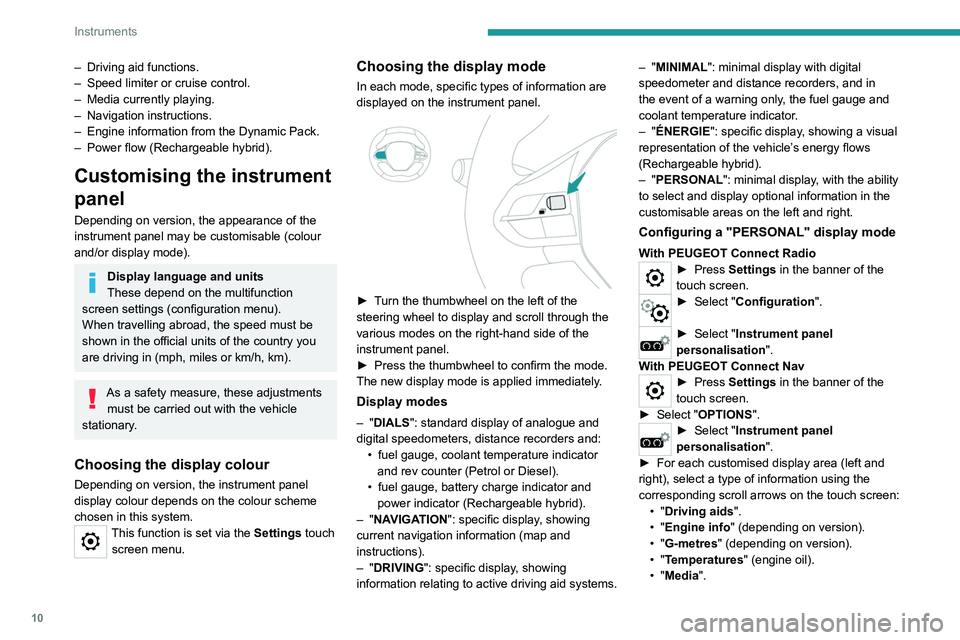
► Turn the thumbwheel on the left of the
steering wheel to display and scroll through the
various modes on the right-hand side of the
instrument panel.
►
Press the thumbwheel to confirm the mode.
The new display mode is applied immediately
.
Display modes
– "DIALS": standard display of analogue and
digital speedometers, distance recorders and: •
fuel gauge, coolant temperature indicator
and rev counter (Petrol or Diesel).
•
fuel gauge, battery charge indicator and
power indicator (Rechargeable hybrid).
–
"NAVIGATION": specific display, showing
current navigation information (map and
instructions).
–
"DRIVING": specific display, showing
information relating to active driving aid systems. –
"MINIMAL": minimal display with digital
speedometer and distance recorders, and in
the event of a warning only, the fuel gauge and
coolant temperature indicator.
– "ÉNERGIE": specific display, showing a visual
representation of the vehicle’s energy flows
(Rechargeable hybrid).
– "PERSONAL": minimal display, with the ability
to select and display optional information in the
customisable areas on the left and right.
Configuring a "PERSONAL" display mode
With PEUGEOT Connect Radio► Press Settings in the banner of the
touch screen.
► Select " Configuration ".
► Select "Instrument panel
personalisation".
With PEUGEOT Connect Nav
► Press Settings in the banner of the
touch screen.
►
Select "
OPTIONS".
► Select " Instrument panel
personalisation".
►
For each customised display area (left and
right), select a type of information using the
corresponding scroll arrows on the touch screen: •
"Driving aids".
•
"Engine info " (depending on version).
•
"G-metres " (depending on version).
•
"Temperatures " (engine oil).
•
"Media".
Page 17 of 292
15
Instruments
1Dynamic stability control (DSC)/Anti-slip
regulation (ASR)
Fixed.
The system is deactivated.
The DSC/ASR system is reactivated
automatically when the vehicle is restarted,
and at speeds above approximately 31 mph
(50
km/h).
At speeds below 31
mph (50 km/h), it can be
reactivated manually.
Flashing.
DSC/ASR regulation is activated in the
event of a loss of grip or trajectory.
Fixed.
The DSC/ASR system has a fault.
Carry out (3).
Emergency brake malfunction (with
electric parking brake)
Fixed, accompanied by the
message "Parking brake fault".
Emergency braking does not deliver optimal
performance.
If automatic release is not available, use manual
release or carry out (3).
Hill start assistFixed, accompanied by the
message "Anti roll-back system
fault".
The system has a fault.
Carry out (3).
Lane Departure Warning SystemFlashing, accompanied by an audible
signal.
A lane marking has been crossed on the left or
right.
Turn the steering wheel in the opposite direction
to return to the correct trajectory.
Fixed, accompanied by an onscreen
message.
The system has a fault.
Stay alert and drive carefully, then carry out (3).
Active Lane Keeping AssistanceFlashing.
You are about to cross a broken
lane marking without operating the direction
indicators.
The system is activated, then corrects the
trajectory on the side of the detected lane
marking.
For more information, refer to the Driving
section.
Fixed, accompanied by the display
of a message and an audible
signal.
The system has a fault.
Carry out (3).
Lane positioning assistFixed, accompanied by the
Service warning lamp.
The system has a fault.
Carry out (3).
AirbagsFixed.
One of the airbags or seat belt
pyrotechnic pretensioners is faulty.
Carry out (3).
Front passenger airbag (ON)Fixed.
The front passenger airbag is activated.
The control is in the "ON" position.
In this case, do NOT install a "rearward
facing" child seat on the front passenger seat
- risk of serious injury!
Front passenger airbag (OFF)Fixed.
The front passenger airbag is deactivated.
The control is set to the “OFF ” position.
A "rearward facing" child seat can be installed,
unless there is a fault with the airbags (Airbags
warning lamp on).
Under-inflationFixed.
The pressure in one or more tyres is too
low.
Check the pressure of the tyres as soon as
possible.
Reinitialise the detection system after adjusting
the pressure.
Under-inflation warning lamp
flashing then fixed and Service
warning lamp fixed.
The tyre pressure monitoring system is faulty.
Under-inflation detection is no longer monitored.
Page 29 of 292
27
Access
2If motorised operation of the tailgate is
deactivated, pressing the button partially
opens the tailgate.
To lock the vehicle, it is necessary to close
the tailgate again.
Locking the vehicle
Normal locking
► Press the locking button.
The locking, and the activation of the alarm
depending on version, is confirmed by the
lighting of the direction indicators.
Depending on version, the door mirrors fold.
An access (door or boot) that is not properly closed prevents locking of the
vehicle. However, if the vehicle is fitted with
an alarm, it will be activated after 45
seconds.
If the vehicle is unlocked but the doors or boot
are not subsequently opened,
the vehicle
will automatically lock itself again after about
30
seconds. If the vehicle is fitted with an
alarm, it will be reactivated automatically.
Deadlocking
Deadlocking renders the interior door
controls inoperative. It also disables the
central locking button.
The horn remains operational.
Never leave anyone inside the vehicle
when it is deadlocked.
►
Press the locking button again within 5
seconds to deadlock the vehicle (confirmed by
the temporary lighting of the direction indicators).
Az ablakok felhúzása
A reteszelőgomb több mint 3 másodpercig történő lenyomva tartásával lehet felhúzni
az ablakokat.
Az ablakok felhúzásakor ügyeljen arra, hogy semmi ne akadályozza az ablakok
megfelelő záródását.
Ha riasztóval szerelt változatoknál résnyire
nyitva szeretné hagyni az ablakokat, először
kapcsolja ki a riasztó belső térvédelmi
funkcióját.
A riasztórendszerről a megfelelő részben
olvashat további tudnivalókat.
Locating the vehicle
Helps you to locate your vehicle from a distance,
with the vehicle locked:
–
The direction indicators flash for approximately
10 seconds.
–
The door mirror spotlamps come on.
– The courtesy lamps come on.► Press this button.
Remote lighting of the
lamps
Availability of this function depends on version.► Press this button. The sidelamps,
dipped beam headlamps, number plate
lamps and door mirror spotlamps come on for 30
seconds.
Pressing again before the end of the timed
period switches off the lamps immediately.
Advice
Remote control
The remote control is a sensitive, high-
frequency device; avoid handling it in your
pocket, due to the risk of unintentionally
unlocking the vehicle.
Avoid pressing the remote control buttons
while out of range of the vehicle, due to
the risk of rendering the remote control
inoperative. It would then be necessary to
reset it.
Anti-theft protection
Do not modify the electronic vehicle
immobiliser, as this might result in
malfunctions.
Remember to turn the steering wheel to
engage the steering lock.
Page 44 of 292
42
Ease of use and comfort
Driving position
Correct seating position
Adopting a good driving position contributes to
improving driver comfort and protection.
It also optimises interior and exterior visibility as
well as access to controls.
Certain seat adjustments described in this
section depend on the trim level and the country
in which the vehicle is sold.
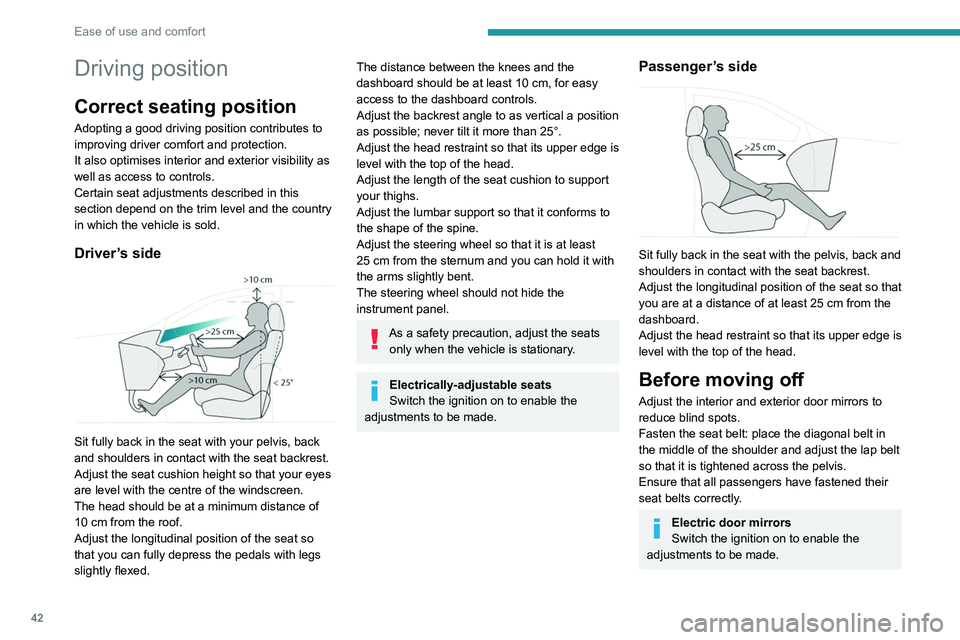
Driver’s side
Sit fully back in the seat with your pelvis, back
and shoulders in contact with the seat backrest.
Adjust the seat cushion height so that your eyes
are level with the centre of the windscreen.
The head should be at a minimum distance of
10 cm from the roof.
Adjust the longitudinal position of the seat so
that you can fully depress the pedals with legs
slightly flexed.
The distance between the knees and the
dashboard should be at least 10 cm, for easy
access to the dashboard controls.
Adjust the backrest angle to as vertical a position
as possible; never tilt it more than 25°.
Adjust the head restraint so that its upper edge is
level with the top of the head.
Adjust the length of the seat cushion to support
your thighs.
Adjust the lumbar support so that it conforms to
the shape of the spine.
Adjust the steering wheel so that it is at least
25
cm from the sternum and you can hold it with
the arms slightly bent.
The steering wheel should not hide the
instrument panel.
As a safety precaution, adjust the seats only when the vehicle is stationary.
Electrically-adjustable seats
Switch the ignition on to enable the
adjustments to be made.
Passenger’s side
Sit fully back in the seat with the pelvis, back and
shoulders in contact with the seat backrest.
Adjust the longitudinal position of the seat so that
you are at a distance of at least 25
cm from the
dashboard.
Adjust the head restraint so that its upper edge is
level with the top of the head.
Before moving off
Adjust the interior and exterior door mirrors to
reduce blind spots.
Fasten the seat belt: place the diagonal belt in
the middle of the shoulder and adjust the lap belt
so that it is tightened across the pelvis.
Ensure that all passengers have fastened their
seat belts correctly.
Electric door mirrors
Switch the ignition on to enable the
adjustments to be made.
When driving
Maintain a good driving position and hold the
steering wheel with both hands at the 'quarter to
three' position, so that you can easily and quickly
reach the controls behind and near the steering
wheel.
Never adjust the seats or steering wheel
when driving.
Always keep your feet on the floor.
Front seats
Before moving the seat backwards,
ensure that there is no person or object
that might prevent the full travel of the seat.
There is a risk of trapping or pinching
passengers if present in the rear seats or of
jamming the seat if large objects are placed
on the floor behind the seat.
Page 45 of 292
43
Ease of use and comfort
3When driving
Maintain a good driving position and hold the
steering wheel with both hands at the 'quarter to
three' position, so that you can easily and quickly
reach the controls behind and near the steering
wheel.
Never adjust the seats or steering wheel
when driving.
Always keep your feet on the floor.
Front seats
Before moving the seat backwards,
ensure that there is no person or object
that might prevent the full travel of the seat.
There is a risk of trapping or pinching
passengers if present in the rear seats or of
jamming the seat if large objects are placed
on the floor behind the seat.
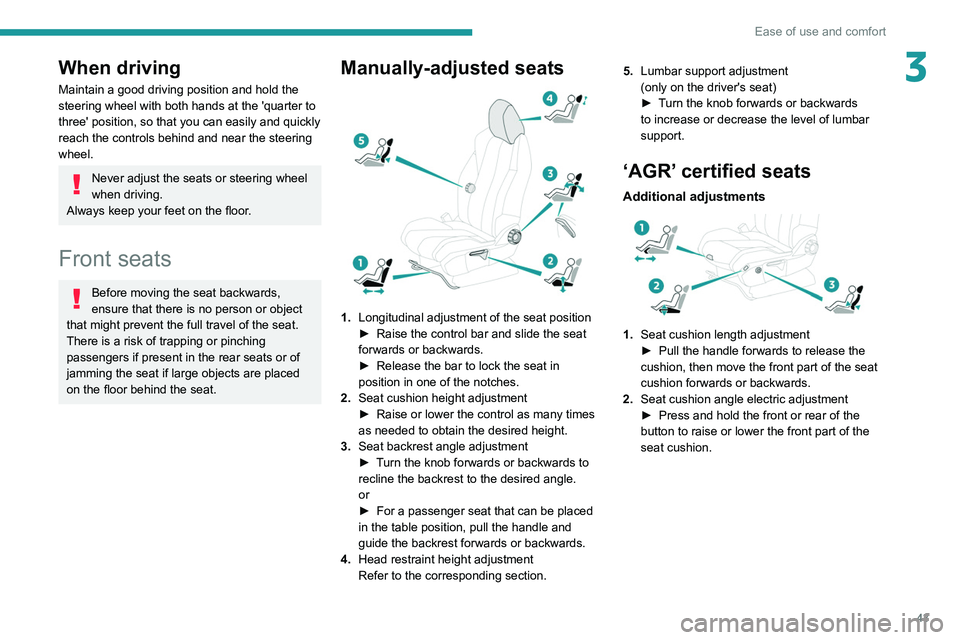
Manually-adjusted seats
1. Longitudinal adjustment of the seat position
►
Raise the control bar and slide the seat
forwards or backwards.
►
Release the bar to lock the seat in
position in one of the notches.
2. Seat cushion height adjustment
►
Raise or lower the control as many times
as needed to obtain the desired height.
3. Seat backrest angle adjustment
►
T
urn the knob forwards or backwards to
recline the backrest to the desired angle.
or
►
For a passenger seat that can be placed
in the table position, pull the handle and
guide the backrest forwards or backwards.
4. Head restraint height adjustment
Refer to the corresponding section. 5.
Lumbar support adjustment
(only on the driver's seat)
►
T
urn the knob forwards or backwards
to increase or decrease the level of lumbar
support.
‘AGR’ certified seats
Additional adjustments
1. Seat cushion length adjustment
►
Pull the handle forwards to release the
cushion, then move the front part of the seat
cushion forwards or backwards.
2. Seat cushion angle electric adjustment
►
Press and hold the front or rear of the
button to raise or lower the front part of the
seat cushion.
Page 48 of 292
46
Ease of use and comfort
► Enter the vehicle and switch the ignition on.
► Adjust your seat and the door mirrors.
►
Press button
M, then press button 1 or 2
within 4 seconds.
An audible signal confirms the memorisation.
Memorising a new position cancels the previous
position.
Recalling a stored position
While the seat is moving, take care that
no person or object hinders the
automatic movement of the seat.
With the ignition on or engine running
►
Press button
1 or 2 to recall the
corresponding position.
An audible signal sounds when adjustment is
complete.
You can interrupt the current movement by
pressing button M, 1 or 2 or by using one of the
seat adjustment controls.
A stored position cannot be recalled while
driving.
The recalling of stored positions is deactivated
45 seconds after switching off the ignition.
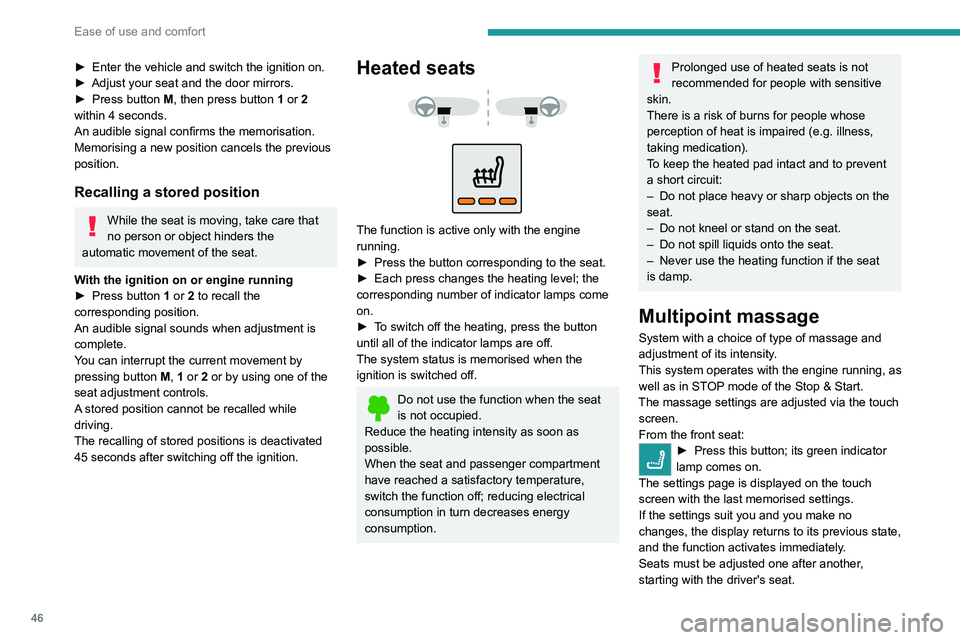
Heated seats
The function is active only with the engine
running.
►
Press the button corresponding to the seat.
►
Each press changes the heating level; the
corresponding number of indicator lamps come
on.
►
T
o switch off the heating, press the button
until all of the indicator lamps are off.
The system status is memorised when the
ignition is switched off.
Do not use the function when the seat
is not occupied.
Reduce the heating intensity as soon as
possible.
When the seat and passenger compartment
have reached a satisfactory temperature,
switch the function off; reducing electrical
consumption in turn decreases energy
consumption.
Prolonged use of heated seats is not
recommended for people with sensitive
skin.
There is a risk of burns for people whose
perception of heat is impaired (e.g.
illness,
taking medication).
To keep the heated pad intact and to prevent
a short circuit:
–
Do not place heavy or sharp objects on the
seat.
–
Do not kneel or stand on the seat.
–
Do not spill liquids onto the seat.
–
Never use the heating function if the seat
is damp.
Multipoint massage
System with a choice of type of massage and
adjustment of its intensity.
This system operates with the engine running, as
well as in STOP mode of the
Stop & Start.
The massage settings are adjusted via the touch screen.
From the front seat:
► Press this button; its green indicator
lamp comes on.
The settings page is displayed on the touch
screen with the last memorised settings.
If the settings suit you and you make no
changes, the display returns to its previous state,
and the function activates immediately
.
Seats must be adjusted one after another,
starting with the driver's seat.
To modify the settings:
► Begin with the driver’s seat.
► Select a massage intensity from the three
levels offered: " 1" (Low), "2" (Normal) or "3"
(High).
► Select another type of massage from those
offered.
► Wait for the driver's seat settings page to
disappear.
► Next, proceed with the passenger's seat in
the same way.
The changes are applied immediately.
Once activated, the system starts a one hour
massage cycle, made up of sequences of 6
minutes of massage followed by 3 minutes at
rest.
The system automatically stops at the end of the
cycle; the indicator lamp for the button goes off.
Steering wheel
adjustment
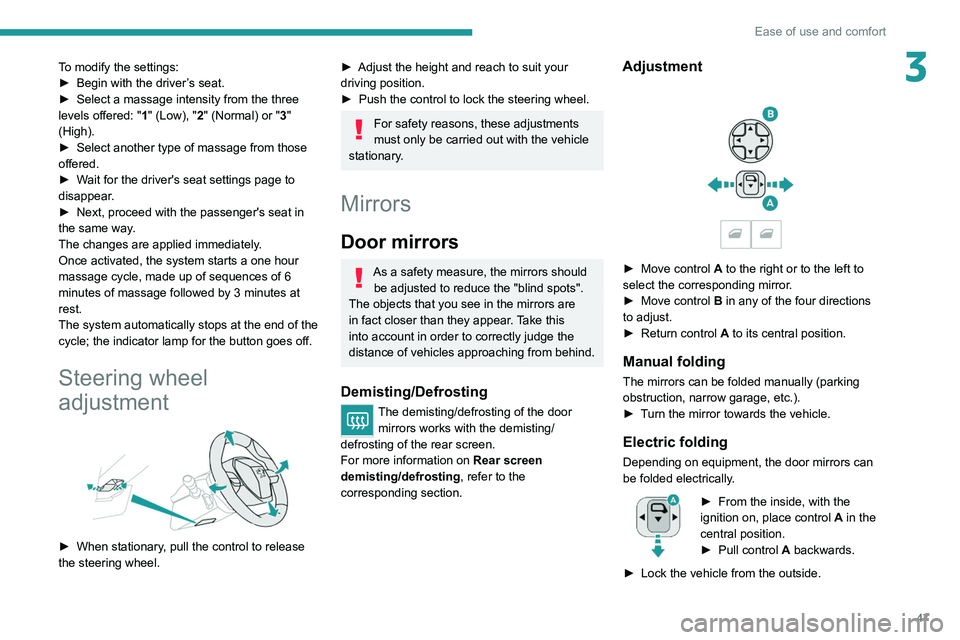
► When stationary, pull the control to release
the steering wheel.
Page 49 of 292
47
Ease of use and comfort
3To modify the settings:
► Begin with the driver ’s seat.
►
Select a massage intensity from the three
levels offered: " 1
" (Low), "2" (Normal) or "3"
(High).
►
Select another type of massage from those
offered.
►
W
ait for the driver's seat settings page to
disappear.
►
Next, proceed with the passenger's seat in
the same way
.
The changes are applied immediately.
Once activated, the system starts a one hour
massage cycle, made up of sequences of 6
minutes of massage followed by 3 minutes at
rest.
The system automatically stops at the end of the
cycle; the indicator lamp for the button goes off.
Steering wheel
adjustment
► When stationary , pull the control to release
the steering wheel.
► Adjust the height and reach to suit your
driving position.
►
Push the control to lock the steering wheel.
For safety reasons, these adjustments
must only be carried out with the vehicle
stationary.
Mirrors
Door mirrors
As a safety measure, the mirrors should be adjusted to reduce the "blind spots".
The objects that you see in the mirrors are
in fact closer than they appear. Take this
into account in order to correctly judge the
distance of vehicles approaching from behind.
Demisting/Defrosting
The demisting/defrosting of the door mirrors works with the demisting/
defrosting of the rear screen.
For more information on Rear screen
demisting/defrosting , refer to the
corresponding section.
Adjustment
► Move control A to the right or to the left to
select the corresponding mirror.
►
Move control
B in any of the four directions
to adjust.
►
Return control A
to its central position.
Manual folding
The mirrors can be folded manually (parking
obstruction, narrow garage, etc.).
►
T
urn the mirror towards the vehicle.
Electric folding
Depending on equipment, the door mirrors can
be folded electrically.
► From the inside, with the
ignition on, place control A
in the
central position.
►
Pull control A
backwards.
►
Lock the vehicle from the outside.
Page 64 of 292
62
Ease of use and comfort
Operating conditions
– The function is only activated when the
ignition is switched off and the
vehicle
locked.
–
When the vehicle is not connected, the
function is only activated if the battery charge
level is greater than 20%.
–
When the vehicle is not connected and a
recurring programme is active (e.g. from Monday
to Friday), if two temperature pre-conditioning
sequences are run without the vehicle being
used, the programme will be deactivated.
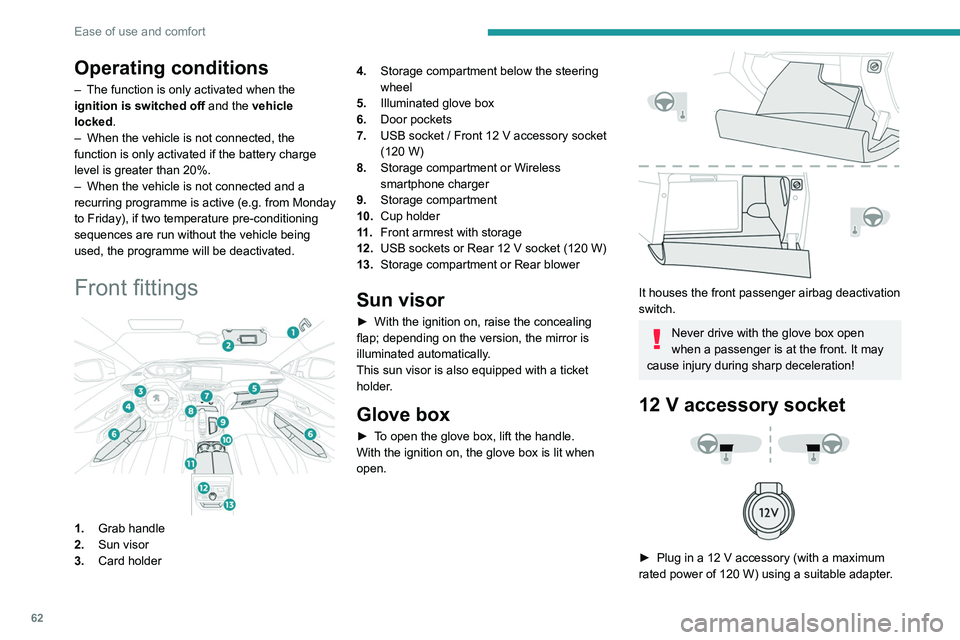
Front fittings
1. Grab handle
2. Sun visor
3. Card holder 4.
Storage compartment below the steering
wheel
5. Illuminated glove box
6. Door pockets
7. USB socket / Front 12 V accessory socket
(120 W)
8. Storage compartment or Wireless
smartphone charger
9. Storage compartment
10. Cup holder
11 . Front armrest with storage
12. USB sockets or Rear 12 V socket (120 W)
13. Storage compartment or Rear blower
Sun visor
► With the ignition on, raise the concealing
flap; depending on the version, the mirror is
illuminated automatically.
This sun visor is also equipped with a ticket
holder.
Glove box
► To open the glove box, lift the handle.
With the ignition on, the glove box is lit when
open.
It houses the front passenger airbag deactivation
switch.
Never drive with the glove box open
when a passenger is at the front. It may
cause injury during sharp deceleration!
12 V accessory socket
► Plug in a 12 V accessory (with a maximum
rated power of 120 W) using a suitable adapter.
Observe the maximum power rating to
avoid damaging the accessory.
The connection of an electrical device not approved by PEUGEOT, such as a
USB charger, may adversely affect the
operation of vehicle electrical systems,
causing faults such as poor radio reception or
interference with displays in the screens.
USB socket
These symbols determine the type of use of a USB socket:
Power supply and recharging.
Likewise, plus exchange of multimedia
data with the audio system.
Likewise, plus use of smartphone
applications with the touch screen.
The USB socket allows the connection of a
portable device or a USB memory stick.
It reads the audio files that are sent to your audio
system and played via the vehicle's speakers.