fog light Peugeot 508 2011 Owner's Manual - RHD (UK, Australia)
[x] Cancel search | Manufacturer: PEUGEOT, Model Year: 2011, Model line: 508, Model: Peugeot 508 2011Pages: 340, PDF Size: 25.76 MB
Page 16 of 340
14
Familiarisation
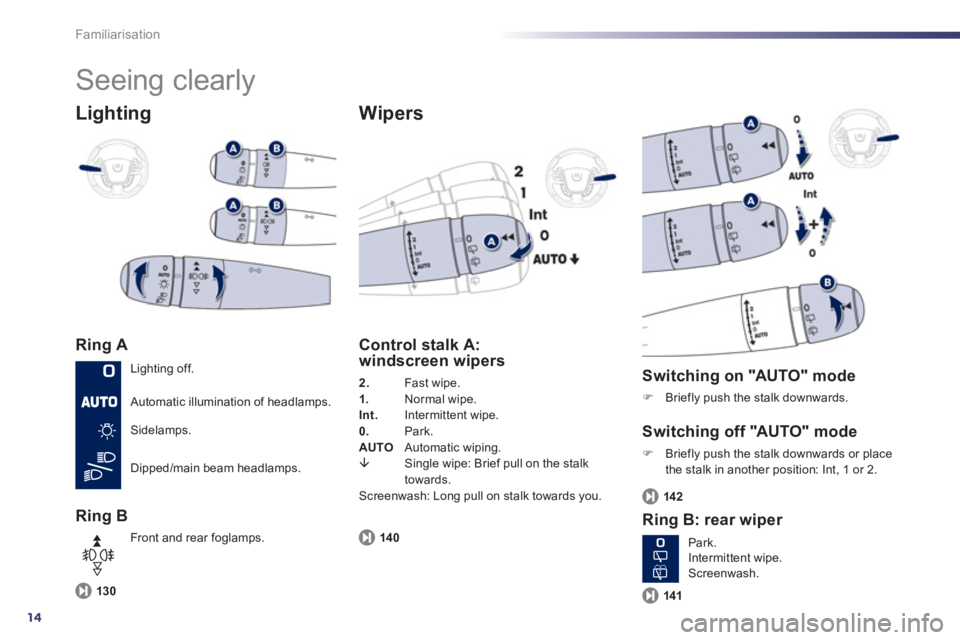
Seeing clearly
Lighting
Ring A
Ring B
Wipers
130
Control stalk A:
windscreen wipers
2.
Fast wipe.
1.
Normal wipe.
Int.
Intermittent wipe.
0.
Park.
AUTO
Automatic wiping.
�È
Single wipe: Brief pull on the stalk
towards.
Screenwash: Long pull on stalk towards you.
14 0
Switching on "AUTO" mode
�)
Briefly push the stalk downwards.
Switching off "AUTO" mode
�)
Briefly push the stalk downwards or place
the stalk in another position: Int, 1 or 2.
Ring B: rear wiper
142
141
Lighting off.
Automatic illumination of headlamps.
Sidelamps.
Dipped/main beam headlamps.
Front and rear foglamps.
Park.
Intermittent wipe.
Screenwash.
Page 24 of 340
22
i
Instruments and controls
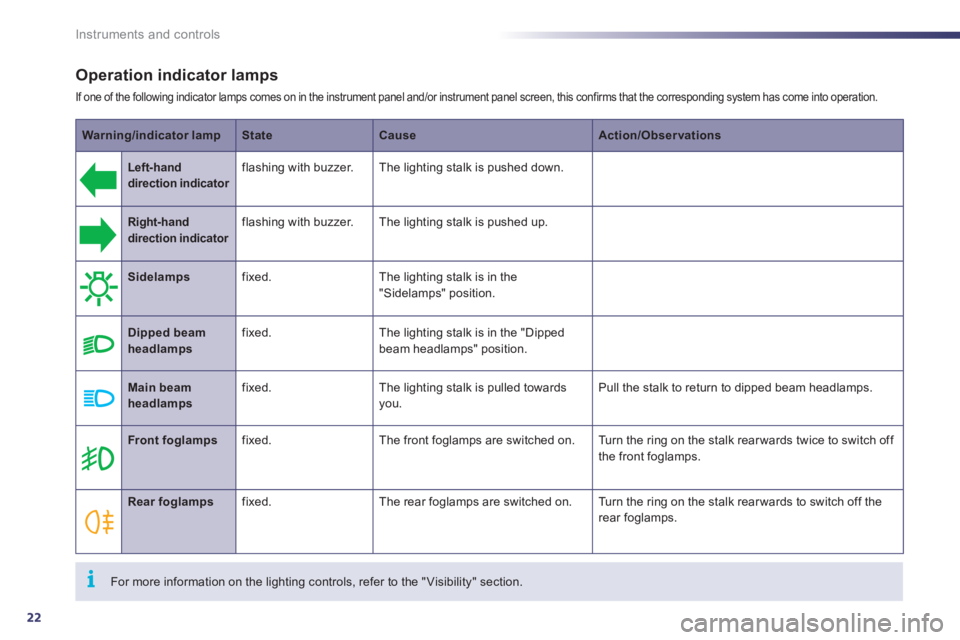
Operation indicator lamps
If one of the following indicator lamps comes on in the instrument panel and/or instrument panel screen, this confirms that the corresponding system has come into operation.
Warning/indicator lamp
State
Cause
Action/Observations
Left-hand
direction indicato
r
flashing with buzzer. The lighting stalk is pushed down.
Right-hand
direction indicator
flashing with buzzer. The lighting stalk is pushed up.
Sidelamps
fixed. The lighting stalk is in the
"Sidelamps" position.
Dipped beam
headlamps
fixed. The lighting stalk is in the "Dipped
beam headlamps" position.
Main beam
headlamps
fixed. The lighting stalk is pulled towards
you. Pull the stalk to return to dipped beam headlamps.
Front foglamps
fixed. The front foglamps are switched on. Turn the ring on the stalk rear wards twice to switch off
the front foglamps.
Rear foglamps
fixed. The rear foglamps are switched on. Turn the ring on the stalk rear wards to switch off the
rear foglamps.
For more information on the lighting controls, refer to the "Visibility" section.
Page 131 of 340
5
129 Visibility
Lighting controls
System for selection and control of the various front and rear lamps providing the vehicle's lighting and signalling.
Main lighting
The various front and rear lamps of the vehicle
are designed to provide the best visibility for the
driver and to signal the presence of the vehicle
to other road users:
- sidelamps, to be seen,
- dipped beam headlamps to see without
dazzling other drivers,
- main beam headlamps to see clearly when
the road is clear,
- directional headlamps for improved
visibility when cornering.
Additional lighting
Other lamps are installed to fulfil the
requirements of par ticular driving conditions:
- rear foglamps to better signal the presence
of the vehicle in foggy conditions,
- front foglamps for better visibility in foggy
conditions and to improve lighting at
intersections and when parking,
- daytime running lamps to be seen during
the day.
Automatic lighting
functions
Various automatic lighting functions are also
available depending on options:
- guide-me-home lighting,
- directional headlamps,
- welcome lighting,
- daytime running lamps,
- automatic illumination of headlamps,
- automatic headlamp dipping.
Page 133 of 340
5
131
!
Visibility
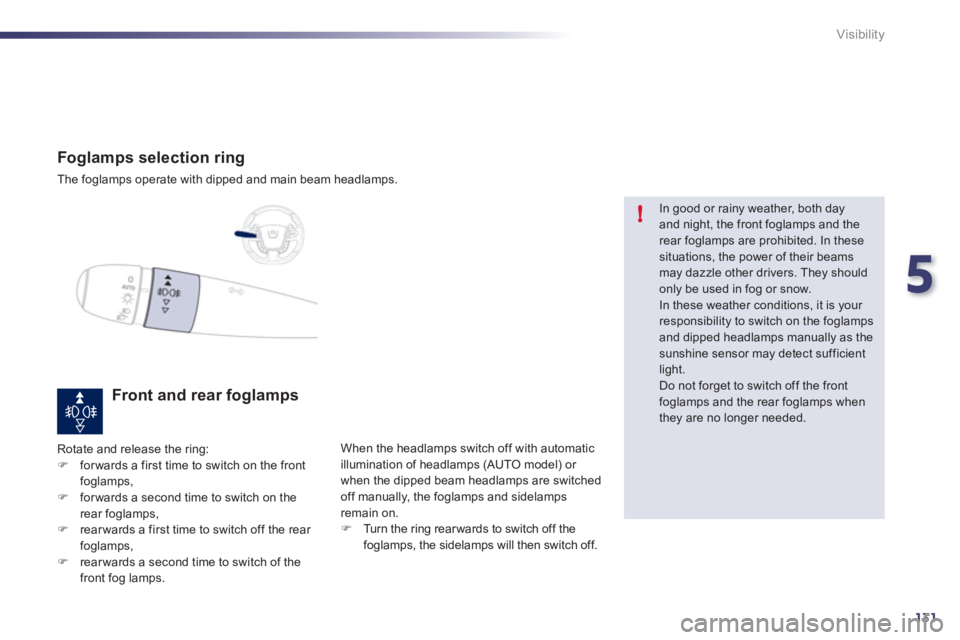
Foglamps selection ring
The foglamps operate with dipped and main beam headlamps.
Front and rear foglamps
Rotate and release the ring:
�)
for wards a first time to switch on the front
foglamps,
�)
for wards a second time to switch on the
rear foglamps,
�)
rear wards a first time to switch off the rear
foglamps,
�)
rear wards a second time to switch of the
front fog lamps. When the headlamps switch off with automatic
illumination of headlamps (AUTO model) or
when the dipped beam headlamps are switched
off manually, the foglamps and sidelamps
remain on.
�)
Turn the ring rear wards to switch off the
foglamps, the sidelamps will then switch off.
In good or rainy weather, both day
and night, the front foglamps and the
rear foglamps are prohibited. In these
situations, the power of their beams
may dazzle other drivers. They should
only be used in fog or snow.
In these weather conditions, it is your
responsibility to switch on the foglamps
and dipped headlamps manually as the
sunshine sensor may detect sufficient
light.
Do not forget to switch off the front
foglamps and the rear foglamps when
they are no longer needed.
Page 136 of 340
134
!
Visibility
The sidelamps and dipped beam headlamps
are switched on automatically, without any
action on the par t of the driver, when a low level
of external light is detected or in cer tain cases
of activation of the windscreen wipers.
As soon as the brightness returns to a sufficient
level or after the windscreen wipers are switched
off, the lamps are switched off automatically.
Automatic illumination of
headlamps
Activation
�)
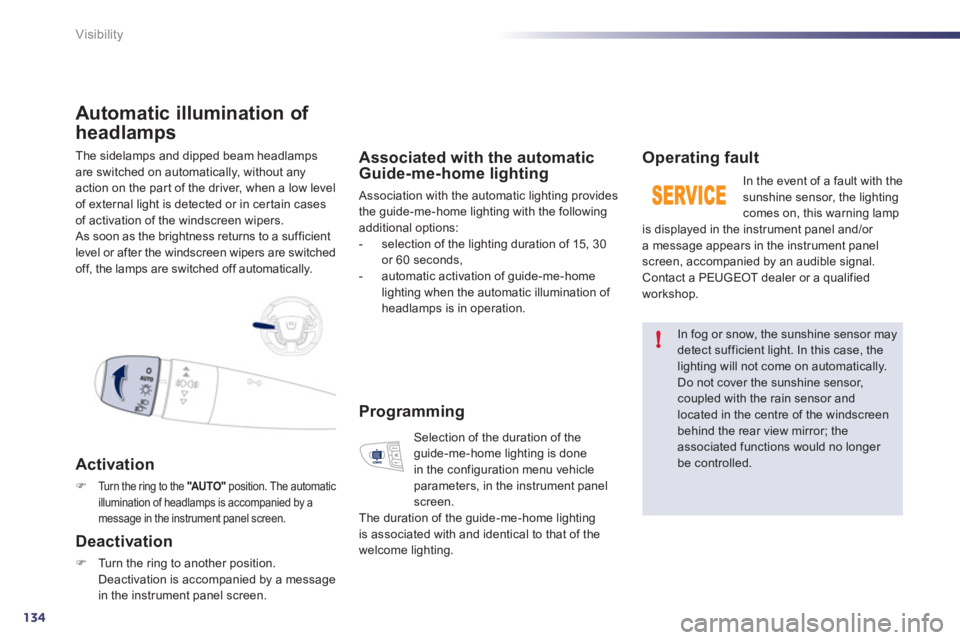
Turn the ring to the "AU TO "
position. The automatic
illumination of headlamps is accompanied by a
message in the instrument panel screen.
Deactivation
�)
Turn the ring to another position.
Deactivation is accompanied by a message
in the instrument panel screen.
Associated with the automatic
Guide-me-home lighting
Association with the automatic lighting provides
the guide-me-home lighting with the following
additional options:
- selection of the lighting duration of 15, 30
or 60 seconds,
- automatic activation of guide-me-home
lighting when the automatic illumination of
headlamps is in operation.
Operating fault
In the event of a fault with the
sunshine sensor, the lighting
comes on, this warning lamp
is displayed in the instrument panel and/or
a message appears in the instrument panel
screen, accompanied by an audible signal.
Contact a PEUGEOT dealer or a qualified
workshop.
In fog or snow, the sunshine sensor may
detect sufficient light. In this case, the
lighting will not come on automatically.
Do not cover the sunshine sensor,
coupled with the rain sensor and
located in the centre of the windscreen
behind the rear view mirror; the
associated functions would no longer
be controlled.
Programming
Selection of the duration of the
guide-me-home lighting is done
in the configuration menu vehicle
parameters, in the instrument panel
screen.
The duration of the guide-me-home lighting
is associated with and identical to that of the
welcome lighting.
Page 137 of 340
5
135
i
i
Visibility
Adaptive lighting
Switching on
The driver can take over at any time, if the
circumstances dictate: System which automatically changes between
dipped and main beam according to the driving
conditions, using a sensor in the rear view
mirror.
The system is active from 15 mph (25 km/h)
and is deactivated below 9 mph (15 km/h).
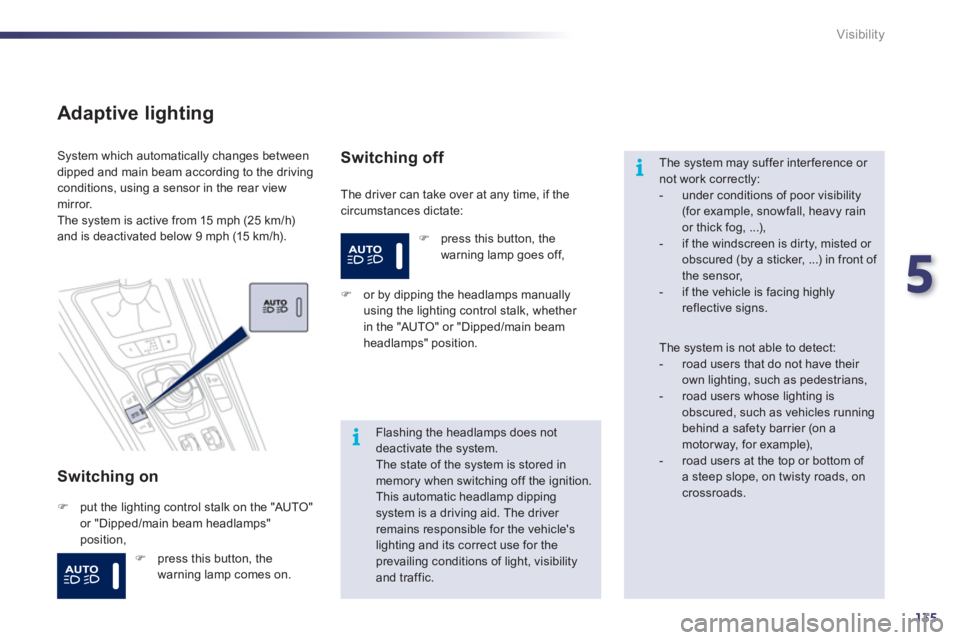
�)
put the lighting control stalk on the "AUTO"
or "Dipped/main beam headlamps"
position,
Switching off
�)
or by dipping the headlamps manually
using the lighting control stalk, whether
in the "AUTO" or "Dipped/main beam
headlamps" position.
Flashing the headlamps does not
deactivate the system.
The state of the system is stored in
memory when switching off the ignition.
This automatic headlamp dipping
system is a driving aid. The driver
remains responsible for the vehicle's
lighting and its correct use for the
prevailing conditions of light, visibility
and traffic.
The system may suffer inter ference or
not work correctly:
- under conditions of poor visibility
(for example, snowfall, heavy rain
or thick fog, ...),
- if the windscreen is dir ty, misted or
obscured (by a sticker, ...) in front of
the sensor,
- if the vehicle is facing highly
reflective signs.
The system is not able to detect:
- road users that do not have their
own lighting, such as pedestrians,
- road users whose lighting is
obscured, such as vehicles running
behind a safety barrier (on a
motor way, for example),
- road users at the top or bottom of
a steep slope, on twisty roads, on
crossroads.
�)
press this button, the
warning lamp goes off,
�)
press this button, the
warning lamp comes on.
Page 141 of 340
5
139
Visibility
Additional directional lighting
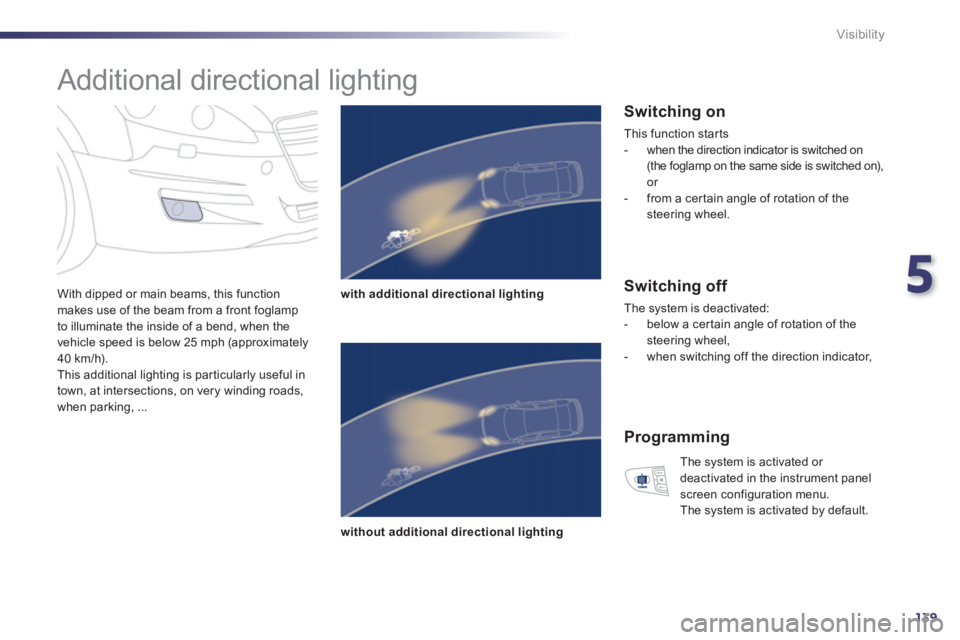
With dipped or main beams, this function
makes use of the beam from a front foglamp
to illuminate the inside of a bend, when the
vehicle speed is below 25 mph (approximately
40 km/h).
This additional lighting is particularly useful in
town, at intersections, on very winding roads,
when parking, ...
with additional directional lighting
without additional directional lighting
Switching on
This function starts
- when the direction indicator is switched on
(the foglamp on the same side is switched on),
or
- from a cer tain angle of rotation of the
steering wheel.
Switching off
The system is deactivated:
- below a cer tain angle of rotation of the
steering wheel,
- when switching off the direction indicator,
Programming
The system is activated or
deactivated in the instrument panel
screen configuration menu.
The system is activated by default.
Page 185 of 340
8
183
i
Practical information
Changing a bulb
Front lamps
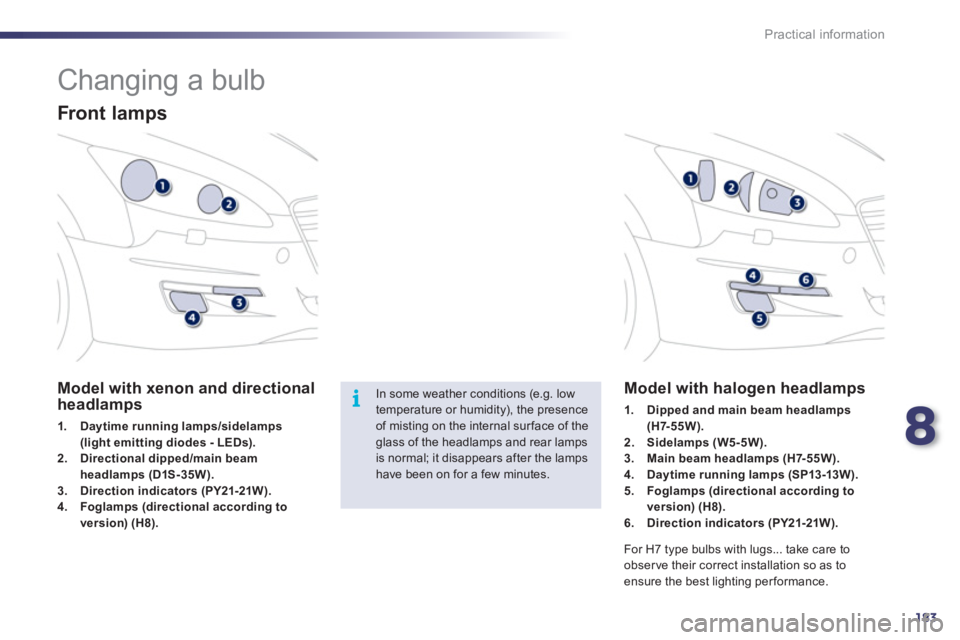
Model with xenon and directional
headlamps
1.
Daytime running lamps/sidelamps
(light emitting diodes - LEDs).
2.
Directional dipped/main beam
headlamps (D1S-35W).
3.
Direction indicators (PY21-21W).
4.
Foglamps (directional according to
version) (H8).
Model with halogen headlamps
1.
Dipped and main beam headlamps
(H7-55W).
2.
Sidelamps (W5-5W).
3.
Main beam headlamps (H7-55W).
4.
Daytime running lamps (SP13-13W).
5.
Foglamps (directional according to
version) (H8).
6.
Direction indicators (PY21-21W).
For H7 type bulbs with lugs... take care to
obser ve their correct installation so as to
ensure the best lighting per formance.
In some weather conditions (e.g. low
temperature or humidity), the presence
of misting on the internal sur face of the
glass of the headlamps and rear lamps
is normal; it disappears after the lamps
have been on for a few minutes.
Page 190 of 340
188
i
Practical information
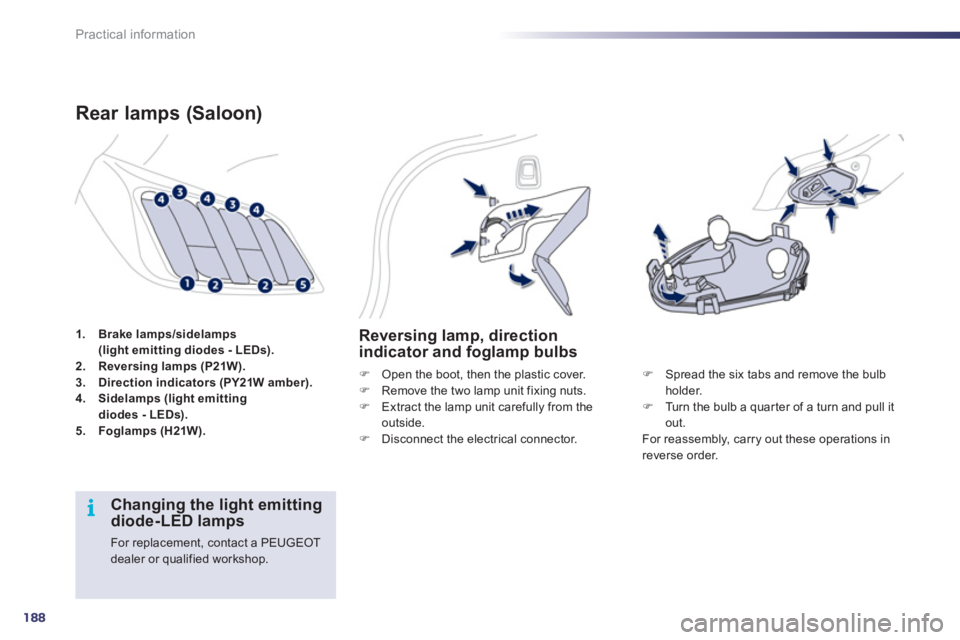
1.
Brake lamps/sidelamps
(light emitting diodes - LEDs).
2.
Reversing lamps (P21W).
3.
Direction indicators (PY21W amber).
4.
Sidelamps (light emitting
diodes - LEDs).
5.
Foglamps (H21W).
Rear lamps (Saloon)
Reversing lamp, direction
indicator and foglamp bulbs
�)
Open the boot, then the plastic cover.
�)
Remove the two lamp unit fixing nuts.
�)
Extract the lamp unit carefully from the
outside.
�)
Disconnect the electrical connector.
�)
Spread the six tabs and remove the bulb
holder.
�)
Turn the bulb a quar ter of a turn and pull it
out.
For reassembly, carry out these operations in
reverse order.
Changing the light emitting
diode-LED lamps
For replacement, contact a PEUGEOT
dealer or qualified workshop.
Page 191 of 340
8
189
i
Practical information
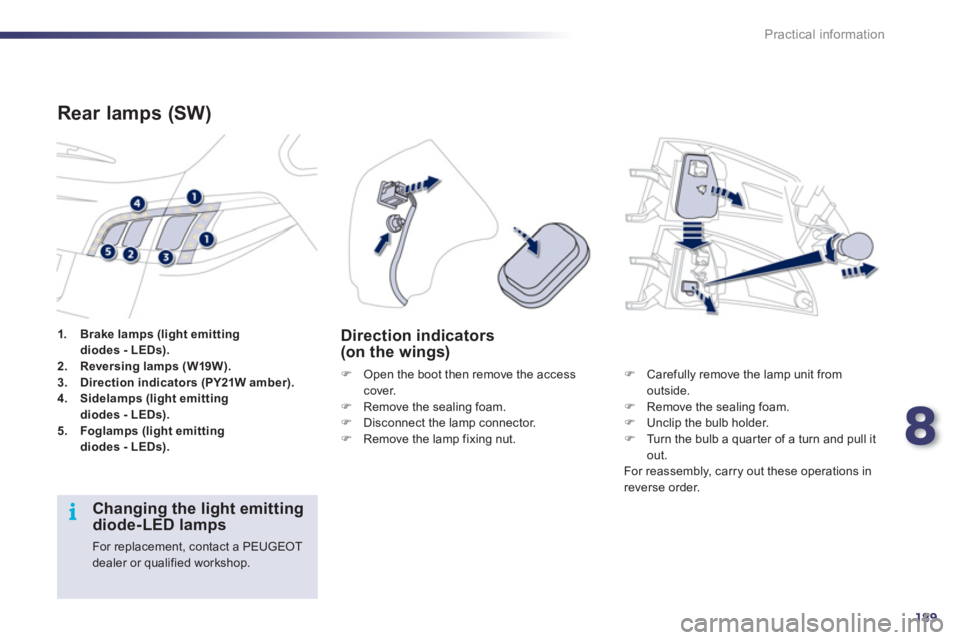
1.
Brake lamps (light emitting
diodes - LEDs).
2.
Reversing lamps (W19W).
3.
Direction indicators (PY21W amber).
4.
Sidelamps (light emitting
diodes - LEDs).
5.
Foglamps (light emitting
diodes - LEDs).
Rear lamps (SW)
�)
Open the boot then remove the access
cover.
�)
Remove the sealing foam.
�)
Disconnect the lamp connector.
�)
Remove the lamp fixing nut.
Direction indicators
(on the wings)
�)
Carefully remove the lamp unit from
outside.
�)
Remove the sealing foam.
�)
Unclip the bulb holder.
�)
Turn the bulb a quar ter of a turn and pull it
out.
For reassembly, carry out these operations in
reverse order.
Changing the light emitting
diode-LED lamps
For replacement, contact a PEUGEOT
dealer or qualified workshop.