key Peugeot 508 2012 Owner's Manual
[x] Cancel search | Manufacturer: PEUGEOT, Model Year: 2012, Model line: 508, Model: Peugeot 508 2012Pages: 340, PDF Size: 11.11 MB
Page 3 of 340
i !
WELCOME
Key
Warning:
this symbol marks warnings which it is essential to observe for your own safety, for the safety of others or toavoid any risk of damaging your vehicle.
Information:
this symbol draws your attention to additional information for better use of your vehicle.
Protection of
the environment:
this symbol accompanies advicerelating to protection of the environment.
Page reference:
this symbol invites you to refer to the
pages which provide details of the function.
Thank
you for choosing a 508.
This handbook has been designed to enable you
to make the most of
your vehicle in all situations.
Therefore, on the first few pages, you will find a
detailed summary followed by a quick reference guide intended to make it easier for you to
become
familiar with your vehicle.
All of the details specific to your vehicle, comfort, safety, practical information, are then presented in this handbook, to increase your
appreciation of the vehicle and to help you make
the most of it.
Each model ma
y only be fitted with some
of the equipment shown in this handbook,depending on the trim level, model, version andspecification for the country in which it is sold.
Page 4 of 340
.
Contents
Instrument panel 22
Indicator and warning lamps 23
Gauges and indicators 33
Tr ip computer 38
Instruments and controlsFamiliarisation
Remote control key 41
Alarm 50
Electric windows 52
Boot 54
Motorised tailgate (SW) 55
Sunroof 58
Panoramic sunroof (SW) 60
Fuel tank 61
Diesel misfuel prevention 62
Access
Front seats 64
Rear seats 69
Mirrors 71
Steering wheel adjustment 73
Interior fi ttings 74
Boot fi ttin
gs (Saloon) 77
Boot fi ttings (SW) 78
Heating and Ventilation 83
Manual air conditioning 85
Dual-zone digital air conditioning 87
Quad-zone digital air conditioning 90
Rear screen demist - defrost 95
Programmable Heating/Ventilation 96
Comfort
Starting-switching off the engine 97
Electric parking brake 99
Manual parking brake 106
Manual gearbox 107
Gear shift indicator 108
Automatic gearbox 109
6-speed electronic gear control gearbox 113
Stop & Star t 117
Hill start assist 120
Head-up display 121
Speed limiter 124
Cruise control 126
Parking sensors 128
Parking space sensors 130
Driving
Lighting controls 132
Automatic illumination of headlamps 137
Headlamp adjustment 140
Directional lighting 141
Wiper controls 143
Automatic rain sensitive wipers 145
Cour tesy lamps 147
Interior mood lighting 148
Visibility
Eco-driving 20
Page 6 of 340
4
Familiarisation
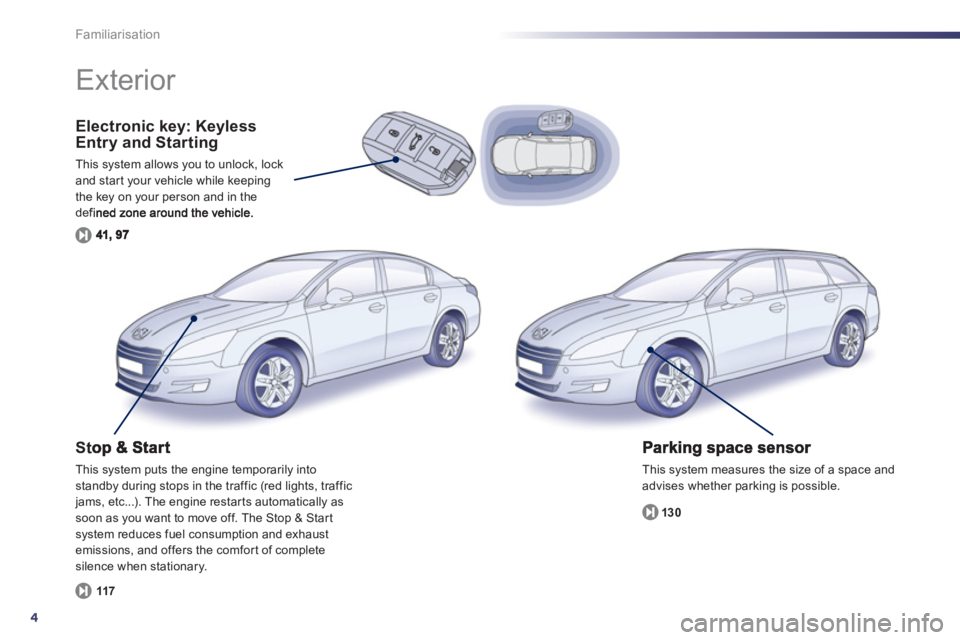
Electronic key: KeylessEntry and Starting
This system allows you to unlock, lockand star t your vehicle while keepingthe key on your person and in the defined zone around the vehicle.
This system measures the size of a space and
advises whether parking is possible.
13
0
Exterior
St
This system puts the engine temporarily into standby during stops in the traffic (red lights, traffic jams, etc...). The engine restar ts automatically as soon as you want to move off. The Stop & Start system reduces fuel consumption and exhaustemissions, and offers the comfor t of complete silence when stationary.
117
Page 8 of 340
6
i
Familiarisation
Open
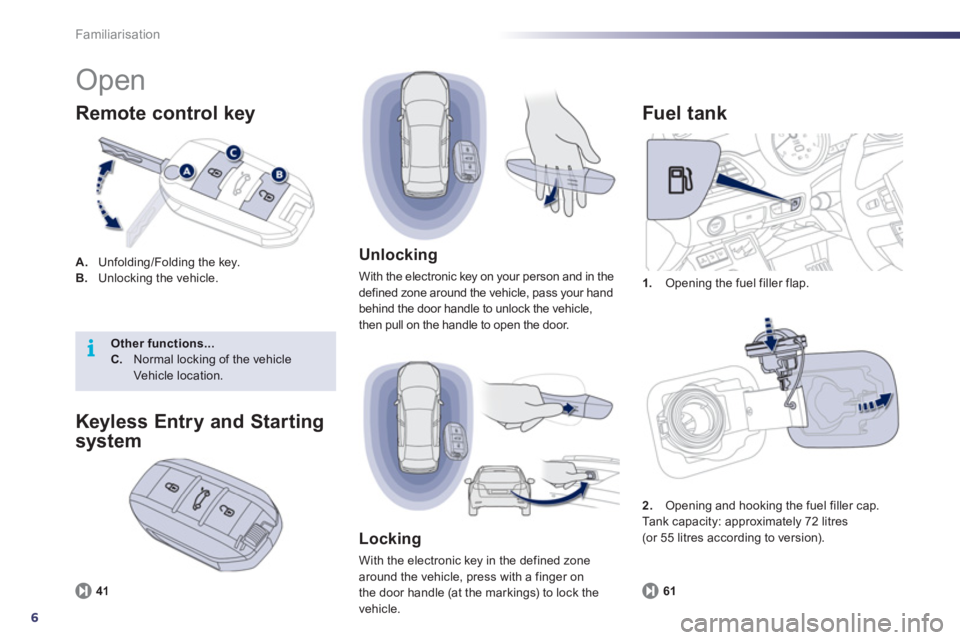
A.
Unfolding/Folding the key. B.Unlocking the vehicle.
Remote control key
1.
Opening the fuel filler flap.
Fuel t ank
61
Unlocking
With the electronic key on your person and in the
defined zone around the vehicle, pass your hand behind the door handle to unlock the vehicle,
then pull on the handle to open the door.
Locking
With the electronic key in the defined zone
around the vehicle, press with a finger on
the door handle (at the markings) to lock the
vehicle.
Keyless Entry and Starting
system
2.Opening and hooking the fuel filler cap.
Ta n k c a p a c i ty: approximately 72 litres(or 55 litres according to version).
Other functions...C.Normal locking of the vehicle Vehicle location.
41
Page 10 of 340
8
Familiarisation
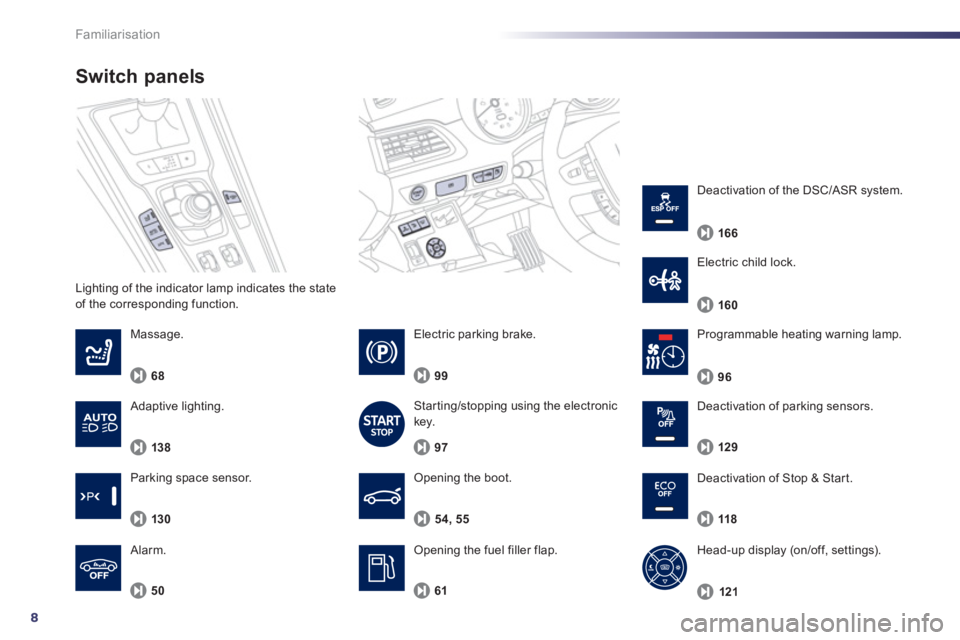
Lighting of the indicator lamp indicates the state
of the corresponding function.
Switch panels
Opening the boot.
Opening the fuel filler flap. 54, 55
Massa
ge.
6
8
50
Alarm.
Pro
grammable heating warning lamp.
6
1
96
Electric parking brake.
99
Starting/stopping using the electronic key.
97
Deactivation o
f Stop & Start.
118
Head-up display (on/off, settings).
12
1
Deactivation of parking sensors.
129
Parkin
g space sensor.
130
Electric child lock.
160
Deactivation o
f the DSC/ASR system.
166
Adaptive lighting.
138
Page 12 of 340
10
Familiarisation
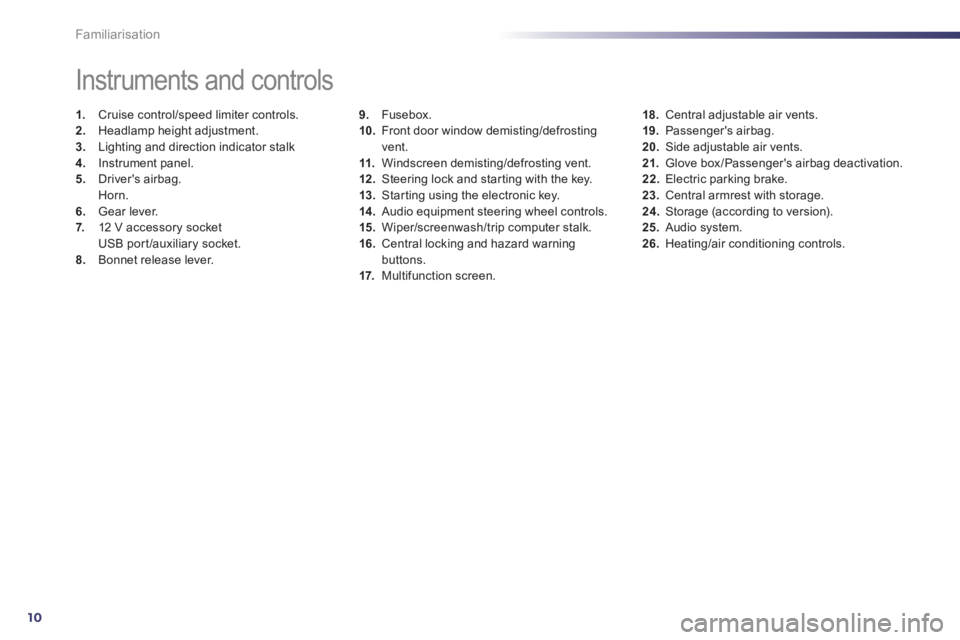
9.Fusebox.
10. Front door window demisting/defrostingvent.
11.Windscreen demisting/defrosting vent. 12 .Steering lock and star ting with the key.
13. Starting using the electronic key. 14 .
Audio equipment steering wheel controls.
15. Wiper/screenwash/trip computer stalk.
16.Central locking and hazard warningbuttons.
17. Multifunction screen.
Instruments and controls
1.
Cruise control/speed limiter controls. 2.
Headlamp height adjustment. 3.
Lighting and direction indicator stalk
4.
Instrument panel. 5.
Driver's airbag.Horn.
6.Gear lever.
7. 12 V accessory socket
USB por t/auxiliary socket.8.Bonnet release lever.
18.Central adjustable air vents.19. Passenger's airbag.20.
Side adjustable air vents.
21.Glove box/Passenger's airbag deactivation. 22.
Electric parking brake. 23.
Central armrest with storage. 24.
Storage (according to version).25.Audio system. 26.Heating/air conditioning controls.
Page 19 of 340
.
17
Familiarisation
Passenger safety
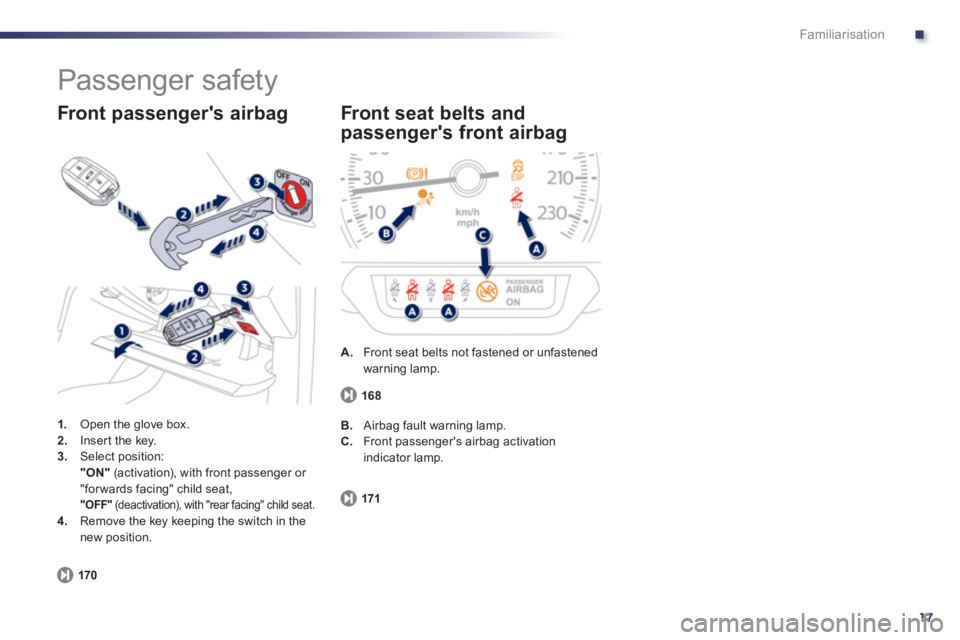
1.
Open the glove box. 2.Inser t the key. 3.Select position:"ON"(activation), with front passenger or
"for wards facing" child seat, "OFF"
(deactivation), with "rear facing" child seat. 4.
Remove the key keeping the switch in the
new position.
Front passenger's airbag
170
A.
Front seat belts not fastened or unfastenedwarning lamp.
Front seat belts and
passen
ger's front airbag
171
B. Airbag fault warning lamp.
C.
Front passenger's airbag activationindicator lamp.
168
Page 20 of 340
18
i
!
Familiarisation
Driving safely
Stop & Start
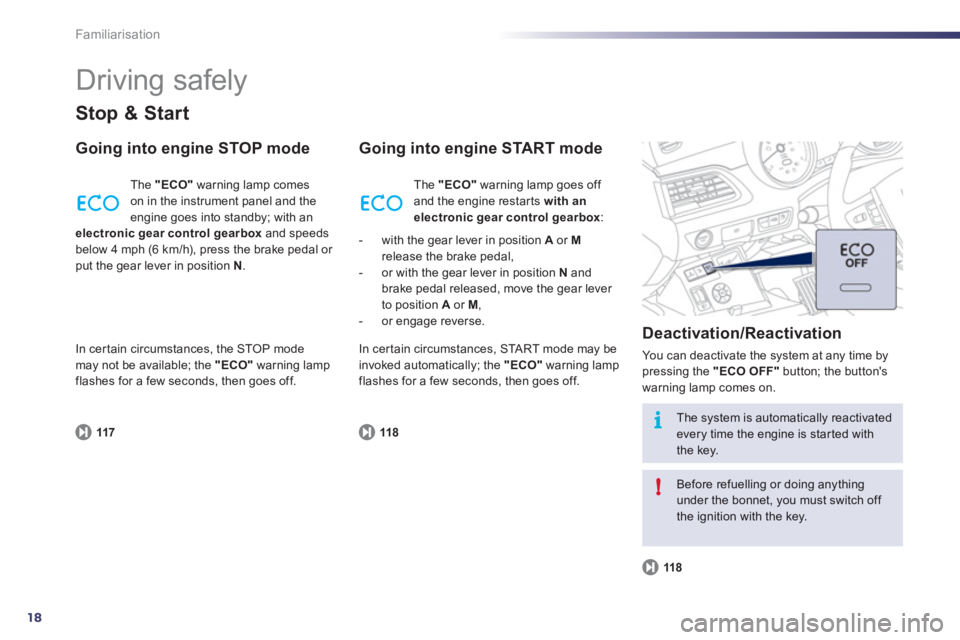
Going into engine STOP mode
117
The "ECO"warning lamp comes
on in the instrument panel and the
engine goes into standby; with anelectronic gear control gearbox and speeds
below 4 mph (6 km/h), press the brake pedal or put the gear lever in position N.
Going into engine START mode
Deactivation
/Reactivation
You can deactivate the system at any time bypressing the "ECO OFF"
button; the button's
warning lamp comes on.
118
118
The system is automatically reactivated every time the engine is star ted withthe key.
Before refuelling or doing anything under the bonnet, you must switch off the ignition with the key. Th
e "ECO"
warning lamp goes off
and the engine restar ts with anelectronic gear control gearbox:
- with the gear lever in position A
or Mrelease the brake pedal,
- or with the gear lever in position N
andbrake pedal released, move the gear lever
to position Aor M ,
- or engage reverse.
In certain circumstances, the ST
OP modemay not be available; the "ECO"
warning lamp
flashes for a few seconds, then goes off. In certain circumstances,
STA R T m o d e m ay be
invoked automatically; the "ECO"warning lampflashes for a few seconds, then goes off.
Page 36 of 340
34
i
Instruments and controls
* According to country.
CHECK (vehicle autotest)
Automatic CHECK
With the key in the ignition on position, all of the
warning lamps for the functions tested are displayed.
They are switched off after a few seconds. At the same time, an automatic CHECK(vehicle autotest) is carried out.
In the presence of a fault
A "minor" fault has been detected: the warning
lamp(s) are displayed then go off.You can star t your vehicle; however, contact a PEUGEOT dealer or a qualified workshop as soon as possible.
A "major" fault has been detected:
the associated warning lamps(s) remain
on accompanied by the STOP or SERVICE
warning lamp.
Do not star t your vehicle. Call a PEUGEOT dealer or a qualified
wor
kshop without delay.
Manual CHECK
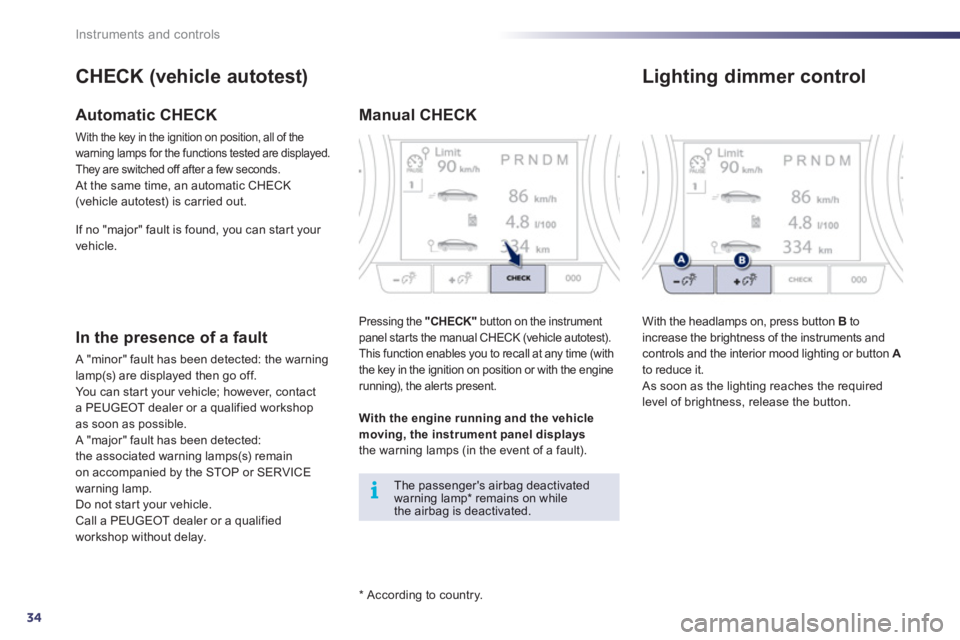
Pressing the "CHECK"button on the instrument
panel star ts the manual CHECK (vehicle autotest).
This function enables you to recall at any time (with
the key in the ignition on position or with the engine
running), the aler ts present.
The passenger's airbag deactivated warning lamp * remains on while the airbag is deactivated.
With the en
gine running and the vehiclemoving, the instrument panel displaysthe warning lamps (in the event of a fault). I
f no "major" fault is found, you can star t your
vehicle.
Lighting dimmer control
With the headlamps on, press button B
to
increase the brightness of the instruments and controls and the interior mood lighting or button Ato reduce it.
As soon as the lighting reaches the required
level of brightness, release the button.
Page 37 of 340
1
35
i
Instruments and controls
Service indicator
More than 1 800 miles (3 000 km)remain before the next service is due
When the ignition is switched on, no ser vice information appears in the screen. S
ystem which informs the driver when the next ser vice is due, in accordance with themanufacturer's servicing schedule.
The point at which the ser vice is due is calculated from the last indicator zero reset.
It is determined by two parameters:
- the distance travelled,
- the time elapsed since the last ser vice. Between 600 miles (1 000 km) and
1 800 miles (3 000 km) remainbefore the next service is due
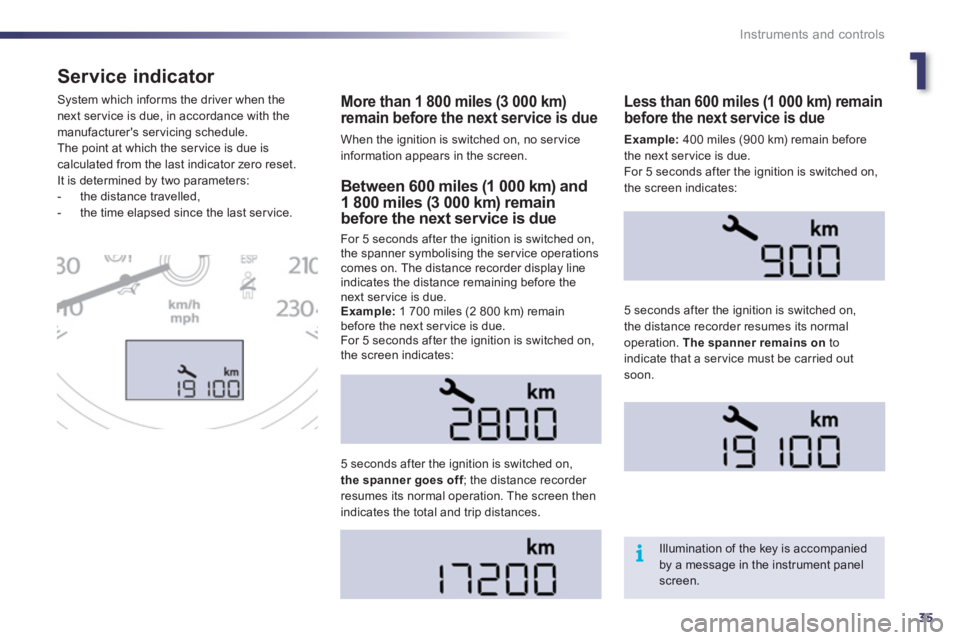
For 5 seconds after the ignition is switched on,
the spanner symbolising the ser vice operationscomes on. The distance recorder display line indicates the distance remaining before the next service is due.
Example:
1 700 miles (2 800 km) remain before the next service is due.
For 5 seconds after the ignition is switched on,
the screen indicates:
5 seconds a
fter the ignition is switched on,the spanner goes off; the distance recorder fresumes its normal operation. The screen thenindicates the total and trip distances.
Less than 600 miles (1 000 km) remain
before the next service is due
Example:400 miles (900 km) remain before
the next service is due.
For 5 seconds after the i
gnition is switched on,
the screen indicates:
5 seconds after the i
gnition is switched on,
the distance recorder resumes its normal operation. The spanner remains on
toindicate that a service must be carried out soon.
Illumination of the key is accompaniedby a message in the instrument panel screen.