tyre pressure Peugeot 508 2018 User Guide
[x] Cancel search | Manufacturer: PEUGEOT, Model Year: 2018, Model line: 508, Model: Peugeot 508 2018Pages: 320, PDF Size: 10.09 MB
Page 218 of 320
216
Temporary puncture
repair kit
Scan the QR code on page 3 to view
explanatory videos.
Comprising a compressor and a sealant
cartridge, it allows the temporary repair of
a tyre so that you can drive to the nearest
garage.
It is designed to repair most punctures which
could affect the tyre, located on the tyre tread
or shoulder.
The vehicle's electric system allows the
connection of the compressor for long
enough to inflate a tyre after a puncture
repair.
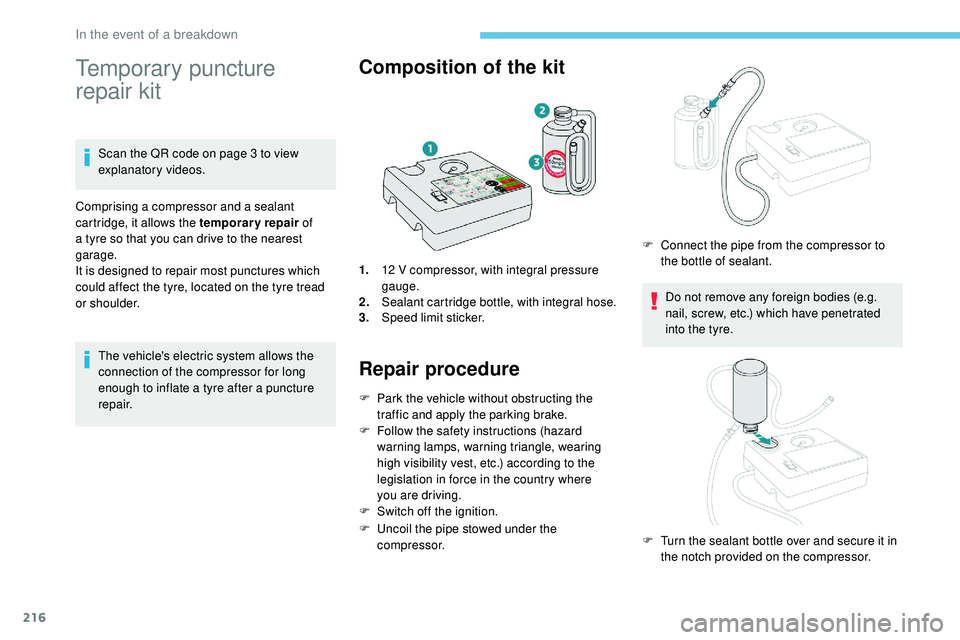
Composition of the kit
1. 12 V compressor, with integral pressure
gauge.
2. Sealant cartridge bottle, with integral hose.
3. Speed limit sticker.
Repair procedure
F Park the vehicle without obstructing the
traffic and apply the parking brake.
F
F
ollow the safety instructions (hazard
warning lamps, warning triangle, wearing
high visibility vest, etc.) according to the
legislation in force in the country where
you
are driving.
F
S
witch off the ignition.
F
U
ncoil the pipe stowed under the
compressor. Do not remove any foreign bodies (e.g.
nail, screw, etc.) which have penetrated
into the tyre.
F
C
onnect the pipe from the compressor to
the bottle of sealant.
F
T
urn the sealant bottle over and secure it in
the notch provided on the compressor.
In the event of a breakdown
Page 219 of 320
217
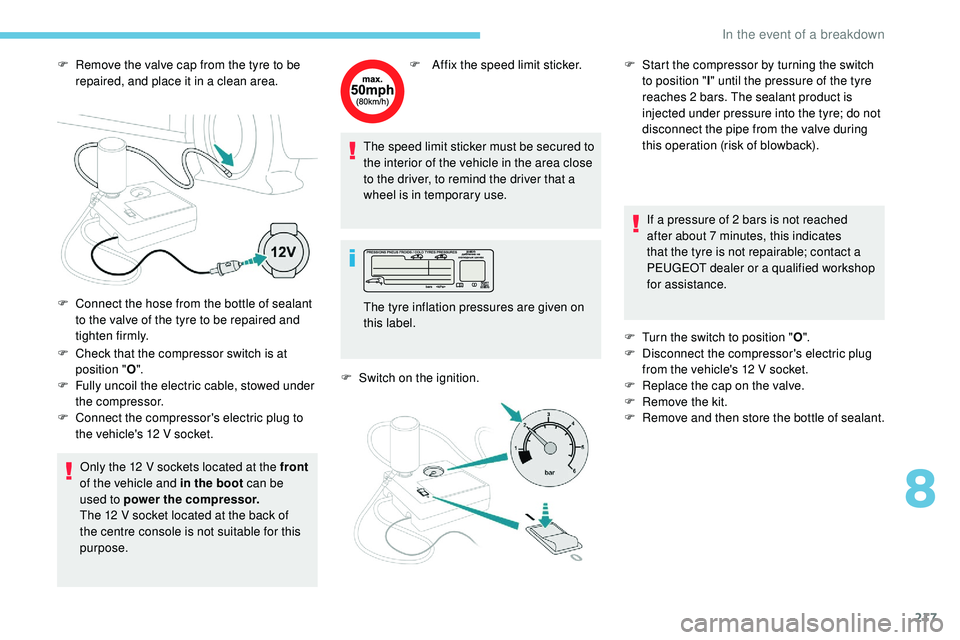
F Remove the valve cap from the tyre to be repaired, and place it in a clean area.
F
C
heck that the compressor switch is at
position " O".
F
F
ully uncoil the electric cable, stowed under
the compressor.
F
C
onnect the compressor's electric plug to
the vehicle's 12
V socket.
Only the 12
V sockets located at the front
of the vehicle and in the boot can be
used to power the compressor.
The 12
V socket located at the back of
the centre console is not suitable for this
purpose. F
A ffix the speed limit sticker.
The speed limit sticker must be secured to
the interior of the vehicle in the area close
to the driver, to remind the driver that a
wheel is in temporary use.
F
S
witch on the ignition.If a pressure of 2 bars is not reached
after about 7 minutes, this indicates
that the tyre is not repairable; contact a
PEUGEOT dealer or a qualified workshop
for assistance.
F
T
urn the switch to position "O".
F
D
isconnect the compressor's electric plug
from the vehicle's 12
V socket.
F
R
eplace the cap on the valve.
F
R
emove the kit.
F
R
emove and then store the bottle of sealant.
F
C
onnect the hose from the bottle of sealant
to the valve of the tyre to be repaired and
tighten firmly. The tyre inflation pressures are given on
this label.F
S tart the compressor by turning the switch
to position " l" until the pressure of the tyre
reaches 2 bars. The sealant product is
injected under pressure into the tyre; do not
disconnect the pipe from the valve during
this operation (risk of blowback).
8
In the event of a breakdown
Page 220 of 320
218
Take care, the sealant product is harmful
if swallowed and causes irritation to the
eyes.
Keep this product out of the reach of
children.
The use-by date of the fluid is marked on
the bottle.
After use, do not discard the bottle in
standard waste, take it to a PEUGEOT
dealer or an authorised waste disposal
site.
Do not forget to obtain a new bottle of
sealant, available from a PEUGEOT
dealer or a qualified workshop.Do not exceed the speed of 50 mph
(80
km/h) when driving with a tyre repaired
using this type of kit.
Checking/adjusting tyre
pressures
You can also use the compressor,
without injecting sealant, to check and,
if
necessary, adjust the tyre pressures.
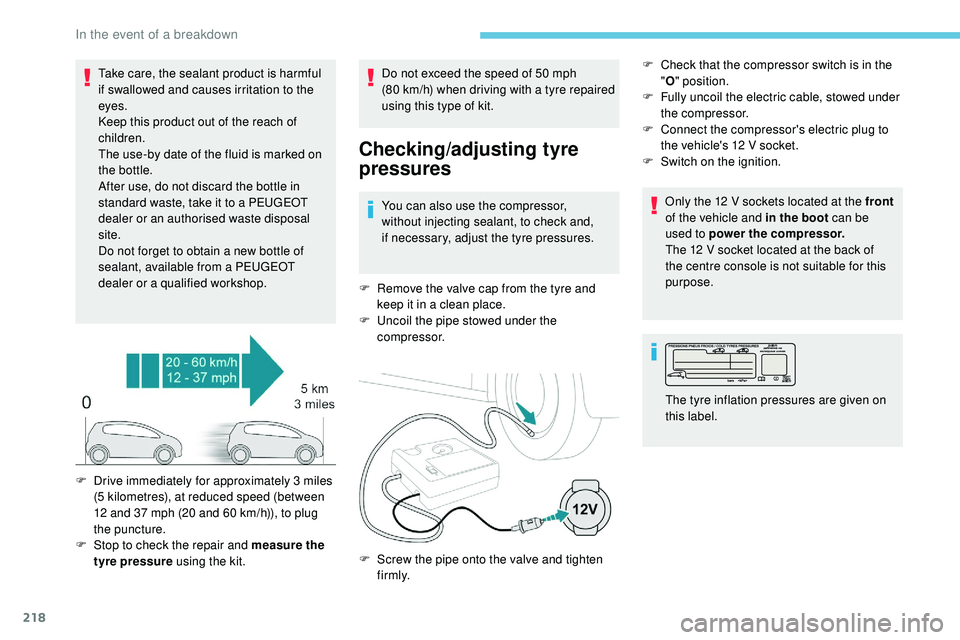
F
R
emove the valve cap from the tyre and
keep it in a clean place.
F
U
ncoil the pipe stowed under the
compressor. F
C
heck that the compressor switch is in the
" O " position.
F
F
ully uncoil the electric cable, stowed under
the compressor.
F
C
onnect the compressor's electric plug to
the vehicle's 12 V socket.
F
S
witch on the ignition.
Only the 12 V sockets located at the front
of the vehicle and in the boot can be
used to power the compressor.
The 12 V socket located at the back of
the centre console is not suitable for this
purpose.
F
D
rive immediately for approximately 3 miles
(5 kilometres), at reduced speed (between
12 and 37 mph (20 and 60
km/h)), to plug
the puncture.
F
S
top to check the repair and measure the
tyre pressure using the kit. F
S
crew the pipe onto the valve and tighten
f i r m l y. The tyre inflation pressures are given on
this label.
In the event of a breakdown
Page 221 of 320
219
If a pressure of 2 bars is not reached after
7 minutes, this indicates that the tyre is not
repairable; contact a PEUGEOT dealer or
a qualified workshop for assistance.
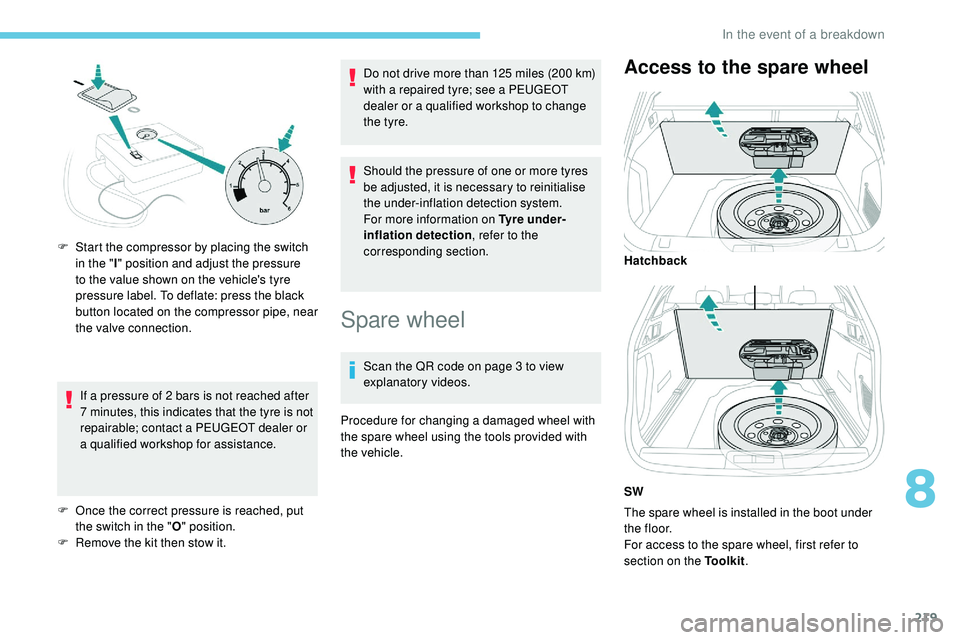
F
O
nce the correct pressure is reached, put
the switch in the " O" position.
F
R
emove the kit then stow it. Do not drive more than 125 miles (200
km)
with a repaired tyre; see a PEUGEOT
dealer or a qualified workshop to change
the tyre.
Should the pressure of one or more tyres
be adjusted, it is necessary to reinitialise
the under-inflation detection system.
For more information on Tyre under-
inflation detection , refer to the
corresponding section.
Spare wheel
Scan the QR code on page 3 to view
explanatory videos.
Procedure for changing a damaged wheel with
the spare wheel using the tools provided with
the vehicle.
Access to the spare wheel
The spare wheel is installed in the boot under
t h e f l o o r.
For access to the spare wheel, first refer to
section on the Toolkit .
F
S
tart the compressor by placing the switch
in the " I" position and adjust the pressure
to the value shown on the vehicle's tyre
pressure label. To deflate: press the black
button located on the compressor pipe, near
the valve connection. Hatchback
SW
8
In the event of a breakdown
Page 225 of 320
223
After changing a wheel
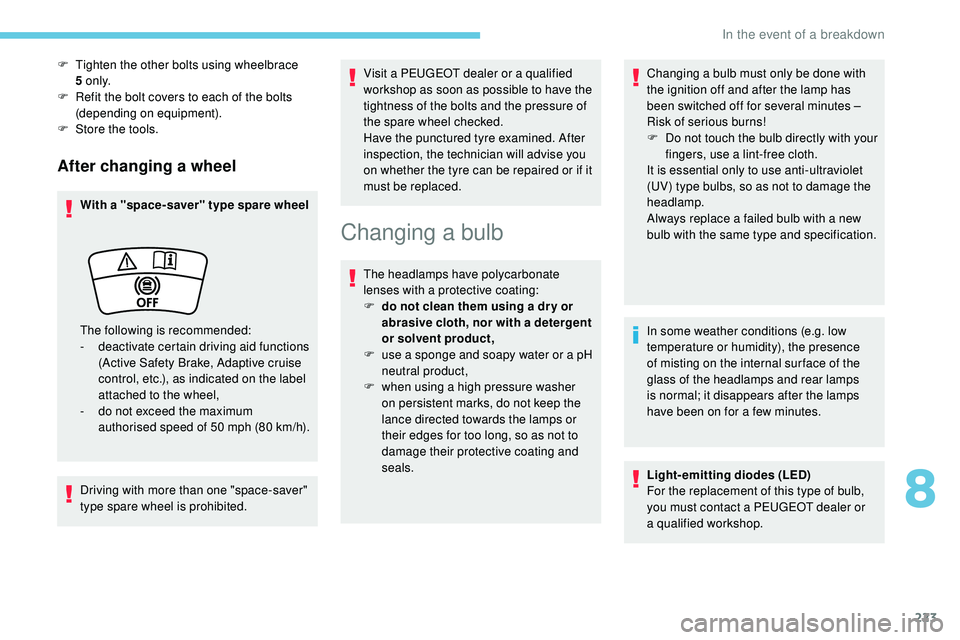
With a "space-saver" type spare wheel
Driving with more than one "space-saver"
type spare wheel is prohibited.Visit a PEUGEOT dealer or a qualified
workshop as soon as possible to have the
tightness of the bolts and the pressure of
the spare wheel checked.
Have the punctured tyre examined. After
inspection, the technician will advise you
on whether the tyre can be repaired or if it
must be replaced.
Changing a bulb
The headlamps have polycarbonate
lenses with a protective coating:
F
d
o not clean them using a dr y or
abrasive cloth, nor with a detergent
or solvent product,
F
u
se a sponge and soapy water or a pH
neutral product,
F
w
hen using a high pressure washer
on persistent marks, do not keep the
lance directed towards the lamps or
their edges for too long, so as not to
damage their protective coating and
seals. Changing a bulb must only be done with
the ignition off and after the lamp has
been switched off for several minutes –
Risk of serious burns!
F
D
o not touch the bulb directly with your
fingers, use a lint-free cloth.
It is essential only to use anti-ultraviolet
(UV) type bulbs, so as not to damage the
headlamp.
Always replace a failed bulb with a new
bulb with the same type and specification.
In some weather conditions (e.g. low
temperature or humidity), the presence
of misting on the internal sur face of the
glass of the headlamps and rear lamps
is
normal; it disappears after the lamps
have been on for a few minutes.
Light-emitting diodes (LED)
For the replacement of this type of bulb,
you must contact a PEUGEOT dealer or
a
qualified workshop.
F
T
ighten the other bolts using wheelbrace
5
o n l y.
F
R
efit the bolt covers to each of the bolts
(depending on equipment).
F
S
tore the tools.
The following is recommended:
-
d
eactivate certain driving aid functions
(Active Safety Brake, Adaptive cruise
control, etc.), as indicated on the label
attached to the wheel,
-
d
o not exceed the maximum
authorised speed of 50 mph (80
km/h).
8
In the event of a breakdown
Page 245 of 320
243
Identification markings
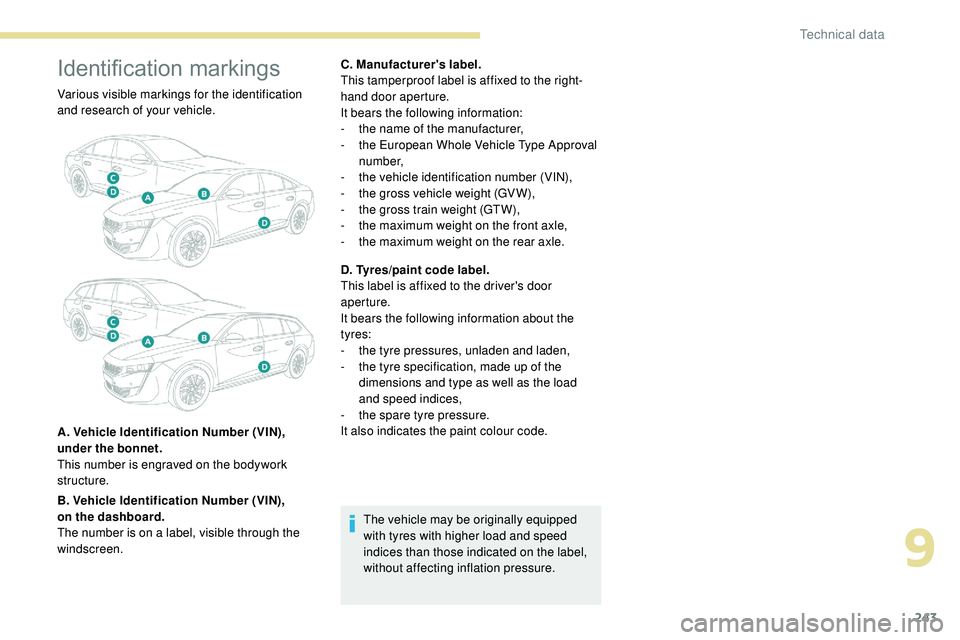
Various visible markings for the identification
and research of your vehicle.
A. Vehicle Identification Number (VIN),
under the bonnet.
This number is engraved on the bodywork
structure.
B. Vehicle Identification Number (VIN),
on
the dashboard.
The number is on a label, visible through the
windscreen. C. Manufacturer's label.
This tamperproof label is affixed to the right-
hand door aperture.
It bears the following information:
-
t
he name of the manufacturer,
-
t
he European Whole Vehicle Type Approval
number,
-
t
he vehicle identification number (VIN),
-
t
he gross vehicle weight (GV W),
-
t
he gross train weight (GTW),
-
t
he maximum weight on the front axle,
-
t
he maximum weight on the rear axle.
D. Tyres/paint code label.
This label is affixed to the driver's door
aperture.
It bears the following information about the
tyres:
-
t
he tyre pressures, unladen and laden,
-
t
he tyre specification, made up of the
dimensions and type as well as the load
and
speed indices,
-
t
he spare tyre pressure.
It also indicates the paint colour code.
The vehicle may be originally equipped
with tyres with higher load and speed
indices than those indicated on the label,
without affecting inflation pressure.
9
Technical data
Page 311 of 320
247
K
Key ...................................................... 3 5 , 4 0 - 41
Key, electronic ............................................37- 3 9
Keyless Entry and Starting
........3
7, 3 9, 125 -126
Key not recognised
....................................... 12
7
Key with remote control
................................12
5
Kit, hands-free
................................ 1
3 -14, 27-2 8
L
Labels, identification ..................................... 243
Lamp, boot ...................................................... 85
Lamps, front
.................................................. 210
Lamps, rear
................................................... 210
Lane Departure Warning System (LDWS)
.....19
Lane Positioning Assist
.........151, 161-163, 165
Leather (care)
................................................ 210
Level, AdBlue
® .............................................. 2 07
Level, brake fluid ........................................... 207
Level, Diesel additive
............................. 207-208
Level, engine coolant
.............................. 24, 207
Level, engine oil
.............................. 24, 206-207
Levels and checks
..............................
..205-207
Level, screenwash fluid
................................ 2
07
Lighting dimmer
.............................................. 27
Lighting, ambient interior
................................ 79
L
ighting, guide-me home
................................ 37
Lighting, interior
...............................
...............79
Loading
................................................. 203-204
Load reduction mode
.................................... 201
Locating your vehicle
...................................... 36
Locking
...............................
.................36, 39 - 40
Locking from the inside
................................... 43
Locking the doors
........................................... 48
L
ong objects, transporting
.............................. 80
Low fuel level
................................................ 19
8
Lumbar
............................................................ 58
M
Maintenance (advice) ....................................2 10
Map reading lamps ......................................... 79
M
arkings, identification
.................................243
Massage function
........................................... 60
Massage, multi-point
...................................... 60
Mat
.................................................................. 78
Memorising a speed
..................................... 1
51
Menu
............................................................... 12
Menus (audio)
........................................ 4-5, 4-5
Messages
........................................................ 30
Messages, quick
............................................. 3
0
Mirror, rear view
.............................................. 62
Mirrors, door .......................... 61- 6 2 , 71, 174 -176
Mirror, vanity
................................................... 75
Misfuel prevention
......................................... 19 9
Motorised tailgate
..................................... 48
-50
Mountings, ISOFIX
....................................... 11 8
N
Net, high load retaining .............................83-84
Night Vision ................................................ 21-22
O
Obstacle detection ........................................ 176
Oil change ............................................. 20
6-207
Oil consumption
.................................... 206-207
Oil, engine
............................................. 206-207
On-board tools
................................................ 85
Opening the bonnet
...................................... 204
Opening the boot
...................................... 3 7, 4 7
Opening the doors
.................................... 3 7, 4 6
Opening the fuel filler flap
.............................198
Opening the windows
..................................... 35
P
Pads, brake ................................................... 209
Paint .............................................................. 243
Paint colour code
.......................................... 243
Parcel shelf, rear
............................................. 81
Park Assist
...............................
.....................18 4
Parking brake
................................................ 209
Parking brake, electric
..................... 12-13 , 16 -17, 19, 128 -131
Parking sensors, audible and visual
.............176
Parking sensors, front
...................................17 7
Parking sensors, rear .................................... 17 7
Personalisation
............................................. 8-9
PEUGEOT Connect Nav
...................................1
PEUGEOT Connect Radio
...............................1
P
lates, identification ...................................... 243
Player, Apple
® ............................................. 9 , 26
Player, MP3 CD ............................... ................25
Player, USB
........................................... 75, 9, 25
Port, USB
.................................. 75 -76, 80, 9, 25
Pre-heater, Diesel
........................................... 14
Pressures, tyres
............................................ 209
Pre-tensioning seat belts
.............................. 104
Profiles
...................................................... 16, 31
Programmable cruise control
.......................148
Protecting children
....1 0 6 -1 0 7, 11 0 -112 , 117-12 0
R
Radio .............................................. 6 -7, 9, 23, 25
Radio, digital (Digital Audio Broadcasting – DAB)
................................8, 24
Range, AdBlue
.......................................... 24-25
RDS
................
........................................ 7, 2 3 - 2 4
Rear screen, demisting
...................................71
Recirculation, air
....................................... 68, 70
Reduction of electrical load
..........................201
Regeneration of the particle filter
.................208
Reinitialisation of the under-inflation detection system
.................................. 141-142
.
Alphabetical index