light Peugeot Bipper 2008.5 Repair Manual
[x] Cancel search | Manufacturer: PEUGEOT, Model Year: 2008.5, Model line: Bipper, Model: Peugeot Bipper 2008.5Pages: 140, PDF Size: 1.65 MB
Page 111 of 140
102
Towing a trailer
In certain cases of particularly arduous
use (towing the maximum load up a steep
slope in high temperatures), the engine
automatically limits its power. In this
case, the automatic cutting off of the air
conditioning allows the engine power to be
recovered.
If the coolant temperature
warning light comes on, stop the
vehicle and switch off the engine
as soon as possible.
See the "Levels" section of chapter 7.
Tyres: check the tyre pressures of the
towing vehicle (see the "Identification
features" section of chapter 7) and of
the trailer, observing the recommended
pressure.
Brakes: towing increases the braking
distance. Drive at a moderate speed,
change down early and brake gradually.
Side wind: sensitivity to side wind is
increased. Drive smoothly and at a
moderate speed.
ABS: the system only controls the vehicle,
not the trailer.
Rear parking assistance: the
assistance will be deactivated
automatically when an original PEUGEOT
towbar is used (see the "Rear parking
assistance" section of chapter 4).
Towbar
We recommend the use of original
PEUGEOT towbars and their harnesses,
which have been tested and approved from
the design stage of your vehicle, and that
the fitting of this equipment is entrusted to a
PEUGEOT dealer .
If this equipment is not fitted by a PEUGEOT
dealer , it is essential that it is fitted using
the electrical pre-equipment located at the
rear of the vehicle in accordance with the
manufacturer ’s instructions.
The operation of the sensors is deactivated
automatically when the pin of the trailer
cable is inserted in the towbar socket.
When the trailer cable pin is removed, the
sensors are re-activated.
Distribution of loads
Dis t r ibut e t he load in t he t r ailer s o t hat t he
heav ies t objec t s ar e as c los e as pos s ible
t o t he ax le and t he nos e weight is c los e
t o t he max imum aut hor is ed wit hout ,
howev er, ex c eeding it . T he air dens it y
dec r eas es wit h alt it ude, s o r educ ing t he
per f or manc e of t he engine. T he max imum
t owed load mus t be r educ ed by 10 % f or
eac h 1 000 met r es of alt it ude. Ref er t o
t he " Tec hnic al dat a" c hapt er f or det ails of
t he weight s and t owed loads applic able t o
y our v ehic le and als o t o t he adminis t r at iv e
doc ument s ( V5 r egis t r at ion doc ument , . . . ) .
Page 116 of 140

106
Battery The batteries contain harmful
substances such as sulphuric acid and
lead. They must be discarded in accordance
with the provisions of the law and must not,
in any circumstances, be discarded with
household waste.
Take used batteries to a special collection
point.
Before disconnecting the battery, you must
wait for 2 minutes after switching off the
ignition.
Never disconnect a terminal when the
engine is running.
Never charge a battery without first
disconnecting the terminals.
Close the windows and doors before
disconnecting the battery.
After every reconnection of the battery,
switch on the ignition and wait 1 minute
before starting to allow the electronic
systems to be initialised. If slight difficulties
are experienced after this, please consult a
PEUGEOT dealer . It is advisable to disconnect the battery
if the vehicle is not to be used for a
period of more than one month.
If the battery has been disconnected for
some time, it may be necessary
to reinitialise the following functions:
- the display parameters (date, time, language, distance unit and temperature
unit),
- the radio stations,
- the central locking.
Some settings are cleared and must be
reprogrammed, consult a PEUGEOT dealer .
Page 117 of 140
107
7
TROUBLESHOOTING
Changing a wheel
CHANGING A WHEEL
Parking the vehicle
As far as possible, park the vehicle on level,
stable and non-slippery ground.
Apply the handbrake, switch off the ignition
and engage first gear (on a hill).
If possible, place a chock under the
wheel diagonally opposite the wheel to be
changed.
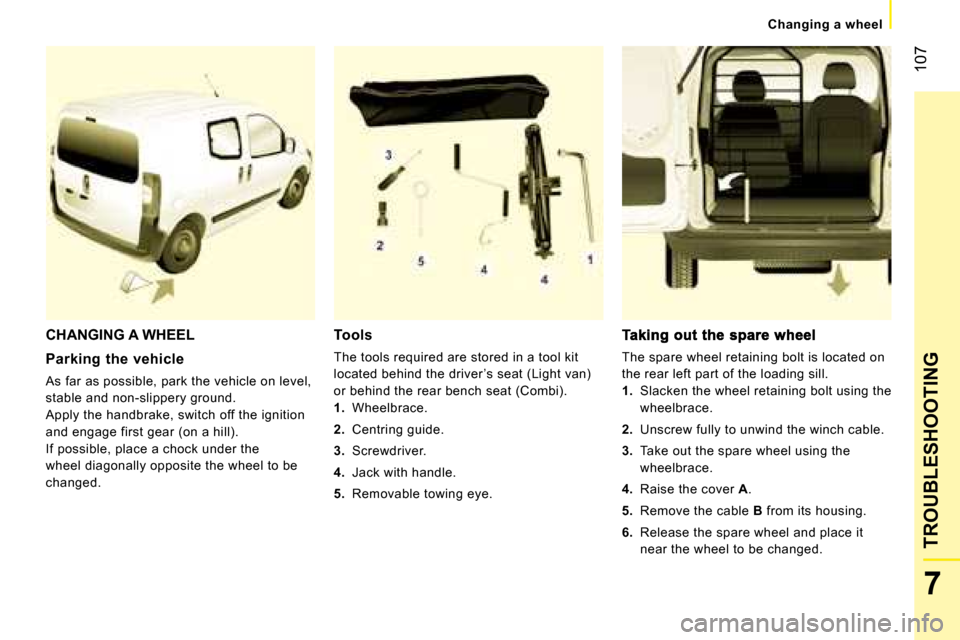
Tools
The tools required are stored in a tool kit
located behind the driver ’s seat (Light van)
or behind the rear bench seat (Combi).
1. Wheelbrace.
2. Centring guide.
3. Screwdriver.
4. Jack with handle.
5. Removable towing eye. The spare wheel retaining bolt is located on
the rear left part of the loading sill.
1. Slacken the wheel retaining bolt using the
wheelbrace.
2. Unscrew fully to unwind the winch cable.
3. Take out the spare wheel using the
wheelbrace.
4. Raise the cover A .
5. Remove the cable B from its housing.
6. Release the spare wheel and place it
near the wheel to be changed.
Page 122 of 140
112
Changing a bulb
Front lights
Open the bonnet. To access the bulbs, reach
behind the headlamp unit.
Remove the protective covers to gain
access to the bulbs.
Carry out the operations in reverse order to
refit each bulb.
CHANGING A BULB
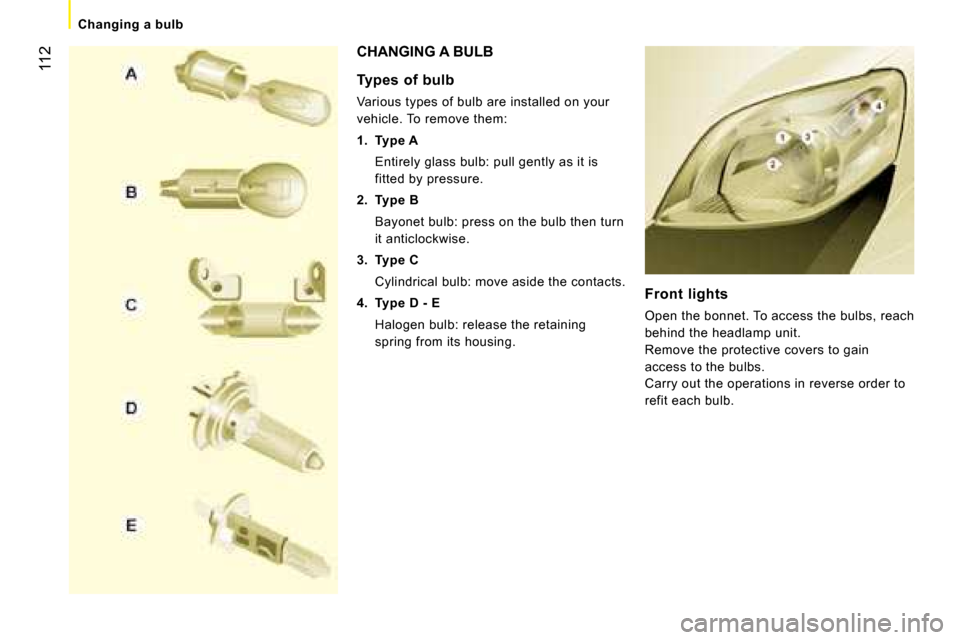
T ypes of bulb
Various types of bulb are installed on your
vehicle. To remove them:
1. Type A
Entirely glass bulb: pull gently as it is fitted by pressure.
2. Type B
Bayonet bulb: press on the bulb then turn it anticlockwise.
3. Type C
Cylindrical bulb: move aside the contacts.
4. Type D - E
Halogen bulb: release the retaining spring from its housing.
Page 123 of 140
113
7
TROUBLESHOOTING
Changing a bulb
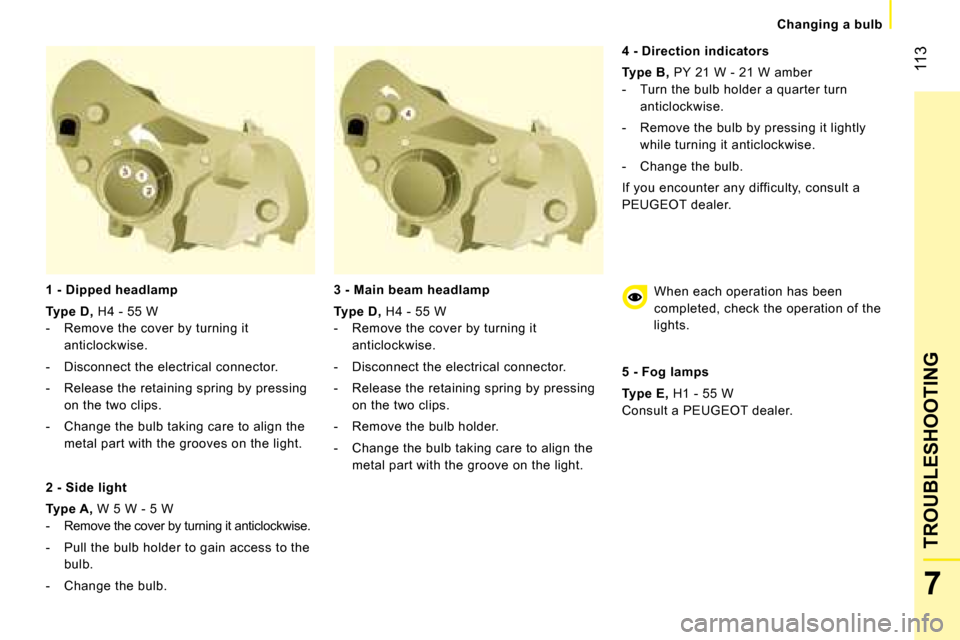
1 - Dipped headlamp
Type D
, H4 - 55 W
- Remove the cover by turning it anticlockwise.
- Disconnect the electrical connector.
- Release the retaining spring by pressing on the two clips.
- Change the bulb taking care to align the metal part with the grooves on the light.
2 - Side light
Type A , W 5 W - 5 W
- Remove the cover by turning it anticlockwise.
- Pull the bulb holder to gain access to the bulb.
- Change the bulb.
3 - Main beam headlamp
Type D
, H4 - 55 W
- Remove the cover by turning it anticlockwise.
- Disconnect the electrical connector.
- Release the retaining spring by pressing on the two clips.
- Remove the bulb holder.
- Change the bulb taking care to align the metal part with the groove on the light.
4 - Direction indicators
Type B
, PY 21 W - 21 W amber
- Turn the bulb holder a quarter turn anticlockwise.
- Remove the bulb by pressing it lightly while turning it anticlockwise.
- Change the bulb.
If you encounter any difficulty, consult a
PEUGEOT dealer.
When each operation has been
completed, check the operation of the
lights.
5 - Fog lamps
Type E , H1 - 55 W
Consult a PEUGEOT dealer.
Page 124 of 140
114
Changing a bulb
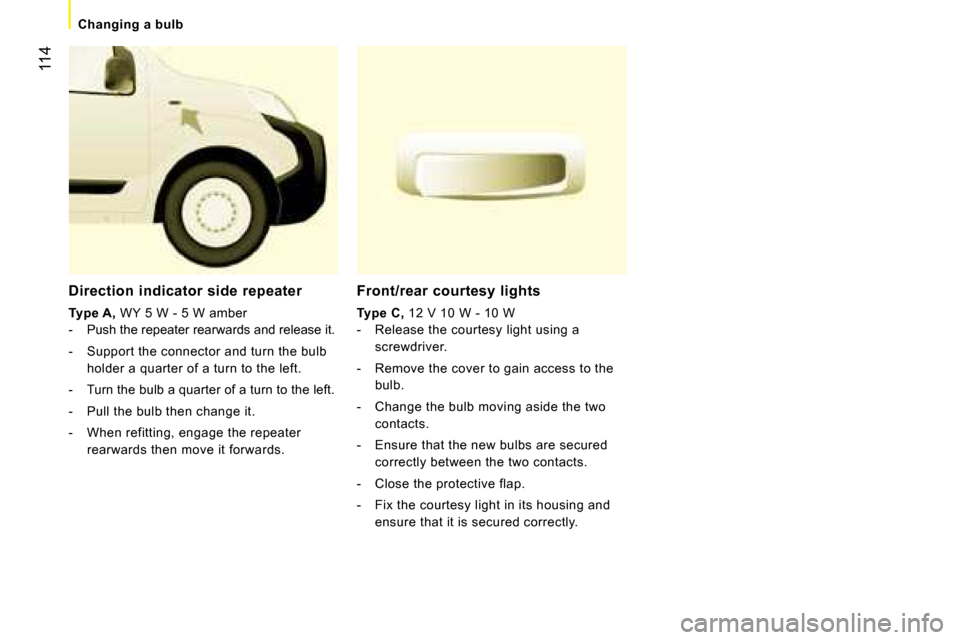
Front/rear courtesy lights
Type C
, 12 V 10 W - 10 W
- Release the courtesy light using a screwdriver.
- Remove the cover to gain access to the bulb.
- Change the bulb moving aside the two contacts.
- Ensure that the new bulbs are secured correctly between the two contacts.
- Close the protective flap.
- Fix the courtesy light in its housing and ensure that it is secured correctly.
Direction indicator side repeater
Type A
, WY 5 W - 5 W amber
- Push the repeater rearwards and release it.
- Support the connector and turn the bulb holder a quarter of a turn to the left.
- Turn the bulb a quarter of a turn to the left.
- Pull the bulb then change it.
- When refitting, engage the repeater rearwards then move it forwards.
Page 125 of 140
114
Changing a bulb
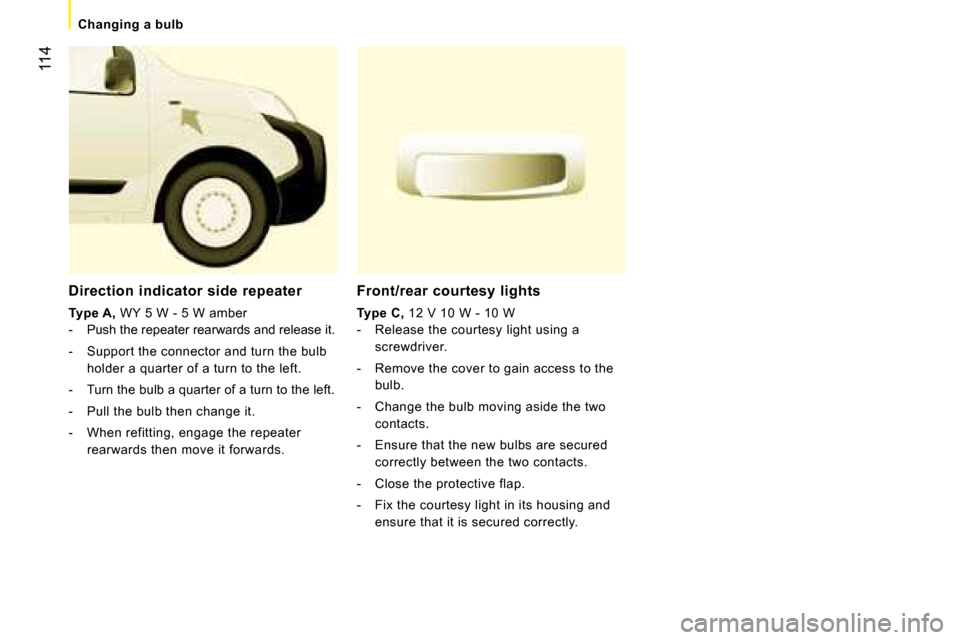
Front/rear courtesy lights
Type C
, 12 V 10 W - 10 W
- Release the courtesy light using a screwdriver.
- Remove the cover to gain access to the bulb.
- Change the bulb moving aside the two contacts.
- Ensure that the new bulbs are secured correctly between the two contacts.
- Close the protective flap.
- Fix the courtesy light in its housing and ensure that it is secured correctly.
Direction indicator side repeater
Type A
, WY 5 W - 5 W amber
- Push the repeater rearwards and release it.
- Support the connector and turn the bulb holder a quarter of a turn to the left.
- Turn the bulb a quarter of a turn to the left.
- Pull the bulb then change it.
- When refitting, engage the repeater rearwards then move it forwards.
Page 126 of 140
115
7
TROUBLESHOOTING
Changing a bulb
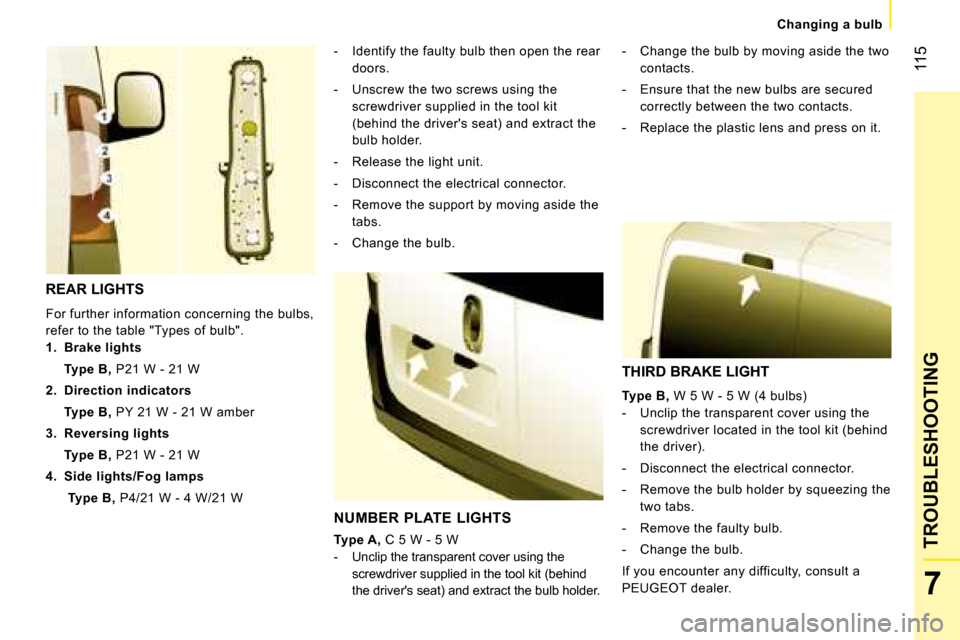
REAR LIGHTS
For further information concerning the bulbs,
refer to the table "Types of bulb".
1. Brake lights
Type B, P21 W - 21 W
2. Direction indicators
Type B, PY 21 W - 21 W amber
3. Reversing lights
Type B, P21 W - 21 W
4. Side lights/Fog lamps
Type B, P4/21 W - 4 W/21 W - Identify the faulty bulb then open the rear
doors.
- Unscrew the two screws using the screwdriver supplied in the tool kit
(behind the driver's seat) and extract the
bulb holder.
- Release the light unit.
- Disconnect the electrical connector.
- Remove the support by moving aside the tabs.
- Change the bulb.
NUMBER PLATE LIGHTS
Type A, C 5 W - 5 W
- Unclip the transparent cover using the screwdriver supplied in the tool kit (behind
the driver's seat) and extract the bulb holder. - Change the bulb by moving aside the two
contacts.
- Ensure that the new bulbs are secured correctly between the two contacts.
- Replace the plastic lens and press on it.
THIRD BRAKE LIGHT
Type B, W 5 W - 5 W (4 bulbs)
- Unclip the transparent cover using the screwdriver located in the tool kit (behind
the driver).
- Disconnect the electrical connector.
- Remove the bulb holder by squeezing the two tabs.
- Remove the faulty bulb.
- Change the bulb.
If you encounter any difficulty, consult a
PEUGEOT dealer.
Page 128 of 140
117
7
TROUBLESHOOTING
Changing a fuse
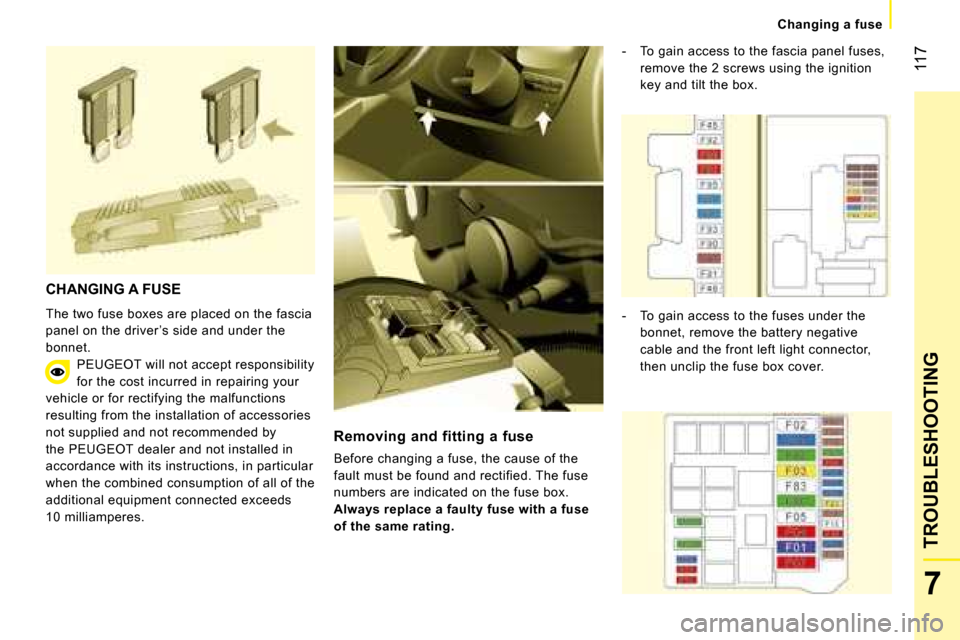
CHANGING A FUSE
The two fuse boxes are placed on the fascia
panel on the driver ’s side and under the
bonnet. PEUGEOT will not accept responsibility
for the cost incurred in repairing your
vehicle or for rectifying the malfunctions
resulting from the installation of accessories
not supplied and not recommended by
the PEUGEOT dealer and not installed in
accordance with its instructions, in particular
when the combined consumption of all of the
additional equipment connected exceeds
10 milliamperes.
Removing and fitting a fuse
Before changing a fuse, the cause of the
fault must be found and rectified. The fuse
numbers are indicated on the fuse box.
Always replace a faulty fuse with a fuse
of the same rating. - To gain access to the fascia panel fuses,
remove the 2 screws using the ignition
key and tilt the box.
- To gain access to the fuses under the bonnet, remove the battery negative
cable and the front left light connector,
then unclip the fuse box cover.
Page 129 of 140
119
7
TROUBLESHOOTING
Changing a fuse
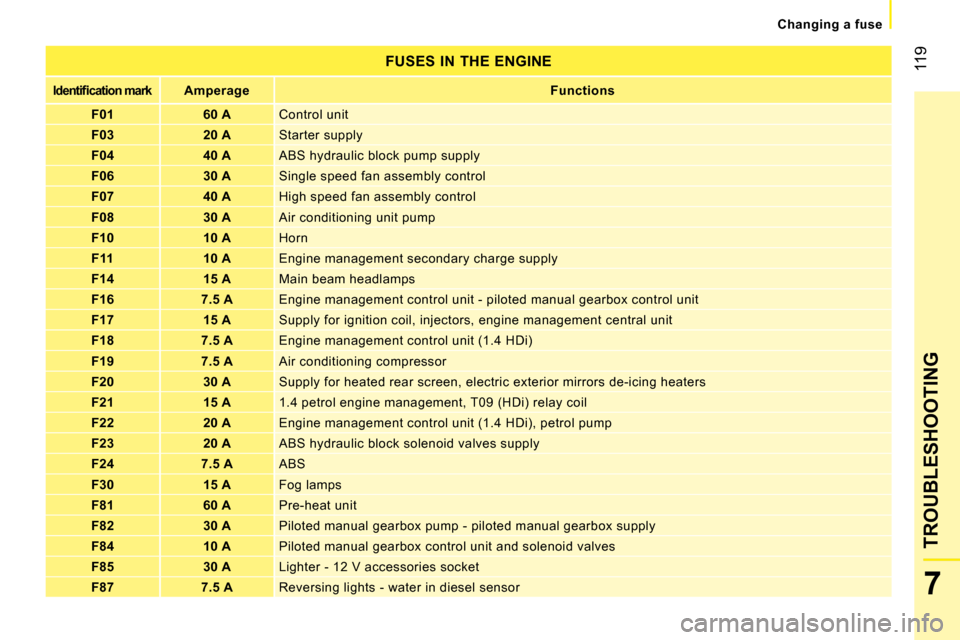
FUSES IN THE ENGINE
�I�d�e�n�t�i�fi� �c�a�t�i�o�n� �m�a�r�k
Amperage
Functions
F01 60 A Control unit
F03 20 A Starter supply
F04 40 A ABS hydraulic block pump supply
F06 30 A Single speed fan assembly control
F07 40 A High speed fan assembly control
F08 30 A Air conditioning unit pump
F10 10 A Horn
F11 10 A Engine management secondary charge supply
F14 15 A Main beam headlamps
F16 7.5 A Engine management control unit - piloted manual ge arbox control unit
F17 15 A Supply for ignition coil, injectors, engine manage ment central unit
F18 7.5 A Engine management control unit (1.4 HDi)
F19 7.5 A Air conditioning compressor
F20 30 A Supply for heated rear screen, electric exterior m irrors de-icing heaters
F21 15 A 1.4 petrol engine management, T09 (HDi) relay coil
F22 20 A Engine management control unit (1.4 HDi), petrol p ump
F23 20 A ABS hydraulic block solenoid valves supply
F24 7.5 A ABS
F30 15 A Fog lamps
F81 60 A Pre-heat unit
F82 30 A Piloted manual gearbox pump - piloted manual gearb ox supply
F84 10 A Piloted manual gearbox control unit and solenoid v alves
F85 30 A Lighter - 12 V accessories socket
F87 7.5 A Reversing lights - water in diesel sensor