tow Peugeot Bipper 2009 User Guide
[x] Cancel search | Manufacturer: PEUGEOT, Model Year: 2009, Model line: Bipper, Model: Peugeot Bipper 2009Pages: 154, PDF Size: 4.02 MB
Page 47 of 154
37
1
READY TO SET OFF
Accesses
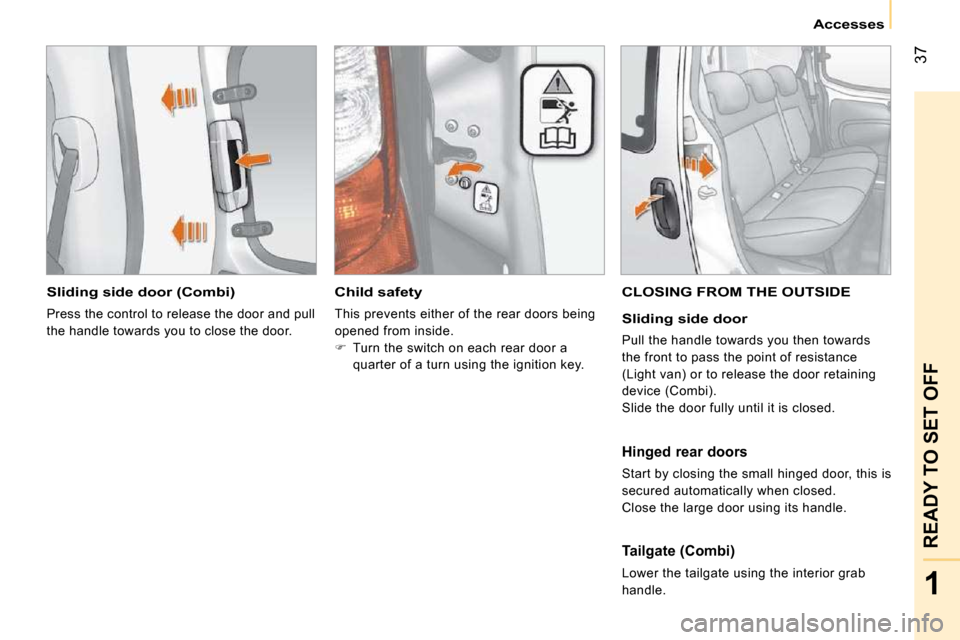
Sliding side door (Combi)
Press the control to release the door and pull
the handle towards you to close the door.
Child safety
This prevents either of the rear doors being
opened from inside.
� Turn the switch on each rear door a
quarter of a turn using the ignition key.
CLOSING FROM THE OUTSIDE
Sliding side door
Pull the handle towards you then towards
the front to pass the point of resistance
(Light van) or to release the door retaining
device (Combi).
Slide the door fully until it is closed.
Hinged rear doors
Start by closing the small hinged door, this is
secured automatically when closed.
Close the large door using its handle.
Tailgate (Combi)
Lower the tailgate using the interior grab
handle.
Page 48 of 154
37
1
READY TO SET OFF
Accesses
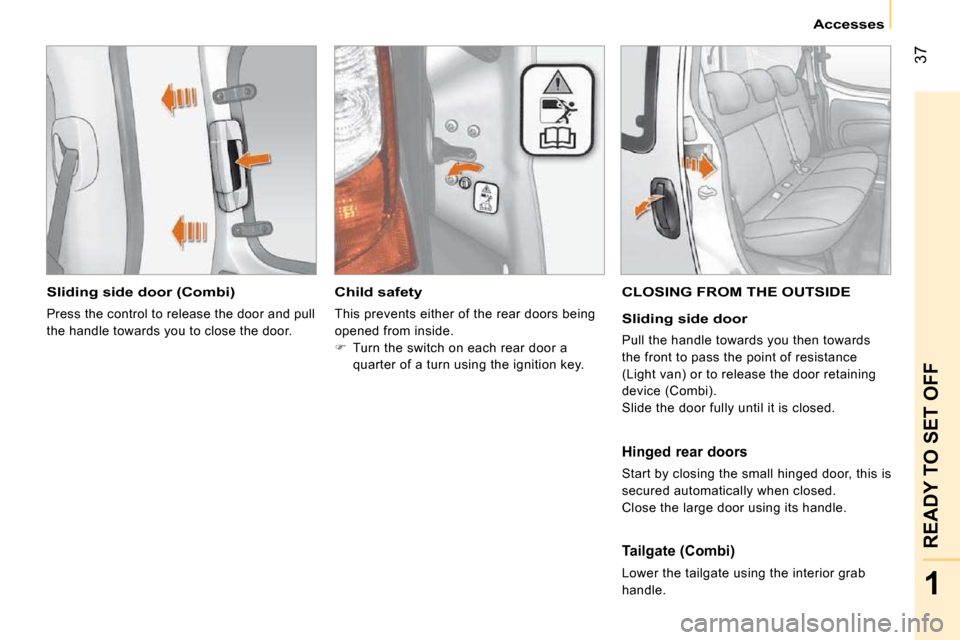
Sliding side door (Combi)
Press the control to release the door and pull
the handle towards you to close the door.
Child safety
This prevents either of the rear doors being
opened from inside.
� Turn the switch on each rear door a
quarter of a turn using the ignition key.
CLOSING FROM THE OUTSIDE
Sliding side door
Pull the handle towards you then towards
the front to pass the point of resistance
(Light van) or to release the door retaining
device (Combi).
Slide the door fully until it is closed.
Hinged rear doors
Start by closing the small hinged door, this is
secured automatically when closed.
Close the large door using its handle.
Tailgate (Combi)
Lower the tailgate using the interior grab
handle.
Page 49 of 154
38
Steering wheel controls
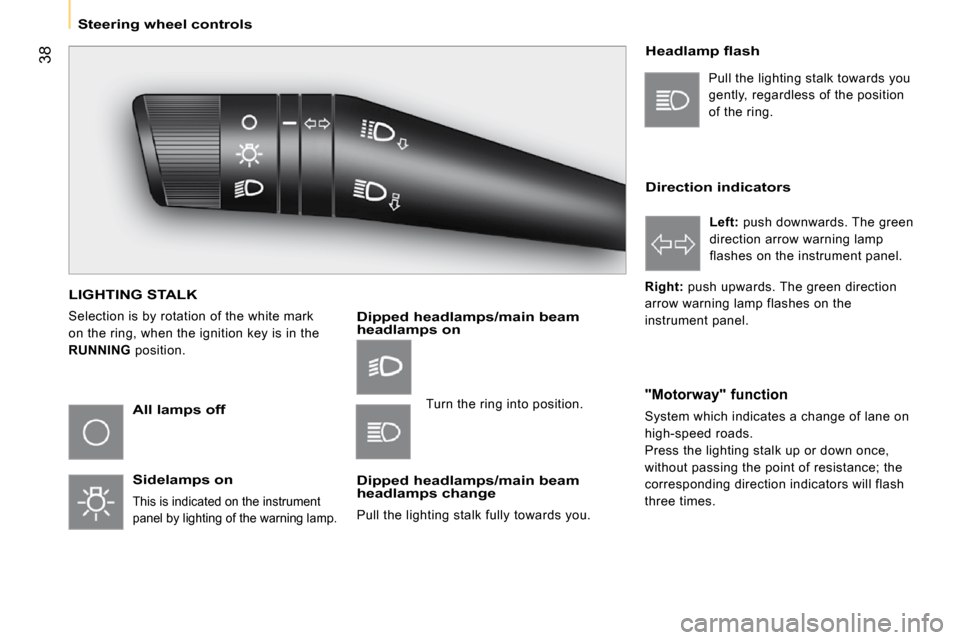
LIGHTING STALK
Selection is by rotation of the white mark
on the ring, when the ignition key is in the
RUNNING position.
All lamps off
Sidelamps on
This is indicated on the instrument
panel by lighting of the warning lamp.
Dipped headlamps/main beam headlamps on
Dipped headlamps/main beam headlamps change
Pull the lighting stalk fully towards you.
� � �H�e�a�d�l�a�m�p� �fl� �a�s�h�
Direction indicators
"Motorway" function
System which indicates a change of lane on
high-speed roads.
Press the lighting stalk up or down once,
without passing the point of resistance; the
corresponding direction indicators will flash
three times. Pull the lighting stalk towards you
gently, regardless of the position
of the ring.
Left: push downwards. The green
direction arrow warning lamp
flashes on the instrument panel.
Right: push upwards. The green direction
arrow warning lamp flashes on the
instrument panel.
Turn the ring into position.
Page 50 of 154
39
1
READY TO SET OFF
Steering wheel controls
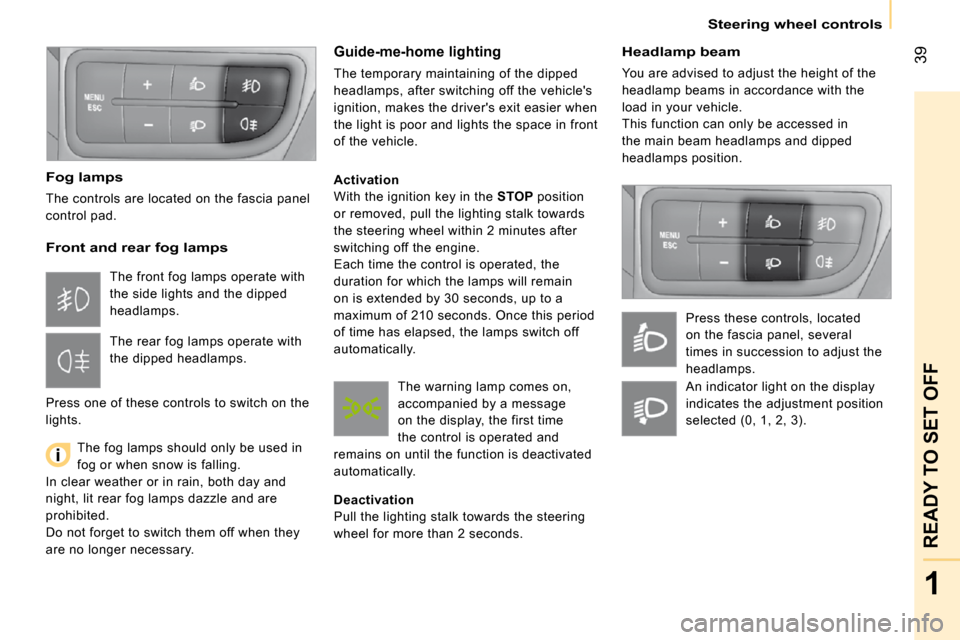
Headlamp beam
You are advised to adjust the height of the
headlamp beams in accordance with the
load in your vehicle.
This function can only be accessed in
the main beam headlamps and dipped
headlamps position. Press these controls, located
on the fascia panel, several
times in succession to adjust the
headlamps.
Fog lamps
The controls are located on the fascia panel
control pad.
Front and rear fog lamps
The fog lamps should only be used in
fog or when snow is falling.
In clear weather or in rain, both day and
night, lit rear fog lamps dazzle and are
prohibited.
Do not forget to switch them off when they
are no longer necessary.
Guide-me-home lighting
The temporary maintaining of the dipped
headlamps, after switching off the vehicle's
ignition, makes the driver's exit easier when
the light is poor and lights the space in front
of the vehicle.
Activation
With the ignition key in the STOP position
or removed, pull the lighting stalk towards
the steering wheel within 2 minutes after
switching off the engine.
Each time the control is operated, the
duration for which the lamps will remain
on is extended by 30 seconds, up to a
maximum of 210 seconds. Once this period
of time has elapsed, the lamps switch off
automatically.
Deactivation
Pull the lighting stalk towards the steering
wheel for more than 2 seconds.
The front fog lamps operate with
the side lights and the dipped
headlamps.
The rear fog lamps operate with
the dipped headlamps.
Press one of these controls to switch on the
lights. The warning lamp comes on,
accompanied by a message
on the display, the first time
the control is operated and
remains on until the function is deactivated
automatically. An indicator light on the display
indicates the adjustment position
selected (0, 1, 2, 3).
Page 51 of 154

39
1
READY TO SET OFF
Steering wheel controls
Headlamp beam
You are advised to adjust the height of the
headlamp beams in accordance with the
load in your vehicle.
This function can only be accessed in
the main beam headlamps and dipped
headlamps position. Press these controls, located
on the fascia panel, several
times in succession to adjust the
headlamps.
Fog lamps
The controls are located on the fascia panel
control pad.
Front and rear fog lamps
The fog lamps should only be used in
fog or when snow is falling.
In clear weather or in rain, both day and
night, lit rear fog lamps dazzle and are
prohibited.
Do not forget to switch them off when they
are no longer necessary.
Guide-me-home lighting
The temporary maintaining of the dipped
headlamps, after switching off the vehicle's
ignition, makes the driver's exit easier when
the light is poor and lights the space in front
of the vehicle.
Activation
With the ignition key in the STOP position
or removed, pull the lighting stalk towards
the steering wheel within 2 minutes after
switching off the engine.
Each time the control is operated, the
duration for which the lamps will remain
on is extended by 30 seconds, up to a
maximum of 210 seconds. Once this period
of time has elapsed, the lamps switch off
automatically.
Deactivation
Pull the lighting stalk towards the steering
wheel for more than 2 seconds.
The front fog lamps operate with
the side lights and the dipped
headlamps.
The rear fog lamps operate with
the dipped headlamps.
Press one of these controls to switch on the
lights. The warning lamp comes on,
accompanied by a message
on the display, the first time
the control is operated and
remains on until the function is deactivated
automatically. An indicator light on the display
indicates the adjustment position
selected (0, 1, 2, 3).
Page 59 of 154

47
1
READY TO SET OFF
Mirrors and windows
Interior mirror
The lever located on the lower edge moves
the mirror into two positions.
For the day position, the lever is pushed.
For the night position to prevent dazzle,
pull the lever towards you.
Exterior mirrors
The mirror glass is spherical in order to
widen the lateral field of vision. Objects
seen in the mirror are in reality closer than
they appear. Therefore, this must be taken
into account in order to assess the distance
correctly.
Electric controls
The electric control is located on the left-
hand interior side, level with the mirror.
MIRRORS AND WINDOWS
To de-ice the mirrors, press the
rear screen de-icing button.
Select the mirror to be adjusted by turning
the control to the right or to the left, then
move the control in the direction of the
adjustment required.
Manual controls
The right-hand and left-hand manual
controls are located on the interior side of
the base of each mirror.
Move the lever in the direction of the
adjustment required.
Page 80 of 154
68
� � � �P�a�r�k�i�n�g� �a�s�s�i�s�t�a�n�c�e� � �
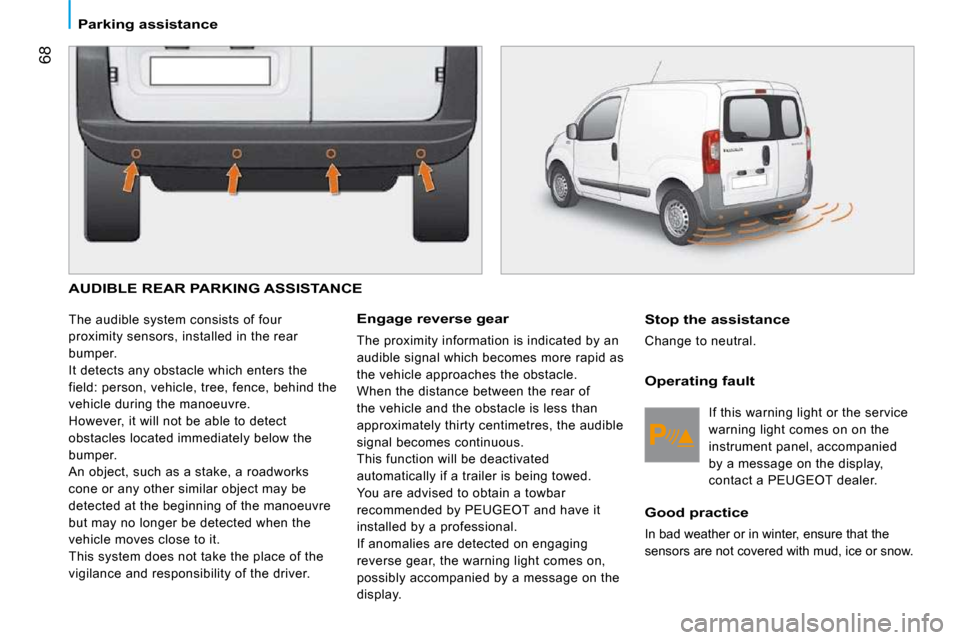
AUDIBLE REAR PARKING ASSISTANCE
The audible system consists of four
proximity sensors, installed in the rear
bumper.
It detects any obstacle which enters the
field: person, vehicle, tree, fence, behind the
vehicle during the manoeuvre.
However, it will not be able to detect
obstacles located immediately below the
bumper.
An object, such as a stake, a roadworks
cone or any other similar object may be
detected at the beginning of the manoeuvre
but may no longer be detected when the
vehicle moves close to it.
This system does not take the place of the
vigilance and responsibility of the driver. Stop the assistance
Change to neutral.
� � �O�p�e�r�a�t�i�n�g� �f�a�u�l�t�
If this warning light or the service
warning light comes on on the
instrument panel, accompanied
by a message on the display,
contact a PEUGEOT dealer.
Good practice
In bad weather or in winter, ensure that the
sensors are not covered with mud, ice or snow.
� � �E�n�g�a�g�e� �r�e�v�e�r�s�e� �g�e�a�r�
The proximity information is indicated by an
audible signal which becomes more rapid as
the vehicle approaches the obstacle.
When the distance between the rear of
the vehicle and the obstacle is less than
approximately thirty centimetres, the audible
signal becomes continuous.
This function will be deactivated
automatically if a trailer is being towed.
You are advised to obtain a towbar
recommended by PEUGEOT and have it
installed by a professional.
If anomalies are detected on engaging
reverse gear, the warning light comes on,
possibly accompanied by a message on the
display.
Page 88 of 154

76
Seats
RETRACTABLE PASSENGER SEAT Table position
Press the head restraint to place it in the
lowest position.
Push one of the controls rearwards, located
on each side of the seat back.
Lower the seat back onto the seat cushion
to the table position.
Retracted position
After placing the seat back in the table
position, pull the seat's rear strap while
guiding the folded seat back forwards and
towards the floor.
Returning the seat to the sitting position
Pull the seat's rear strap to unlock the seat.
Lift the seat from the front and the rear then
guide it forwards to bring it to the table position.
Push one of the controls rearwards, located on
each side of the seat back while pressing on
the seat back, then place the seat back in the
upright position.
� �P�r�e�s�s� �o�n� �t�h�e� �s�e�a�t� �b�a�c�k� �fi� �r�m�l�y� �t�o� �t�r�i�g�g�e�r� �t�h�e�
�l�o�c�k�i�n�g� �o�f� �t�h�e� �s�e�a�t� �o�n� �t�h�e� �fl� �o�o�r�.�
Adjust the head restraint using the button on
the side.
Only move the seat when the rear
seats are not occupied.
Page 90 of 154
78
Seats
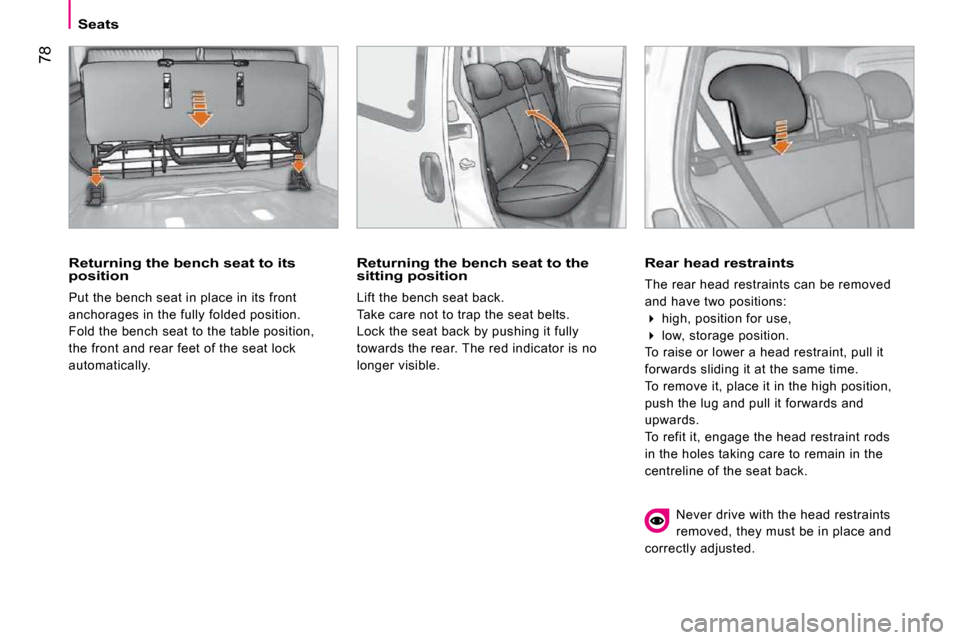
Returning the bench seat to its position
Put the bench seat in place in its front
anchorages in the fully folded position.
Fold the bench seat to the table position,
the front and rear feet of the seat lock
automatically.
Returning the bench seat to the sitting position
Lift the bench seat back.
Take care not to trap the seat belts.
Lock the seat back by pushing it fully
towards the rear. The red indicator is no
longer visible.
Rear head restraints
The rear head restraints can be removed
and have two positions:
� high, position for use,
� low, storage position.
To raise or lower a head restraint, pull it
forwards sliding it at the same time.
To remove it, place it in the high position,
push the lug and pull it forwards and
upwards.
To refit it, engage the head restraint rods
in the holes taking care to remain in the
centreline of the seat back.
Never drive with the head restraints
removed, they must be in place and
correctly adjusted.
Page 91 of 154
79
4
ERGONOMICS and COMFORT
Seats
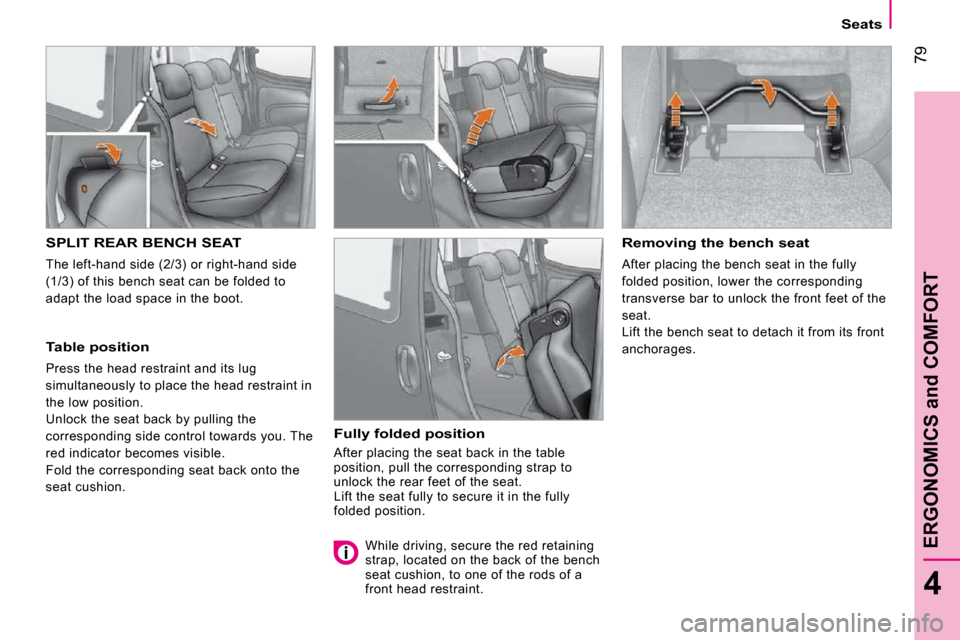
SPLIT REAR BENCH SEAT
The left-hand side (2/3) or right-hand side
(1/3) of this bench seat can be folded to
adapt the load space in the boot.
Table position
Press the head restraint and its lug
simultaneously to place the head restraint in
the low position.
Unlock the seat back by pulling the
corresponding side control towards you. The
red indicator becomes visible.
Fold the corresponding seat back onto the
seat cushion.
Fully folded position
After placing the seat back in the table
position, pull the corresponding strap to
unlock the rear feet of the seat.
Lift the seat fully to secure it in the fully
folded position.
Removing the bench seat
After placing the bench seat in the fully
folded position, lower the corresponding
transverse bar to unlock the front feet of the
seat.
Lift the bench seat to detach it from its front
anchorages.
While driving, secure the red retaining
strap, located on the back of the bench
seat cushion, to one of the rods of a
front head restraint.