fuse box Peugeot Bipper 2009 Owner's Manual
[x] Cancel search | Manufacturer: PEUGEOT, Model Year: 2009, Model line: Bipper, Model: Peugeot Bipper 2009Pages: 154, PDF Size: 4.02 MB
Page 5 of 154

8
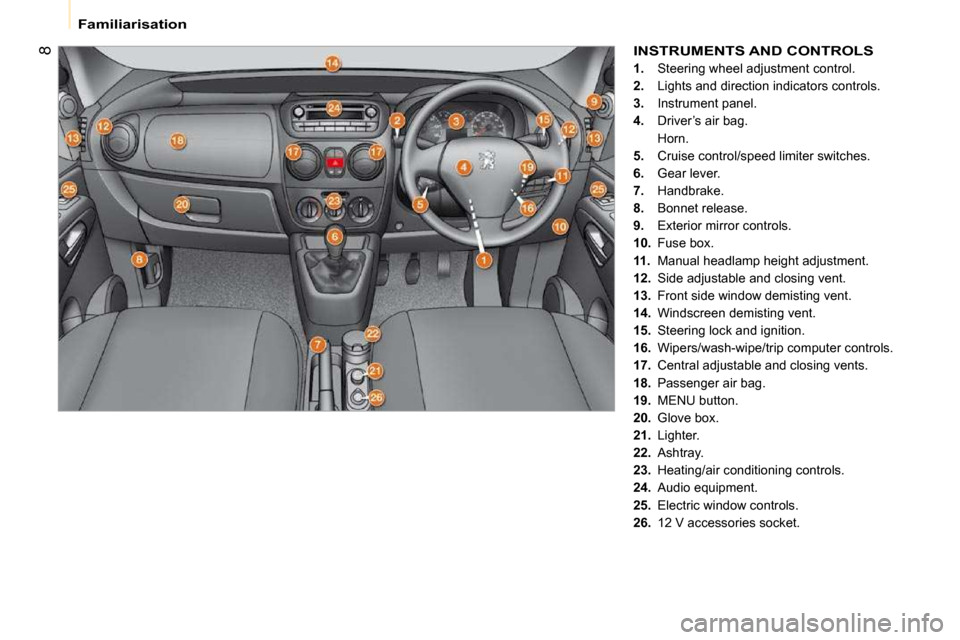
Familiarisation INSTRUMENTS AND CONTROLS
1. Steering wheel adjustment control.
2. Lights and direction indicators controls.
3. Instrument panel.
4. Driver’s air bag.
Horn.
5. Cruise control/speed limiter switches.
6. Gear lever.
7. Handbrake.
8. Bonnet release.
9. Exterior mirror controls.
10. Fuse box.
11. Manual headlamp height adjustment.
12. Side adjustable and closing vent.
13. Front side window demisting vent.
14. Windscreen demisting vent.
15. Steering lock and ignition.
16. Wipers/wash-wipe/trip computer controls.
17. Central adjustable and closing vents.
18. Passenger air bag.
19. MENU button.
20. Glove box.
21. Lighter.
22. Ashtray.
23. Heating/air conditioning controls.
24. Audio equipment.
25. Electric window controls.
26. 12 V accessories socket.
Page 142 of 154

124
Changing a fuse
CHANGING A FUSE
The two fuse boxes are placed on the fascia
panel on the driver's side and under the
bonnet.
Removing and fitting a fuse
Before changing a fuse, the cause of the
fault must be found and rectified. The fuse
numbers are indicated on the fuse box.
Always replace a faulty fuse with a fuse
of the same rating. - To gain access to the fascia panel fuses,
remove the 2 screws using the ignition
key and tilt the box.
- To gain access to the fuses under the bonnet, remove the battery negative
cable and the front left light connector,
then unclip the fuse box cover.
PEUGEOT will not accept responsibility
for the cost incurred in repairing your
vehicle or for rectifying the malfunctions
resulting from the installation of accessories
not supplied and not recommended by
the PEUGEOT dealer and not installed in
accordance with its instructions, in particular
when the combined consumption of all of
the additional equipment connected exceeds
10 milliamperes.
Page 143 of 154

126
Changing a fuse
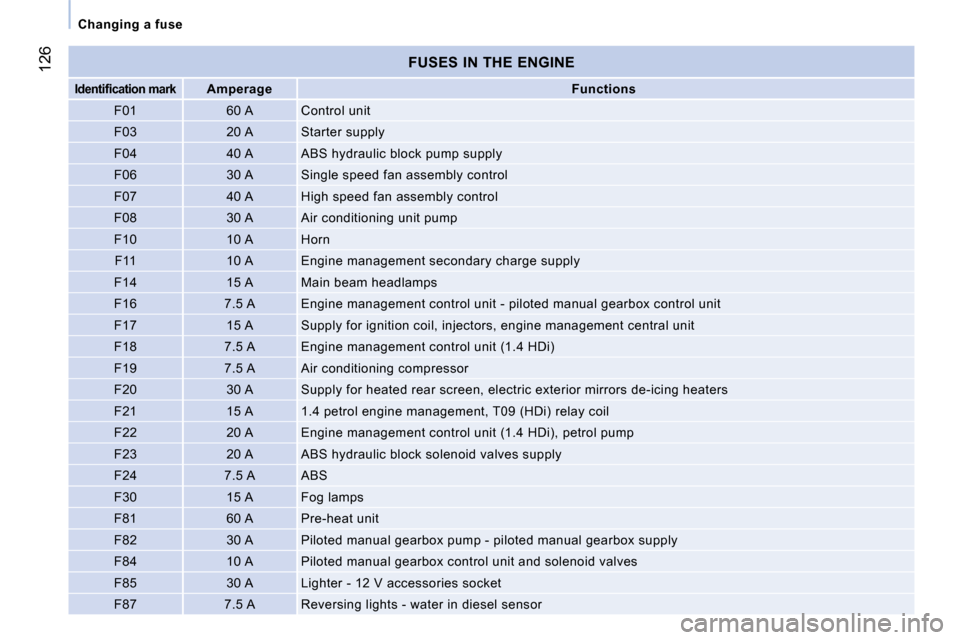
FUSES IN THE ENGINE
�I�d�e�n�t�i�fi� �c�a�t�i�o�n� �m�a�r�k
Amperage
Functions
F01 60 A Control unit
F03 20 A Starter supply
F04 40 A ABS hydraulic block pump supply
F06 30 A Single speed fan assembly control
F07 40 A High speed fan assembly control
F08 30 A Air conditioning unit pump
F10 10 A Horn F11 10 A Engine management secondary charge supply
F14 15 A Main beam headlamps
F16 7.5 A Engine management control unit - p iloted manual gearbox control unit
F17 15 A Supply for ignition coil, injectors , engine management central unit
F18 7.5 A Engine management control unit (1. 4 HDi)
F19 7.5 A Air conditioning compressor
F20 30 A Supply for heated rear screen, elec tric exterior mirrors de-icing heaters
F21 15 A 1.4 petrol engine management, T09 ( HDi) relay coil
F22 20 A Engine management control unit (1.4 HDi), petrol pump
F23 20 A ABS hydraulic block solenoid valves supply
F24 7.5 A ABS
F30 15 A Fog lamps
F81 60 A Pre-heat unit
F82 30 A Piloted manual gearbox pump - pilot ed manual gearbox supply
F84 10 A Piloted manual gearbox control unit and solenoid valves
F85 30 A Lighter - 12 V accessories socket
F87 7.5 A Reversing lights - water in diesel sensor
Page 144 of 154

124
Changing a fuse
CHANGING A FUSE
The two fuse boxes are placed on the fascia
panel on the driver's side and under the
bonnet.
Removing and fitting a fuse
Before changing a fuse, the cause of the
fault must be found and rectified. The fuse
numbers are indicated on the fuse box.
Always replace a faulty fuse with a fuse
of the same rating. - To gain access to the fascia panel fuses,
remove the 2 screws using the ignition
key and tilt the box.
- To gain access to the fuses under the bonnet, remove the battery negative
cable and the front left light connector,
then unclip the fuse box cover.
PEUGEOT will not accept responsibility
for the cost incurred in repairing your
vehicle or for rectifying the malfunctions
resulting from the installation of accessories
not supplied and not recommended by
the PEUGEOT dealer and not installed in
accordance with its instructions, in particular
when the combined consumption of all of
the additional equipment connected exceeds
10 milliamperes.
Page 150 of 154

132
Under the bonnet
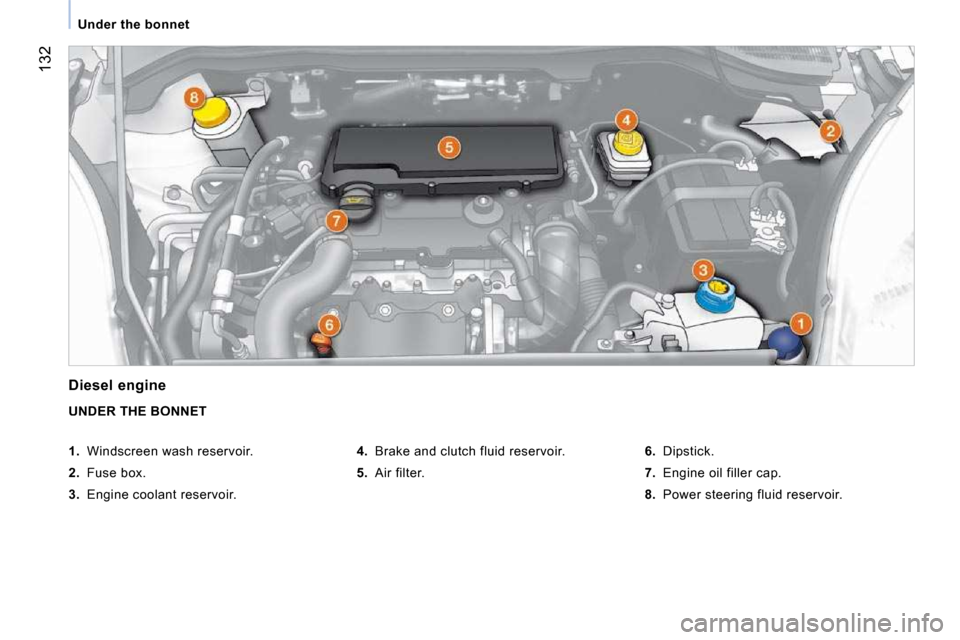
Diesel engine
UNDER THE BONNET
4. Brake and clutch fluid reservoir.
5. Air filter.
6. Dipstick.
7. Engine oil filler cap.
8. Power steering fluid reservoir.
1. Windscreen wash reservoir.
2. Fuse box.
3. Engine coolant reservoir.
Page 151 of 154

133
7
TROUBLESHOOTING
Under the bonnet
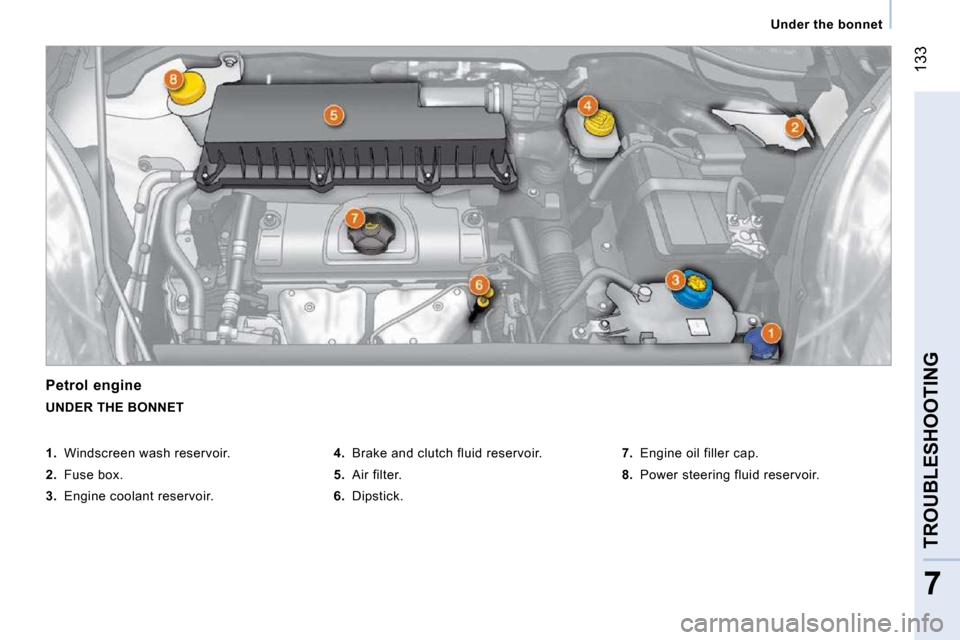
Petrol engine
UNDER THE BONNET
4. Brake and clutch fluid reservoir.
5. Air filter.
6. Dipstick.
7. Engine oil filler cap.
8. Power steering fluid reservoir.
1. Windscreen wash reservoir.
2. Fuse box.
3. Engine coolant reservoir.