display Peugeot Bipper Dag 2009 User Guide
[x] Cancel search | Manufacturer: PEUGEOT, Model Year: 2009, Model line: Bipper Dag, Model: Peugeot Bipper Dag 2009Pages: 154, PDF Size: 4.07 MB
Page 26 of 154
28
Instruments and controls
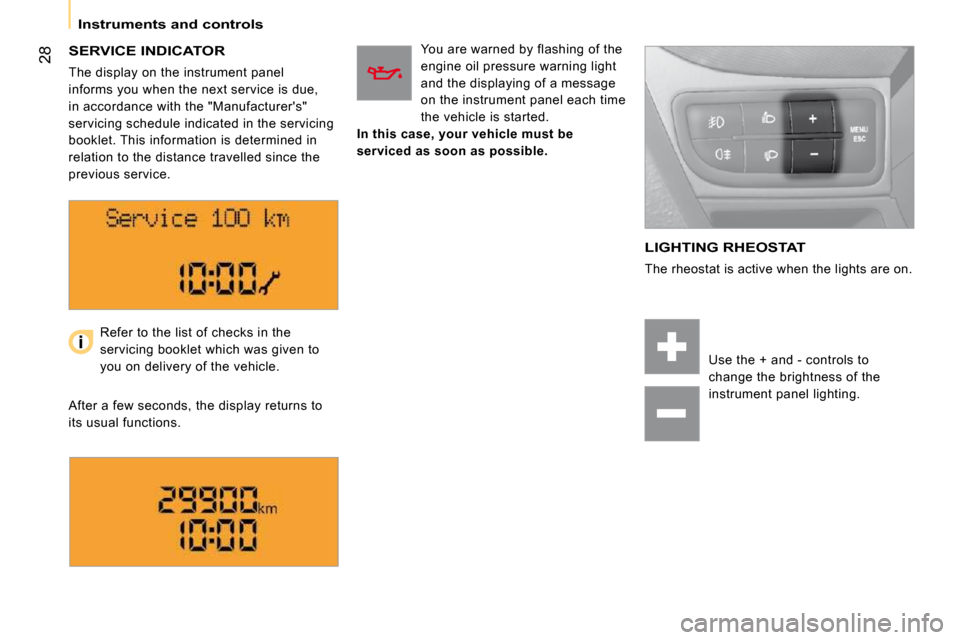
SERVICE INDICATOR
The display on the instrument panel
informs you when the next service is due,
in accordance with the "Manufacturer's"
servicing schedule indicated in the servicing
booklet. This information is determined in
relation to the distance travelled since the
previous service. You are warned by flashing of the
engine oil pressure warning light
and the displaying of a message
on the instrument panel each time
the vehicle is started.
In this case, your vehicle must be
serviced as soon as possible.
LIGHTING RHEOSTAT
The rheostat is active when the lights are on.
Refer to the list of checks in the
servicing booklet which was given to
you on delivery of the vehicle.
After a few seconds, the display returns to
its usual functions. Use the + and - controls to
change the brightness of the
instrument panel lighting.
Page 30 of 154

Accesses
Deactivation using the remote control
Deactivation using the key
Unlock the doors using the key and enter
the vehicle. Switch on the ignition to the
RUNNING position, identification of the key
code will switch off the alarm.
CONFIDENTIAL CARD
This is given to you on delivery of your
vehicle with the duplicate keys.
It contains the identification code necessary
for any work carried out by a dealer on the
electronic immobiliser system. This code is
hidden by a film, which should be removed
only if necessary.
Keep your card in a safe place, never inside
the vehicle.
When undertaking a long trip or journey,
however, it is advisable to take it with you
along with your personal papers.
Deactivation of the anti-lift protection
To deactivate the anti-lift protection, press the
button located on the vehicle's courtesy light.
Good practice
To quickly deactivate the siren following
unwanted triggering, unlock the vehicle
using the remote control.
To avoid setting the alarm, before washing
the vehicle for example, lock the vehicle
using the key.
When this button is pressed, the
alarm is deactivated when the
vehicle is unlocked.
Signalling of attempted intrusion
When you return to your vehicle,
flashing of the electronic engine
immobiliser warning light or
the appearance of a warning
message on the instrument panel display
indicates an attempted intrusion during your
absence.
Page 33 of 154

Accesses
Deactivation using the remote control
Deactivation using the key
Unlock the doors using the key and enter
the vehicle. Switch on the ignition to the
RUNNING position, identification of the key
code will switch off the alarm.
CONFIDENTIAL CARD
This is given to you on delivery of your
vehicle with the duplicate keys.
It contains the identification code necessary
for any work carried out by a dealer on the
electronic immobiliser system. This code is
hidden by a film, which should be removed
only if necessary.
Keep your card in a safe place, never inside
the vehicle.
When undertaking a long trip or journey,
however, it is advisable to take it with you
along with your personal papers.
Deactivation of the anti-lift protection
To deactivate the anti-lift protection, press the
button located on the vehicle's courtesy light.
Good practice
To quickly deactivate the siren following
unwanted triggering, unlock the vehicle
using the remote control.
To avoid setting the alarm, before washing
the vehicle for example, lock the vehicle
using the key.
When this button is pressed, the
alarm is deactivated when the
vehicle is unlocked.
Signalling of attempted intrusion
When you return to your vehicle,
flashing of the electronic engine
immobiliser warning light or
the appearance of a warning
message on the instrument panel display
indicates an attempted intrusion during your
absence.
Page 36 of 154

Accesses
Deactivation using the remote control
Deactivation using the key
Unlock the doors using the key and enter
the vehicle. Switch on the ignition to the
RUNNING position, identification of the key
code will switch off the alarm.
CONFIDENTIAL CARD
This is given to you on delivery of your
vehicle with the duplicate keys.
It contains the identification code necessary
for any work carried out by a dealer on the
electronic immobiliser system. This code is
hidden by a film, which should be removed
only if necessary.
Keep your card in a safe place, never inside
the vehicle.
When undertaking a long trip or journey,
however, it is advisable to take it with you
along with your personal papers.
Deactivation of the anti-lift protection
To deactivate the anti-lift protection, press the
button located on the vehicle's courtesy light.
Good practice
To quickly deactivate the siren following
unwanted triggering, unlock the vehicle
using the remote control.
To avoid setting the alarm, before washing
the vehicle for example, lock the vehicle
using the key.
When this button is pressed, the
alarm is deactivated when the
vehicle is unlocked.
Signalling of attempted intrusion
When you return to your vehicle,
flashing of the electronic engine
immobiliser warning light or
the appearance of a warning
message on the instrument panel display
indicates an attempted intrusion during your
absence.
Page 37 of 154

Accesses
Deactivation using the remote control
Deactivation using the key
Unlock the doors using the key and enter
the vehicle. Switch on the ignition to the
RUNNING position, identification of the key
code will switch off the alarm.
CONFIDENTIAL CARD
This is given to you on delivery of your
vehicle with the duplicate keys.
It contains the identification code necessary
for any work carried out by a dealer on the
electronic immobiliser system. This code is
hidden by a film, which should be removed
only if necessary.
Keep your card in a safe place, never inside
the vehicle.
When undertaking a long trip or journey,
however, it is advisable to take it with you
along with your personal papers.
Deactivation of the anti-lift protection
To deactivate the anti-lift protection, press the
button located on the vehicle's courtesy light.
Good practice
To quickly deactivate the siren following
unwanted triggering, unlock the vehicle
using the remote control.
To avoid setting the alarm, before washing
the vehicle for example, lock the vehicle
using the key.
When this button is pressed, the
alarm is deactivated when the
vehicle is unlocked.
Signalling of attempted intrusion
When you return to your vehicle,
flashing of the electronic engine
immobiliser warning light or
the appearance of a warning
message on the instrument panel display
indicates an attempted intrusion during your
absence.
Page 50 of 154
39
1
READY TO SET OFF
Steering wheel controls
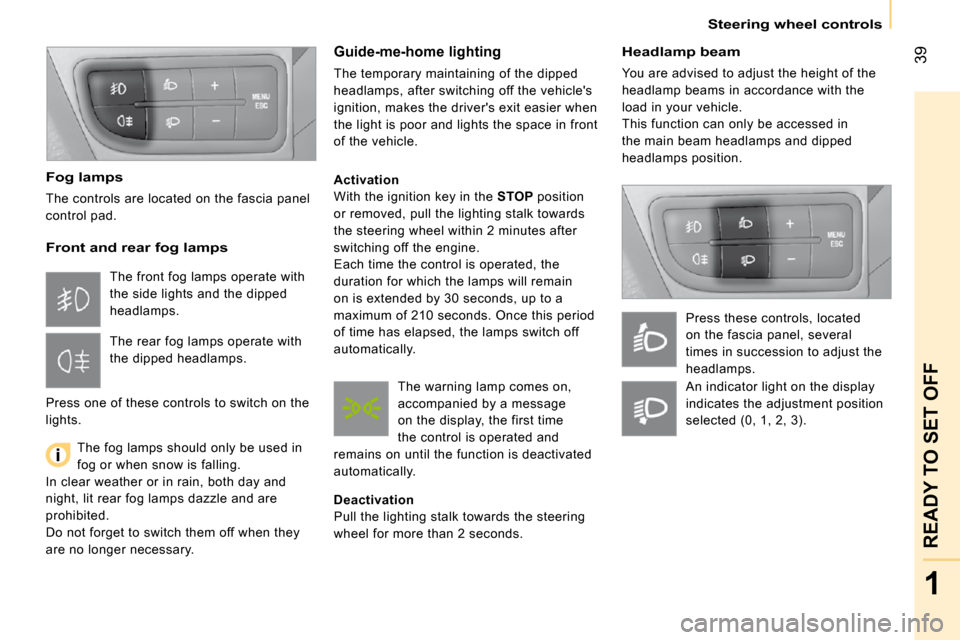
Headlamp beam
You are advised to adjust the height of the
headlamp beams in accordance with the
load in your vehicle.
This function can only be accessed in
the main beam headlamps and dipped
headlamps position. Press these controls, located
on the fascia panel, several
times in succession to adjust the
headlamps.
Fog lamps
The controls are located on the fascia panel
control pad.
Front and rear fog lamps
The fog lamps should only be used in
fog or when snow is falling.
In clear weather or in rain, both day and
night, lit rear fog lamps dazzle and are
prohibited.
Do not forget to switch them off when they
are no longer necessary.
Guide-me-home lighting
The temporary maintaining of the dipped
headlamps, after switching off the vehicle's
ignition, makes the driver's exit easier when
the light is poor and lights the space in front
of the vehicle.
Activation
With the ignition key in the STOP position
or removed, pull the lighting stalk towards
the steering wheel within 2 minutes after
switching off the engine.
Each time the control is operated, the
duration for which the lamps will remain
on is extended by 30 seconds, up to a
maximum of 210 seconds. Once this period
of time has elapsed, the lamps switch off
automatically.
Deactivation
Pull the lighting stalk towards the steering
wheel for more than 2 seconds.
The front fog lamps operate with
the side lights and the dipped
headlamps.
The rear fog lamps operate with
the dipped headlamps.
Press one of these controls to switch on the
lights. The warning lamp comes on,
accompanied by a message
on the display, the first time
the control is operated and
remains on until the function is deactivated
automatically. An indicator light on the display
indicates the adjustment position
selected (0, 1, 2, 3).
Page 51 of 154
39
1
READY TO SET OFF
Steering wheel controls
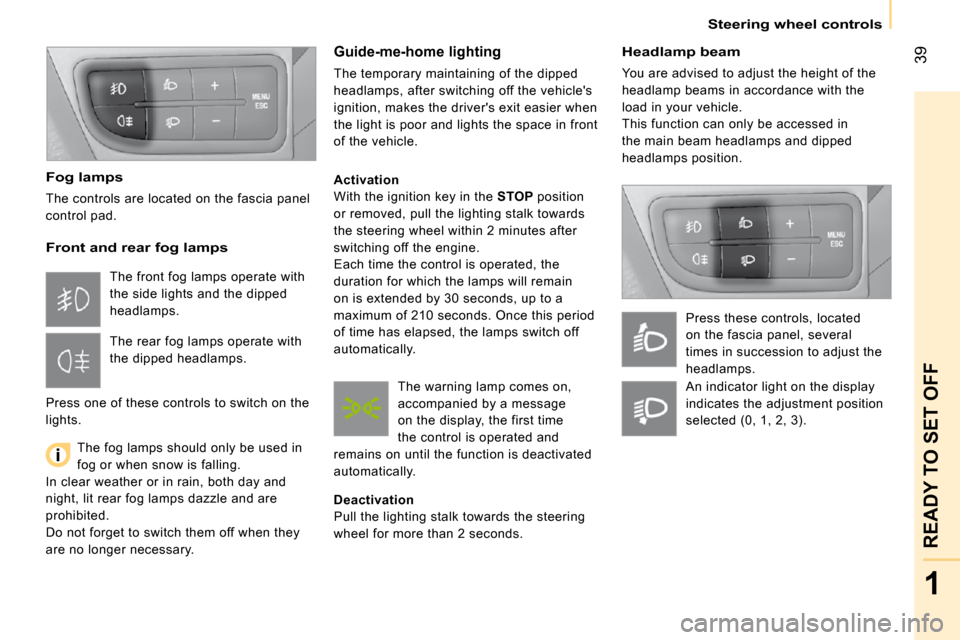
Headlamp beam
You are advised to adjust the height of the
headlamp beams in accordance with the
load in your vehicle.
This function can only be accessed in
the main beam headlamps and dipped
headlamps position. Press these controls, located
on the fascia panel, several
times in succession to adjust the
headlamps.
Fog lamps
The controls are located on the fascia panel
control pad.
Front and rear fog lamps
The fog lamps should only be used in
fog or when snow is falling.
In clear weather or in rain, both day and
night, lit rear fog lamps dazzle and are
prohibited.
Do not forget to switch them off when they
are no longer necessary.
Guide-me-home lighting
The temporary maintaining of the dipped
headlamps, after switching off the vehicle's
ignition, makes the driver's exit easier when
the light is poor and lights the space in front
of the vehicle.
Activation
With the ignition key in the STOP position
or removed, pull the lighting stalk towards
the steering wheel within 2 minutes after
switching off the engine.
Each time the control is operated, the
duration for which the lamps will remain
on is extended by 30 seconds, up to a
maximum of 210 seconds. Once this period
of time has elapsed, the lamps switch off
automatically.
Deactivation
Pull the lighting stalk towards the steering
wheel for more than 2 seconds.
The front fog lamps operate with
the side lights and the dipped
headlamps.
The rear fog lamps operate with
the dipped headlamps.
Press one of these controls to switch on the
lights. The warning lamp comes on,
accompanied by a message
on the display, the first time
the control is operated and
remains on until the function is deactivated
automatically. An indicator light on the display
indicates the adjustment position
selected (0, 1, 2, 3).
Page 53 of 154
1
READY TO SET OFF
Steering wheel controls
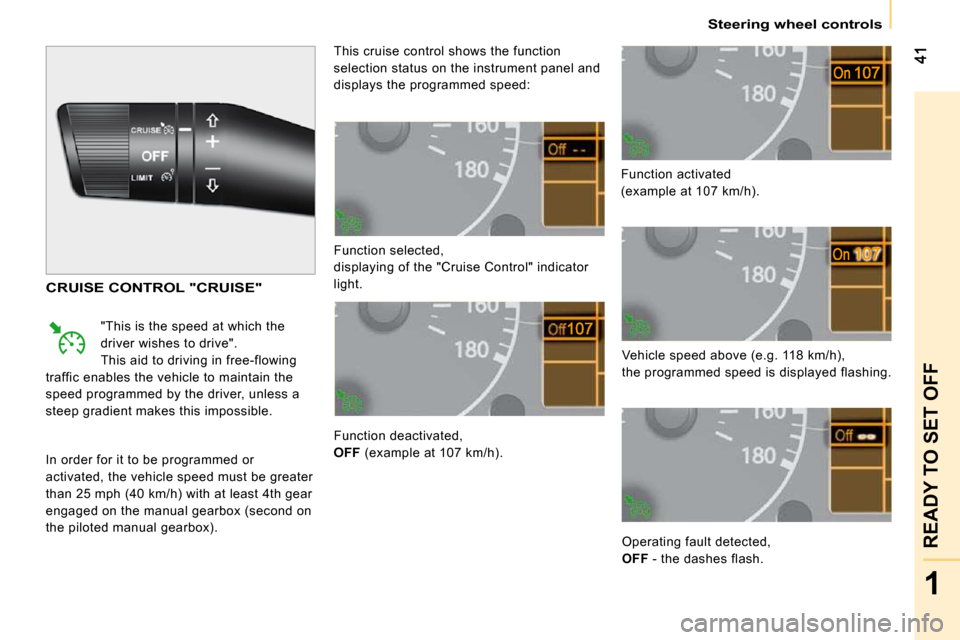
Function selected,
displaying of the "Cruise Control" indicator
light.
Function deactivated,
OFF (example at 107 km/h). Function activated
(example at 107 km/h).
Vehicle speed above (e.g. 118 km/h),
the programmed speed is displayed flashing.
This cruise control shows the function
selection status on the instrument panel and
displays the programmed speed:
CRUISE CONTROL "CRUISE"
"This is the speed at which the
driver wishes to drive".
This aid to driving in free-flowing
traffic enables the vehicle to maintain the
speed programmed by the driver, unless a
steep gradient makes this impossible.
In order for it to be programmed or
activated, the vehicle speed must be greater
than 25 mph (40 km/h) with at least 4th gear
engaged on the manual gearbox (second on
the piloted manual gearbox). Operating fault detected,
OFF - the dashes flash.
Page 56 of 154
44
Steering wheel controls
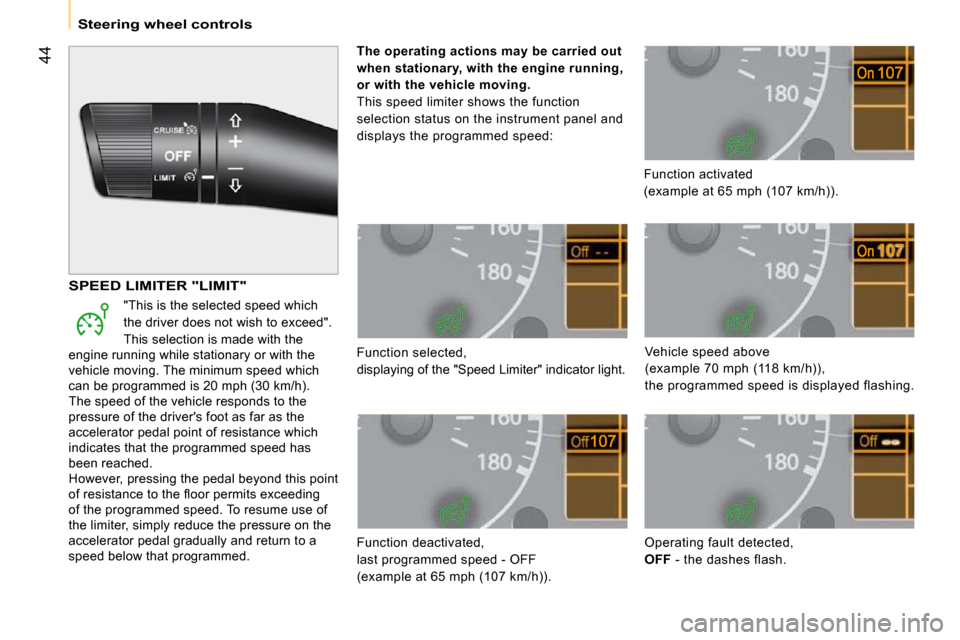
Function selected,
displaying of the "Speed Limiter" indicator light.
Function deactivated,
last programmed speed - OFF
(example at 65 mph (107 km/h)). Function activated
(example at 65 mph (107 km/h)).
Vehicle speed above
(example 70 mph (118 km/h)),
the programmed speed is displayed flashing.
Operating fault detected,
OFF - the dashes flash.
SPEED LIMITER "LIMIT"
"This is the selected speed which
the driver does not wish to exceed".
This selection is made with the
engine running while stationary or with the
vehicle moving. The minimum speed which
can be programmed is 20 mph (30 km/h).
The speed of the vehicle responds to the
pressure of the driver's foot as far as the
accelerator pedal point of resistance which
indicates that the programmed speed has
been reached.
However, pressing the pedal beyond this point
�o�f� �r�e�s�i�s�t�a�n�c�e� �t�o� �t�h�e� �fl� �o�o�r� �p�e�r�m�i�t�s� �e�x�c�e�e�d�i�n�g�
of the programmed speed. To resume use of
the limiter, simply reduce the pressure on the
accelerator pedal gradually and return to a
speed below that programmed.
The operating actions may be carried out
when stationary, with the engine running,
or with the vehicle moving.
This speed limiter shows the function
selection status on the instrument panel and
displays the programmed speed:
Page 57 of 154
45
1
READY TO SET OFF
Steering wheel controls
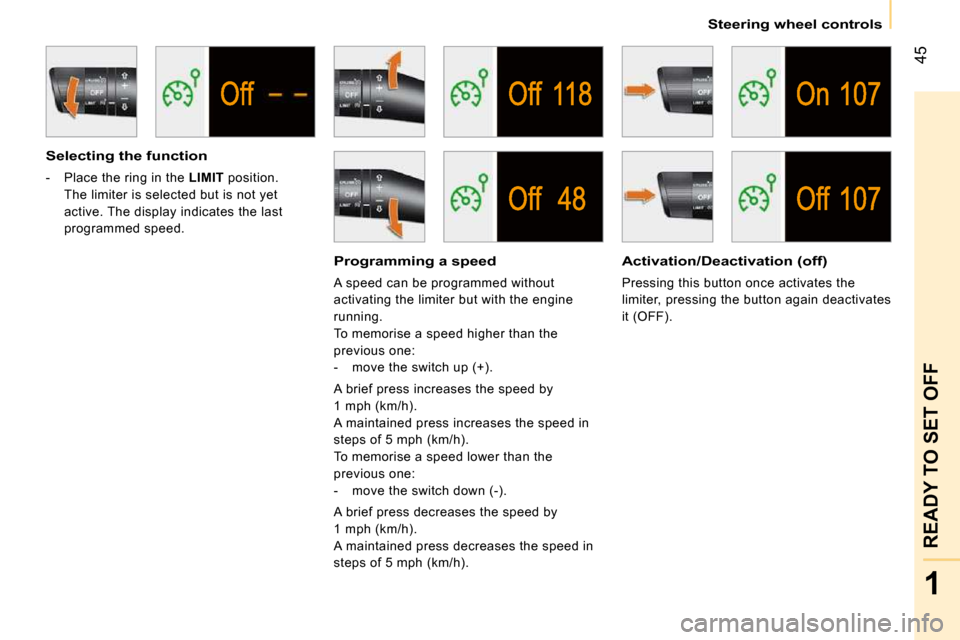
Selecting the function
- Place the ring in the LIMIT position.
The limiter is selected but is not yet
active. The display indicates the last
programmed speed.
Programming a speed
A speed can be programmed without
activating the limiter but with the engine
running.
To memorise a speed higher than the
previous one:
- move the switch up (+).
A brief press increases the speed by
1 mph (km/h).
A maintained press increases the speed in
steps of 5 mph (km/h).
To memorise a speed lower than the
previous one:
- move the switch down (-).
A brief press decreases the speed by
1 mph (km/h).
A maintained press decreases the speed in
steps of 5 mph (km/h).
Activation/Deactivation (off)
Pressing this button once activates the
limiter, pressing the button again deactivates
it (OFF).