fuel Peugeot Boxer 2016 User Guide
[x] Cancel search | Manufacturer: PEUGEOT, Model Year: 2016, Model line: Boxer, Model: Peugeot Boxer 2016Pages: 292, PDF Size: 10.07 MB
Page 38 of 292
36
boxer_en_Chap02_Pret-a-Partir_ed01-2015
to change gear easily, always depress the
clutch pedal fully.
to prevent the mat from becoming caught
under the pedal:
-
ensure that the mat is positioned
correctly,
-
never fit one mat on top of another
.
Avoid leaving your hand on the gear knob as
the force exerted, even if slight, may wear
the internal components of the gearbox over
time.
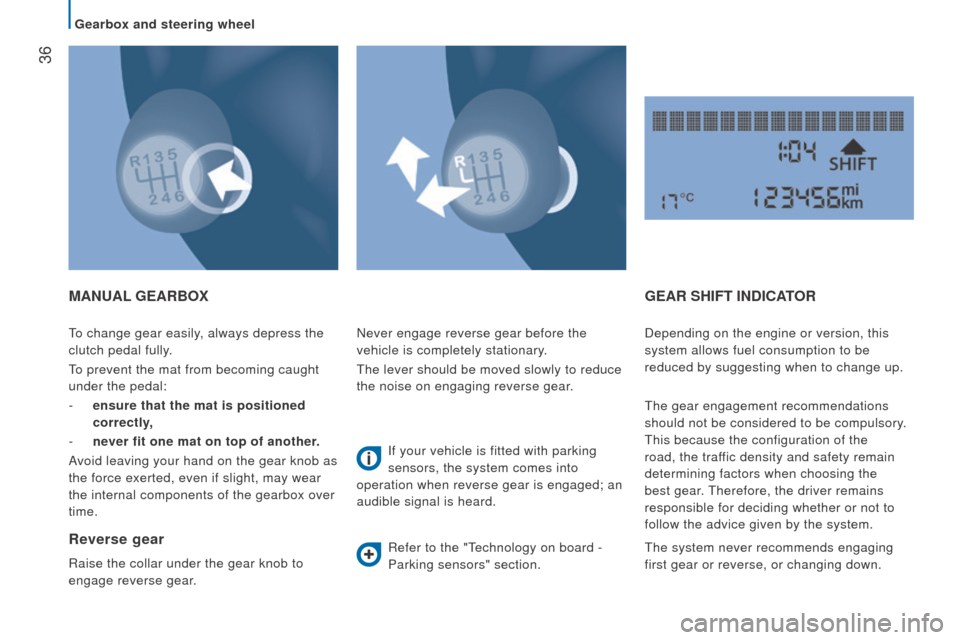
MAnuAL GEA r B ox
r
everse gear
Raise the collar under the gear knob to
engage reverse gear. Never engage reverse gear before the
vehicle is completely stationary.
t
he lever should be moved slowly to reduce
the noise on engaging reverse gear.
If your vehicle is fitted with parking
sensors, the system comes into
operation when reverse gear is engaged; an
audible signal is heard.
Refer to the " technology on board -
Parking sensors" section.
GEAr SHIFt IndIcAt or
Depending on the engine or version, this
system allows fuel consumption to be
reduced by suggesting when to change up.
t
he gear engagement recommendations
should not be considered to be compulsory.
t
his because the configuration of the
road, the traffic density and safety remain
determining factors when choosing the
best gear.
t
herefore, the driver remains
responsible for deciding whether or not to
follow the advice given by the system.
t
he system never recommends engaging
first gear or reverse, or changing down.
Gearbox and steering wheel
Page 40 of 292
38
boxer_en_Chap02_Pret-a-Partir_ed01-2015
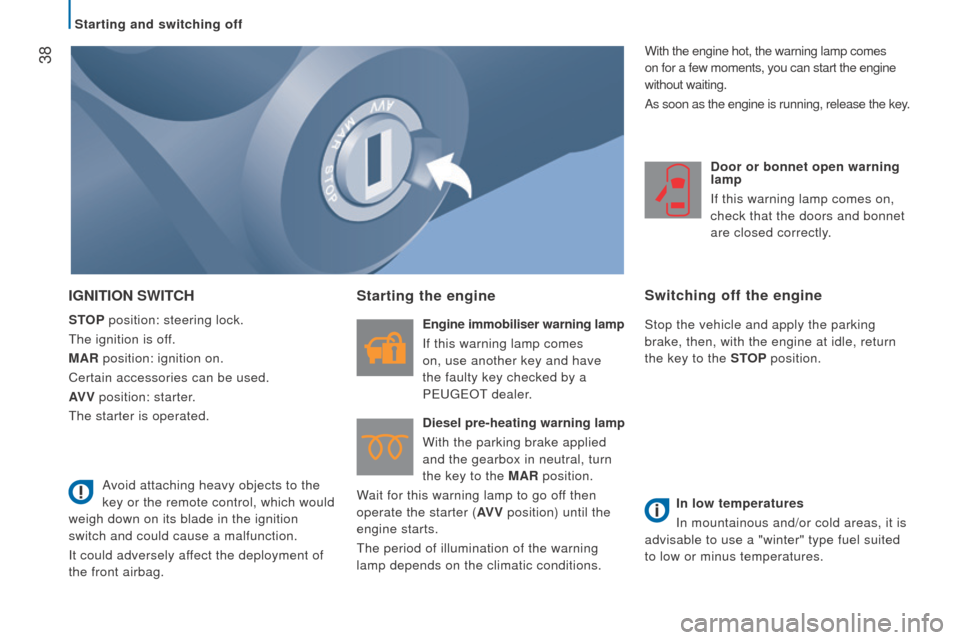
IGnItIon SWItcH
StoP position: steering lock.
t
he ignition is off.
MA
r position: ignition on.
Certain accessories can be used.
AV V position: starter.
t
he starter is operated.
Starting the engine
Engine immobiliser warning lamp
If this warning lamp comes
on, use another key and have
the faulty key checked by a
P
euge O t
dealer
.
d
iesel pre-heating warning lamp
With the parking brake applied
and the gearbox in neutral, turn
the key to the MA
r position.
Wait for this warning lamp to go off then
operate the starter (AV V position) until the
engine starts.
t
he period of illumination of the warning
lamp depends on the climatic conditions.
d
oor or bonnet open warning
lamp
If this warning lamp comes on,
check that the doors and bonnet
are closed correctly.
Switching off the engine
Stop the vehicle and apply the parking
brake, then, with the engine at idle, return
the key to the S
to P position.
In low temperatures
In mountainous and/or cold areas, it is
advisable to use a "winter" type fuel suited
to low or minus temperatures.
Avoid attaching heavy objects to the
key or the remote control, which would
weigh down on its blade in the ignition
switch and could cause a malfunction.
It could adversely affect the deployment of
the front airbag. With the engine hot, the warning lamp comes
on for a few moments, you can start the engine
without waiting.
As soon as the engine is running, release the key.
Starting and switching off
Page 42 of 292

40
boxer_en_Chap02_Pret-a-Partir_ed01-2015
the Stop & Start system puts the engine
temporarily into standby - S t
OP
mode -
during stops in the traffic (red lights, traffic
jams, or other...).
t
he engine restarts
automatically - S
t
ARt mode - as soon as
you want to move off.
t
he restart takes
place instantly, quickly and silently.
Perfect for urban use, the Stop & Start
system reduces fuel consumption and
exhaust emissions and offers the comfort of
complete silence when stationary.
StoP & StA rt
o
peration
Going into engine StoP mode
With the vehicle stationary , put the gear
lever into neutral, then release the clutch
pedal.
-
t his indicator lamp comes on
in the instrument panel and
the engine goes into standby. Automatic stopping of the engine is
only possible after the vehicle has
exceed a speed of about 6 mph (10 km/h),
to avoid repeated stopping of the engine
when driving slowly.
Never leave your vehicle with out first
turning off the ignition with the key.
Never refuel with the engine in
S t
OP
mode; you must switch off the
ignition with the key. Special cases: S
to P mode unavailable
t
he S t
OP
mode is not invoked when:
-
the system is initialising,
-
the driver's door is open,
-
the driver's seat belt is not fastened,
-
the air conditioning is running,
-
the heated rear screen is on,
-
the windscreen wiper is on fast wipe,
-
reverse gear is engaged, for a parking
manoeuvre,
-
some special conditions (battery
charge, engine temperature, particle
filter regeneration, braking assistance,
ambient temperature...) where the
engine is needed to assure control of a
system.
t
his indicator lamp in the
instrument panel flashes for a
few seconds, then goes off.
t
his operation is perfectly normal.
Starting and switching off
Page 71 of 292
69
boxer_en_Chap03_ergo-et-confort_ed01-2015
Have the additional heating checked at
least once a year at the beginning of
winter. Maintenance and repairs should only
be carried out by a P
euge O t
dealer or a
qualified workshop.
u
se only genuine replacement parts.
Switching off the heating
In the case of deferred operation, the
heating stops at the end of the programmed
period.
Good practice
to avoid any risk of poisoning or
asphyxiation, the additional heating must
not be used, even for short periods, in
an enclosed space such as a garage or
workshop which is not fitted with an exhaust
gas extraction system.
t
he additional heating switches off when the
battery voltage is low, so as to allow engine
starting.
t
he additional heating is supplied by the
vehicle's fuel tank.
e nsure that the low fuel
warning lamp is not on.
Always switch off the additional heating
when filling with fuel to avoid any risk of fire
or explosion.
t
he temperature near the heater must not
exceed 120 °C. A temperature higher than
this (for example in the case of painting in
an oven) could damage the components of
the electronic circuits.
t
he additional heating is fitted with
a temperature limiter which cuts off
the combustion in the event of engine
overheating due to a lack of coolant. Check
the level and if necessary top-up following
the advice given in the "Checks - Levels"
section.
t
hen press the programme
selection button before switching the heating
on again.
Setting the operating period
the period of operation can be set to
between 10 and 60 minutes.
Press and hold the
"set" button.
At the same time press the "<"
or ">" button.
t
he time and the time setting
indicator come on.
Press and hold the "set" button again.
At the same time press the "<" or ">" button
again.
t
he programmed operating period is
displayed and the heating or ventilation
cycle indicator flashes.
Adjust the period by pressing the "<" or
">" button.
t
he setting is confirmed by the period
disappearing from the screen or by pressing
the "set" button again In the case of immediate
operation, press this button again
to switch off manually.
t
he heating cycle indicator and
the screen go off.
Ventilation
3
EASE oF uSE and coMFort
Page 91 of 292
89
boxer_en_Chap04_technologie-a-bord_ed01-2015
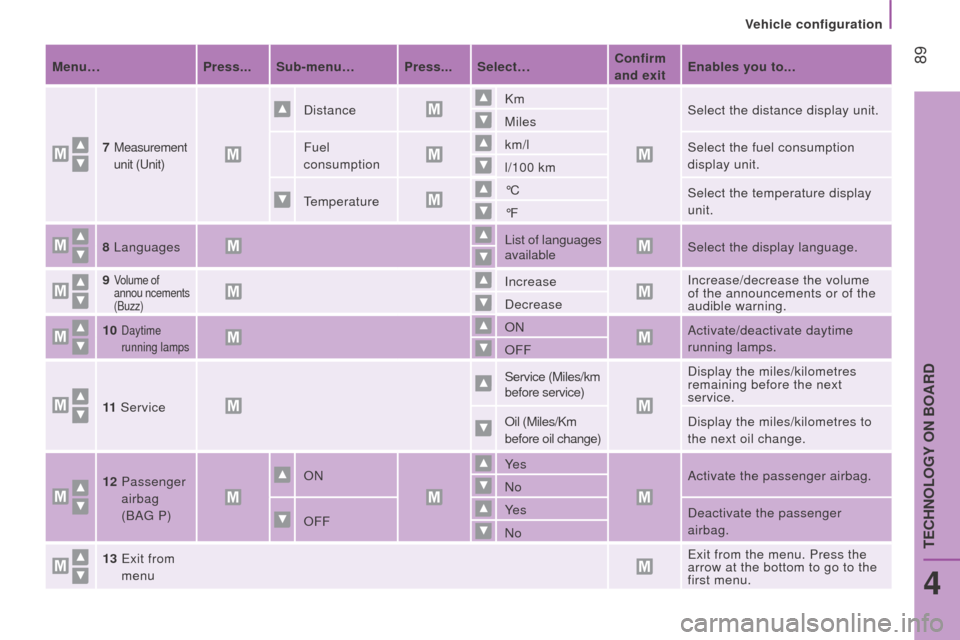
Menu… Press... Sub-menu… Press... Select…c onfirm
and exit Enables you to...
7
Measurement
unit (u nit)
Distance Km
Select the distance display unit.
Miles
Fuel
consumption km/l
Select the fuel consumption
display unit.
l/100 km
temperature °C
Select the temperature display
unit.
°F
8 Languages List of languages
availableSelect the display language.
9
Volume of
annou ncements
(Buzz)Increase Increase/decrease the volume
of the announcements or of the
audible warning.
Decrease
10
Daytime
running lampsON Activate/deactivate daytime
running lamps.
OFF
11 Service Service (Miles/km
before service)
Display the miles/kilometres
remaining before the next
service.
Oil (Miles/Km
before oil change) Display the miles/kilometres to
the next oil change.
12
Passenger
airbag
(BA
g
P) ON
Ye s
Activate the passenger airbag.
No
OFF Ye s
Deactivate the passenger
airbag.
No
13
e
xit from
menu
e
xit from the menu. Press the
arrow at the bottom to go to the
first menu.
Vehicle configuration
4
teCHNOLOgY ON BOARD
Page 93 of 292

91
boxer_en_Chap04_technologie-a-bord_ed01-2015
From the "Safety / Help" sub menu, you can:
-
select "Parkview Camera", then
"Reversing camera" to activate or
deactivate its use (On, Off),
-
select "Parkview Camera", then
"Camera delay" to activate or deactivate
the maintaining of the display for
10 seconds or up to 11 mph (18 km/h)
(On, Off),
-
select "Passenger airbag" to activate or
deactivate its use (On, Off).
From the "Lighting" sub-menu, you can:
-
select "Day lamps" to activate or
deactivate their use (On, Off),
-
select "Headlamp sensor" to adjust its
sensitivity (1, 2, 3).
From the "Doors & locking", you can:
-
select "Autoclose" to activate or
deactivate its use (On, Off).
From the "Display" sub-menu, you can:
-
select "Languages" and choose one of
the languages listed above,
-
select "
u
nits of measurement" to choose
the units for fuel consumption
(l/100 km, mpg), distance (miles, km)
and temperature (°C, °F),
-
select "Display trip B" to switch trip B
On or Off in the trip computer.
From the "
t
ime and Date" sub-menu, you
can:
-
select "Adjust time and format" to set the
hour, minutes and seconds and choose
the format (24 h, 12 h with am or pm),
-
select "Adjust Date" to set the day
,
month and year.
to set the time manually
, "Synch
time"
must be Off.
Vehicle configuration
4
teCHNOLOgY ON BOARD
Page 94 of 292

92
boxer_en_Chap04_technologie-a-bord_ed01-2015
the trIP button, located at the end of the
wiper control stalk, gives access to the
following information:
-
r
ange
t his indicates the distance that can still
be travelled with the fuel remaining in
the tank on the basis of the average
consumption over the last few miles
(kilometres) travelled. -
A verage speed A
t his is the average speed calculated
since the last trip computer zero reset
(with the ignition on).
-
t
rip
duration A
t his indicates the total time since the
last trip recorder zero reset.
-
d istance A
t his indicates the distance travelled
since the last trip computer zero reset.
-
A
verage fuel consumption A
t his is the average quantity of fuel
consumed since the last trip computer
zero reset.
-
c
urrent fuel consumption A
t his is the average quantity of fuel
consumed during the last few seconds.
trIP co MP ut E r
If tRIP B is activated in the M od E menu:
-
Distance B
-
A
verage fuel consumption B
-
A
verage speed B
-
t
rip duration B
Vehicle data
Page 136 of 292

134
boxer_en_Chap07_Verifications_ed01-2015
Low fuel level
rEF
u
ELLI
n
G
In low temperatures
In mountainous and/or cold areas, it is
advisable to use a "winter" type fuel suited
to low or minus temperatures. With Stop & Start, never refuel with
the system in S
t
OP
mode; you must
switch off the ignition with the key. When the fuel tank level E
( e mpty) is reached, this warning
lamp comes on.
You then have around 10 to
12 litres in the reserve, depending on the
capacity of the tank, the engine type, the
driving conditions and the profile of the road.
Refuel without delay to avoid running out of
fuel.
t
he capacity of the fuel tank is
approximately 90 litres.
Fuel tanks of different capacities, 60 and
120 litres, may be fitted.
t
he fuel tank must be filled with the engine
off.
-
Open the fuel filler flap.
-
Support the black cap with one hand.
-
With the other hand, insert the key
, then
turn it anticlockwise.
-
Remove the black cap and hook it onto
the clip located on the inside of the flap.
A label affixed to the inside of the flap
reminds you of the type of fuel to be used.
When filling the fuel tank, do not continue
after the 3rd cut-off of the nozzle.
t
his could
cause malfunctions.
-
After filling the fuel tank, lock the black
cap and close the flap.
BlueH d i and AdBlue additive
t
he blue cap is only present on BlueHDi
Diesel versions.
For more information, refer to the "AdBlue
additive section".to understand the significance of the
precautions mentioned on the labels,
refer to the "Quick help - Label glossary"
section.
Fuel
Page 137 of 292

135
boxer_en_Chap07_Verifications_ed01-2015
FuEL SYS t EM cut-o FF
Following an impact and before
restoring the supply, check that there is
no leak of fuel or sparks so as to avoid any
risk of fire. In the event of a collision, a device
automatically cuts off the fuel supply to the
engine and the vehicle's electrical supply.
It switches on the hazard warning lamps and
the courtesy lamps, as well as unlocking the
doors.
to restore the fuel supply
, press the first
button located under the glove box.t hen, to restore the electrical power supply,
press the second button, located in the
battery compartment under the driver's floor
(Minibus).
On other versions the second button
is replaced by a fuse; contact a
P
euge O t
dealer or a qualified workshop.
Fuel
7
CHeCKS
Page 138 of 292

136
boxer_en_Chap07_Verifications_ed01-2015
BLuEHdI
A nd AdB L u E® AddItIVE
AdBlue® is the brand name of the solution
needed for operation of the SCR system.
BlueHDI vehicles have a specific AdBlue
®
additive tank with a capacity of 15 litres.
It has an exterior filler located behind the
fuel filler flap below the fuel filler cap and
closed with a blue filler cap.
t
he objective of BlueHDi is to reduce by
up to 90% the emissions of NOx (nitrous
oxides) in the air, using a system that
converts NOx into water vapour and nitrogen
in a dedicated catalytic converter: SCR
(Selective Catalytic Reduction).
t
his objective meets the "
e
uro 6" emissions
standard adopted by the
e
uropean
u
nion
aimed at limiting the emissions of pollutants
from internal combustion engines.
t
he SCR technology used on BlueHDi
engines involves the injection of AdBlue
®
fluid into the exhaust system.t his operation can also be carried out
by a P euge O t dealer or a qualified
workshop.
Scr technology
Filling of the AdBlue® tank can be done
using:
-
5 or 10 litres containers equipped with a
10 centimetre filler tube or the filling kit
available from P
euge O t
dealers,
-
1.89 litre botles that are screwed onto
the filler neck, available from P
euge O t
dealers,
-
or when at a fuel filling station equipped
with a special AdBlue
® delivery pump for
heavy or light vehicles.
AdBlue® additive