brake PEUGEOT EXPERT 2018 Service Manual
[x] Cancel search | Manufacturer: PEUGEOT, Model Year: 2018, Model line: EXPERT, Model: PEUGEOT EXPERT 2018Pages: 416, PDF Size: 14.12 MB
Page 251 of 416
249
Engine oil change
Refer to the manufacturer's service schedule
for details of the inter val for this operation.
In order to maintain the reliability of the engine
and emissions control system, never use
additives in the engine oil.
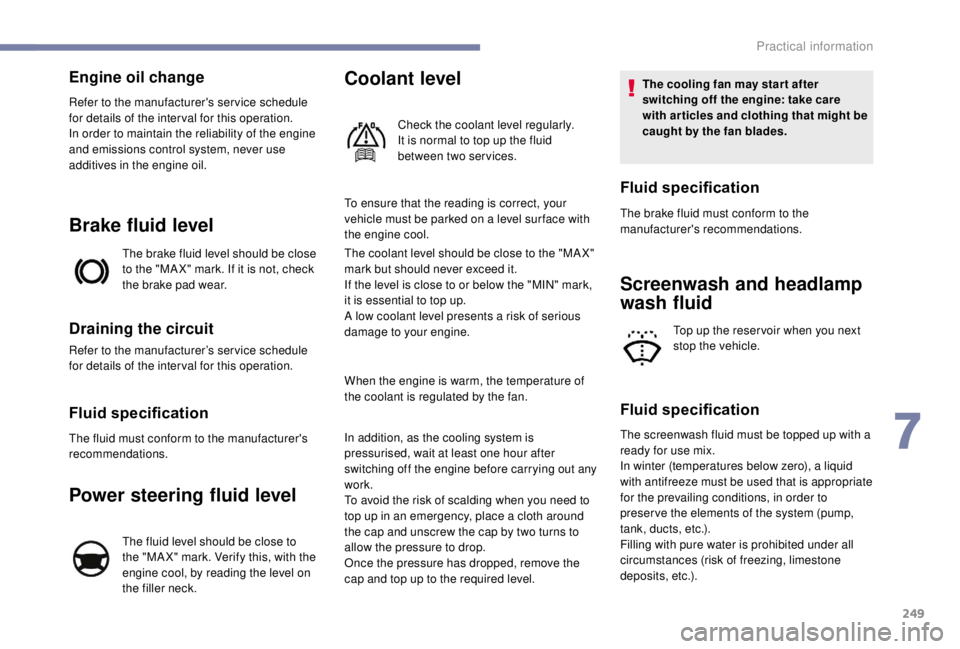
Brake fluid level
The brake fluid level should be close
to the "MA X" mark. If it is not, check
the brake pad wear.
Draining the circuit
Refer to the manufacturer’s service schedule
for details of the inter val for this operation.
Fluid specification
The fluid must conform to the manufacturer's
recommendations.
Power steering fluid level
The fluid level should be close to
the "MA X" mark. Verify this, with the
engine cool, by reading the level on
the filler neck.
Coolant level
Check the coolant level regularly.
It is normal to top up the fluid
between two services.
To ensure that the reading is correct, your
vehicle must be parked on a level sur face with
the engine cool.
The coolant level should be close to the "MA X"
mark but should never exceed it.
If the level is close to or below the "MIN" mark,
it is essential to top up.
A low coolant level presents a risk of serious
damage to your engine.
When the engine is warm, the temperature of
the coolant is regulated by the fan.
In addition, as the cooling system is
pressurised, wait at least one hour after
switching off the engine before carrying out any
work.
To avoid the risk of scalding when you need to
top up in an emergency, place a cloth around
the cap and unscrew the cap by two turns to
allow the pressure to drop.
Once the pressure has dropped, remove the
cap and top up to the required level. The cooling fan may star t after
switching off the engine: take care
with articles and clothing that might be
caught by the fan blades.
The brake fluid must conform to the
manufacturer's recommendations.
Screenwash and headlamp
wash fluid
Top up the reser voir when you next
stop the vehicle.
Fluid specification
The screenwash fluid must be topped up with a
ready for use mix.
In winter (temperatures below zero), a liquid
with antifreeze must be used that is appropriate
for the prevailing conditions, in order to
preser ve the elements of the system (pump,
tank, ducts, etc.).
Filling with pure water is prohibited under all
circumstances (risk of freezing, limestone
deposits, etc.).
Fluid specification
7
Practical information
Page 253 of 416
251
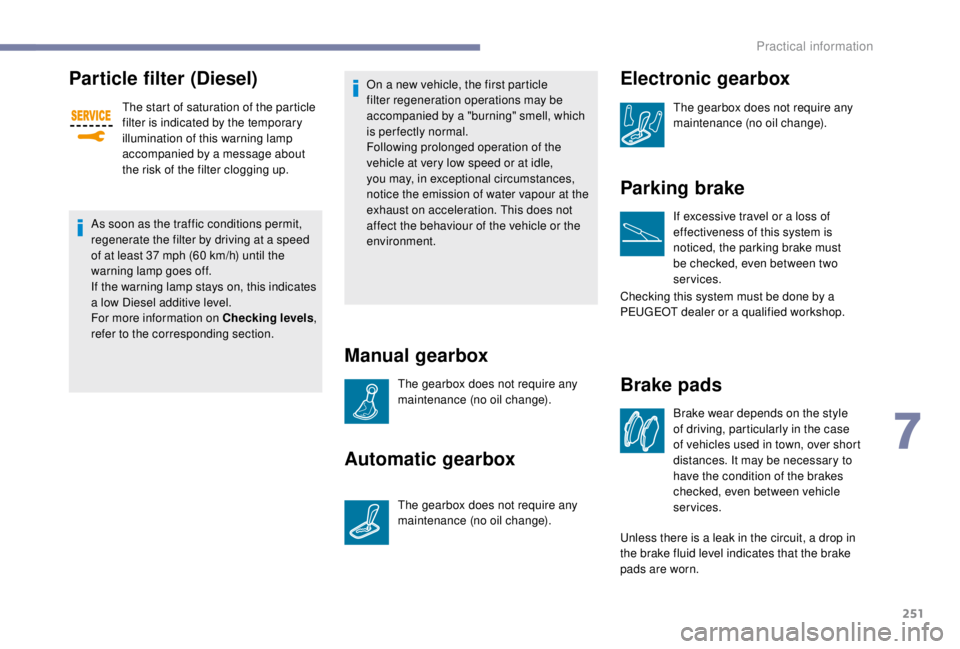
Particle filter (Diesel)
The start of saturation of the particle
filter is indicated by the temporary
illumination of this warning lamp
accompanied by a message about
the risk of the filter clogging up.
As soon as the traffic conditions permit,
regenerate the filter by driving at a speed
of at least 37
mph (60 km/h) until the
warning lamp goes off.
If the warning lamp stays on, this indicates
a low Diesel additive level.
For more information on Checking levels ,
refer to the corresponding section. On a new vehicle, the first particle
filter regeneration operations may be
accompanied by a "burning" smell, which
is per fectly normal.
Following prolonged operation of the
vehicle at very low speed or at idle,
you may, in exceptional circumstances,
notice the emission of water vapour at the
exhaust on acceleration. This does not
affect the behaviour of the vehicle or the
environment.
Manual gearbox
The gearbox does not require any
maintenance (no oil change).
Automatic gearbox
The gearbox does not require any
maintenance (no oil change).
Brake pads
Brake wear depends on the style
of driving, particularly in the case
of vehicles used in town, over short
distances. It may be necessary to
have the condition of the brakes
checked, even between vehicle
services.
Unless there is a leak in the circuit, a drop in
the brake fluid level indicates that the brake
pads are worn.
Electronic gearbox
The gearbox does not require any
maintenance (no oil change).
Parking brake
If excessive travel or a loss of
effectiveness of this system is
noticed, the parking brake must
be checked, even between two
services.
Checking this system must be done by a
PEUGEOT dealer or a qualified workshop.
7
Practical information
Page 254 of 416
252
Brake disc wear
For information on checking brake
disc wear, contact a PEUGEOT or a
qualified workshop.
Only use products recommended by
PEUGEOT or products of equivalent
quality and specification.
In order to optimise the operation of units
as important as those in the braking
system, PEUGEOT selects and offers very
specific products.
After washing the vehicle, dampness, or
in wintry conditions, ice can form on the
brake discs and pads: braking efficiency
may be reduced. Make light brake
applications to dry and defrost the brakes.
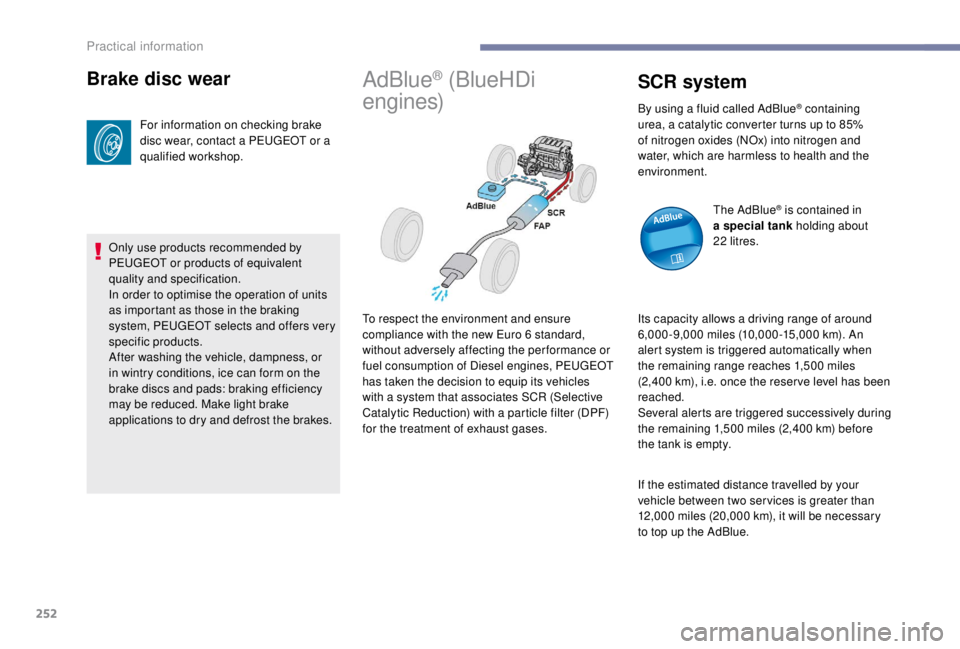
AdBlue® (BlueHDi
engines)
To respect the environment and ensure
compliance with the new Euro 6
standard,
without adversely affecting the performance or
fuel consumption of Diesel engines, PEUGEOT
has taken the decision to equip its vehicles
with a system that associates SCR (Selective
Catalytic Reduction) with a particle filter (DPF)
for the treatment of exhaust gases.
SCR system
By using a fluid called AdBlue® containing
urea, a catalytic converter turns up to 85%
of nitrogen oxides (NOx) into nitrogen and
water, which are harmless to health and the
environment.
The AdBlue
® is contained in
a special tank holding about
22
litres.
Its capacity allows a driving range of around
6,000-9,000
miles (10,000-15,000
km). An
alert system is triggered automatically when
the remaining range reaches 1,500
miles
(2,400
km), i.e. once the reser ve level has been
reached.
Several alerts are triggered successively during
the remaining 1,500
miles (2,400 km) before
the tank is empty.
If the estimated distance travelled by your
vehicle between two ser vices is greater than
12,000
miles (20,000
km), it will be necessary
to top up the AdBlue.
Practical information
Page 271 of 416
269
Removing a wheel
Parking the vehicle
Park the vehicle where it does not block
traffic: the ground must be level, stable
and non-slippery.
With a manual gearbox, engage first gear
then switch off the ignition to block the
wheels.
With an automatic gearbox, place the gear
selector to position P then switch off the
ignition to block the wheels.
With an electronic gearbox, place the gear
selector to position A then switch off the
ignition to block the wheels.
Apply the parking brake and check that
the warning lamp is on in the instrument
panel.
The passengers must get out of the
vehicle and wait where they are safe.
Never go underneath a vehicle raised
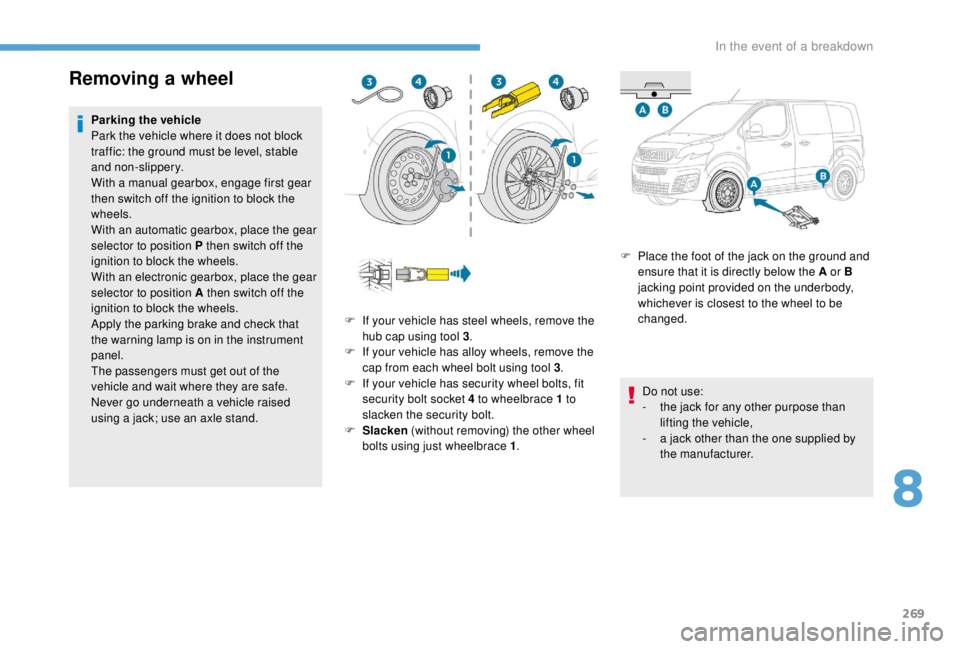
using a jack; use an axle stand.F
P
lace the foot of the jack on the ground and
ensure that it is directly below the A or B
jacking point provided on the underbody,
whichever is closest to the wheel to be
changed.
Do not use:
-
t
he jack for any other purpose than
lifting the vehicle,
-
a j
ack other than the one supplied by
the manufacturer.
F
I
f your vehicle has steel wheels, remove the
hub cap using tool 3 .
F
I
f your vehicle has alloy wheels, remove the
cap from each wheel bolt using tool 3 .
F
I
f your vehicle has security wheel bolts, fit
security bolt socket 4
to wheelbrace 1 to
slacken the security bolt.
F
S
lacken (without removing) the other wheel
bolts using just wheelbrace 1 .
8
In the event of a breakdown
Page 273 of 416
271
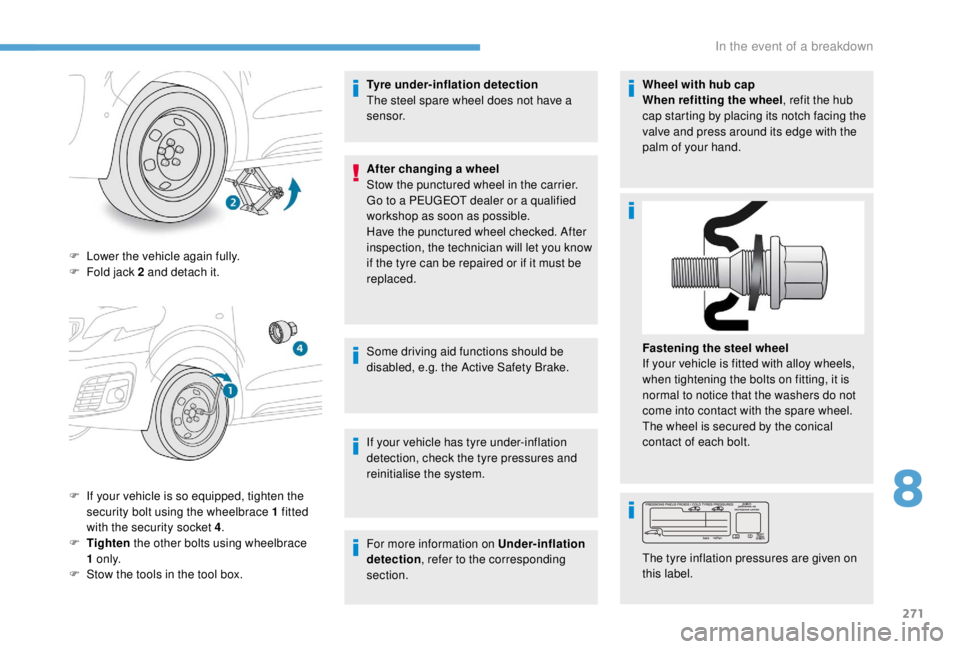
F Lower the vehicle again fully.
F F old jack 2 and detach it.
F
I
f your vehicle is so equipped, tighten the
security bolt using the wheelbrace 1
fitted
with the security socket 4 .
F
T
ighten the other bolts using wheelbrace
1
o n l y.
F
S
tow the tools in the tool box. Tyre under-inflation detection
The steel spare wheel does not have a
sensor.
After changing a wheel
Stow the punctured wheel in the carrier.
Go to a PEUGEOT dealer or a qualified
workshop as soon as possible.
Have the punctured wheel checked. After
inspection, the technician will let you know
if the tyre can be repaired or if it must be
replaced.
Some driving aid functions should be
disabled, e.g. the Active Safety Brake.
If your vehicle has tyre under-inflation
detection, check the tyre pressures and
reinitialise the system.
For more information on Under-inflation
detection
, refer to the corresponding
section. Wheel with hub cap
When refitting the wheel
, refit the hub
cap starting by placing its notch facing the
valve and press around its edge with the
palm of your hand.
Fastening the steel wheel
If your vehicle is fitted with alloy wheels,
when tightening the bolts on fitting, it is
normal to notice that the washers do not
come into contact with the spare wheel.
The wheel is secured by the conical
contact of each bolt.
The tyre inflation pressures are given on
this label.
8
In the event of a breakdown
Page 280 of 416
278
For more information on Changing a bulb and
in particular, the types of bulbs, refer to the
corresponding section.
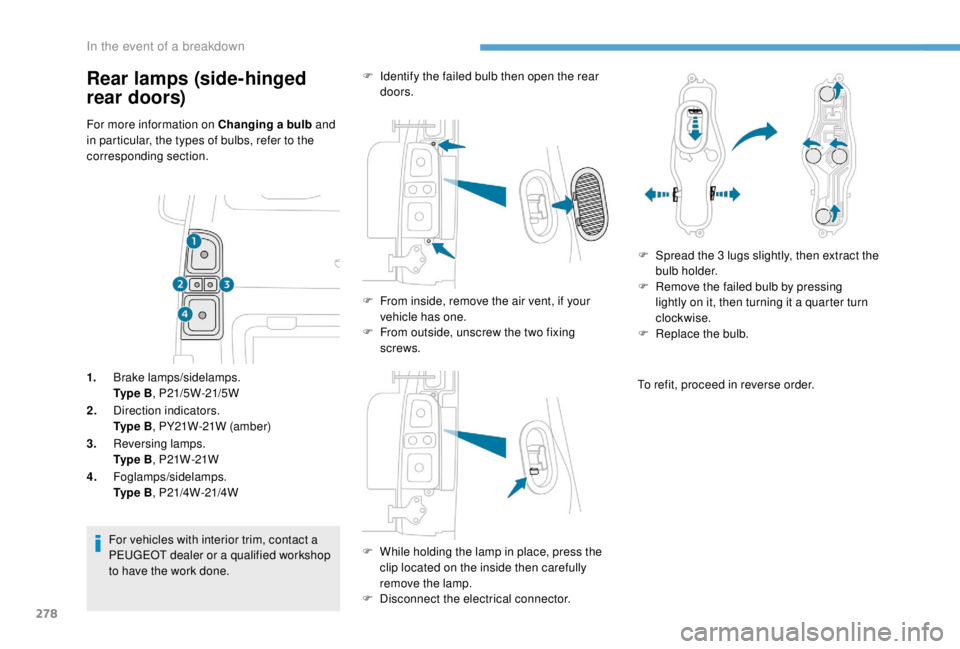
1. Brake lamps/sidelamps.
Ty p e B , P21/5W-21/5W
2. Direction indicators.
Ty p e B , PY21W-21W (amber)
3. Reversing lamps.
Ty p e B , P21W-21W
4. Foglamps/sidelamps.
Ty p e B , P21/4W-21/4W
For vehicles with interior trim, contact a
PEUGEOT dealer or a qualified workshop
to have the work done. F
I
dentify the failed bulb then open the rear
doors.
F
F
rom inside, remove the air vent, if your
vehicle has one.
F
F
rom outside, unscrew the two fixing
screws.
F
W
hile holding the lamp in place, press the
clip located on the inside then carefully
remove the lamp.
F
D
isconnect the electrical connector.F
S
pread the 3 lugs slightly, then extract the
bulb holder.
F
R
emove the failed bulb by pressing
lightly on it, then turning it a quarter turn
clockwise.
F
R
eplace the bulb.
To refit, proceed in reverse order.
Rear lamps (side-hinged
rear doors)
In the event of a breakdown
Page 281 of 416
279
Third brake lamp (side-hinged
doors)
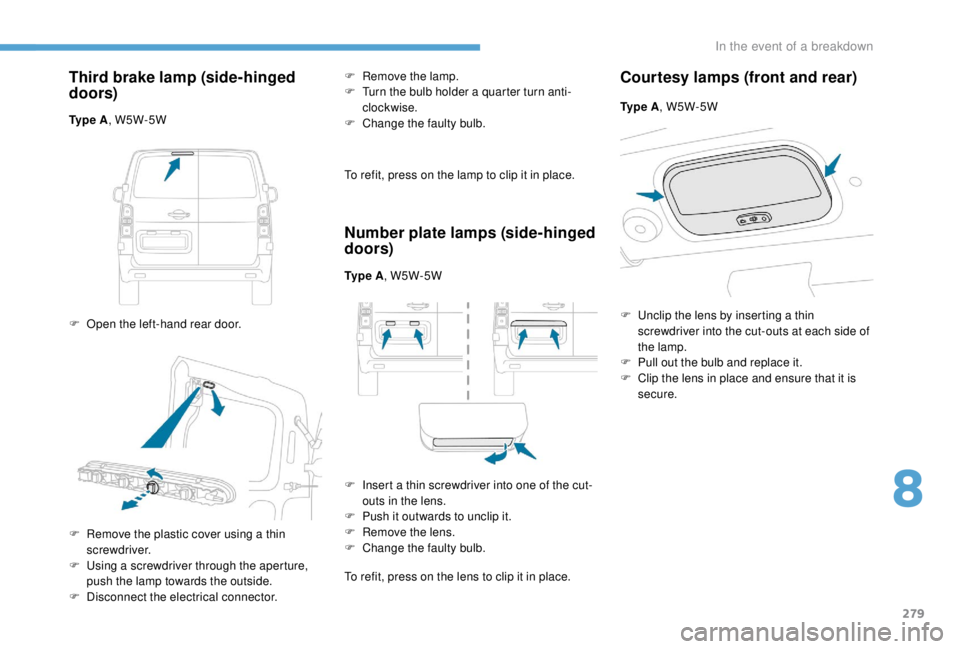
Ty p e A, W5W-5W
F
O
pen the left-hand rear door. F
R
emove the lamp.
F
T
urn the bulb holder a quarter turn anti-
clockwise.
F C hange the faulty bulb.
To refit, press on the lamp to clip it in place.
Number plate lamps (side-hinged
doors)
Ty p e A , W5W-5W
F
I
nsert a thin screwdriver into one of the cut-
outs in the lens.
F
P
ush it outwards to unclip it.
F
R
emove the lens.
F
C
hange the faulty bulb.
To refit, press on the lens to clip it in place.
Courtesy lamps (front and rear)
F Remove the plastic cover using a thin screwdriver.
F
U
sing a screwdriver through the aperture,
push the lamp towards the outside.
F
D
isconnect the electrical connector. Ty p e A
, W5W-5W
F
U
nclip the lens by inserting a thin
screwdriver into the cut-outs at each side of
the lamp.
F
P
ull out the bulb and replace it.
F
C
lip the lens in place and ensure that it is
secure.
8
In the event of a breakdown
Page 282 of 416
280
Rear lamps (tailgate)
For more information on Changing a bulb and
in particular, the types of bulbs, refer to the
corresponding section.
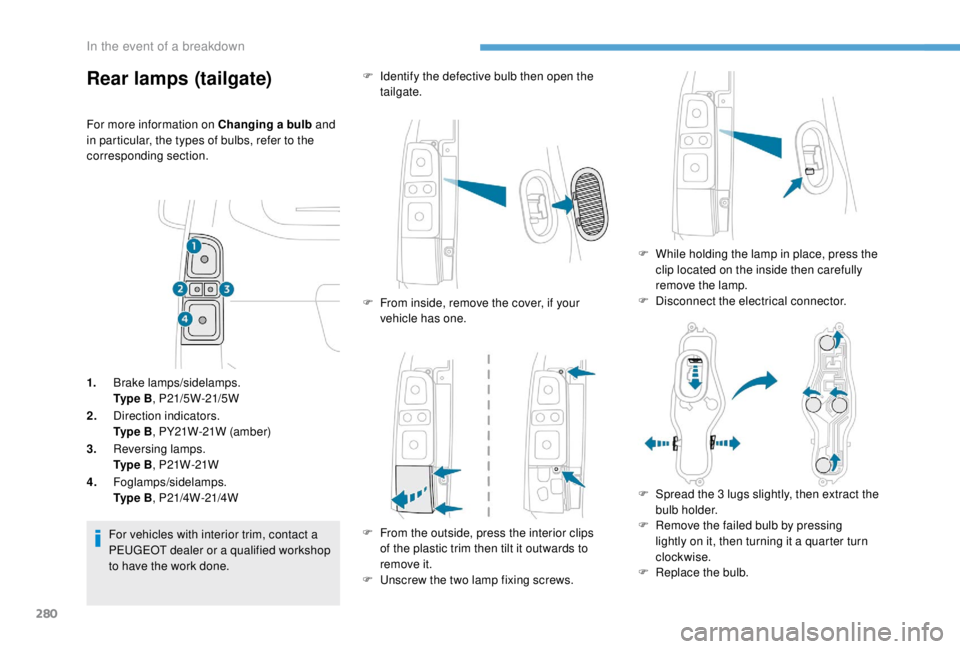
1. Brake lamps/sidelamps.
Ty p e B , P21/5W-21/5W
2. Direction indicators.
Ty p e B , PY21W-21W (amber)
3. Reversing lamps.
Ty p e B , P21W-21W
4. Foglamps/sidelamps.
Ty p e B , P21/4W-21/4W
For vehicles with interior trim, contact a
PEUGEOT dealer or a qualified workshop
to have the work done. F
I
dentify the defective bulb then open the
tailgate.
F
F
rom inside, remove the cover, if your
vehicle has one.
F
F
rom the outside, press the interior clips
of the plastic trim then tilt it outwards to
remove it.
F
U
nscrew the two lamp fixing screws.F
W
hile holding the lamp in place, press the
clip located on the inside then carefully
remove the lamp.
F
D
isconnect the electrical connector.
F
S
pread the 3 lugs slightly, then extract the
bulb holder.
F
R
emove the failed bulb by pressing
lightly on it, then turning it a quarter turn
clockwise.
F
R
eplace the bulb.
In the event of a breakdown
Page 283 of 416
281
To refit, proceed in reverse order.
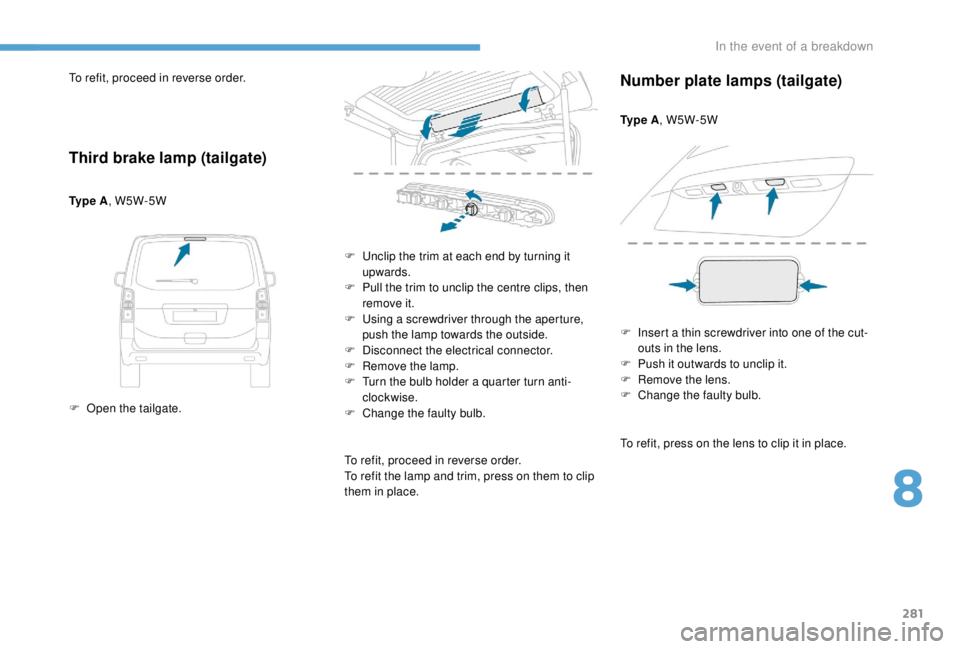
Third brake lamp (tailgate)
Ty p e A, W5W-5W
F
O
pen the tailgate. F
U
nclip the trim at each end by turning it
upwards.
F
P
ull the trim to unclip the centre clips, then
remove it.
F
U
sing a screwdriver through the aperture,
push the lamp towards the outside.
F
D
isconnect the electrical connector.
F
R
emove the lamp.
F
T
urn the bulb holder a quarter turn anti-
clockwise.
F
C
hange the faulty bulb.
To refit, proceed in reverse order.
To refit the lamp and trim, press on them to clip
them in place.
Number plate lamps (tailgate)
Ty p e A , W5W-5W
F
I
nsert a thin screwdriver into one of the cut-
outs in the lens.
F
P
ush it outwards to unclip it.
F
R
emove the lens.
F
C
hange the faulty bulb.
To refit, press on the lens to clip it in place.
8
In the event of a breakdown
Page 284 of 416
282
For the replacement of this type of LED lamp
and light guides, contact a PEUGEOT dealer or
a qualified workshop.
A replacement kit for the LEDs is available from
PEUGEOT dealers.
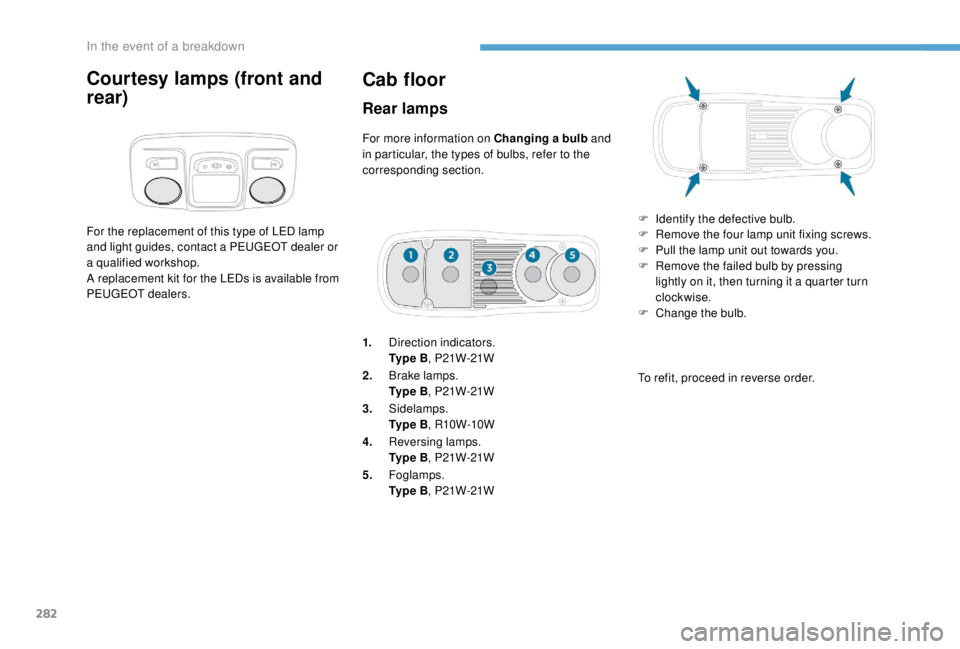
Cab floor
Rear lamps
For more information on Changing a bulb and
in particular, the types of bulbs, refer to the
corresponding section.
1. Direction indicators.
Ty p e B , P21W-21W
2. Brake lamps.
Ty p e B , P21W-21W
3. Sidelamps.
Ty p e B , R10W-10W
4. Reversing lamps.
Ty p e B , P21W-21W
5. Foglamps.
Ty p e B , P21W-21W F
I
dentify the defective bulb.
F
R
emove the four lamp unit fixing screws.
F
P
ull the lamp unit out towards you.
F
R
emove the failed bulb by pressing
lightly on it, then turning it a quarter turn
clockwise.
F
C
hange the bulb.
To refit, proceed in reverse order.
Courtesy lamps (front and
rear)
In the event of a breakdown