ECO mode PEUGEOT EXPERT 2023 Owners Manual
[x] Cancel search | Manufacturer: PEUGEOT, Model Year: 2023, Model line: EXPERT, Model: PEUGEOT EXPERT 2023Pages: 348, PDF Size: 12 MB
Page 5 of 348
3
Contents
6-speed manual gearbox 141
Gear shift indicator 142
Automatic gearbox 142
Drive selector (Electric) 145
Driving modes (Electric) 146
Stop & Start 147
Tyre under-inflation detection 148
Driving and manoeuvring aids - General
recommendations
150
Memorising speeds 151
Road signs recognition 152
Speed limiter 154
Cruise control - Specific recommendations 156
Cruise control 156
Adaptive cruise control 158
Active Safety Brake with Collision Risk Alert and
Intelligent emergency braking assistance
162
Lane departure warning 165
Distraction detection 166
Blind spot monitoring 167
Parking sensors 168
Visiopark 1 170
7Practical informationCompatibility of fuels 174
Refuelling 174
Diesel misfuel prevention 175
Charging system (Electric) 176
Charging the traction battery (Electric) 183
Energy economy mode 187
Snow chains 188
Towing device 188
Roof bars/Roof rack 189
Bonnet 190
Engine compartment 191
Checking levels 191
Checks 194
AdBlue® (BlueHDi) 196
Free-wheeling 198
Advice on care and maintenance 199
8In the event of a breakdownWarning triangle 202
Running out of fuel (Diesel) 202
Tool box 203
Temporary puncture repair kit 204
Spare wheel 207
Changing a bulb 2 11
Fuses 216
12
V battery
/ Accessory battery 216
Towing the vehicle 220
9Technical dataEngine technical data and towed loads 223
Diesel engines 224
Electric motor 227
Dimensions 229
Identification markings 231
10Bluetooth® audio systemFirst steps 232
Steering mounted controls 233
Menus 233
Radio 234
DAB (Digital Audio Broadcasting) radio 235
Media 236
Telephone 238
Frequently asked questions 241
11Audio System with Touch ScreenFirst steps 244
Steering mounted controls 245
Menus 246
Applications 247
Radio 247
DAB (Digital Audio Broadcasting) radio 249
Media 249
Telephone 251
Settings 254
Frequently asked questions 255
123D Connected NavigationFirst steps 257
Steering mounted controls 258
Menus 258
Voice commands 260
Navigation 263
Connected navigation 266
Applications 268
Radio 271
DAB (Digital Audio Broadcasting) radio 272
Media 272
Telephone 274
Settings 276
Frequently asked questions 278
13Vehicle data recording and privacy
■
Alphabetical index
■
Appendix
■
Hydrogen electric motor supplement CarM an uals 2 .c o m
Page 7 of 348
5
Overview
1.Locking/unlocking from the inside
2. Left-hand electric sliding side door
3. Electric child lock
4. Right-hand electric sliding side door
5. Hazard warning lamps
6. DSC/ASR system
7. Tyre under-inflation detection
8. Stop & Start (Diesel)
Side control bar
1. Advanced Grip Control
2. Head-up display
3. Parking sensors
4. Additional heating/ventilation system (Diesel)
5. Alarm (Diesel or Electric)
6. Headlamp beam height adjustment
7. Lane departure warning system
8. Blind spot monitoring system
9. Automatic headlamp dipping
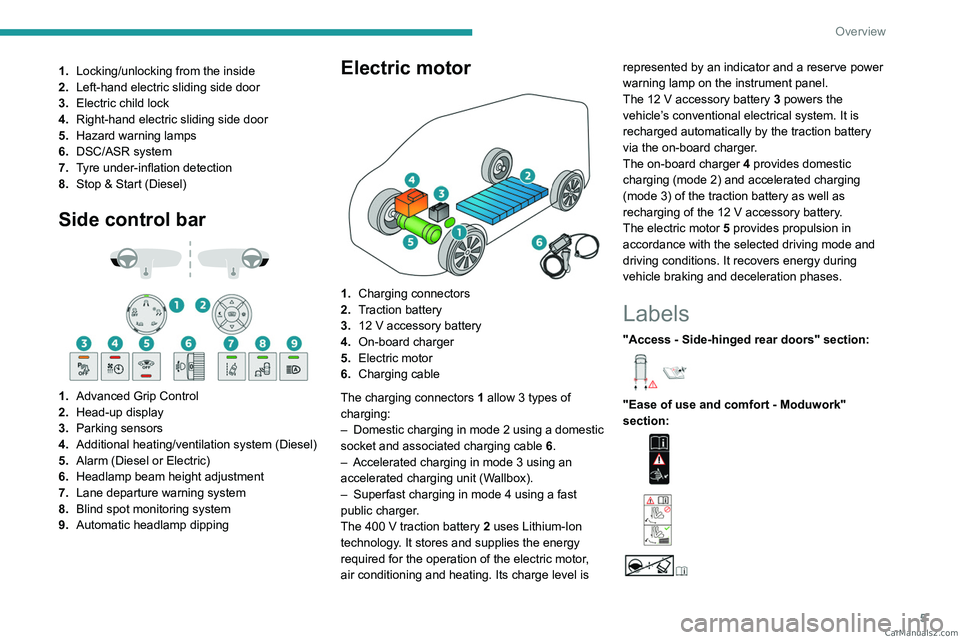
Electric motor
1.Charging connectors
2. Traction battery
3. 12
V accessory battery
4. On-board charger
5. Electric motor
6. Charging cable
The charging connectors
1
allow 3 types of
charging:
–
Domestic chargin
g in mode 2 using a domestic
socket and associated charging cable
6
.
–
Accelerated charging in mode
3 using an
accelerated charging unit (Wallbox).
–
Superfast charging in mode
4 using a fast
public charger.
The 400
V traction battery 2 uses Lithium-Ion
technology. It stores and supplies the energy
required for the operation of the electric motor,
air conditioning and heating. Its charge level is represented by an indicator and a reserve power
warning lamp on the instrument panel.
The 12
V accessory battery 3 powers the
vehicle’s conventional electrical system. It is
recharged automatically by the traction battery
via the on-board charger.
The on-board charger
4
provides domestic
charging (mode 2) and accelerated charging
(mode 3) of the traction battery as well as
recharging of the 12 V accessory battery.
The electric motor 5 provides propulsion in
accordance with the selected driving mode and
driving conditions. It recovers energy during
vehicle braking and deceleration phases.
Labels
"Access - Side-hinged rear doors" section:
"Ease of use and comfort - Moduwork"
section:
CarM an uals 2 .c o m
Page 9 of 348
7
Eco-driving
Eco-driving
Eco-driving refers to a range of everyday
practices that allow the motorist to optimise
the vehicle's energy consumption (fuel and/or
electricity) and CO
2 emissions.
Optimise your use of the gearbox
With a manual gearbox, move off gently and
change up promptly. While accelerating, change
up early.
With an automatic gearbox, favour automatic
mode. Do not depress the accelerator pedal
heavily or suddenly.
The gear shift indicator prompts you to engage
the most suitable gear. Whenever this indication
is displayed on the instrument panel, follow it
straight away.
With an automatic gearbox, this indicator
appears only in manual mode.
Drive smoothly
Maintain a safe distance between vehicles, use
engine braking rather than the brake pedal and
press the accelerator gradually. These practices
help to save on energy consumption, reduce
CO
2 emissions and decrease general traffic
noise.
When the traffic is flowing smoothly, select the
cruise control.
Control the use of electrical equipment
Before moving off, if the passenger compartment
is too warm, ventilate it by opening the windows
and air vents before using the air conditioning.
At speeds above 31
mph (50 km/h), close the
windows and leave the air vents open.
Consider using equipment that can help keep
the temperature in the passenger compartment
down (e.g.
sunroof blind, window blinds).
Unless automatically regulated, switch off the air
conditioning as soon as the desired temperature
has been reached.
Switch off the demisting and defrosting functions,
if they are not managed automatically.
Switch off the heated seat as soon as possible.
Adapt your use of the headlamps and/or
foglamps to the level of visibility, in accordance
with current legislation in the country in which
you are driving.
Avoid running the engine before moving off,
particularly in winter (other than in severe wintry
conditions: temperature below -23°C). The
vehicle will warm up much faster while driving.
As a passenger, avoid connecting your
multimedia devices (e.g.
film, music, video
game) to help reduce the consumption of energy.
Disconnect all portable devices before leaving
the vehicle.
Limit the causes of excess consumption
Spread loads throughout the vehicle. Place the
heaviest items in the boot as close as possible to
the rear seats. Limit the loads carried in the vehicle and
minimise wind resistance (e.g.
roof bars, roof
rack, bicycle carrier, trailer). Preferably, use a
roof box.
Remove roof bars and roof racks after use.
At the end of winter, remove snow tyres and refit
summer tyres.
Comply with the servicing instructions
Check tyre pressures regularly, with the tyres
cold, referring to the label in the door aperture on
the driver's side.
Carry out this check in particular:
–
before a long journey
.
–
at each change of season.
–
after a long period out of use.
Do not forget the spare wheel and, where
applicable, the tyres on your trailer or caravan.
Have your vehicle serviced regularly (e.g.
engine
oil, oil filter, air filter, passenger compartment
filter, etc.). Observe the schedule of operations in
the manufacturer's service schedule.
With a BlueHDi Diesel engine, if the SCR system
has a fault, your vehicle will emit pollution. Visit
a PEUGEOT dealer or a qualified workshop
as soon as possible to restore your vehicle's
nitrogen oxide emissions to legal levels.
When filling the fuel tank, do not continue after
the third cut-out of the nozzle, to avoid overflow.
You will only see the fuel consumption of your
new vehicle settle down to a consistent average
after the first 1,900 miles (3,000 kilometres). CarM an uals 2 .c o m
Page 12 of 348
10
Dashboard instruments
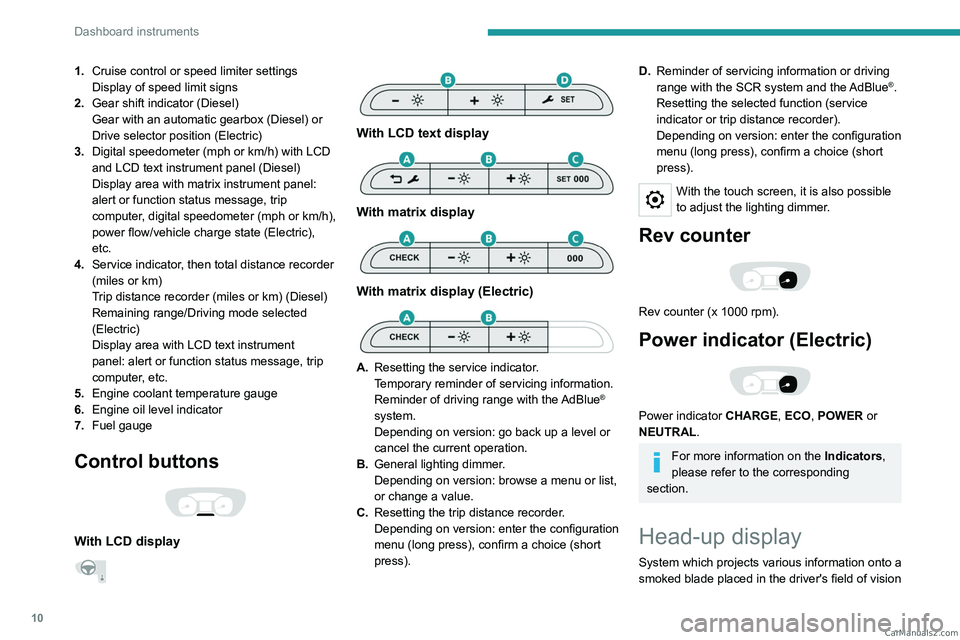
1.Cruise control or speed limiter settings
Display of speed limit signs
2. Gear shift indicator (Diesel)
Gear with an automatic gearbox (Diesel) or
Drive selector position (Electric)
3. Digital speedometer (mph or km/h) with LCD
and LCD text instrument panel (Diesel)
Display area with matrix instrument panel:
alert or function status message, trip
computer, digital speedometer (mph or km/h),
power flow/vehicle charge state (Electric),
etc.
4. Service indicator, then total distance recorder
(miles or km)
Trip distance recorder (miles or km) (Diesel)
Remaining range/Driving mode selected
(Electric)
Display area with LCD text instrument
panel: alert or function status message, trip
computer, etc.
5. Engine coolant temperature gauge
6. Engine oil level indicator
7. Fuel gauge
Control buttons
With LCD display
With LCD text display
With matrix display
With matrix display (Electric)
A.
Resetting the service indicator.
Temporary reminder of servicing information.
Reminder of driving range with the AdBlue
®
system.
Depending on version: go back up a level or
cancel the current operation.
B. General lighting dimmer.
Depending on version: browse a menu or list,
or change a value.
C. Resetting the trip distance recorder.
Depending on version: enter the configuration
menu (long press), confirm a choice (short
press).
D.Reminder of servicing information or driving
range with the SCR system and the
AdBlue®.
Resetting the selected function (service
indicator or trip distance recorder).
Depending on version: enter the configuration
menu (long press), confirm a choice (short
press).
With the touch screen, it is also possible
to adjust the lighting dimmer.
Rev counter
Rev counter (x 1000 rpm).
Power indicator (Electric)
Power indicator CHARGE, ECO, POWER or
NEUTRAL.
For more information on the Indicators ,
please refer to the corresponding
section.
Head-up display
System which projects various information onto a
smoked blade placed in the driver's field of vision CarM an uals 2 .c o m
Page 15 of 348
13
Dashboard instruments
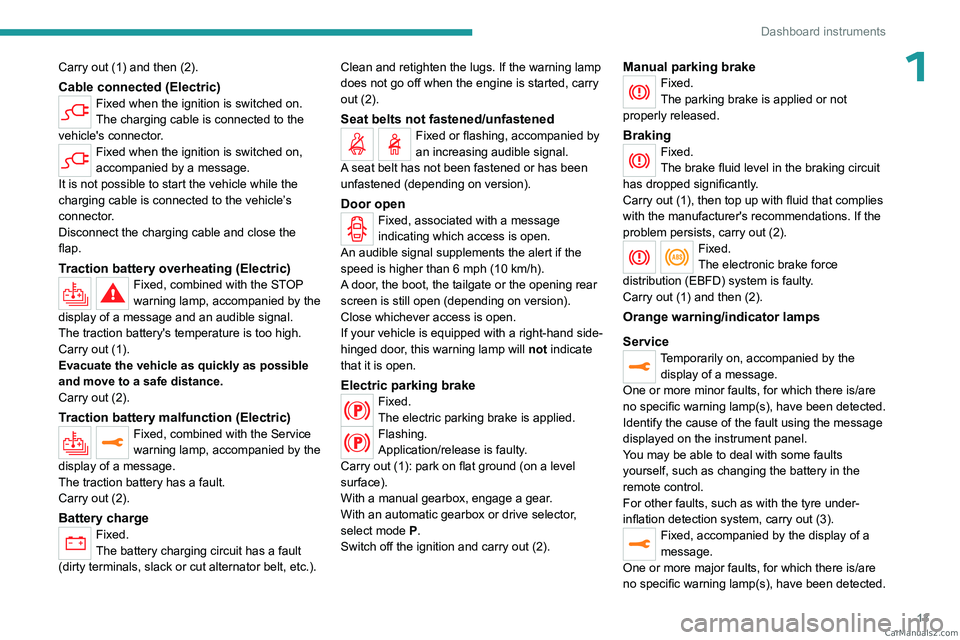
1Carry out (1) and then (2).
Cable connected (Electric)Fixed when the ignition is switched on.
The charging cable is connected to the
vehicle's connector.
Fixed when the ignition is switched on,
accompanied by a message.
It is not possible to start the vehicle while the
charging cable is connected to the vehicle’s
connector.
Disconnect the charging cable and close the
flap.
Traction battery overheating (Electric)Fixed, combined with the STOP
warning lamp, accompanied by the
display of a message and an audible signal.
The traction battery's temperature is too high.
Carry out (1).
Evacuate the vehicle as quickly as possible
and move to a safe distance.
Carry out (2).
Traction battery malfunction (Electric)
Fixed, combined with the Service
warning lamp, accompanied by the
display of a message.
The traction battery has a fault.
Carry out (2).
Battery chargeFixed.
The battery charging circuit has a fault
(dirty terminals, slack or cut alternator belt, etc.). Clean and retighten the lugs. If the warning lamp
does not go off when the engine is started, carry
out (2).
Seat belts not fastened/unfastenedFixed or flashing, accompanied by
an increasing audible signal.
A seat belt has not been fastened or has been
unfastened (depending on version).
Door openFixed, associated with a message
indicating which access is open.
An audible signal supplements the alert if the
speed is higher than 6 mph (10
km/h).
A door, the boot, the tailgate or the opening rear
screen is still open (depending on version).
Close whichever access is open.
If your vehicle is equipped with a right-hand side-
hinged door, this warning lamp will not indicate
that it is open.
Electric parking brakeFixed.
The electric parking brake is applied.
Flashing.
Application/release is faulty.
Carry out (1): park on flat ground (on a level
surface).
With a manual gearbox, engage a gear.
With an automatic gearbox or drive selector,
select mode
P.
Switch off the ignition and carry out (2).
Manual parking brakeFixed.
The parking brake is applied or not
properly released.
BrakingFixed.
The brake fluid level in the braking circuit
has dropped significantly.
Carry out (1), then top up with fluid that complies
with the manufacturer's recommendations. If the
problem persists, carry out (2).
Fixed.
The electronic brake force
distribution
(EBFD) system is faulty.
Carry out (1) and then (2).
Orange warning/indicator lamps
Service
Temporarily on, accompanied by the display of a message.
One or more minor faults, for which there is/are
no specific warning lamp(s), have been detected.
Identify the cause of the fault using the message
displayed on the instrument panel.
You may be able to deal with some faults
yourself, such as changing the battery in the
remote control.
For other faults, such as with the tyre under-
inflation detection system, carry out (3).
Fixed, accompanied by the display of a
message.
One or more major faults, for which there is/are
no specific warning lamp(s), have been detected. CarM an uals 2 .c o m
Page 16 of 348
14
Dashboard instruments
Identify the cause of the fault using the message
displayed on the instrument panel, then carry
out (3).
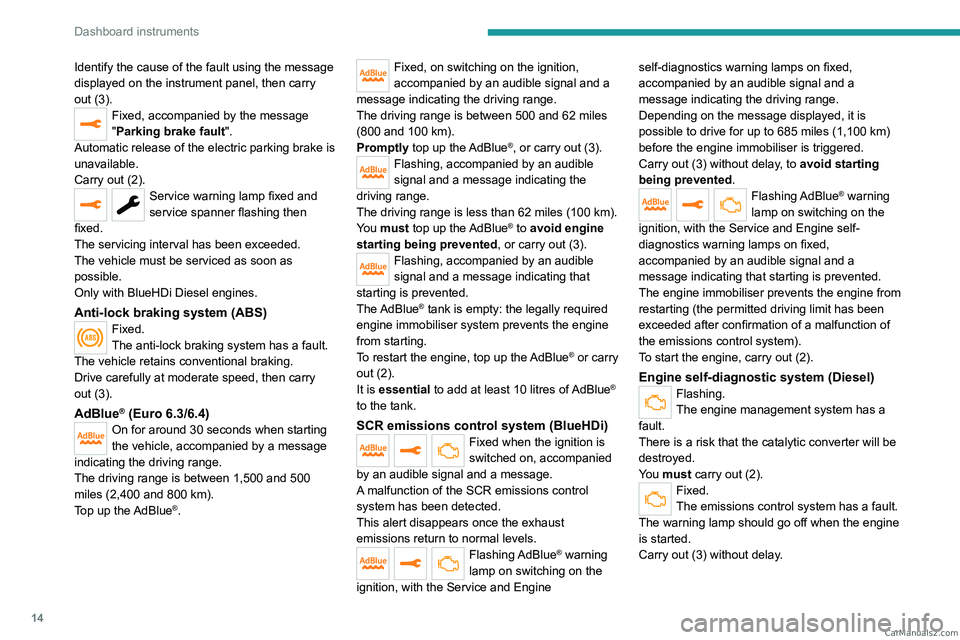
Fixed, accompanied by the message
"Parking brake fault".
Automatic release of the electric parking brake is
unavailable.
Carry out (2).
Service warning lamp fixed and
service spanner flashing then
fixed.
The servicing interval has been exceeded.
The vehicle must be serviced as soon as
possible.
Only with BlueHDi Diesel engines.
Anti-lock braking system (ABS)Fixed.
The anti-lock braking system has a fault.
The vehicle retains conventional braking.
Drive carefully at moderate speed, then carry
out (3).
AdBlue® (Euro 6.3/6.4)
On for around 30 seconds when starting
the vehicle, accompanied by a message
indicating the driving range.
The driving range is between 1,500 and 500
miles (2,400 and 800
km).
Top up the AdBlue
®.
Fixed, on switching on the ignition,
accompanied by an audible signal and a
message indicating the driving range.
The driving range is between 500 and 62 miles
(800 and 100
km).
Promptly top up the AdBlue
®, or carry out (3).Flashing, accompanied by an audible
signal and a message indicating the
driving range.
The driving range is less than 62 miles (100
km).
You must top up the AdBlue
® to avoid engine
starting being prevented , or carry out (3).
Flashing, accompanied by an audible
signal and a message indicating that
starting is prevented.
The AdBlue
® tank is empty: the legally required
engine immobiliser system prevents the engine
from starting.
To restart the engine, top up the AdBlue
® or carry
out (2).
It is essential to add at least 10
litres of AdBlue
®
to the tank.
SCR emissions control system (BlueHDi)
Fixed when the ignition is
switched on, accompanied
by an audible signal and a message.
A malfunction of the SCR emissions control
system has been detected.
This alert disappears once the exhaust
emissions return to normal levels.
Flashing AdBlue® warning
lamp on switching on the
ignition, with the Service and Engine self-diagnostics warning lamps on fixed,
accompanied by an audible signal and a
message indicating the driving range.
Depending on the message displayed, it is
possible to drive for up to 685 miles (1,100
km)
before the engine immobiliser is triggered.
Carry out (3) without delay, to avoid starting
being prevented.
Flashing AdBlue® warning
lamp on switching on the
ignition, with the Service and Engine self-
diagnostics warning lamps on fixed,
accompanied by an audible signal and a
message indicating that starting is prevented.
The engine immobiliser prevents the engine from
restarting (the permitted driving limit has been
exceeded after confirmation of a malfunction of
the emissions control system).
To start the engine, carry out (2).
Engine self-diagnostic system (Diesel)Flashing.
The engine management system has a
fault.
There is a risk that the catalytic converter will be
destroyed.
You must carry out (2).
Fixed.
The emissions control system has a fault.
The warning lamp should go off when the engine
is started.
Carry out (3) without delay. CarM an uals 2 .c o m
Page 17 of 348
15
Dashboard instruments
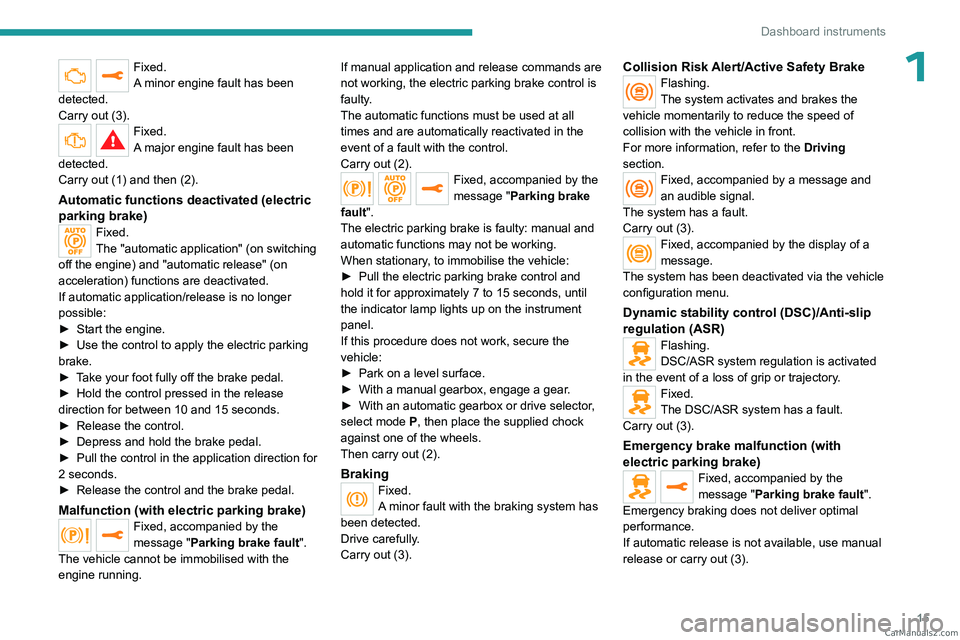
1Fixed.
A minor engine fault has been
detected.
Carry out (3).
Fixed.
A major engine fault has been
detected.
Carry out (1) and then (2).
Automatic functions deactivated (electric
parking brake)
Fixed.
The "automatic application" (on switching
off the engine) and "automatic release" (on
acceleration) functions are deactivated.
If automatic application/release is no longer
possible:
►
Start the engine.
►
Use the control to apply the electric parking
brake.
►
T
ake your foot fully off the brake pedal.
►
Hold the control pressed in the release
direction for between 10 and 15
seconds.
►
Release the control.
►
Depress and hold the brake pedal.
►
Pull the control in the application direction for
2
seconds.
►
Release the control and the brake pedal.
Malfunction (with electric parking brake)Fixed, accompanied by the
message "Parking brake fault".
The vehicle cannot be immobilised with the
engine running. If manual application and release commands are
not working, the electric parking brake control is
faulty.
The automatic functions must be used at all
times and are automatically reactivated in the
event of a fault with the control.
Carry out (2).
Fixed, accompanied by the
message "Parking brake
fault".
The electric parking brake is faulty: manual and
automatic functions may not be working.
When stationary, to immobilise the vehicle:
►
Pull the electric parking brake control and
hold it for approximately 7 to 15
seconds, until
the indicator lamp lights up on the instrument
panel.
If this procedure does not work, secure the
vehicle:
►
Park on a level surface.
►
With a manual gearbox, engage a gear
.
►
With an automatic gearbox or drive selector
,
select mode
P, then place the supplied chock
against one of the wheels.
Then carry out (2).
BrakingFixed.
A minor fault with the braking system has
been detected.
Drive carefully.
Carry out (3).
Collision Risk Alert/Active Safety BrakeFlashing.
The system activates and brakes the
vehicle momentarily to reduce the speed of
collision with the vehicle in front.
For more information, refer to the Driving
section.
Fixed, accompanied by a message and
an audible signal.
The system has a fault.
Carry out (3).
Fixed, accompanied by the display of a
message.
The system has been deactivated via the vehicle
configuration menu.
Dynamic stability control (DSC)/Anti-slip
regulation (ASR)
Flashing.
DSC/ASR system regulation is activated
in the event of a loss of grip or trajectory.
Fixed.
The DSC/ASR system has a fault.
Carry out (3).
Emergency brake malfunction (with
electric parking brake)
Fixed, accompanied by the
message "Parking brake fault".
Emergency braking does not deliver optimal
performance.
If automatic release is not available, use manual
release or carry out (3). CarM an uals 2 .c o m
Page 18 of 348
16
Dashboard instruments
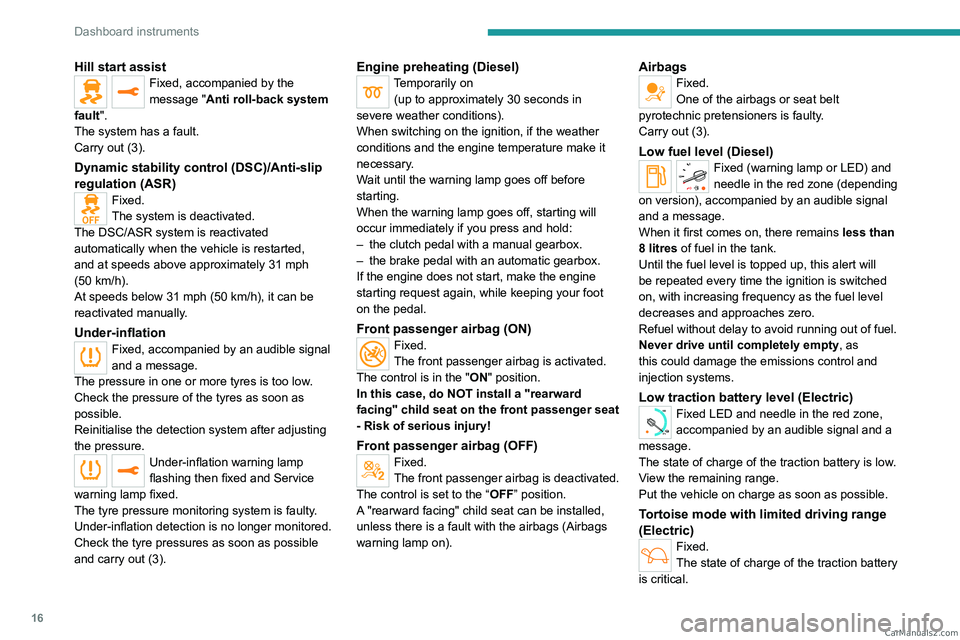
Hill start assistFixed, accompanied by the
message "Anti roll-back system
fault".
The system has a fault.
Carry out (3).
Dynamic stability control (DSC)/Anti-slip
regulation (ASR)
Fixed.
The system is deactivated.
The DSC/ASR system is reactivated
automatically when the vehicle is restarted,
and at speeds above approximately 31 mph
(50
km/h).
At speeds below 31
mph (50 km/h), it can be
reactivated manually.
Under-inflationFixed, accompanied by an audible signal
and a message.
The pressure in one or more tyres is too low.
Check the pressure of the tyres as soon as
possible.
Reinitialise the detection system after adjusting
the pressure.
Under-inflation warning lamp
flashing then fixed and Service
warning lamp fixed.
The tyre pressure monitoring system is faulty.
Under-inflation detection is no longer monitored.
Check the tyre pressures as soon as possible
and carry out (3).
Engine preheating (Diesel)Temporarily on (up to approximately 30 seconds in
severe weather conditions).
When switching on the ignition, if the weather
conditions and the engine temperature make it
necessary.
Wait until the warning lamp goes off before
starting.
When the warning lamp goes off, starting will
occur immediately if you press and hold:
–
the clutch pedal with a manual gearbox.
–
the brake pedal with an automatic gearbox.
If the engine does not start, make the engine
starting request again, while keeping your foot
on the pedal.
Front passenger airbag (ON)Fixed.
The front passenger airbag is activated.
The control is in the "ON" position.
In this case, do NOT install a "rearward
facing" child seat on the front passenger seat
- Risk of serious injury!
Front passenger airbag (OFF)Fixed.
The front passenger airbag is deactivated.
The control is set to the “OFF ” position.
A "rearward facing" child seat can be installed,
unless there is a fault with the airbags (Airbags
warning lamp on).
AirbagsFixed.
One of the airbags or seat belt
pyrotechnic pretensioners is faulty.
Carry out (3).
Low fuel level (Diesel)Fixed (warning lamp or LED) and
needle in the red zone (depending
on version), accompanied by an audible signal
and a message.
When it first comes on, there remains less than
8 litres of fuel in the tank.
Until the fuel level is topped up, this alert will
be repeated every time the ignition is switched
on, with increasing frequency as the fuel level
decreases and approaches zero.
Refuel without delay to avoid running out of fuel.
Never drive until completely empty, as
this could damage the emissions control and
injection systems.
Low traction battery level (Electric)
0 %
100
Fixed LED and needle in the red zone,
accompanied by an audible signal and a
message.
The state of charge of the traction battery is low.
View the remaining range.
Put the vehicle on charge as soon as possible.
Tortoise mode with limited driving range
(Electric)
Fixed.
The state of charge of the traction battery
is critical. CarM an uals 2 .c o m
Page 24 of 348

22
Dashboard instruments
Power indicator (Electric)
CHARGE
Traction battery charging during deceleration
and braking.
ECO
Moderate energy consumption and optimised
driving range.
POWER
Energy consumption by the drive train during
acceleration.
NEUTRAL
When the ignition is switched on, the vehicle’s
electric drive train neither consumes nor
generates energy; after sweeping over the
indicator, the needle returns to its "neutral"
position: between ECO and CHARGE.
With the ignition off, opening the driver's
door activates the indicator, which moves
to the "neutral" position: between ECO and
CHARGE.
Charge level indicator
(Electric)
The traction battery's actual charge level and
the remaining range are displayed continuously
when the vehicle is started.
With the ignition off, opening the driver's
door activates the indicator.
Associated warning lamps
Two successive alert levels indicate that the
energy available has dropped to a low level:
1st level: Reserve
0 %
100
The state of charge of the traction battery
is low.
Fixed LED and needle in the red zone,
accompanied by an audible signal.
►
V
iew the remaining range on the instrument
panel.
►
Put the vehicle on charge as soon as
possible.
2nd level: Critical
The state of charge of the traction battery is critical.
Fixed, together with the reserve LED,
accompanied by an audible signal.
►
Y
ou must put the vehicle on charge.
The remaining range is no longer calculated. The drive train power
gradually decreases.
The heating and air conditioning are switched
off (even if the needle indicating their
consumption is not at the "ECO" position). CarM an uals 2 .c o m
Page 25 of 348
23
Dashboard instruments
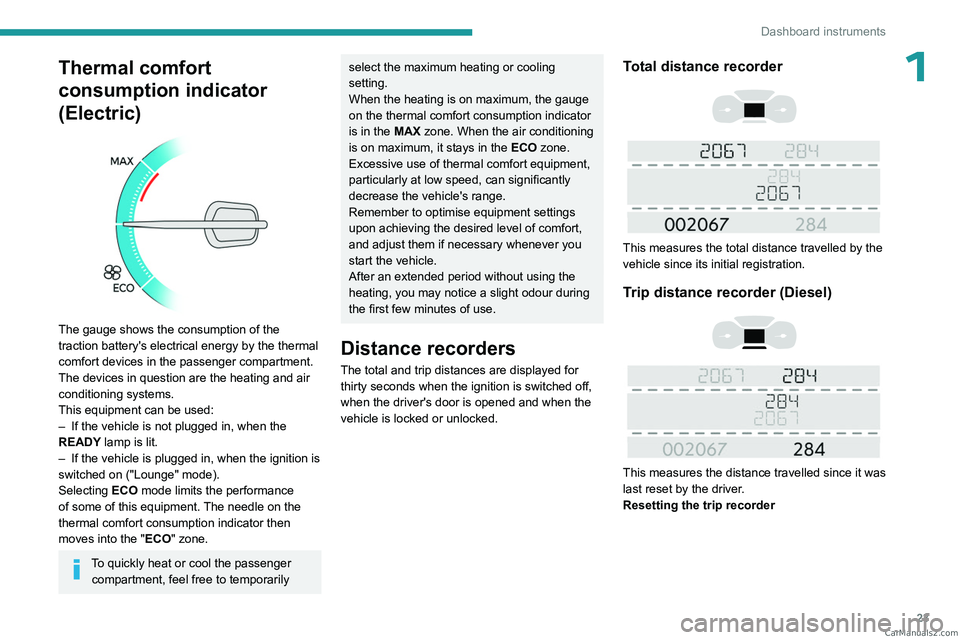
1Thermal comfort
consumption indicator
(Electric)
The gauge shows the consumption of the
traction battery's electrical energy by the thermal
comfort devices in the passenger compartment.
The devices in question are the heating and air
conditioning systems.
This equipment can be used:
–
If the vehicle is not plugged in, when the
READY
lamp is lit.
–
If the vehicle is plugged in, when the ignition is
switched on ("Lounge" mode).
Selecting ECO
mode limits the performance
of some of this equipment. The needle on the
thermal comfort consumption indicator then
moves into the "ECO" zone.
To quickly heat or cool the passenger compartment, feel free to temporarily
select the maximum heating or cooling
setting.
When the heating is on maximum, the gauge
on the thermal comfort consumption indicator
is in the MAX zone. When the air conditioning
is on maximum, it stays in the ECO zone.
Excessive use of thermal comfort equipment,
particularly at low speed, can significantly
decrease the vehicle's range.
Remember to optimise equipment settings
upon achieving the desired level of comfort,
and adjust them if necessary whenever you
start the vehicle.
After an extended period without using the
heating, you may notice a slight odour during
the first few minutes of use.
Distance recorders
The total and trip distances are displayed for thirty seconds when the ignition is switched off,
when the driver's door is opened and when the
vehicle is locked or unlocked.
Total distance recorder
This measures the total distance travelled by the
vehicle since its initial registration.
Trip distance recorder (Diesel)
This measures the distance travelled since it was
last reset by the driver.
Resetting the trip recorder
CarM an uals 2 .c o m