display mode Peugeot Expert VU 2009 Owner's Manual
[x] Cancel search | Manufacturer: PEUGEOT, Model Year: 2009, Model line: Expert VU, Model: Peugeot Expert VU 2009Pages: 226, PDF Size: 10.49 MB
Page 25 of 226
25
Instruments and controls
READY TO SET OFF
2
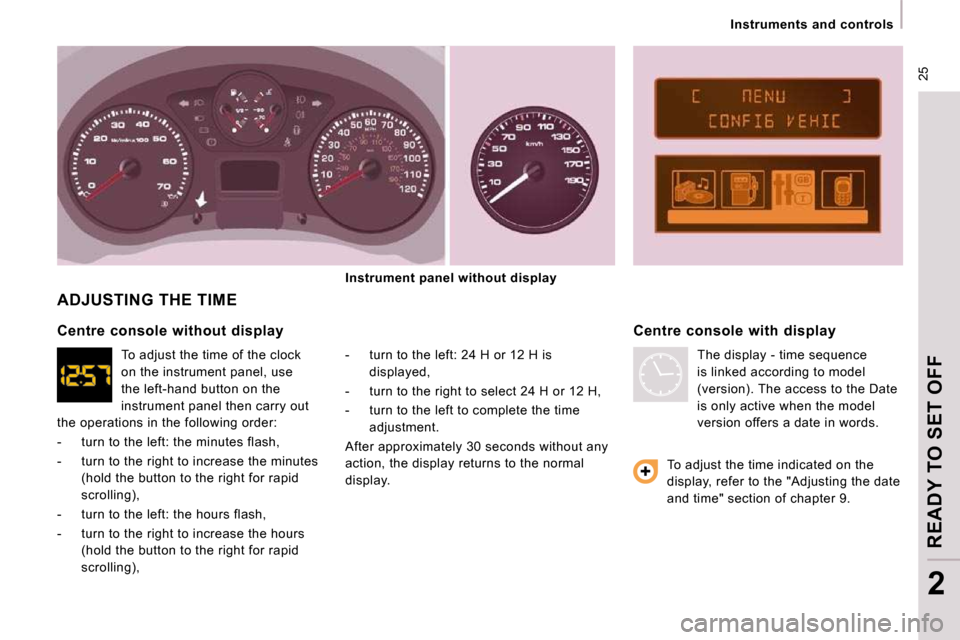
ADJUSTING THE TIME
- turn to the left: 24 H or 12 H is displayed,
- turn to the right to select 24 H or 12 H,
- turn to the left to complete the time adjustment.
After approximately 30 seconds without any
action, the display returns to the normal
display. Centre console with display
The display - time sequence
is linked according to model
(version). The access to the Date
is only active when the model
version offers a date in words.
Centre console without display
To adjust the time of the clock
on the instrument panel, use
the left-hand button on the
instrument panel then carry out
the operations in the following order:
- turn to the left: the minutes flash,
- turn to the right to increase the minutes (hold the button to the right for rapid
scrolling),
- turn to the left: the hours flash,
- turn to the right to increase the hours (hold the button to the right for rapid
scrolling), To adjust the time indicated on the
display, refer to the "Adjusting the date
and time" section of chapter 9.
Instrument panel without display
Page 29 of 226
ABS
ESP
29
Instruments and controls
READY TO SET OFF
2
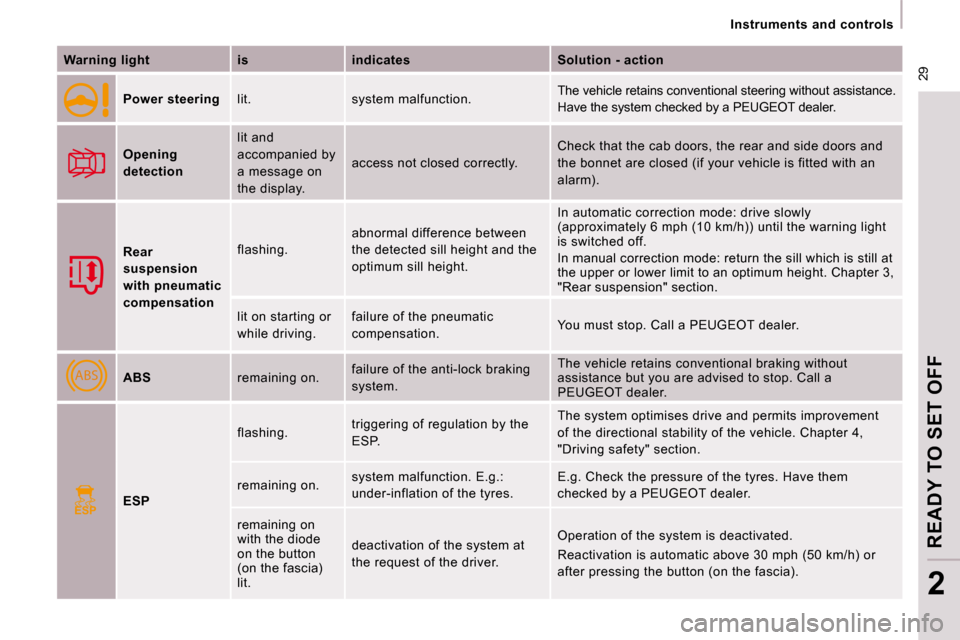
Warning light is indicates Solution - action
Power steering lit. system malfunction. The vehicle retains conventional steering without
assistance.
Have the system checked by a PEUGEOT dealer.
Opening
detection lit and
accompanied by
a message on
the display.
access not closed correctly.
Check that the cab doors, the rear and side doors
and
the bonnet are closed (if your vehicle is fitted wi th an
alarm).
Rear
suspension
with pneumatic
compensation flashing.
abnormal difference between
the detected sill height and the
optimum sill height. In automatic correction mode: drive slowly
(approximately 6 mph (10 km/h)) until the warning l
ight
is switched off.
In manual correction mode: return the sill which is still at
the upper or lower limit to an optimum height. Chap ter 3,
"Rear suspension" section.
lit on starting or
while driving. failure of the pneumatic
compensation.
You must stop. Call a PEUGEOT dealer.
ABS remaining on. failure of the anti-lock braking
system. The vehicle retains conventional braking without
assistance but you are advised to stop. Call a
PEUGEOT dealer.
ESP flashing.
triggering of regulation by the
ESP. The system optimises drive and permits improvement
of the directional stability of the vehicle. Chapte r 4,
"Driving safety" section.
remaining on. system malfunction. E.g.:
under-inflation of the tyres. E.g. Check the pressure of the tyres. Have them
checked by a PEUGEOT dealer.
remaining on
with the diode
on the button
(on the fascia)
lit. deactivation of the system at
the request of the driver.
Operation of the system is deactivated.
Reactivation is automatic above 30 mph (50 km/h) o
r
after pressing the button (on the fascia).
Page 40 of 226
38
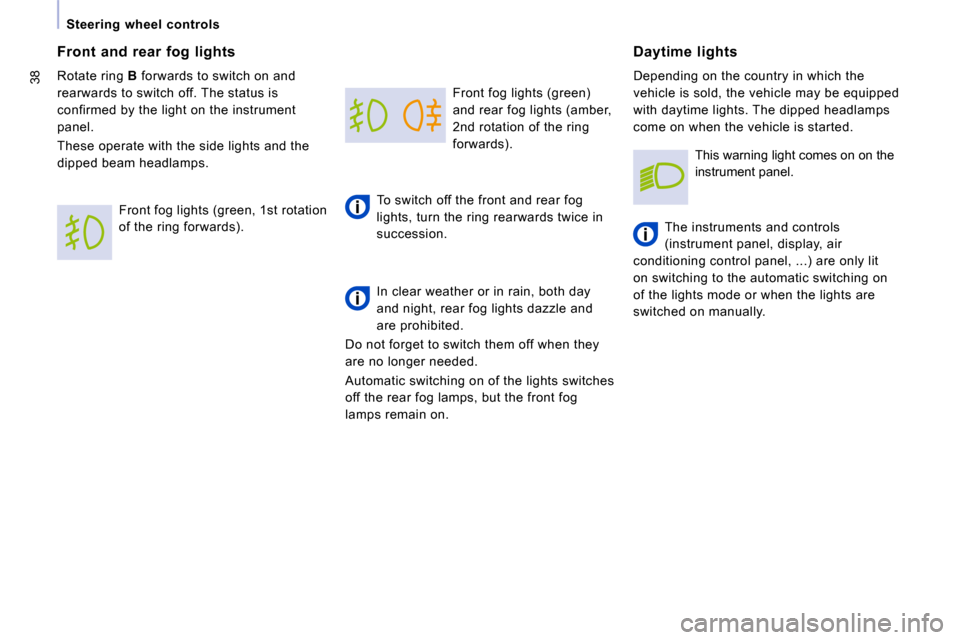
Steering wheel controls Front fog lights (green)
and rear fog lights (amber,
2nd rotation of the ring
forwards).
To switch off the front and rear fog
lights, turn the ring rearwards twice in
succession.
In clear weather or in rain, both day
and night, rear fog lights dazzle and
are prohibited.
Do not forget to switch them off when they
are no longer needed.
Automatic switching on of the lights switches
off the rear fog lamps, but the front fog
lamps remain on. Daytime lights
Depending on the country in which the
vehicle is sold, the vehicle may be equipped
with daytime lights. The dipped headlamps
come on when the vehicle is started.
The instruments and controls
(instrument panel, display, air
conditioning control panel, ...) are only lit
on switching to the automatic switching on
of the lights mode or when the lights are
switched on manually.
Front and rear fog lights
Rotate ring
B forwards to switch on and
rearwards to switch off. The status is
confirmed by the light on the instrument
panel.
These operate with the side lights and the
dipped beam headlamps.
Front fog lights (green, 1st rotation
of the ring forwards). This warning light comes on on the
instrument panel.
Page 43 of 226
41
Steering wheel controls
ERGONOMICS and COMFORT
3
Special position of the windscreen
wipers
In the minute following switching off of the
ignition, any action on the stalk positions the
wipers against the windscreen uprights. This action enables you to position the
wiper blades for winter parking, cleaning or
replacement.
Refer to the "Changing a windscreen
wiper blade" section of chapter 7.
When using an automatic car wash,
switch off the ignition to avoid
triggering of the automatic wiping.
In winter, it is advisable to wait for the
windscreen to completely clear of ice before
operating the automatic wipe.
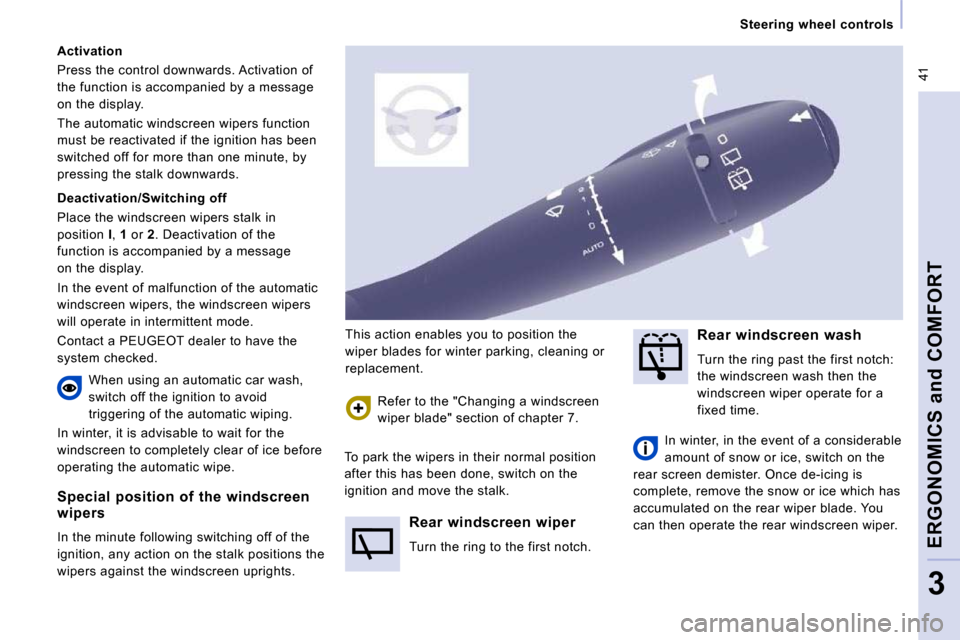
Rear windscreen wiper
Turn the ring to the first notch. Rear windscreen wash
Turn the ring past the first notch:
the windscreen wash then the
windscreen wiper operate for a
fixed time.
In winter, in the event of a considerable
amount of snow or ice, switch on the
rear screen demister. Once de-icing is
complete, remove the snow or ice which has
accumulated on the rear wiper blade. You
can then operate the rear windscreen wiper.
To park the wipers in their normal position
after this has been done, switch on the
ignition and move the stalk.
Activation
Press the control downwards. Activation of
the function is accompanied by a message
on the display.
The automatic windscreen wipers function
must be reactivated if the ignition has been
switched off for more than one minute, by
pressing the stalk downwards.
Deactivation/Switching off
Place the windscreen wipers stalk in
position
I , 1 or 2 . Deactivation of the
function is accompanied by a message
on the display.
In the event of malfunction of the automatic
windscreen wipers, the windscreen wipers
will operate in intermittent mode.
Contact a PEUGEOT dealer to have the
system checked.
Page 53 of 226
51
Ventilation
ERGONOMICS and COMFORT
3
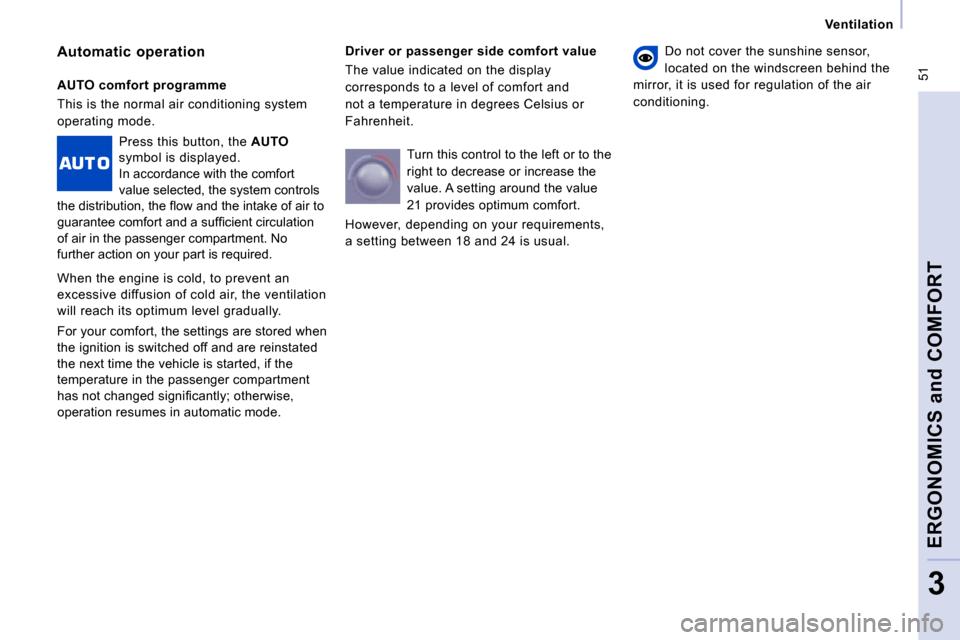
Driver or passenger side comfort value
The value indicated on the display
corresponds to a level of comfort and
not a temperature in degrees Celsius or
Fahrenheit.
Automatic operation Do not cover the sunshine sensor,
located on the windscreen behind the
mirror, it is used for regulation of the air
conditioning.
AUTO comfort programme
This is the normal air conditioning system
operating mode.
Press this button, the AUTO symbol is displayed. In accordance with the comfort value selected, the system controls �t�h�e� �d�i�s�t�r�i�b�u�t�i�o�n�,� �t�h�e� �fl� �o�w� �a�n�d� �t�h�e� �i�n�t�a�k�e� �o�f� �a�i�r� �t�o� �g�u�a�r�a�n�t�e�e� �c�o�m�f�o�r�t� �a�n�d� �a� �s�u�f�fi� �c�i�e�n�t� �c�i�r�c�u�l�a�t�i�o�n� of air in the passenger compartment. No further action on your part is required.
When the engine is cold, to prevent an excessive diffusion of cold air, the ventilation will reach its optimum level gradually.
For your comfort, the settings are stored when the ignition is switched off and are reinstated the next time the vehicle is started, if the temperature in the passenger compartment �h�a�s� �n�o�t� �c�h�a�n�g�e�d� �s�i�g�n�i�fi� �c�a�n�t�l�y�;� �o�t�h�e�r�w�i�s�e�,� operation resumes in automatic mode.
Turn this control to the left or to the
right to decrease or increase the
value. A setting around the value
21 provides optimum comfort.
However, depending on your requirements,
a setting between 18 and 24 is usual.
Page 54 of 226
52
Ventilation
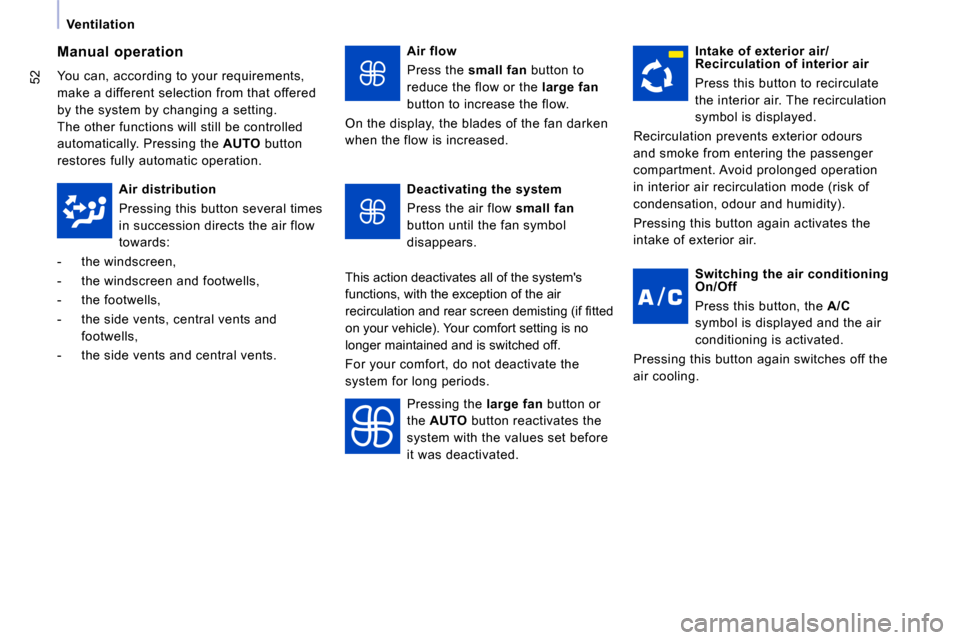
Air flow
Press the small fan button to
reduce the flow or the large fan
button to increase the flow.
On the display, the blades of the fan darken
when the flow is increased.
Manual operation
You can, according to your requirements,
make a different selection from that offered
by the system by changing a setting.
The other functions will still be controlled
automatically. Pressing the AUTO button
restores fully automatic operation.
Intake of exterior air/Recirculation of interior air
Press this button to recirculate
the interior air. The recirculation
symbol is displayed.
Recirculation prevents exterior odours
and smoke from entering the passenger
compartment. Avoid prolonged operation
in interior air recirculation mode (risk of
condensation, odour and humidity).
Pressing this button again activates the
intake of exterior air.
Air distribution
Pressing this button several times
in succession directs the air flow
towards:
- the windscreen,
- the windscreen and footwells,
- the footwells,
- the side vents, central vents and
footwells,
- the side vents and central vents.
Deactivating the system
Press the air flow small fan
button until the fan symbol
disappears.
This action deactivates all of the system's
functions, with the exception of the air
�r�e�c�i�r�c�u�l�a�t�i�o�n� �a�n�d� �r�e�a�r� �s�c�r�e�e�n� �d�e�m�i�s�t�i�n�g� �(�i�f� �fi� �t�t�e�d�
on your vehicle). Your comfort setting is no
longer maintained and is switched off.
For your comfort, do not deactivate the
system for long periods.
Pressing the large fan button or
the AUTO button reactivates the
system with the values set before
it was deactivated.
Switching the air conditioning On/Off
Press this button, the A/C
symbol is displayed and the air
conditioning is activated.
Pressing this button again switches off the
air cooling.
Page 109 of 226
105
Battery
TROUBLESHOOTING
7
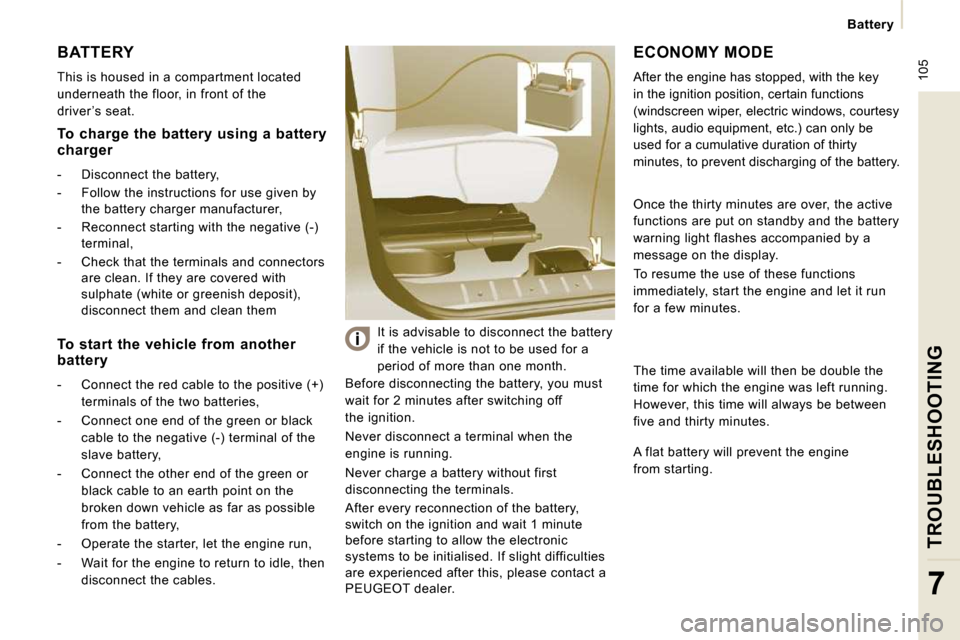
BATTERY
This is housed in a compartment located
underneath the floor, in front of the
driver ’s seat.
Before disconnecting the battery, you must
wait for 2 minutes after switching off
the ignition.
Never disconnect a terminal when the
engine is running.
Never charge a battery without first
disconnecting the terminals.
After every reconnection of the battery, switch on the ignition and wait 1 minute
before starting to allow the electronic systems to be initialised. If slight difficulties are experienced after this, please contact a PEUGEOT dealer.
It is advisable to disconnect the battery
if the vehicle is not to be used for a
period of more than one month.
ECONOMY MODE
After the engine has stopped, with the key
in the ignition position, certain functions
(windscreen wiper, electric windows, courtesy
lights, audio equipment, etc.) can only be
used for a cumulative duration of thirty
minutes, to prevent discharging of the battery.
To charge the battery using a battery
charger
- Disconnect the battery,
- Follow the instructions for use given by the battery charger manufacturer,
- Reconnect starting with the negative (-) terminal,
- Check that the terminals and connectors are clean. If they are covered with sulphate (white or greenish deposit), disconnect them and clean them
To start the vehicle from another
battery
- Connect the red cable to the positive (+)
terminals of the two batteries,
- Connect one end of the green or black
cable to the negative (-) terminal of the
slave battery,
- Connect the other end of the green or
black cable to an earth point on the
broken down vehicle as far as possible
from the battery,
- Operate the starter, let the engine run,
- Wait for the engine to return to idle, then
disconnect the cables.
Once the thirty minutes are over, the active
functions are put on standby and the battery
warning light flashes accompanied by a
message on the display.
To resume the use of these functions
immediately, start the engine and let it run
for a few minutes.
The time available will then be double the
time for which the engine was left running.
However, this time will always be between
five and thirty minutes.
A flat battery will prevent the engine
from starting.
Page 143 of 226
9.2
01 FIRST STEPS
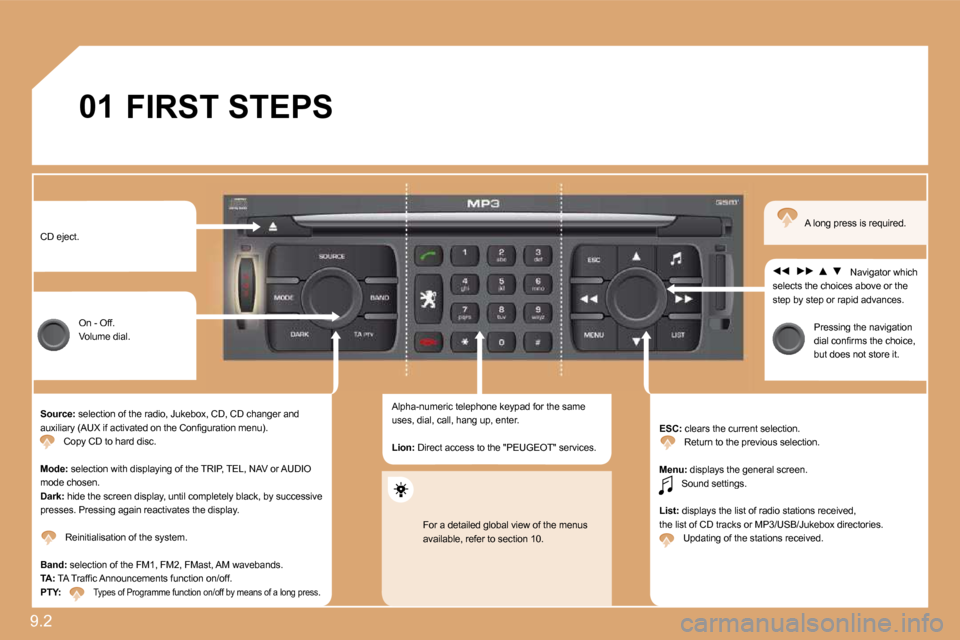
CD eject.
On - Off. Volume dial.
� � �S�o�u�r�c�e�:� � �s�e�l�e�c�t�i�o�n� �o�f� �t�h�e� �r�a�d�i�o�,� �J�u�k�e�b�o�x�,� �C�D�,� �C�D� �c�h�a�n�g�e�r� �a�n�d� �a�u�x�i�l�i�a�r�y� �(�A�U�X� �i�f� �a�c�t�i�v�a�t�e�d� �o�n� �t�h�e� �C�o�n�fi� �g�u�r�a�t�i�o�n� �m�e�n�u�)�.� Copy CD to hard disc.
�M�o�d�e�:� � �s�e�l�e�c�t�i�o�n� �w�i�t�h� �d�i�s�p�l�a�y�i�n�g� �o�f� �t�h�e� �T�R�I�P�,� �T�E�L�,� �N�A�V� �o�r� �A�U�D�I�O� mode chosen. � � �D�a�r�k�:� hide the screen display, until completely black, by successive �p�r�e�s�s�e�s�.� �P�r�e�s�s�i�n�g� �a�g�a�i�n� �r�e�a�c�t�i�v�a�t�e�s� �t�h�e� �d�i�s�p�l�a�y�.�
� �R�e�i�n�i�t�i�a�l�i�s�a�t�i�o�n� �o�f� �t�h�e� �s�y�s�t�e�m�.�
� � �B�a�n�d�: selection of the FM1, FM2, FMast, AM wavebands. � � �T�A�:� � �T�A� �T�r�a�f�fi� �c� �A�n�n�o�u�n�c�e�m�e�n�t�s� �f�u�n�c�t�i�o�n� �o�n�/�o�f�f�.� � � �P�T�Y�:� � �T�y�p�e�s� �o�f� �P�r�o�g�r�a�m�m�e� �f�u�n�c�t�i�o�n� �o�n�/�o�f�f� �b�y� �m�e�a�n�s� �o�f� �a� �l�o �n�g� �p�r�e�s�s.
Alpha-numeric telephone keypad for the same �u�s�e�s�,� �d�i�a�l�,� �c�a�l�l�,� �h�a�n�g� �u�p�,� �e�n�t�e�r�.�
� � �L�i�o�n�: Direct access to the "PEUGEOT" services.
�E�S�C�: clears the current selection. � �R�e�t�u�r�n� �t�o� �t�h�e� �p�r�e�v�i�o�u�s� �s�e�l�e�c�t�i�o�n�.�
� � �M�e�n�u�:� � �d�i�s�p�l�a�y�s� �t�h�e� �g�e�n�e�r�a�l� �s�c�r�e�e�n�.� � �S�o�u�n�d� �s�e�t�t�i�n�g�s�.�
�L�i�s�t�:� displays the list of radio stations received, � �t�h�e� �l�i�s�t� �o�f� �C�D� �t�r�a�c�k�s� �o�r� �M�P�3�/�U�S�B�/�J�u�k�e�b�o�x� �d�i�r�e�c�t�o�r�i�e�s�.� � �U�p�d�a�t�i�n�g� �o�f� �t�h�e� �s�t�a�t�i�o�n�s� �r�e�c�e�i�v�e�d�.�
� �N�a�v�i�g�a�t�o�r� �w�h�i�c�h� selects the choices above or the step by step or rapid advances.
� �P�r�e�s�s�i�n�g� �t�h�e� �n�a�v�i�g�a�t�i�o�n� �d�i�a�l� �c�o�n�fi� �r�m�s� �t�h�e� �c�h�o�i�c�e�,� but does not store it.
� �A� �l�o�n�g� �p�r�e�s�s� �i�s� �r�e�q�u�i�r�e�d�.�
� �F�o�r� �a� �d�e�t�a�i�l�e�d� �g�l�o�b�a�l� �v�i�e�w� �o�f� �t�h�e� �m�e�n�u�s� available, refer to section 10.
Page 154 of 226
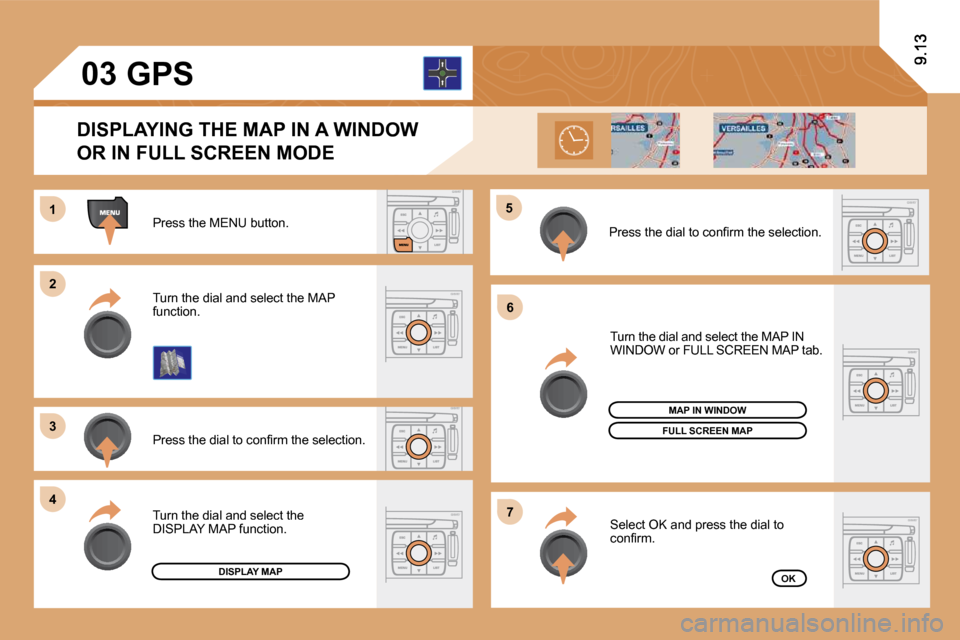
11
�2�2
�3�3
�4�4
�5�5
�6�6
�7�7
�0�3
� �P�r�e�s�s� �t�h�e� �M�E�N�U� �b�u�t�t�o�n�.�
� �P�r�e�s�s� �t�h�e� �d�i�a�l� �t�o� �c�o�n�fi� �r�m� �t�h�e� �s�e�l�e�c�t�i�o�n�.�
Turn the dial and select the MAP function.
� �T�u�r�n� �t�h�e� �d�i�a�l� �a�n�d� �s�e�l�e�c�t� �t�h�e� �M�A�P� �I�N� �W�I�N�D�O�W� �o�r� �F�U�L�L� �S�C�R�E�E�N� �M�A�P� �t�a�b�.�
� �S�e�l�e�c�t� �O�K� � � �a�n�d� �p�r�e�s�s� �t�h�e� �d�i�a�l� �t�o� �c�o�n�fi� �r�m�.� �
� �P�r�e�s�s� �t�h�e� �d�i�a�l� �t�o� �c�o�n�fi� �r�m� �t�h�e� �s�e�l�e�c�t�i�o�n�.�
Turn the dial and select the �D�I�S�P�L�A�Y� �M�A�P� �f�u�n�c�t�i�o�n�.�
DISPLAYING THE MAP IN A WINDOW
OR IN FULL SCREEN MODE
GPS
DISPLAY MAP
FULL SCREEN MAP
OK
MAP IN WINDOW
Page 166 of 226
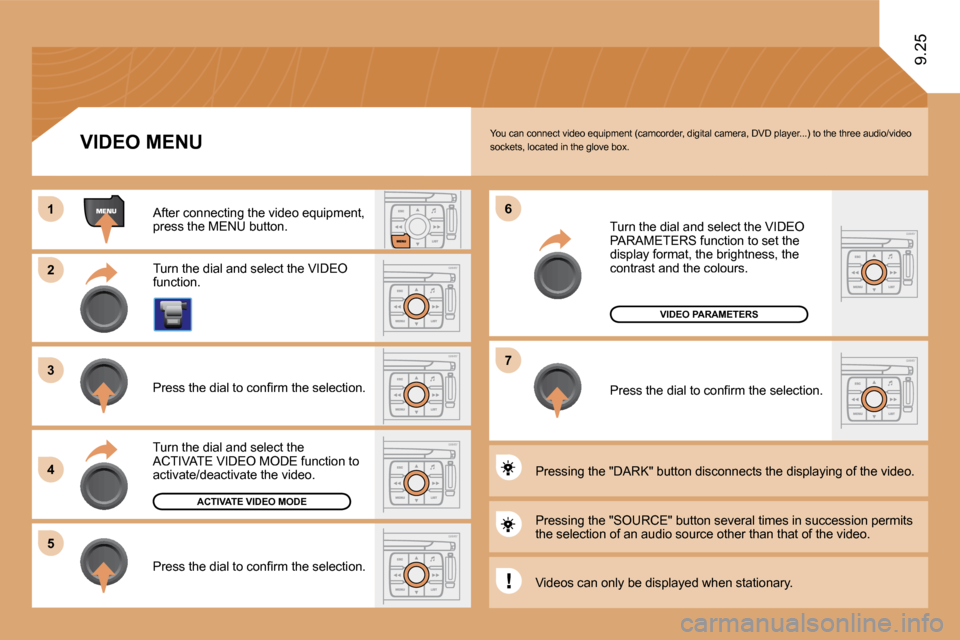
11
�2�2
�3�3
�4�4
�5�5
�6�6
�7�7
9.25
�A�C�T�I�V�A�T�E� �V�I�D�E�O� �M�O�D�E
�V�I�D�E�O� �P�A�R�A�M�E�T�E�R�S
� �Y�o�u� �c�a�n� �c�o�n�n�e�c�t� �v�i�d�e�o� �e�q�u�i�p�m�e�n�t� �(�c�a�m�c�o�r�d�e�r�,� �d�i�g�i�t�a�l� �c�a�m�e�r�a�,� �D�V�D� �p�l�a�y�e�r�.�.�.�)� �t�o� �t�h�e� �t�h�r�e�e� �a�u�d�i�o�/�v�i�d�e�o� �s�o�c�k�e�t�s�,� �l�o�c�a�t�e�d� �i�n� �t�h�e� �g�l�o�v�e� �b�o�x�.�
Turn the dial and select the VIDEO function.
� �A�f�t�e�r� �c�o�n�n�e�c�t�i�n�g� �t�h�e� �v�i�d�e�o� �e�q�u�i�p�m�e�n�t�,� �p�r�e�s�s� �t�h�e� �M�E�N�U� �b�u�t�t�o�n�.�
Turn the dial and select the ACTIVATE VIDEO MODE function to �a�c�t�i�v�a�t�e�/�d�e�a�c�t�i�v�a�t�e� �t�h�e� �v�i�d�e�o�.�
� �P�r�e�s�s� �t�h�e� �d�i�a�l� �t�o� �c�o�n�fi� �r�m� �t�h�e� �s�e�l�e�c�t�i�o�n�.�
� �P�r�e�s�s� �t�h�e� �d�i�a�l� �t�o� �c�o�n�fi� �r�m� �t�h�e� �s�e�l�e�c�t�i�o�n�.�
� �P�r�e�s�s�i�n�g� �t�h�e� �"�S�O�U�R�C�E�"� �b�u�t�t�o�n� �s�e�v�e�r�a�l� �t�i�m�e�s� �i�n� �s�u�c�c �e�s�s�i�o�n� �p�e�r�m�i�t�s� the selection of an audio source other than that of the video.
� �P�r�e�s�s�i�n�g� �t�h�e� �"�D�A�R�K�"� �b�u�t�t�o�n� �d�i�s�c�o�n�n�e�c�t�s� �t�h�e� �d�i�s�p�l�a�y �i�n�g� �o�f� �t�h�e� �v�i�d�e�o�.�
Turn the dial and select the VIDEO �P�A�R�A�M�E�T�E�R�S� �f�u�n�c�t�i�o�n� �t�o� �s�e�t� �t�h�e� �d�i�s�p�l�a�y� �f�o�r�m�a�t�,� �t�h�e� �b�r�i�g�h�t�n�e�s�s�,� �t�h�e� contrast and the colours.
� �P�r�e�s�s� �t�h�e� �d�i�a�l� �t�o� �c�o�n�fi� �r�m� �t�h�e� �s�e�l�e�c�t�i�o�n�.�
� � � � � � � � � �V�I�D�E�O� �M�E�N�U�
Videos can only be displayed when stationary.