audio Peugeot Expert VU 2016 Owner's Manual
[x] Cancel search | Manufacturer: PEUGEOT, Model Year: 2016, Model line: Expert VU, Model: Peugeot Expert VU 2016Pages: 599, PDF Size: 13.14 MB
Page 5 of 599
.
.
Expert_en_Chap00a_sommaire_ed01-2016
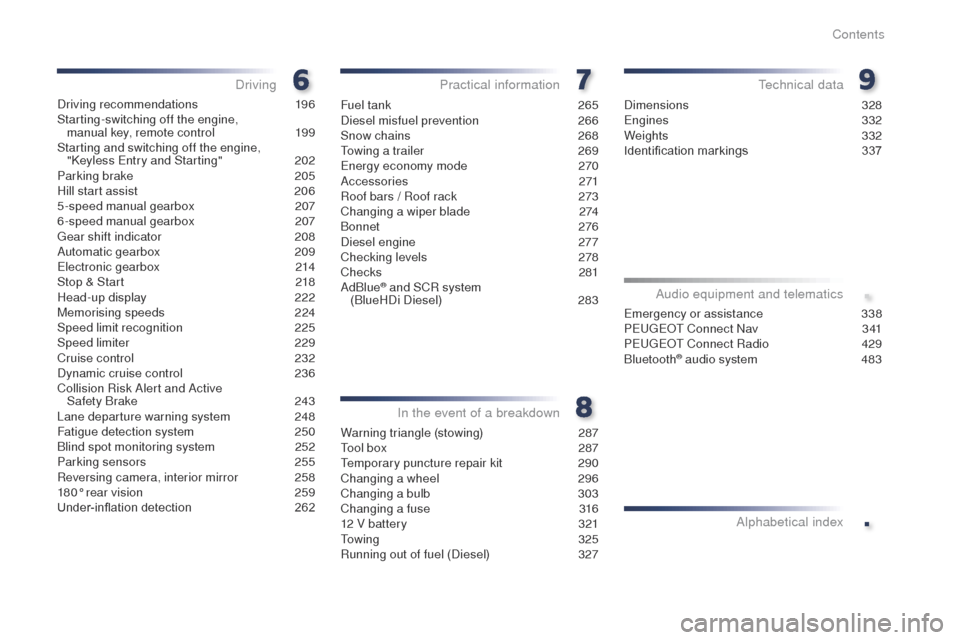
Driving recommendations 196
Starting-switching off the engine, manual key, remote control
1
99
Starting and switching off the engine, "Keyless Entry and Starting"
2
02
Parking brake
2
05
Hill start assist
2
06
5-speed manual gearbox
2
07
6-speed manual gearbox
2
07
ge
ar shift indicator
2
08
Automatic gearbox
20
9
Electronic gearbox
2
14
Stop & Start
2
18
Head-up display
2
22
Memorising speeds
2
24
Speed limit recognition
2
25
Speed limiter
2
29
Cruise control
2
32
Dynamic cruise control
2
36
Collision Risk Alert and Active Safety Brake
2
43
Lane departure warning system
2
48
Fatigue detection system
2
50
Blind spot monitoring system
2
52
Parking sensors
2
55
Reversing camera, interior mirror
2
58
180° rear vision
2
59
Under-inflation detection
2
62Fuel tank
2 65
Diesel misfuel prevention 26
6
Snow chains
2
68
to
wing a trailer
2
69
Energy economy mode
2
70
Accessories
271
Roof bars / Roof rack
2
73
Changing a wiper blade
2
74
Bonnet
276
Diesel engine
2
77
Checking levels
2
78
Checks
281
AdBlue
® and SCR system
(BlueHDi Diesel) 2 83
Warning triangle (stowing)
2
87
to
ol box
2
87
te
mporary puncture repair kit
2
90
Changing a wheel
2
96
Changing a bulb
3
03
Changing a fuse
3
16
12 V battery
3
21
to
wing
325
Running out of fuel (Diesel)
3
27Dimensions
328
Engines
332
Weights
332
Identification markings
3
37
Driving
Practical information
In the event of a breakdownte chnical data
Emergency or assistance 338
PEu gEo t Connect Nav 3 41
PE
u
g
Eo
t Connect Radio
4
29
Bluetooth
® audio system 4 83
Audio equipment and telematics
Alphabetical index
Contents
Page 8 of 599
6
Expert_en_Chap00b_vue-ensemble_ed01-2016
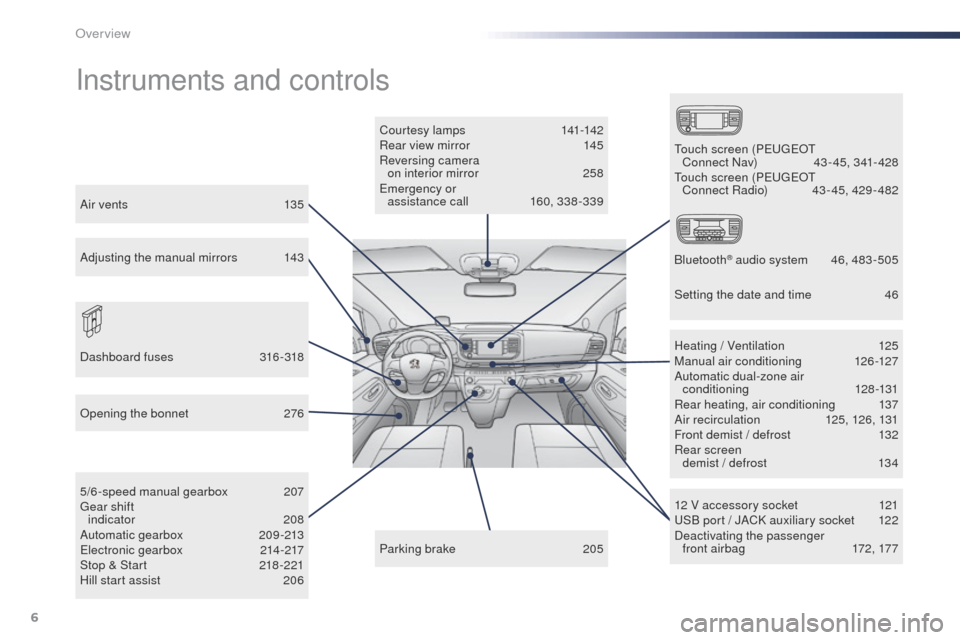
Instruments and controls
Courtesy lamps 141-142
Rear view mirror 1 45
Reversing camera on interior mirror
2
58
Emergency or assistance call
1
60, 338 -339
12 V accessory socket
1
21
uS
B port / JACK auxiliary socket
1
22
Deactivating the passenger front airbag
1
72, 177
5/6-speed manual gearbox
2
07
ge
ar shift
indicator
2
08
Automatic gearbox
20
9-213
Electronic gearbox
2
14-217
Stop & Start
2
18 -221
Hill start assist
2
06 Heating / Ventilation
1
25
Manual air conditioning
1
26-127
Automatic dual-zone air conditioning
128-131
Rear heating, air conditioning
1
37
Air recirculation
1
25, 126, 131
Front demist / defrost
1
32
Rear screen demist / defrost
1
34
Parking brake
2
05
op
ening the bonnet
2
76
Dashboard fuses
3
16-318
to
uch screen (PE
u
g
Eo
t
Connect Nav)
4
3 - 45, 341- 428
to
uch screen (PE
u
g
Eo
t
Connect Radio)
4
3 - 45, 429 - 482
Bluetooth
® audio system 4 6, 483 -505
Air vents
1
35
Adjusting the manual mirrors 1
43
Setting the date and time
4
6
over view
Page 45 of 599
43
Expert_en_Chap01_instruments-de-bord_ed01-2016
use this button to confirm.
us
e this button to quit.
us
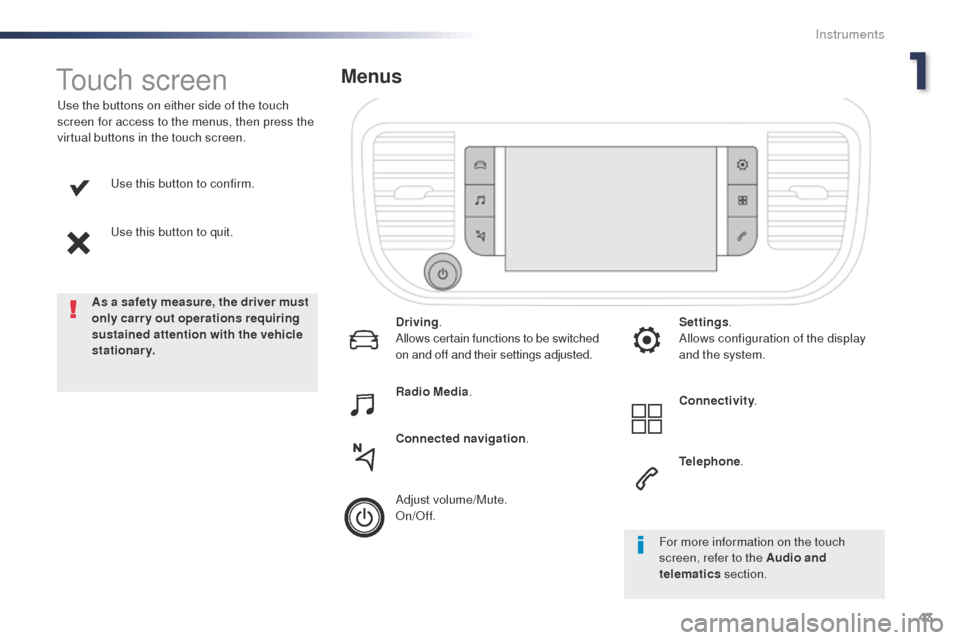
e the buttons on either side of the touch
screen for access to the menus, then press the
virtual buttons in the touch screen.
Menus
Driving .
Allows certain functions to be switched
on and off and their settings adjusted.
Connectivity.
Radio Media
.
Connected navigation .
Adjust volume/Mute.
o
n/
of
f. Settings
.
Allows configuration of the display
and the system.
Telephone .
touch screen
As a safety measure, the driver must
only carry out operations requiring
sustained attention with the vehicle
stationary.
For more information on the touch
screen, refer to the Audio and
telematics section.
1
Instruments
Page 48 of 599
46
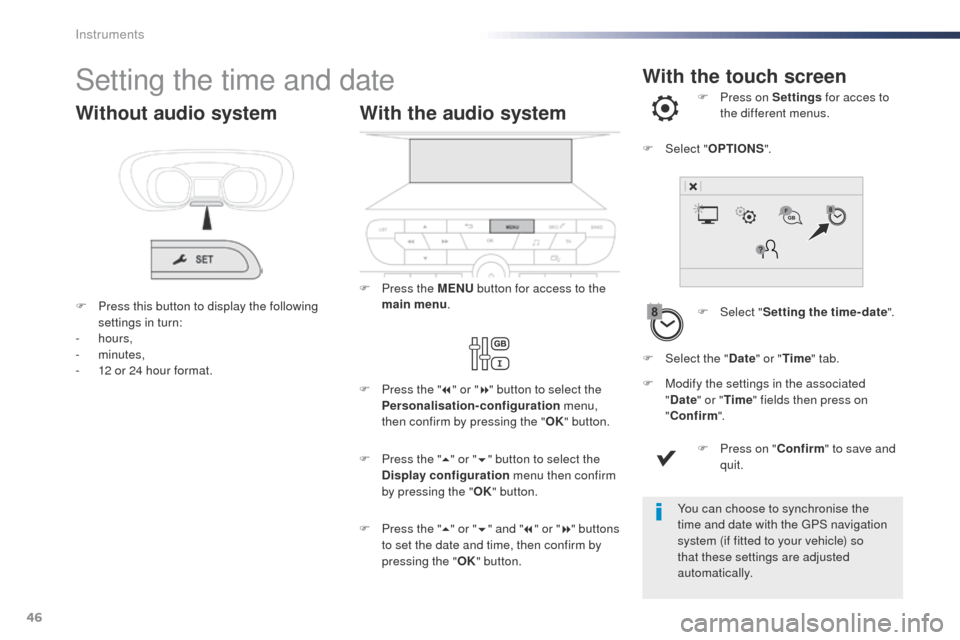
With the touch screenSetting the time and date
F Select "Setting the time- date ".
F
P
ress on Settings
for acces to
the different menus.
F
M
odify the settings in the associated
" Date " or "Time " fields then press on
" Confirm ".
F
P
ress on " Confirm" to save and
quit.
F
Sel
ect "
OPTIONS ".
F
Sel
ect the " Date" or "Time " tab.
You can choose to synchronise the
time and date with the
g
P
S navigation
system (if fitted to your vehicle) so
that these settings are adjusted
automatically.
With the audio system
F Press the MENU button for access to the
main menu .
F
P
ress the " 7" or " 8" button to select the
Personalisation-configuration menu,
then confirm by pressing the " OK" button.
F
P
ress the " 5" or " 6" and " 7" or " 8" buttons
to set the date and time, then confirm by
pressing the " OK" button.
F
P
ress the " 5" or " 6" button to select the
Display configuration menu then confirm
by pressing the " OK" button.
Without audio system
F Press this button to display the following
settings in turn:
-
hours,
-
minutes,
-
1
2 or 24 hour format.
Instruments
Page 91 of 599

89
Expert_en_Chap02_ouvertures_ed01-2016
Confirmation that the door is going
to close is signalled by the direction
indicators flashing for a few seconds,
accompanied by an audible signal.
th
e movement of the door is reversed
if you pass your foot under the bumper
during operation of the door.
If fitted to your vehicle, the electric door
mirrors fold on locking the vehicle.
Closing
With " Hands-free access " activated in the
vehicle configuration menu.
F
W
ith the remote control on your person and
in the recognition zone A , pass your foot
under the outer rear bumper, on the side
you want to close the door.
on
ce the door has closed, the vehicle locks
itself automatically, if " Hands-free access
self-locking " has been selected in the vehicle
configuration menu.
With the audio system
With the touch screen
In the " Personalisation-Configuration " menu,
activate/deactivate " Hands-free access".
Deactivation
By default, hands-free access is activated.th
e function can be deactivated in the vehicle
configuration menu.
Automatic locking
the vehicle locks itself following the hands-free
closing of a sliding door.
th
e automatic locking can be deactivated in
the vehicle configuration menu.
If your vehicle is not fitted with an
alarm, locking is confirmed by fixed
illumination of the direction indicators
for about two seconds.
Depending on version, the door mirrors
fold at the same time. In the vehicle settings menu, activate/
deactivate "
Hands-free access ".
th
en, if you want automatic locking after
closing the door, activate/deactivate " Hands-
free access self-locking ".
Operating fault
An audible signal repeated three times
indicates a fault with the system.
Contact a PE
u
g
Eo
t dealer or a qualified
workshop to have the system checked.
2
Access
Page 124 of 599

122
Expert_en_Chap03_ergonomie-et-confort_ed01-2016
Auxiliary socket
It permits the connection of a portable device
so that you can listen to your music files via the
vehicle's speakers.
th
e management of the files is done using your
portable device.
For more information on the use of
this equipment, refer to the Audio and
telematics section.
Lashing rings
Loading area
fittings
use the lashing rings on the rear floor to secure
your loads.
As a safety precaution in case of sharp braking,
you are advised to place heavy objects as far
for wards towards the cab as possible.
You are advised to immobilise the load by
securing it firmly using the lashing rings on the
f l o o r.Depending on the vehicle's equipment, the
various fittings below are located in the loading
area.
USB port
It allows the connection of a portable device,
such as a digital audio player of the iPod® type
or a
uS
B memory stick.
It reads the audio files which are transmitted to
your audio system and played via the vehicle's
speakers.
You can manage these files using the steering
mounted controls or the audio system.
When a
u
S
B port is used, the portable
device charges automatically.
While charging, a message is displayed
if the current consumption of the
portable device exceeds the power
rating of the port.
For more information on using this
equipment, refer to the Audio and
telematics section.
Ease of use and comfort
Page 140 of 599

138
Expert_en_Chap03_ergonomie-et-confort_ed01-2016
Heating
this is an additional and separate system
which heats the engine hot water circuit to
heat the passenger compartment and improve
defrosting.
th
is indicator lamp is on when if the
system is programmed to come on
for heating.
th
is indicator lamp flashes while the
heating is operating.
Programmable Heating / Ventilation
Ventilation
this system allows ventilation of the passenger
compartment to improve the temperature
experienced on entering the vehicle in summer.
Programming
Audio system
F Press on the MENU button to go
to the main menu.
F
Sel
ect " Pre-heat. / Pre-ventil. ".
F
Sel
ect " Heating " to heat the engine and
passenger compartment or " Ventilation"
to ventilate the passenger compartment. F
Select:
-
t
he 1
st clock to programme/store your
start time,
-
t
he 2
nd clock to programme/store a
second start time.
us
ing these two clocks and according
to season you can, for example, select
one or the other start time.
A message in the screen confirms your
choice.
F
Sel
ect " Activation " and if necessary for
programming, select " Parameters".
Ease of use and comfort
Page 152 of 599

150
Expert_en_Chap04_eclairage-et-visibilite_ed01-2016
temporarily keeping the dipped beam
headlamps on after the vehicle's ignition has
been switched off makes the driver's exit easier
when the light is poor.
Manual guide-me-home
lighting
F With the ignition off, "flash" the headlamps using the lighting stalk.
F
A f
urther "headlamp flash" switches the
function off.
Switching off
the manual guide-me-home lighting switches
off automatically after a set time.
Automatic guide-me-home
lighting
When the automatic illumination of headlamps
function is activated, under low ambient
light the dipped beam headlamps come on
automatically when the ignition is switched off.
Programming
the activation, deactivation and selection of
period the guide-me-home lighting is kept on
can be set.
With the audio system
In the " Personalisation-configuration "
menu, activate/deactivate " Follow-me-home
headlamps ".
In the vehicle settings menu, activate/
deactivate " Guide-me-home lighting ".
With the touch screen
Switching on
Lighting and visibility
Page 153 of 599

151
Expert_en_Chap04_eclairage-et-visibilite_ed01-2016
Exterior welcome
lighting
the remote switching on of the lighting makes
your approach to the vehicle easier in poor
light. It is activated when the lighting control
is in the "AUTO" position and the level of light
detected by the sunshine sensor is low.
Switching on
F Press the open padlock on the remote control or one of the front
door handles with Keyless Entry
and Starting.
Switching off
the exterior welcome lighting switches off
automatically after a set time, when the ignition
is switched on or on locking the vehicle.
Programming
the activation, deactivation and choice of
welcome lighting duration can be set.
th
e dipped beam headlamps and sidelamps
come on; your vehicle is also unlocked. In the vehicle settings menu, activate/
deactivate "
Welcome lighting ".
With the touch screen
With the audio system
In the " Personalisation-configuration " menu,
activate/deactivate " Welcome lighting".
4
Lighting and visibility
Page 154 of 599
152
Expert_en_Chap04_eclairage-et-visibilite_ed01-2016
In the vehicle settings menu, activate/
deactivate "Driving lighting ".
With the touch screen
With the audio system
In the "
Personalisation-configuration " menu,
activate/deactivate " Driving lighting".
th
e system is activated or deactivated in the
vehicle configuration menu.
th
e system is activated by default.
ProgrammingCornering lighting
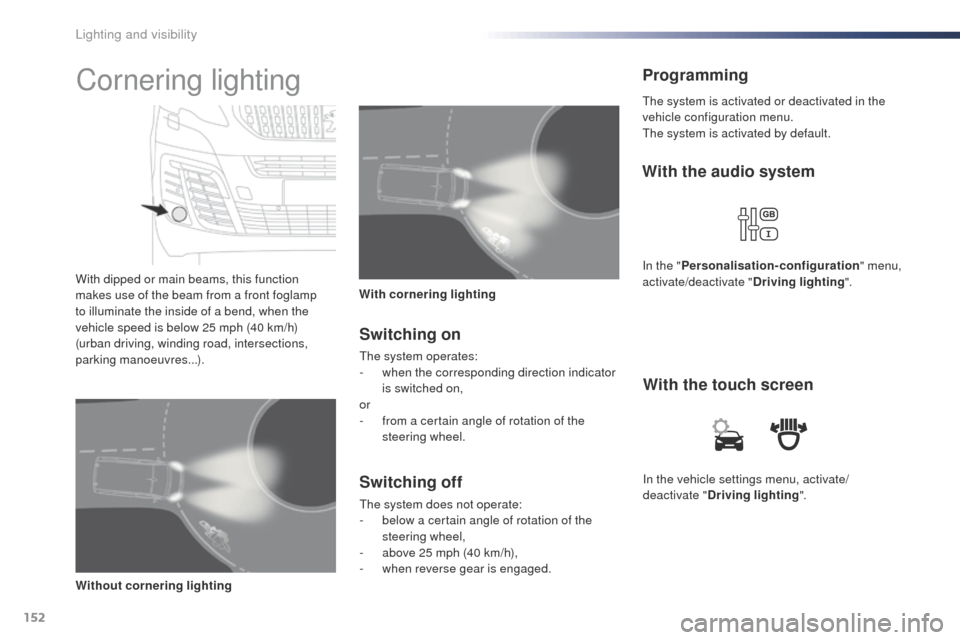
With dipped or main beams, this function
makes use of the beam from a front foglamp
to illuminate the inside of a bend, when the
vehicle speed is below 25 mph (40 km/h)
(urban driving, winding road, intersections,
parking manoeuvres...).
With cornering lighting
Without cornering lighting
Switching on
the system operates:
- w hen the corresponding direction indicator
is switched on,
or
-
f
rom a certain angle of rotation of the
steering wheel.
Switching off
the system does not operate:
- b elow a certain angle of rotation of the
steering wheel,
-
a
bove 25 mph (40 km/h),
-
w
hen reverse gear is engaged.
Lighting and visibility