Chapter 9 Peugeot Partner 2012 Owner's Guide
[x] Cancel search | Manufacturer: PEUGEOT, Model Year: 2012, Model line: Partner, Model: Peugeot Partner 2012Pages: 208, PDF Size: 6.5 MB
Page 109 of 208

Levels
107
CHECK
S
6
LEVELS
Oil change
This must be carried out at the
intervals specifi ed and the viscosity
grade of the oil selected must fulfi l the
requirements in the manufacturer's
servicing schedule. Ask for advice from
a PEUGEOT dealer.
Remove the dipstick before fi lling.
Check the level after fi lling (never
exceed the max mark).
Refi t the oil fi ller cap before closing the
bonnet.
Changing the brake fluid
The brake fl uid must be changed at
the intervals stated, according to the
manufacturer's servicing schedule.
Use fl uids recommended by the
manufacturer, which fulfi l DOT4
standards.
The level must be between the MIN
and MAX marks on the reservoir.
If fl uid has to be added frequently,
this indicates a fault which must be
checked by a PEUGEOT dealer or
a qualifi ed workshop as soon as
possible.
Warning lamps
If you have to remove / refi t the
engine style cover, handle it with
care to avoid damaging the fi xing
clips.
Oil level
It is recommended that the oil level be
checked every 3 000 miles (5 000 km)
and topped up if necessary between oil
changes.
Check the level with the vehicle level,
engine cold, using the dipstick.
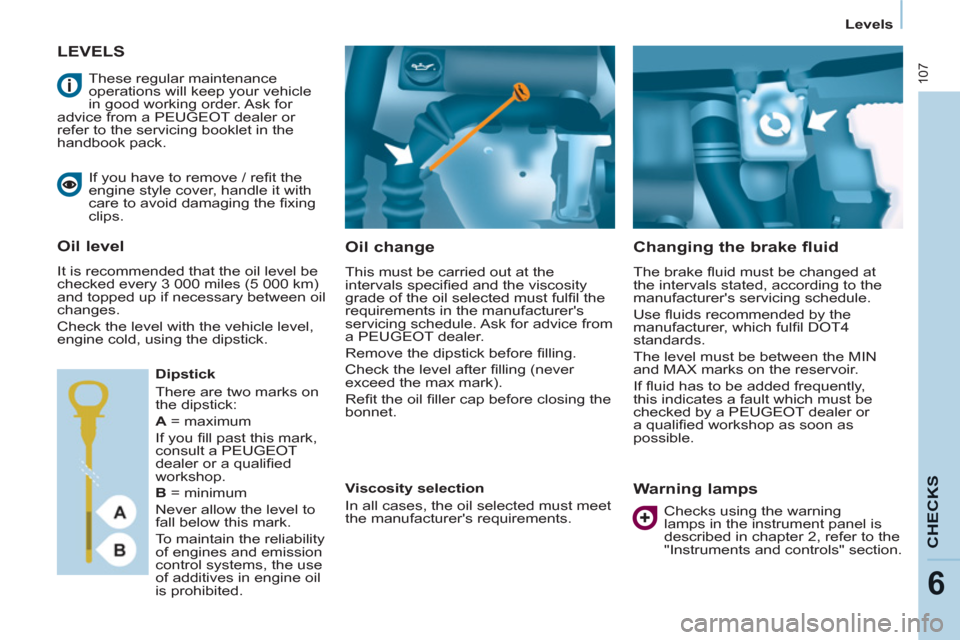
Dipstick
There are two marks on
the dipstick:
A
= maximum
If you fi ll past this mark,
consult a PEUGEOT
dealer or a qualifi ed
workshop.
B
= minimum
Never allow the level to
fall below this mark.
To maintain the reliability
of engines and emission
control systems, the use
of additives in engine oil
is prohibited.
Viscosity selection
In all cases, the oil selected must meet
the manufacturer's requirements.
These regular maintenance
operations will keep your vehicle
in good working order. Ask for
advice from a PEUGEOT dealer or
refer to the servicing booklet in the
handbook pack.
Checks using the warning
lamps in the instrument panel is
described in chapter 2, refer to the
"Instruments and controls" section.
Page 114 of 208

DIESEL
Fuel
11 2
FUEL CUT-OFF
In a serious collision, a mechanism
automatically prevents fuel from
reaching the engine.
The fl ashing of this warning
lamp is accompanied by a
message in the screen.
Check that there is no odour or
leakage of fuel outside the vehicle and
re-establish the fuel supply:
- switch off the ignition (STOP
position),
- remove the key,
- put the key back in the ignition,
- switch on the ignition and start.
DIESEL PRIMING PUMP
If you should run out of fuel, it is
necessary to prime the fuel circuit:
- fi ll the fuel tank with at least
fi ve litres of Diesel,
- squeeze and release the manual
priming pump, under the bonnet
under the protective cover,
- operate the starter until the engine
starts.
Refer to the "Under the bonnet"
section of chapter 6.
Quality of the fuel used for
Diesel engines
The Diesel engines are perfectly
compatible with biofuels which conform
to current and future European
standards (Diesel fuel which complies
with standard EN 590 mixed with a
biofuel which complies with standard
EN 14214) available at the pumps
(containing up to 7 % Fatty Acid Methyl
Ester).
The B30 biofuel can be used in certain
Diesel engines; however, this use
is subject to strict application of the
special servicing conditions. Contact
a PEUGEOT dealer or a qualifi ed
workshop.
The use of any other type of (bio)fuel
(vegetable or animal oils, pure or
diluted, domestic fuel...) is strictly
prohibited (risk of damage to the
engine and fuel system).
Page 121 of 208

Snow screen
11 9
QUICK HEL
P
7
REMOVABLE SNOW SCREEN
According to country, the removable
snow screen is installed on the lower
part of the front bumper to prevent the
accumulation of snow at the radiator
cooling fan.
Do not forget to remove the snow
screen when the exterior temperature
is higher than 10°C (no risk of snowfall)
and when towing.
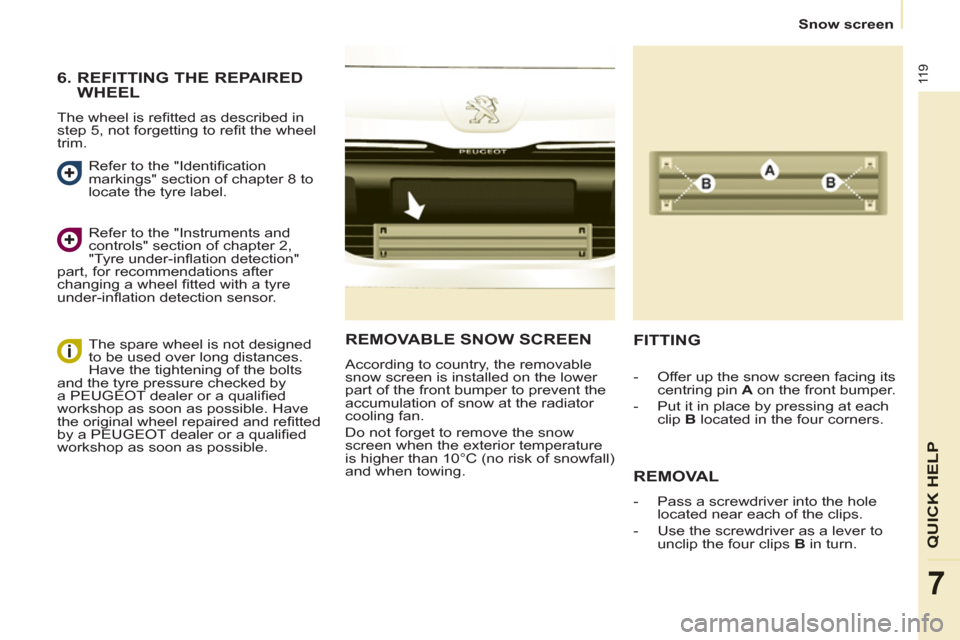
FITTING
REMOVAL
- Pass a screwdriver into the hole
located near each of the clips.
- Use the screwdriver as a lever to
unclip the four clips B
in turn.
- Offer up the snow screen facing its
centring pin A
on the front bumper.
- Put it in place by pressing at each
clip B
located in the four corners.
6. REFITTING THE REPAIRED
WHEEL
The wheel is refi tted as described in
step 5, not forgetting to refi t the wheel
trim.
Refer to the "Identifi cation
markings" section of chapter 8 to
locate the tyre label.
Refer to the "Instruments and
controls" section of chapter 2,
"Tyre under-infl ation detection"
part, for recommendations after
changing a wheel fi tted with a tyre
under-infl ation detection sensor.
The spare wheel is not designed
to be used over long distances.
Have the tightening of the bolts
and the tyre pressure checked by
a PEUGEOT dealer or a qualifi ed
workshop as soon as possible. Have
the original wheel repaired and refi tted
by a PEUGEOT dealer or a qualifi ed
workshop as soon as possible.
Page 125 of 208

Changing a bulb
123
QUICK HELP
7
For more information concerning the
bulbs, refer to the "Types of bulb".
1.
Brake lamps/sidelamps
Type B
, P21/5W - 21/5W
2.
Direction indicators
Type B
, PY21W - 21W (amber)
3.
Reversing lamps
Type B
, P21W - 21W
4.
Foglamps
Type B
, P21W - 21W
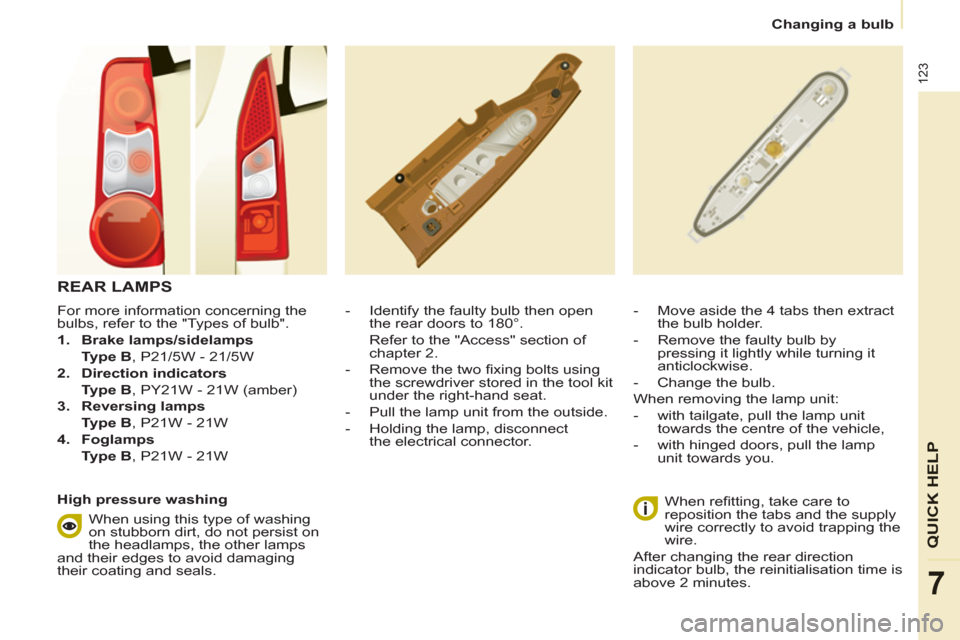
- Identify the faulty bulb then open
the rear doors to 180°.
Refer to the "Access" section of
chapter 2.
- Remove the two fi xing bolts using
the screwdriver stored in the tool kit
under the right-hand seat.
- Pull the lamp unit from the outside.
- Holding the lamp, disconnect
the electrical connector.
- Move aside the 4 tabs then extract
the bulb holder.
- Remove the faulty bulb by
pressing it lightly while turning it
anticlockwise.
- Change the bulb.
When removing the lamp unit:
- with tailgate, pull the lamp unit
towards the centre of the vehicle,
- with hinged doors, pull the lamp
unit towards you.
When refi tting, take care to
reposition the tabs and the supply
wire correctly to avoid trapping the
wire.
After changing the rear direction
indicator bulb, the reinitialisation time is
above 2 minutes.
REAR LAMPS
High pressure washing
When using this type of washing
on stubborn dirt, do not persist on
the headlamps, the other lamps
and their edges to avoid damaging
their coating and seals.