trip Peugeot Partner 2013 Owner's Manual
[x] Cancel search | Manufacturer: PEUGEOT, Model Year: 2013, Model line: Partner, Model: Peugeot Partner 2013Pages: 236, PDF Size: 9.04 MB
Page 10 of 236
8
Interior
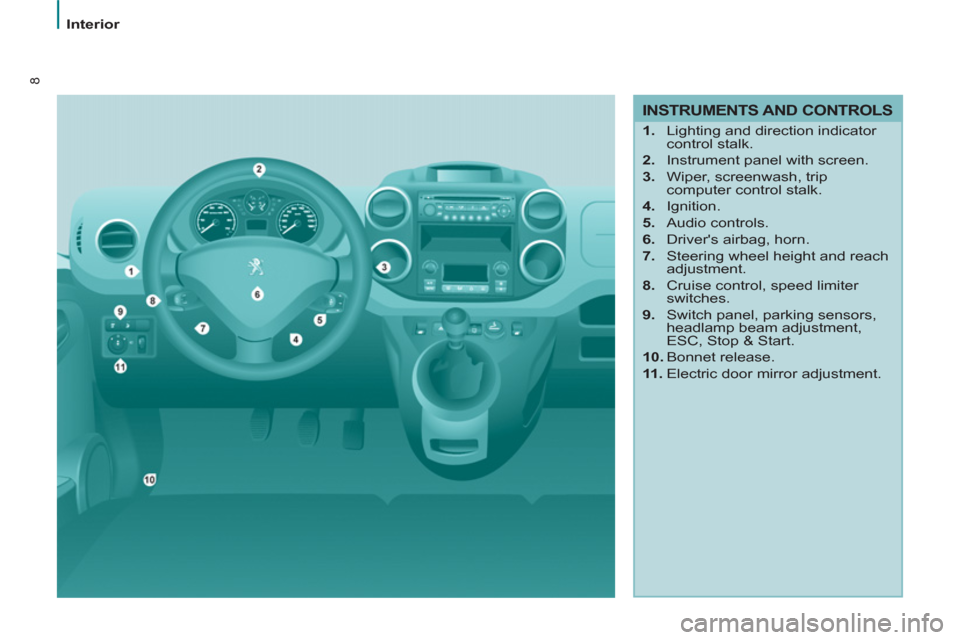
INSTRUMENTS AND CONTROLS
1.
Lighting and direction indicator
control stalk.
2.
Instrument panel with screen.
3.
Wiper, screenwash, trip
computer control stalk.
4.
Ignition.
5.
Audio controls.
6.
Driver's airbag, horn.
7.
Steering wheel height and reach
adjustment.
8.
Cruise control, speed limiter
switches.
9.
Switch panel, parking sensors,
headlamp beam adjustment,
ESC, Stop & Start.
10.
Bonnet release.
11 .
Electric door mirror adjustment.
Page 29 of 236
2
Instruments and controls
27
READY TO SET OFF
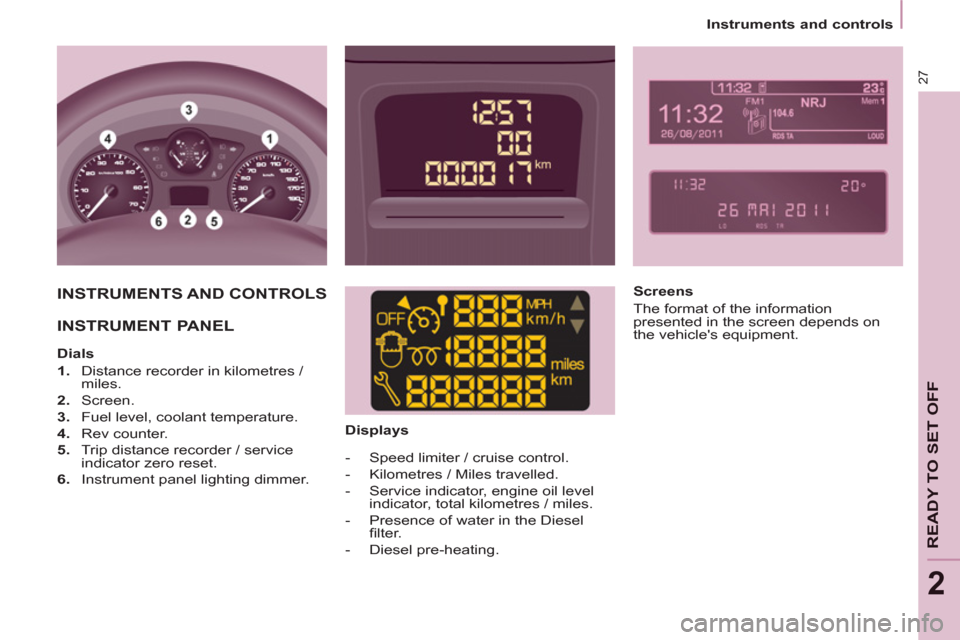
INSTRUMENTS AND CONTROLS
INSTRUMENT PANEL
Dials
1.
Distance recorder in kilometres /
miles.
2.
Screen.
3.
Fuel level, coolant temperature.
4.
Rev counter.
5.
Trip distance recorder / service
indicator zero reset.
6.
Instrument panel lighting dimmer.
Displays
- Speed limiter / cruise control.
- Kilometres / Miles travelled.
- Service indicator, engine oil level
indicator, total kilometres / miles.
- Presence of water in the Diesel
fi lter.
- Diesel pre-heating.
Screens
The format of the information
presented in the screen depends on
the vehicle's equipment.
Page 32 of 236
Instruments and controls
30
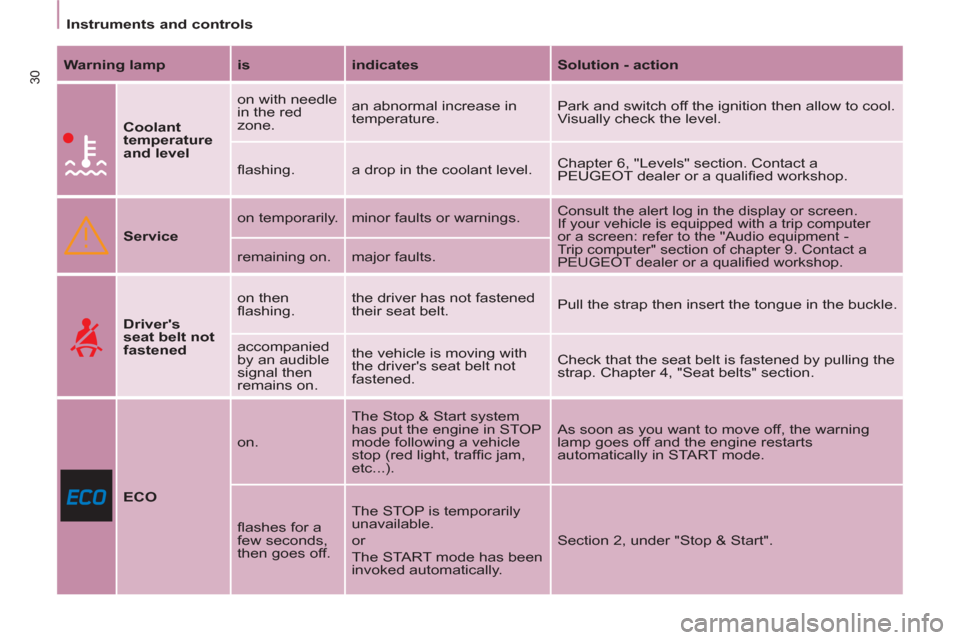
Warning lamp
is
indicates
Solution - action
Coolant
temperature
and level
on with needle
in the red
zone. an abnormal increase in
temperature. Park and switch off the ignition then allow to cool.
Visually check the level.
fl ashing. a drop in the coolant level. Chapter 6, "Levels" section. Contact a
PEUGEOT dealer or a qualifi ed workshop.
Service
on temporarily. minor faults or warnings.
Consult the alert log in the display or screen.
If your vehicle is equipped with a trip computer
or a screen: refer to the "Audio equipment -
Trip computer" section of chapter 9. Contact a
PEUGEOT dealer or a qualifi ed workshop.
remaining on. major faults.
Driver's
seat belt not
fastened
on then
fl ashing. the driver has not fastened
their seat belt. Pull the strap then insert the tongue in the buckle.
accompanied
by an audible
signal then
remains on. the vehicle is moving with
the driver's seat belt not
fastened. Check that the seat belt is fastened by pulling the
strap. Chapter 4, "Seat belts" section.
ECO
on. The Stop & Start system
has put the engine in STOP
mode following a vehicle
stop (red light, traffi c jam,
etc...). As soon as you want to move off, the warning
lamp goes off and the engine restarts
automatically in START mode.
fl ashes for a
few seconds,
then goes off. The STOP is temporarily
unavailable.
or
The START mode has been
invoked automatically. Section 2, under "Stop & Start".
Page 39 of 236
2
Instruments and controls
37
READY TO SET OFF
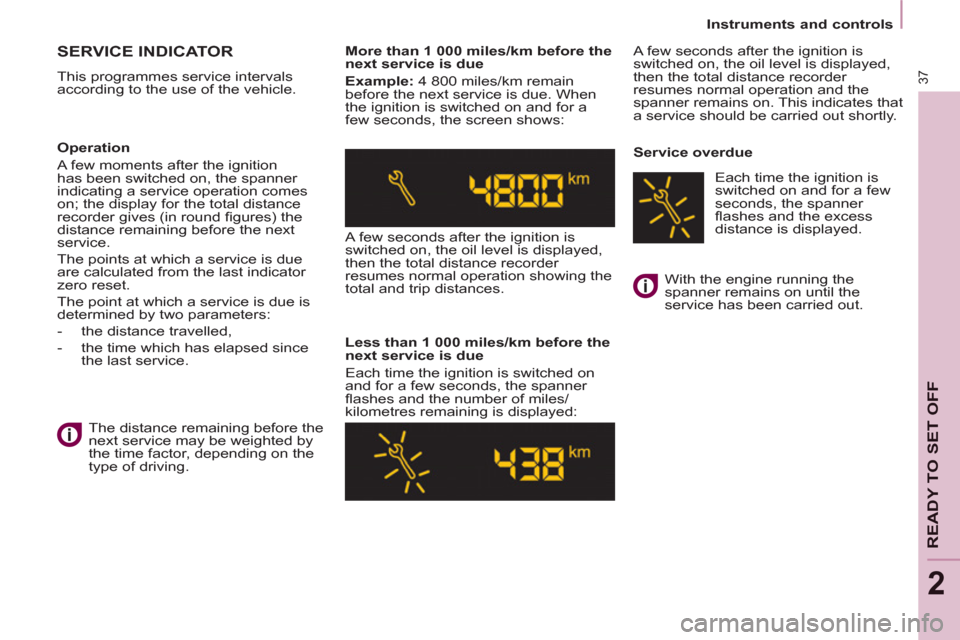
SERVICE INDICATOR
This programmes service intervals
according to the use of the vehicle.
More than 1 000 miles/km before the
next service is due
Example:
4 800 miles/km remain
before the next service is due. When
the ignition is switched on and for a
few seconds, the screen shows:
A few seconds after the ignition is
switched on, the oil level is displayed,
then the total distance recorder
resumes normal operation showing the
total and trip distances.
Less than 1 000 miles/km before the
next service is due
Each time the ignition is switched on
and for a few seconds, the spanner
fl ashes and the number of miles/
kilometres remaining is displayed: A few seconds after the ignition is
switched on, the oil level is displayed,
then the total distance recorder
resumes normal operation and the
spanner remains on. This indicates that
a service should be carried out shortly.
Service overdue
Operation
A few moments after the ignition
has been switched on, the spanner
indicating a service operation comes
on; the display for the total distance
recorder gives (in round fi gures) the
distance remaining before the next
service.
The points at which a service is due
are calculated from the last indicator
zero reset.
The point at which a service is due is
determined by two parameters:
- the distance travelled,
- the time which has elapsed since
the last service.
The distance remaining before the
next service may be weighted by
the time factor, depending on the
type of driving. With the engine running the
spanner remains on until the
service has been carried out.
Each time the ignition is
switched on and for a few
seconds, the spanner
fl ashes and the excess
distance is displayed.
Page 40 of 236
Instruments and controls
38
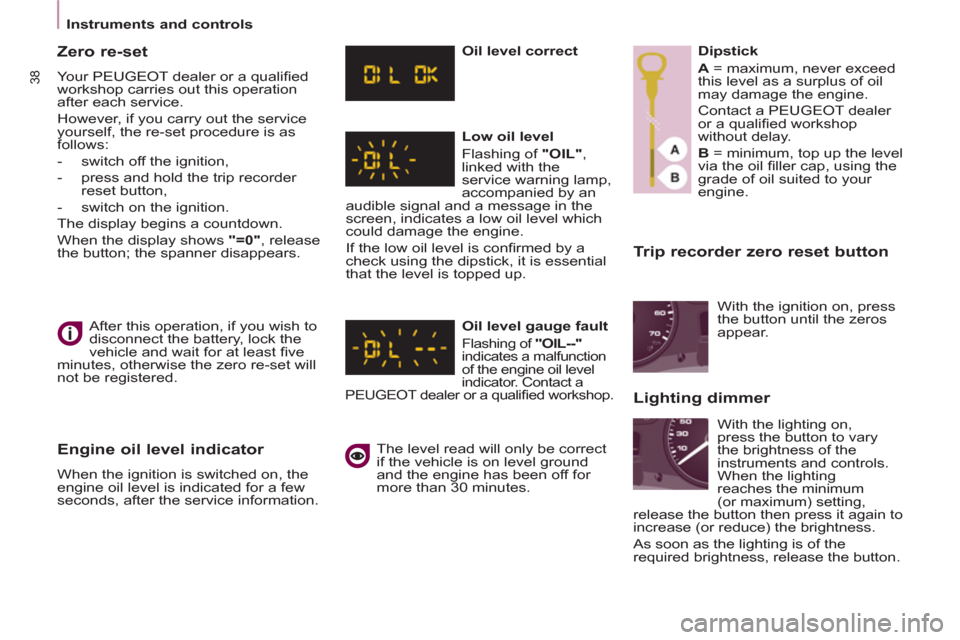
Trip recorder zero reset button
After this operation, if you wish to
disconnect the battery, lock the
vehicle and wait for at least fi ve
minutes, otherwise the zero re-set will
not be registered.
Zero re-set
Your PEUGEOT dealer or a qualifi ed
workshop carries out this operation
after each service.
However, if you carry out the service
yourself, the re-set procedure is as
follows:
- switch off the ignition,
- press and hold the trip recorder
reset button,
- switch on the ignition.
The display begins a countdown.
When the display shows "=0"
, release
the button; the spanner disappears.
Engine oil level indicator
When the ignition is switched on, the
engine oil level is indicated for a few
seconds, after the service information.
Oil level correct
Low oil level
Flashing of "OIL"
,
linked with the
service warning lamp,
accompanied by an
audible signal and a message in the
screen, indicates a low oil level which
could damage the engine.
If the low oil level is confi rmed by a
check using the dipstick, it is essential
that the level is topped up.
Oil level gauge fault
Flashing of "OIL--"
indicates a malfunction
of the engine oil level
indicator. Contact a
PEUGEOT dealer or a qualifi ed workshop.
The level read will only be correct
if the vehicle is on level ground
and the engine has been off for
more than 30 minutes.
Dipstick
A
= maximum, never exceed
this level as a surplus of oil
may damage the engine.
Contact a PEUGEOT dealer
or a qualifi ed workshop
without delay.
B
= minimum, top up the level
via the oil fi ller cap, using the
grade of oil suited to your
engine.
With the lighting on,
press the button to vary
the brightness of the
instruments and controls.
When the lighting
reaches the minimum
(or maximum) setting,
release the button then press it again to
increase (or reduce) the brightness.
As soon as the lighting is of the
required brightness, release the button.
With the ignition on, press
the button until the zeros
appear.
Lighting dimmer
Page 193 of 236
9.51
11TRIP COMPUTER
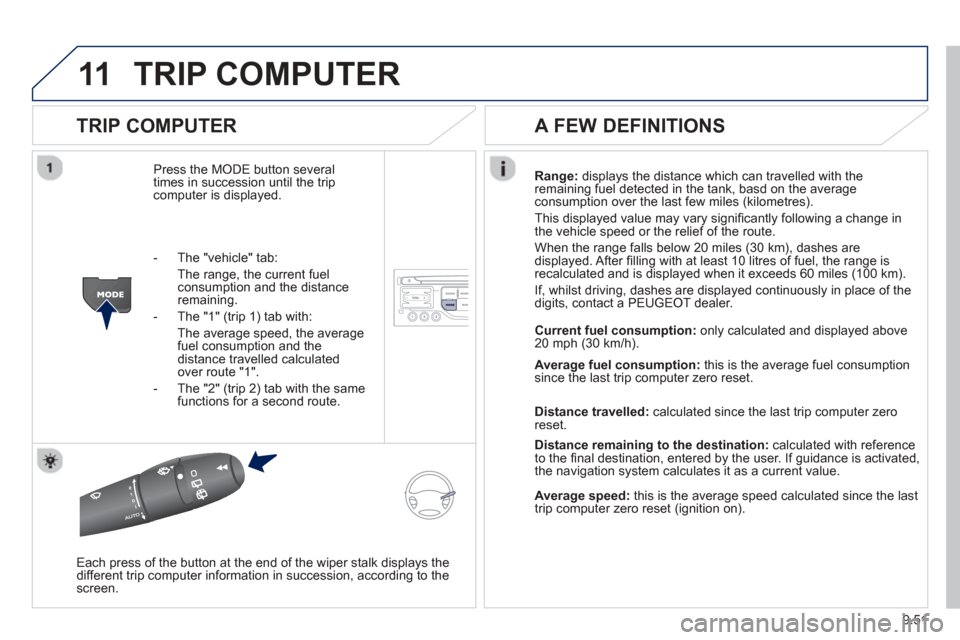
TRIP COMPUTER
Press the MODE button several
times in succession until the tripcomputer is displayed. Ran
ge: displays the distance which can travelled with the
remaining fuel detected in the tank, basd on the averageconsumption over the last few miles (kilometres).
This displa
yed value may vary signifi cantly following a change in
the vehicle speed or the relief of the route.
When the ran
ge falls below 20 miles (30 km), dashes are
displayed. After fi lling with at least 10 litres of fuel, the range is
recalculated and is displayed when it exceeds 60 miles (100 km).
I
f, whilst driving, dashes are displayed continuously in place of the
digits, contact a PEUGEOT dealer.
Each press o
f the button at the end of the wiper stalk displays the
different trip computer information in succession, according to the screen.
A FEW DEFINITIONS
- The "vehicle" tab:
The ran
ge, the current fuelconsumption and the distance remaining.
- The "1"
(trip 1) tab with:
The average speed, the average fuel consumption and the distance travelled calculatedover route "1".
- The "2"
(trip 2) tab with the same
functions for a second route. Current fuel consum
ption:only calculated and displayed above
20 mph (30 km/h).
Avera
ge fuel consumption: this is the average fuel consumption since the last trip computer zero reset.
Distance travelled:calculated since the last trip computer zero
reset.
Distance remaining to the destination:calculated with referenceto the fi nal destination, entered by the user. If guidance is activated,
the navigation system calculates it as a current value.
Average speed: this is the average speed calculated since the last
trip computer zero reset (ignition on).
Page 197 of 236
9.55
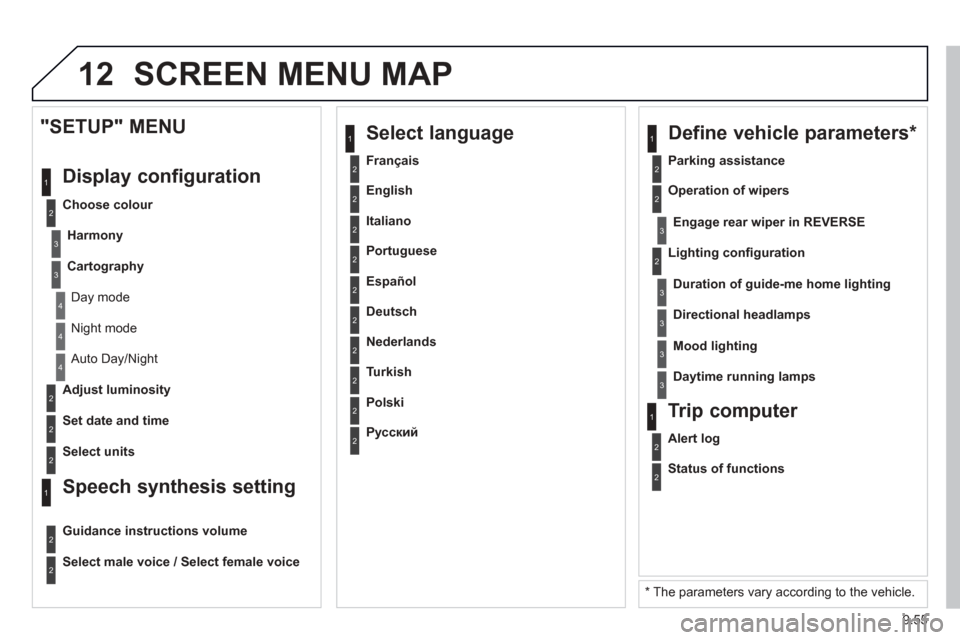
12 SCREEN MENU MAP
2
3
3
1
4
2
2
1
4
4
2
2
Night mode
Auto Day/Night
Ad
just luminosity
Set date and time
"SETUP" MENU
Displa
y configuration
Choose colour
Harmon
y
Cartography
Day mode
Speech synthesis setting
Guidance instructions volume
Select male voice / Select female voice
2 Select units
2
3
3
2 Lighting confi guration
Parkin
g assistance
Engage rear wiper in REVERSE
Duration of guide-me home lighting
1 Define vehicle parameters
*
2 Operation of wipers
3Directional headlamps
3Mood lighting
3Daytime running lamps
* The parameters vary according to the vehicle.
2Alert log
1Trip computer
2Status of functions
2 Français
1
Select language
2 English
2 Italiano
2 Portuguese
2 Español
2 Deutsch
2 Nederlands
2 Turkish
2 Polski
2
Русский
Page 206 of 236
9.64
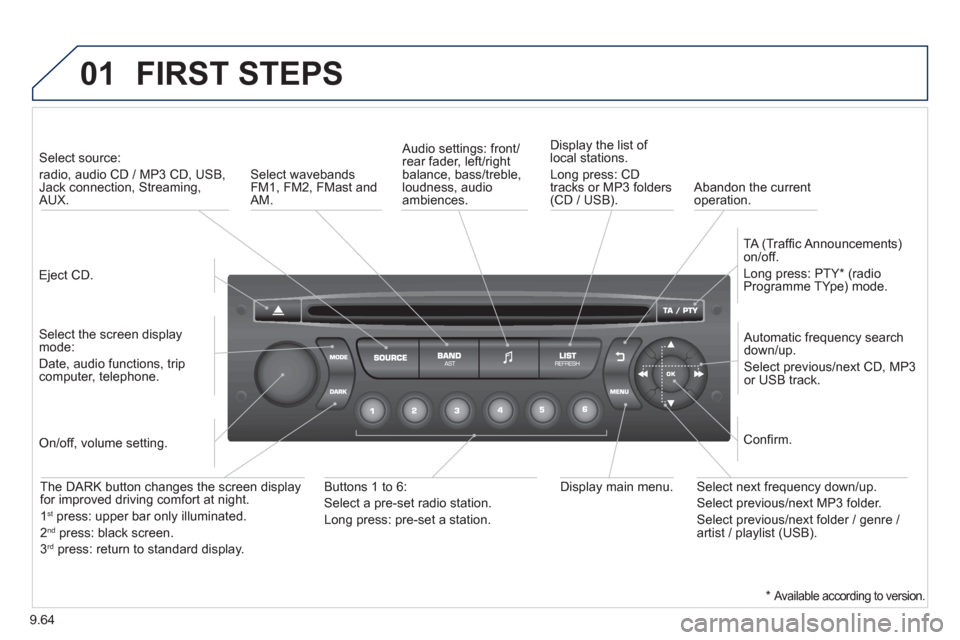
01 FIRST STEPS
Eject CD.
Select source:
radio, audio CD / MP3 CD, USB,Jack connection, Streaming,AUX.
Select the screen displaymode:
Date, audio functions, tripcomputer, telephone.
Automatic frequency search
down/up.
Select previous/next CD, MP3
or USB track.
Audio settings: front/rear fader, left/right
balance, bass/treble, loudness, audio ambiences. Displa
y the list of local stations.
Lon
g press: CD
tracks or MP3 folders(CD / USB).
TA
(Traffi c Announcements)
on/off.
Lon
g press: PTY * (radio
Programme TYpe) mode.
Display main menu. The DARK button changes the screen display
for improved driving comfort at night.
1st
press: upper bar only illuminated.
2ndpress: black screen.
3rdpress: return to standard display.
On/off, volume setting.
Buttons 1 to 6:
Select a pre-set radio station.
Lon
g press: pre-set a station.
Select next frequency down/up.
Select previous/next MP3 folder.
Select previous/next folder / genre /
artist / playlist (USB).
Confi rm.
Select wavebandsFM1, FM2, FMast and AM.
Abandon the current
operation.
*
Available according to version.
Page 208 of 236
9.66
03
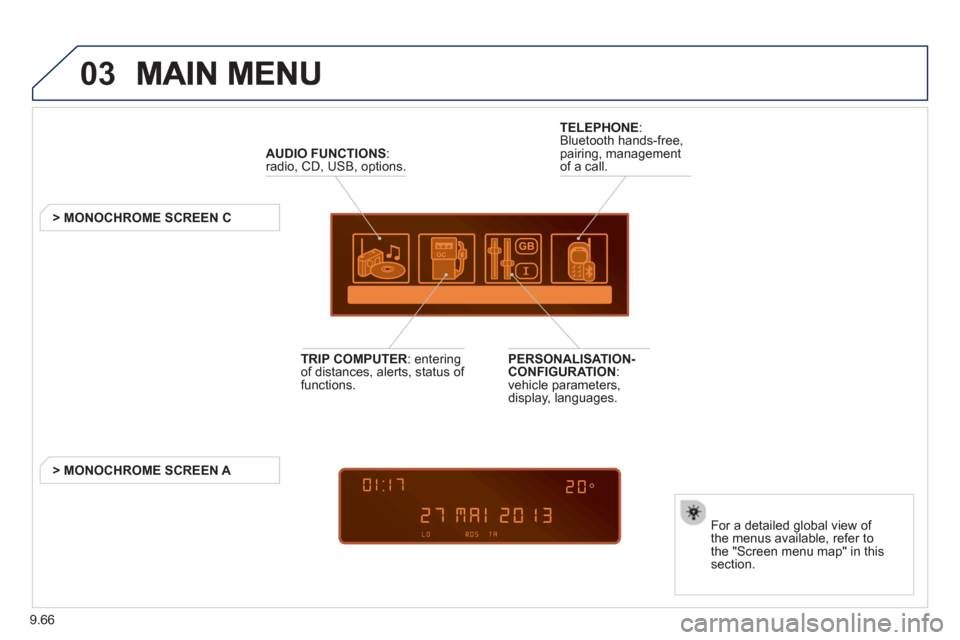
AUDIO FUNCTIONS :radio, CD, USB, options.
> MONOCHROME SCREEN C
For a detailed
global view of
the menus available, refer to
the "Screen menu map" in thissection.
TELEPHONE
:
Bluetooth hands-free,
pairing, managementof a call.
PERSONALISATION-
CONFIGURATION:
vehicle parameters,
display, languages.
TRIP COMPUTER
: enteringof distances, alerts, status of
functions.
> MONOCHROME
SCREEN A
Page 219 of 236
9.77
08
13
TRIP COMPUTER
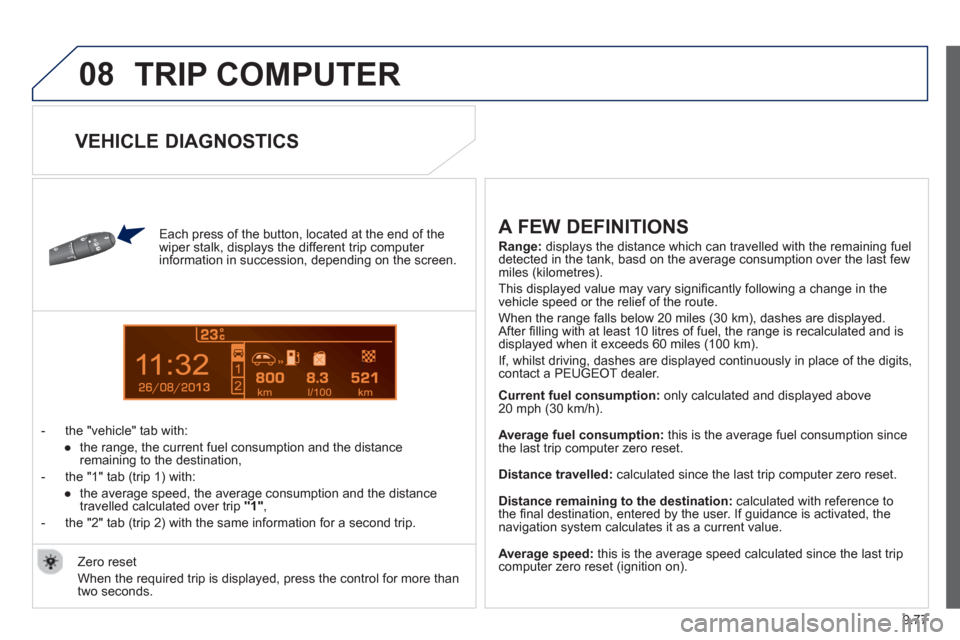
Each press of the button, located at the end of the
wiper stalk, displays the different trip computer
information in succession, depending on the screen.
- t
he "vehicle" tab with:
●
the ran
ge, the current fuel consumption and the distance
remaining to the destination,
- the "1" tab
(trip 1) with:
●
the avera
ge speed, the average consumption and the distance
travelled calculated over trip "1"
,
- the "2" tab
(trip 2) with the same information for a second trip.
A FEW DEFINITIONS
Range:displays the distance which can travelled with the remaining fuel
detected in the tank, basd on the average consumption over the last few miles (kilometres).
This displa
yed value may vary signifi cantly following a change in the
vehicle speed or the relief of the route.
When the ran
ge falls below 20 miles (30 km), dashes are displayed.After fi lling with at least 10 litres of fuel, the range is recalculated and is
displayed when it exceeds 60 miles (100 km).
I
f, whilst driving, dashes are displayed continuously in place of the digits, contact a PEUGEOT dealer.
Current fuel consumption
: only calculated and displayed above
20 mph (30 km/h).
Avera
ge fuel consumption: this is the average fuel consumption since
the last trip computer zero reset.
Distance travelled:calculated since the last trip computer zero reset.
Distance remaining to the destination: calculated with reference to
the fi nal destination, entered by the user. If guidance is activated, thenavigation system calculates it as a current value.
Average speed:
this is the average speed calculated since the last tripcomputer zero reset (ignition on). Zero reset
When the required trip is displa
yed, press the control for more than
two seconds.
VEHICLE DIAGNOSTICS