warning light PEUGEOT PARTNER 2014 Owners Manual
[x] Cancel search | Manufacturer: PEUGEOT, Model Year: 2014, Model line: PARTNER, Model: PEUGEOT PARTNER 2014Pages: 244, PDF Size: 10.39 MB
Page 4 of 244
2
Partner-2-VU_en_Chap00a_Sommaire_ed02-2014
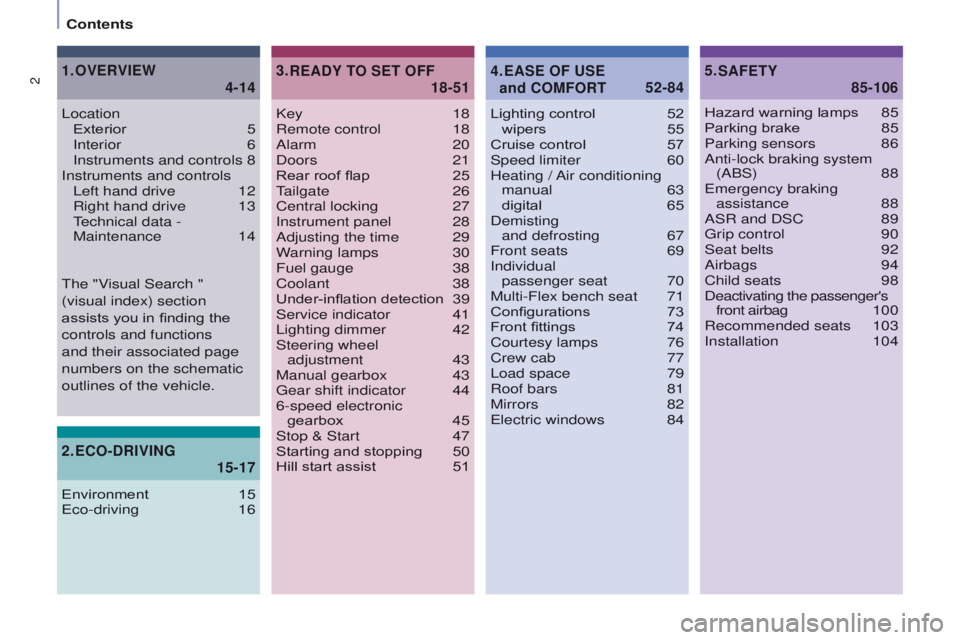
Key 18
Remote control 18
Alarm
20
Doors
21
Rear roof flap
25
T
ailgate 26
Central locking
27
Instrument panel
28
Adjusting the time
29
W
arning lamps
30
Fuel gauge
38
Coolant
38
Under-inflation detection
39
Service indicator
41
Lighting dimmer
42
Steering wheel
adjustment
43
Manual gearbox
43
Gear shift indicator
44
6-speed electronic
gearbox
45
Stop & Start
47
Starting and stopping
50
Hill start assist
51Lighting control
52 wipers
55
Cruise control
57
Speed limiter
60
Heating /
Air conditioning
manual
63
digital
65
Demisting
and defrosting
67
Front seats
69
Individual
passenger seat
70
Multi-Flex bench seat
71
Configurations
73
Front fittings
74
Courtesy lamps
76
Crew cab
77
Load space
79
Roof bars
81
Mirrors
82
Electric windows
84
3.
18-51
READY TO SET OFF
5.
85-106
SAFETY
Location
Exterior 5
Interior
6
Instruments and controls
8
Instruments and controls Left hand drive
12
Right hand drive
13
T
echnical data -
Maintenance
14
1.
4-14
OVERVIEW
Hazard warning lamps 85
Parking brake 85
Parking sensors
86
Anti-lock braking system (ABS)
88
Emergency braking assistance
88
ASR and DSC
89
Grip control
90
Seat belts
92
Airbags
94
Child seats
98
Deactivating the passenger's
front airbag
1
00
Recommended seats
103
Installation
104
4.
52-84
EASE OF USE
and COMFORT
2.
15-17
ECO-DRIVING
Environment 15
Eco-driving 16
The "Visual Search "
(visual
index) section
assists you in finding the
controls and functions
and their associated page
numbers on the schematic
outlines of the vehicle.
Contents
Page 12 of 244
10
Partner-2-VU_en_Chap01_vue-ensemble_ed02-2014
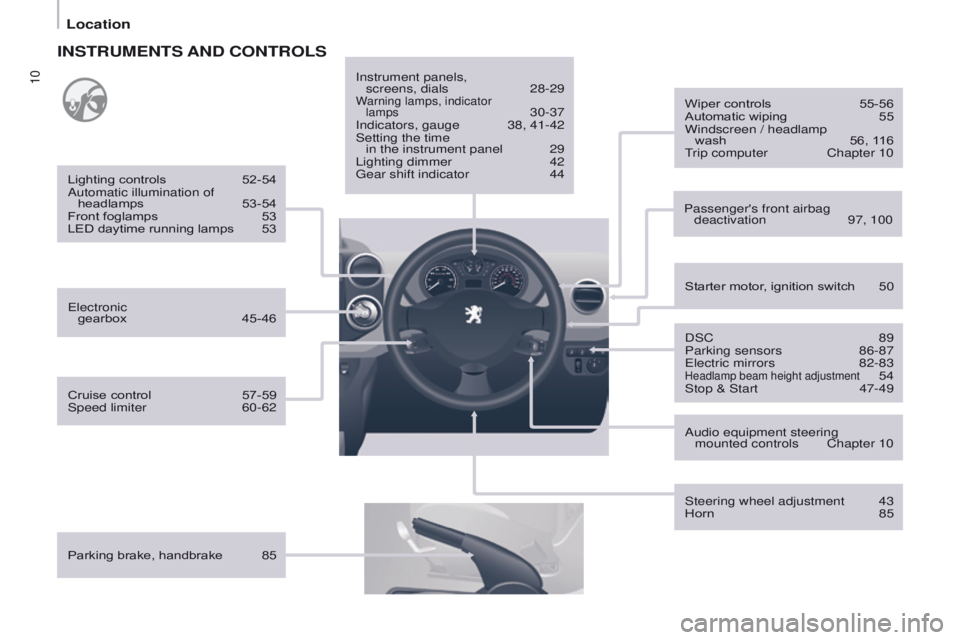
INSTRUMENTS AND CONTROLS
Parking brake, handbrake 85Instrument panels,
screens, dials
28-29Warning lamps, indicator
lamps 30-37
Indicators, gauge 38, 41-42
Setting the time
in the instrument panel
29
Lighting dimmer
42
Gear shift indicator
44 Passenger's front airbag deactivation
97, 100
DSC
89
Parking sensors
86-87
Electric mirrors
82-83Headlamp beam height adjustment 54
Stop & Start
47-49
Starter motor
, ignition switch
50
Wiper controls
55-56
Automatic wiping
55
Windscreen / headlamp
wash
56, 1
16
Trip computer
Chapter 10
Audio equipment steering mounted controls
Chapter 10
Steering wheel adjustment
43
Horn
85
Electronic
gearbox
45-46
Lighting controls
52-54
Automatic illumination of headlamps
53-54
Front foglamps
53
LED daytime running lamps
53
Cruise control
57-59
Speed limiter
60-62
Location
Page 14 of 244
12
Partner-2-VU_en_Chap01_vue-ensemble_ed02-2014
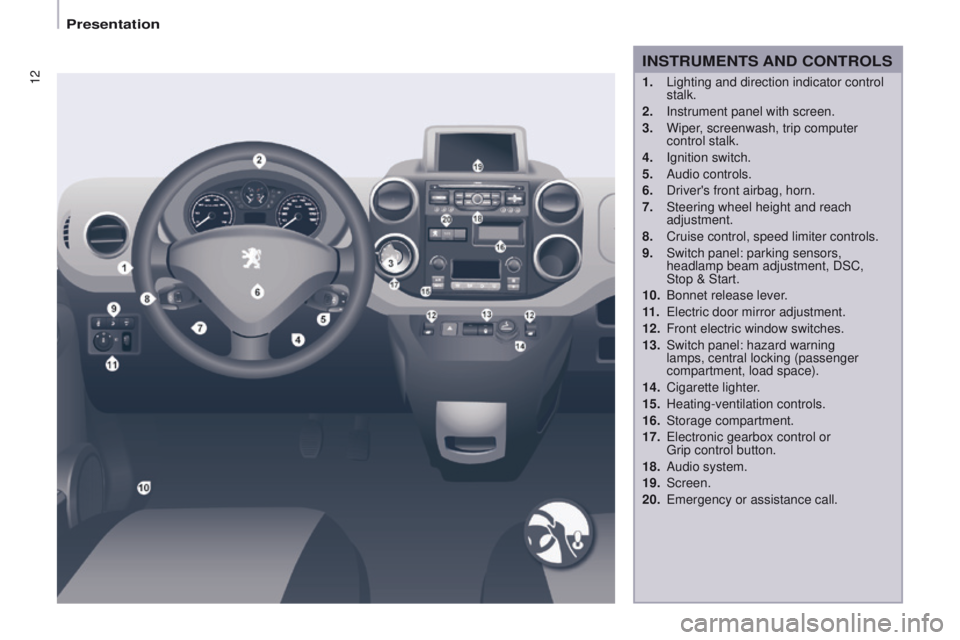
INSTRUMENTS AND CONTROLS
1. Lighting and direction indicator control
stalk.
2.
Instrument panel with screen.
3.
Wiper
, screenwash, trip computer
control stalk.
4.
Ignition switch.
5.
Audio controls.
6.
Driver's front airbag, horn.
7.
Steering wheel height and reach
adjustment.
8.
Cruise control, speed limiter controls.
9.
Switch panel: parking sensors,
headlamp beam adjustment, DSC,
Stop & Start.
10.
Bonnet release lever
.
11 .
Electric door mirror adjustment.
12.
Front electric window switches.
13.
Switch panel: hazard warning
lamps, central locking (passenger
compartment, load space).
14.
Cigarette lighter
.
15.
Heating-ventilation controls.
16.
Storage compartment.
17.
Electronic gearbox control or
Grip
control button.
18.
Audio system.
19.
Screen.
20.
Emergency or assistance call.
Presentation
Page 15 of 244
13
Partner-2-VU_en_Chap01_vue-ensemble_ed02-2014
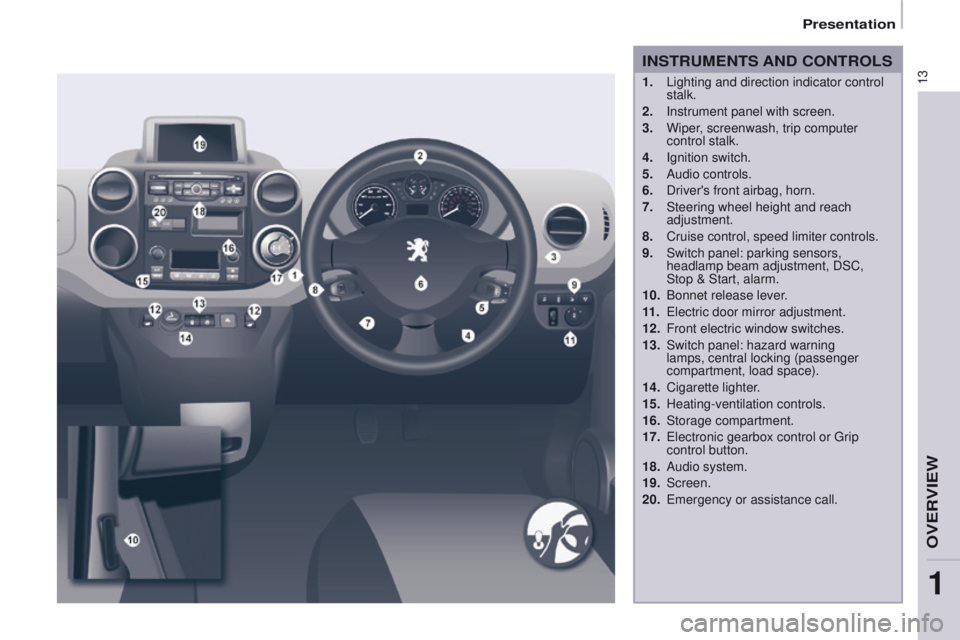
1. Lighting and direction indicator control
stalk.
2.
Instrument panel with screen.
3.
Wiper
, screenwash, trip computer
control stalk.
4.
Ignition switch.
5.
Audio controls.
6.
Driver's front airbag, horn.
7.
Steering wheel height and reach
adjustment.
8.
Cruise control, speed limiter controls.
9.
Switch panel: parking sensors,
headlamp beam adjustment, DSC,
Stop & Start, alarm.
10.
Bonnet release lever
.
11 .
Electric door mirror adjustment.
12.
Front electric window switches.
13.
Switch panel: hazard warning
lamps, central locking (passenger
compartment, load space).
14.
Cigarette lighter
.
15.
Heating-ventilation controls.
16.
Storage compartment.
17.
Electronic gearbox control or Grip
control button.
18.
Audio system.
19.
Screen.
20.
Emergency or assistance call.
INSTRUMENTS AND CONTROLS
1
OVERVIEW
Presentation
Page 16 of 244
14
Partner-2-VU_en_Chap01_vue-ensemble_ed02-2014
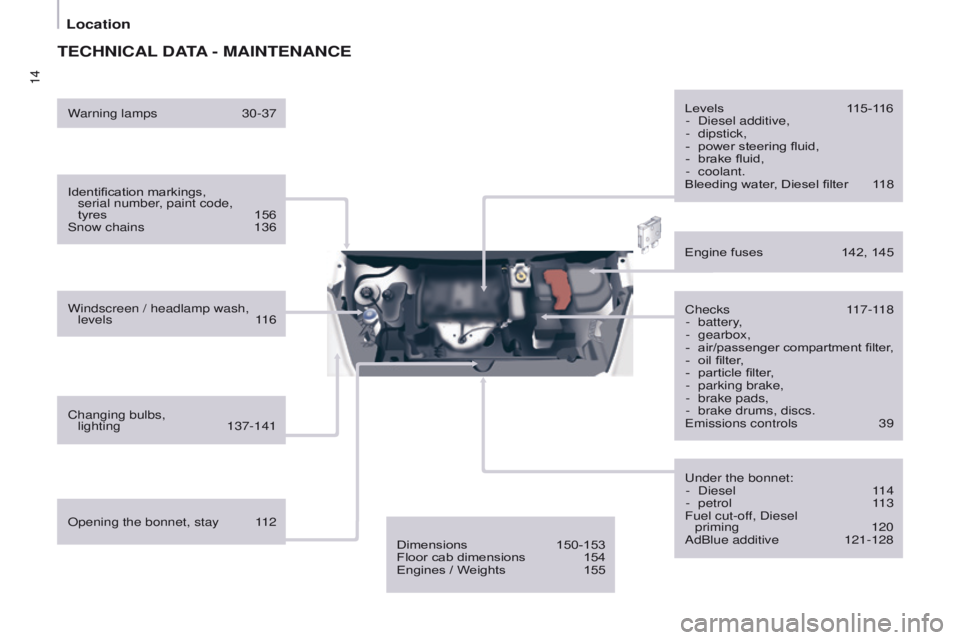
TECHNICAL DATA - MAINTENANCE
Identification markings, serial number, paint code,
tyres
156
Snow chains
136
Windscreen / headlamp wash, levels
116
Changing bulbs, lighting
137-141 Checks
117-118
-
battery
,
-
gearbox,- air/passenger compartment filter,- oil filter,
-
particle filter ,
-
parking brake,
-
brake pads,
-
brake drums, discs.
Emissions controls
39
Engine fuses
142, 145
Under the bonnet: -
Diesel
1
14
-
petrol
1
13
Fuel cut-off, Diesel priming
120
AdBlue additive
121-128
Opening the bonnet, stay
1
12 Levels
1
15-116
-
Diesel additive,
-
dipstick,
-
power steering fluid,
-
brake fluid,
-
coolant.
Bleeding water
, Diesel filter
1
18
Warning lamps
30-37
Dimensions
150-153
Floor cab dimensions
154
Engines / W
eights
155
Location
Page 33 of 244
31
Partner-2-VU_en_Chap03_Pret-a-partir_ed02-2014
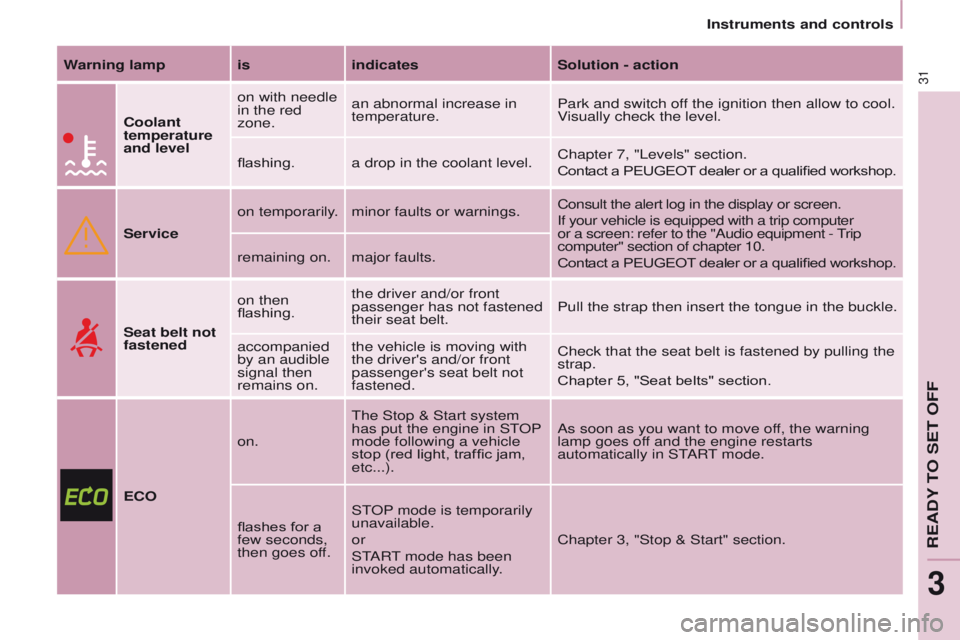
Warning lamp isindicatesSolution - action
Coolant
temperature
and level on with needle
in the red
zone.
an abnormal increase in
temperature.
Park and switch off the ignition then allow to cool.
Visually check the level.
flashing. a drop in the coolant level. Chapter 7, "Levels" section.
Contact a PEUGEOT
dealer or a qualified workshop.
Service on temporarily. minor faults or warnings.
Consult the alert log in the display or screen.
If your vehicle is equipped with a trip computer
or a screen: refer to the "Audio equipment - Trip
computer" section of chapter 10.
Contact a PEUGEOT dealer or a qualified workshop.
remaining on. major faults.
Seat belt not
fastened on then
flashing.
the driver and/or front
passenger has not fastened
their seat belt.
Pull the strap then insert the tongue in the buckle.
accompanied
by an audible
signal then
remains on. the vehicle is moving with
the driver's and/or front
passenger's seat belt not
fastened.
Check that the seat belt is fastened by pulling the
strap.
Chapter 5, "Seat belts" section.
ECO on.
The Stop & Start
system
has put the engine in STOP
mode following a vehicle
stop (red light, traffic jam,
etc...). As soon as you want to move off, the warning
lamp goes off and the engine restarts
automatically in START mode.
flashes for a
few seconds,
then goes off. STOP mode is temporarily
unavailable.
or
START mode has been
invoked automatically.
Chapter 3, "Stop & Start" section.
READY TO SET OFF
3
Instruments and controls
Page 38 of 244
36
Partner-2-VU_en_Chap03_Pret-a-partir_ed02-2014Partner-2-VU_en_Chap03_Pret-a-partir_ed02-2014
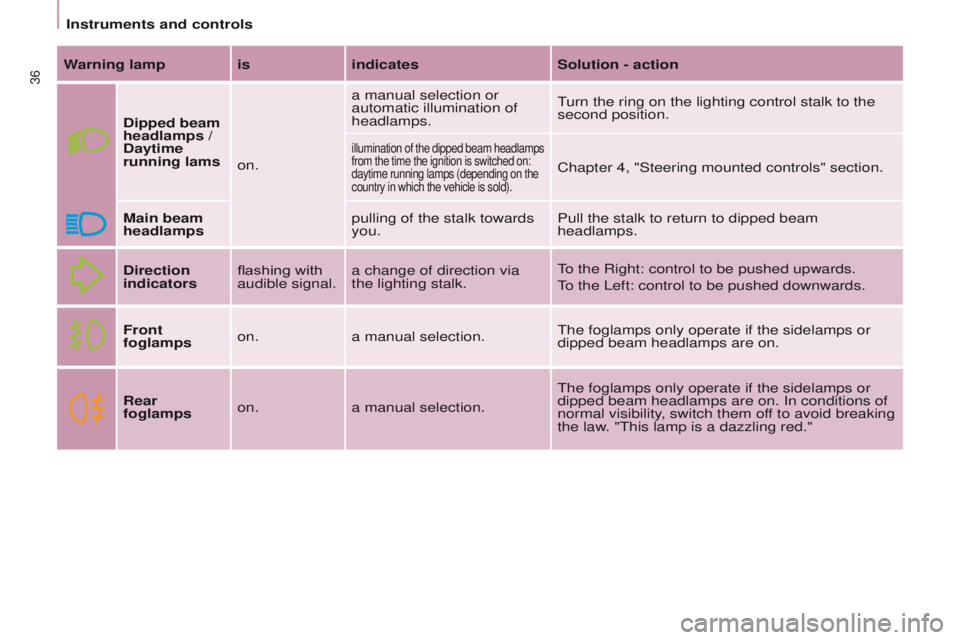
Warning lamp isindicatesSolution - action
Dipped beam
headlamps
/
Daytime
running lams on.a manual selection or
automatic illumination of
headlamps.
Turn the ring on the lighting control stalk to the
second position.
illumination of the dipped beam headlamps
from the time the ignition is switched on:
daytime running lamps (depending on the
country in which the vehicle is sold).
Chapter 4, "Steering mounted controls" section.
Main beam
headlamps pulling of the stalk towards
you.Pull the stalk to return to dipped beam
headlamps.
Direction
indicators flashing with
audible signal.a change of direction via
the lighting stalk. To the Right: control to be pushed upwards.
To the Left: control to be pushed downwards.
Front
foglamps on.
a manual selection. The foglamps only operate if the sidelamps or
dipped beam headlamps are on.
Rear
foglamps on.
a manual selection. The foglamps only operate if the sidelamps or
dipped beam headlamps are on. In conditions of
normal visibility, switch them off to avoid breaking
the law. "This lamp is a dazzling red."
Instruments and controls
Page 44 of 244
42
Partner-2-VU_en_Chap03_Pret-a-partir_ed02-2014Partner-2-VU_en_Chap03_Pret-a-partir_ed02-2014
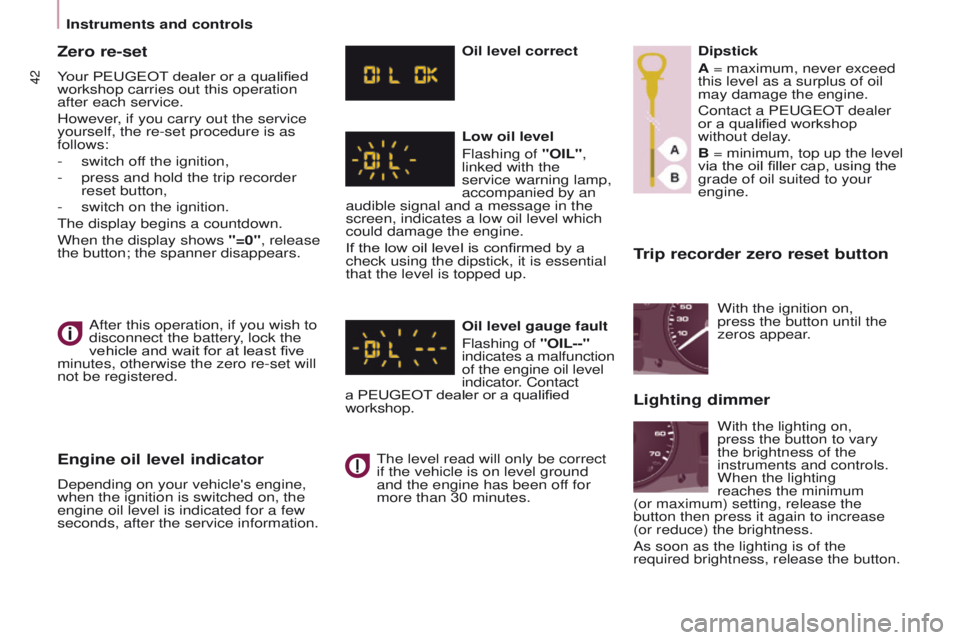
Trip recorder zero reset button
After this operation, if you wish to
disconnect the battery, lock the
vehicle and wait for at least five
minutes, otherwise the zero re-set will
not be registered.
Zero re-set
Your PEUGEOT dealer or a qualified
workshop carries out this operation
after each service.
However, if you carry out the service
yourself, the re-set procedure is as
follows:
-
switch of
f the ignition,
-
press and hold the trip recorder
reset button,
-
switch on the ignition.
The display begins a countdown.
When the display shows
"=0", release
the button; the spanner disappears.
Engine oil level indicator
Depending on your vehicle's engine,
when the ignition is switched on, the
engine oil level is indicated for a few
seconds, after the service information. Oil level correct
Low oil level
Flashing of "OIL",
linked with the
service warning lamp,
accompanied by an
audible signal and a message in the
screen, indicates a low oil level which
could damage the engine.
If the low oil level is confirmed by a
check using the dipstick, it is essential
that the level is topped up.
Oil level gauge fault
Flashing of "OIL--"
indicates a malfunction
of the engine oil level
indicator. Contact
a PEUGEOT dealer or a qualified
workshop.
The level read will only be correct
if the vehicle is on level ground
and the engine has been off for
more than 30 minutes. Dipstick
A = maximum, never exceed
this level as a surplus of oil
may damage the engine.
Contact a PEUGEOT dealer
or a qualified workshop
without delay.
B = minimum, top up the level
via the oil filler cap, using the
grade of oil suited to your
engine.
With the lighting on,
press the button to vary
the brightness of the
instruments and controls.
When the lighting
reaches the minimum
(or
maximum) setting, release the
button then press it again to increase
(or reduce) the brightness.
As soon as the lighting is of the
required brightness, release the button.
With the ignition on,
press the button until the
zeros
appear.
Lighting dimmer
Instruments and controls
Page 49 of 244

47
Partner-2-VU_en_Chap03_Pret-a-partir_ed02-2014
STOP & START
The Stop & Start system puts the
engine temporarily on standby - ST OP
mode - during stops in the traffic (red
lights, traffic jams, or other...). The
engine restarts automatically - START
mode - as soon as you want to move
off. The restart takes place instantly,
quickly and silently.
Perfect for urban use, the Stop & Start
system reduces fuel consumption and
exhaust emissions as well as the noise
level when stationary.
Operation
Going into engine STOP mode
The "ECO" warning lamp
comes on in the instrument
panel and the engine goes into
standby:
-
with a manual gearbox
, at speeds
below 12 mph (20 km/h), when you
put the gear lever into neutral and
release the clutch pedal,
-
with the 6-speed electronic gear
control gearbox
, at a speed below
5 mph (8 km/h), when you press
the brake pedal or put the gear
lever into position N. If your vehicle is fitted with the system,
a time counter calculates the sum of
the periods in STOP mode during a
journey. It rests itself to zero every time
the ignition is switched on with the key.
With the automatic gearbox
system, for your comfort during
parking manoeuvres, STOP mode
is not available for a few seconds after
coming out of reverse gear.
STOP mode does not affect the
functionality of the vehicle, such as
braking, power steering, for example.
Never refuel with the engine in
STOP mode; you must switch off
the ignition with the key. Special cases: STOP mode
unavailable
STOP mode is not invoked when:
-
the driver's door is open,
-
the driver's seat belt is not
fastened,
-
the vehicle has not exceeded
6
mph (10 km/h) since the last
engine start using the key,
-
the engine is needed to maintain
a comfortable temperature in the
passenger compartment,
-
demisting is on,
-
some special conditions (battery
charge, engine temperature,
braking assistance, ambient
temperature...) where the engine
is needed to assure control of a
system.
In this case, the
"ECO"
warning lamp flashes for a
few seconds, then goes off.
This operation is perfectly normal.
READY TO SET OFF
3
Stop & Start
Page 54 of 244
52
Partner-2-VU_en_Chap04_Ergonomie_ed02-2014
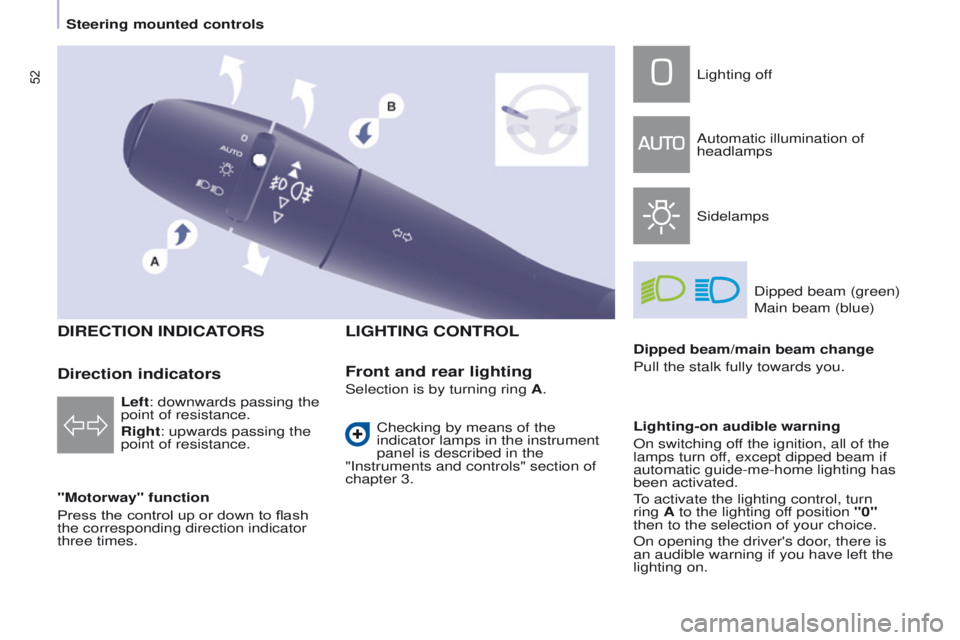
DIRECTION INDICATORS
"Motorway" function
Press the control up or down to flash
the corresponding direction indicator
three times.
LIGHTING CONTROL
Left: downwards passing the
point of resistance.
Right: upwards passing the
point of resistance.
Front and rear lighting
Lighting off
Automatic illumination of
headlamps
SidelampsDipped beam (green)
Main beam (blue)
Dipped beam/main beam change
Pull the stalk fully towards you.
Lighting-on audible warning
On switching off the ignition, all of the
lamps turn off, except dipped beam if
automatic guide-me-home lighting has
been activated.
To activate the lighting control, turn
ring A to the lighting off position "0"
then to the selection of your choice.
On opening the driver's door, there is
an audible warning if you have left the
lighting on.
Checking by means of the
indicator lamps in the instrument
panel is described in the
"Instruments and controls" section of
chapter 3.
Direction indicatorsSelection is by turning ring A.
Steering mounted controls