window Peugeot Partner 2015 User Guide
[x] Cancel search | Manufacturer: PEUGEOT, Model Year: 2015, Model line: Partner, Model: Peugeot Partner 2015Pages: 244, PDF Size: 10.44 MB
Page 85 of 244
83
Partner-2-VU_en_Chap04_Ergonomie_ed02-2014
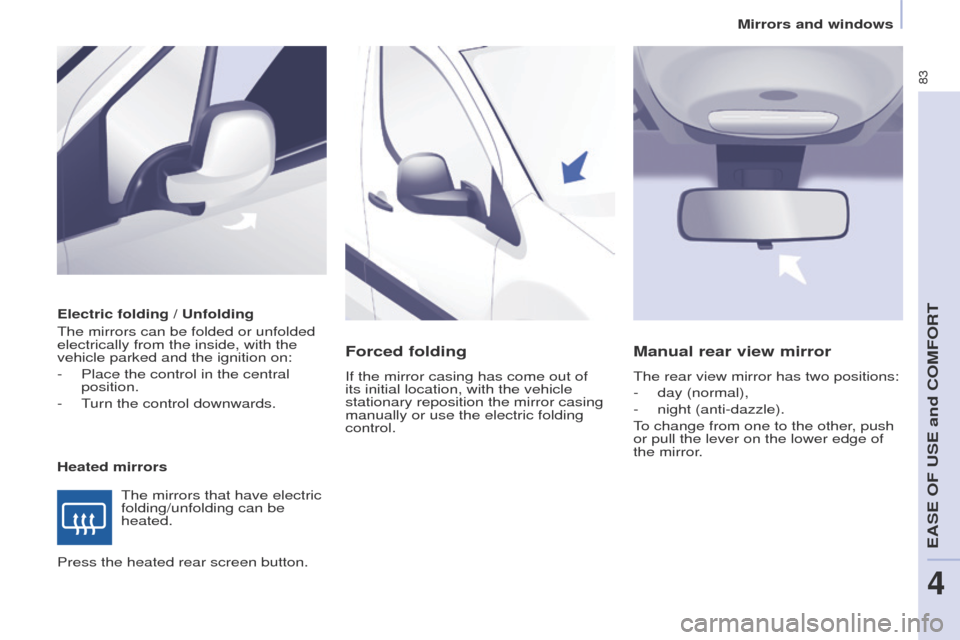
Electric folding / Unfolding
The mirrors can be folded or unfolded
electrically from the inside, with the
vehicle parked and the ignition on:
-
Place the control in the central
position.
-
T
urn the control downwards.
Heated mirrors The mirrors that have electric
folding/unfolding can be
heated.
Forced folding
If the mirror casing has come out of
its initial location, with the vehicle
stationary reposition the mirror casing
manually or use the electric folding
control.
Manual rear view mirror
The rear view mirror has two positions:
-
day (normal),
-
night (anti-dazzle).
T
o change from one to the other, push
or pull the lever on the lower edge of
the mirror.
Press the heated rear screen button.
EASE OF USE and COMFORT
4
Mirrors and windows
Page 86 of 244
84
Partner-2-VU_en_Chap04_Ergonomie_ed02-2014
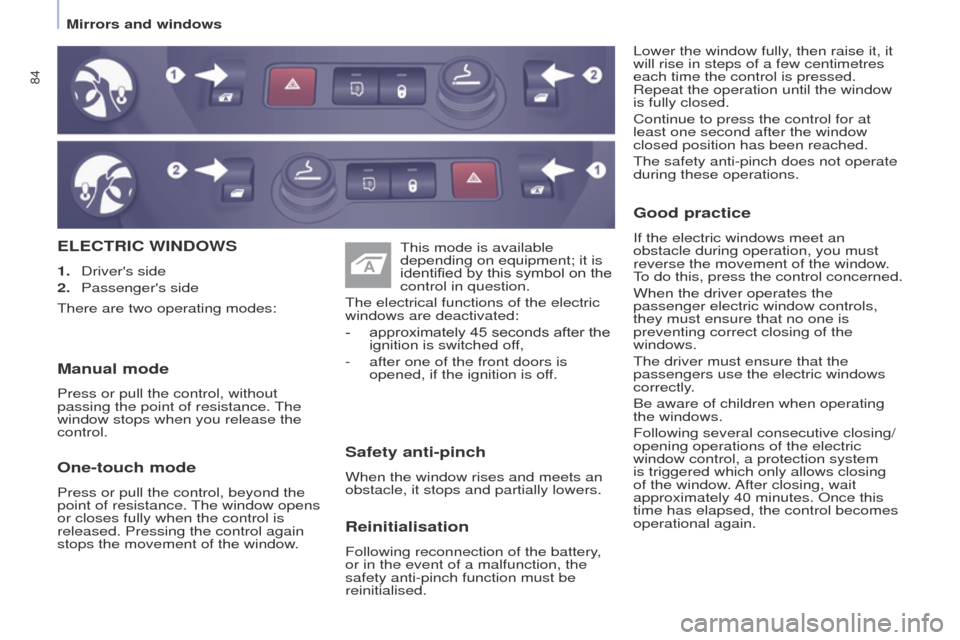
ELECTRIC WINDOWS
1. Driver's side
2.
Passenger's side
Safety anti-pinch
When the window rises and meets an
obstacle, it stops and partially lowers.One-touch mode
Press or pull the control, beyond the
point of resistance. The window opens
or closes fully when the control is
released. Pressing the control again
stops the movement of the window. This mode is available
depending on equipment; it is
identified by this symbol on the
control in question.
The electrical functions of the electric
windows are deactivated:
-
approximately 45 seconds after the
ignition is switched of
f,
-
after one of the front doors is
opened, if the ignition is of
f.
Manual mode
Press or pull the control, without
passing the point of resistance. The
window stops when you release the
control.
Reinitialisation
Following reconnection of the battery,
or in the event of a malfunction, the
safety anti-pinch function must be
reinitialised.
Good practice
If the electric windows meet an
obstacle during operation, you must
reverse the movement of the window.
To do this, press the control concerned.
When the driver operates the
passenger electric window controls,
they must ensure that no one is
preventing correct closing of the
windows.
The driver must ensure that the
passengers use the electric windows
correctly.
Be aware of children when operating
the windows.
Following several consecutive closing/
opening operations of the electric
window control, a protection system
is triggered which only allows closing
of the window. After closing, wait
approximately 40 minutes. Once this
time has elapsed, the control becomes
operational again. Lower the window fully, then raise it, it
will rise in steps of a few centimetres
each time the control is pressed.
Repeat the operation until the window
is fully closed.
Continue to press the control for at
least one second after the window
closed position has been reached.
The safety anti-pinch does not operate
during these operations.
There are two operating modes:
Mirrors and windows
Page 108 of 244
106
Partner-2-VU_en_Chap05_Securite_ed02-2014
ADVICE ON CHILD SEATS
The incorrect installation of a child seat
in a vehicle compromises the child's
protection in the event of an accident.
Check that there is no seat belt or seat
belt buckle under the child seat, as this
could destabilise the seat.
Remember to fasten the seat belts or
the child seat harnesses keeping the
slack relative to the child's body to a
minimum, even for short journeys.
For the installation of a child seat using
the seat belt, ensure that the seat belt
is well tensioned on the child seat
and that it is holding the child seat
firmly against the vehicle's seat. If the
passenger seat is adjustable, move it
forward if necessary.
At the rear, always leave sufficient
space between the front seat and:
-
a "rearward facing" child seat,
-
the feet of a child seated in a
"forward facing" child seat.
For this, move the front seat forward
and, if necessary
, straighten its
backrest as well. For the optimum installation of a
"forward facing" child seat, ensure that
the back of the child seat is as close as
possible to the backrest of the vehicle's
seat, or in contact if possible.
The head restraint must be removed
before installing a child seat with a
backrest on the passenger seat.
Ensure that the head restraint is
stowed or attached securely so that it
is not thrown around the vehicle in the
event of sharp braking.
Refit the head restraint as soon as the
child seat is removed.
Children at the front
The legislation on carrying a child on
the front passenger seat is specific to
each country. Refer to the legislation in
force in your country.
Deactivate the passenger's airbag
when a "rearward facing" child seat is
installed on the front seat.
Otherwise, the child would risk being
seriously injured or killed if the airbag
were deployed.
Installing a booster seat
The chest part of the seat belt must
be positioned on the child's shoulder
without touching the neck.
Ensure that the lap part of the seat belt
passes correctly over the child's thighs.
PEUGEOT recommends the use of a
booster seat which has a back, fitted
with a seat belt guide at shoulder level.
As a safety precaution, never leave:
-
one or more children alone and
unsupervised in a vehicle,
-
a child or an animal in a vehicle
which is exposed to the sun, with
the windows closed,
-
the keys within reach of children
inside the vehicle.
T
o prevent accidental opening of the
doors, use the "Child Lock".
Take care not to open the rear windows
by more than one third.
To protect young children from the rays
of the sun, fit side blinds to the rear
windows.
Child safety
Page 111 of 244
109
Partner-2-VU_en_Chap06_Accessoire_ed02-2014
Audio equipment, hands-free kit,
speakers, CD changer, satellite
navigation system, USB Box, video kit, ...
Regardless of the audio and telematic
equipment offered on the market, the
technical constraints associated with the
fitting of equipment of these families of
products mean that the special features
of the equipment and its compatibility
with the capacities of the your vehicle's
standard equipment must be taken into
account. Please contact a PEUGEOT
dealer for more information before fitting
such equipment. To prevent the mat from becoming
caught under the pedals:
-
ensure that the mat and its fixings
are positioned correctly
,
-
never fit one mat on top of another
.
Maximum weights on bars
-
Roof rack: 120 kg.
-
T
ransverse bars on roof: 100 kg.
-
T
ransverse bars on longitudinal
bars: 75 kg. Installation of radiocommunication
transmitters
Before installing accessory
radiocommunication transmitters with
an external aerial on your vehicle, you
are advised to contact a PEUGEOT
dealer.
A PEUGEOT dealer can inform you
of the specifications (frequency band,
maximum output power, aerial position,
specific installation conditions) of the
transmitters which can be fitted, in
accordance with the Motor Vehicle
Electromagnetic Compatibility Directive
(2004/104/CE).
Front mud flaps, rear mud flaps,
15/17
inch alloy wheels, wheelarch
trim, leather steering wheel, ....
Screenwash, interior and exterior
cleaning and maintenance products,
replacement bulbs, ...
Anti-theft alarm, window etching, first
aid kit, high visibility vest, front and
rear parking sensors, warning triangle,
security bolts for alloy wheels, ... Front seat covers compatible with
airbags, bench, rubber mats, carpet
mats, snow chains, blind, tailgate
bicycle carrier.
OTHER ACCESSORIES
These accessories and parts, having been
tested and approved for reliability and
safety, are all adapted to your vehicle. A
wide range of recommended accessories
and genuine parts is available.
Range of trade equipment
The parts department publishes an
accessory catalogue offering various
equipment and fittings, such as:
Load retainers (all models).
Loading roller.
Towbar, towbar harness: trailer towbar
which should preferably be fitted by a
PEUGEOT dealer.
Separation partitions and grilles,
smooth, planed wood protective liner
with non-slip floor.
Protective grilles.
Another range is also available,
structured around comfort, leisure and
maintenance:
Towing a trailer
ACCESSORIES
6
Page 132 of 244
130
Partner-2-VU_en_Chap08_Aide-rapide_ed02-2014
ECONOMY MODE
After the engine has stopped, with
the key in the ignition position, certain
functions (windscreen wiper, electric
windows, courtesy lamps, audio
equipment, etc.) can only be used for a
cumulative duration of thirty minutes, to
prevent discharging of the battery.
Once the thirty minutes are over, the
active functions are put on standby
and the battery warning lamp flashes
accompanied by a message in the
screen.
To resume the use of these functions
immediately, start the engine and let it
run for a few minutes.
The time available will then be double
the time for which the engine was left
running. However, this time will always
be between five and thirty minutes.A flat battery will prevent the
engine from starting.
Battery
Page 145 of 244
143
Partner-2-VU_en_Chap08_Aide-rapide_ed02-2014
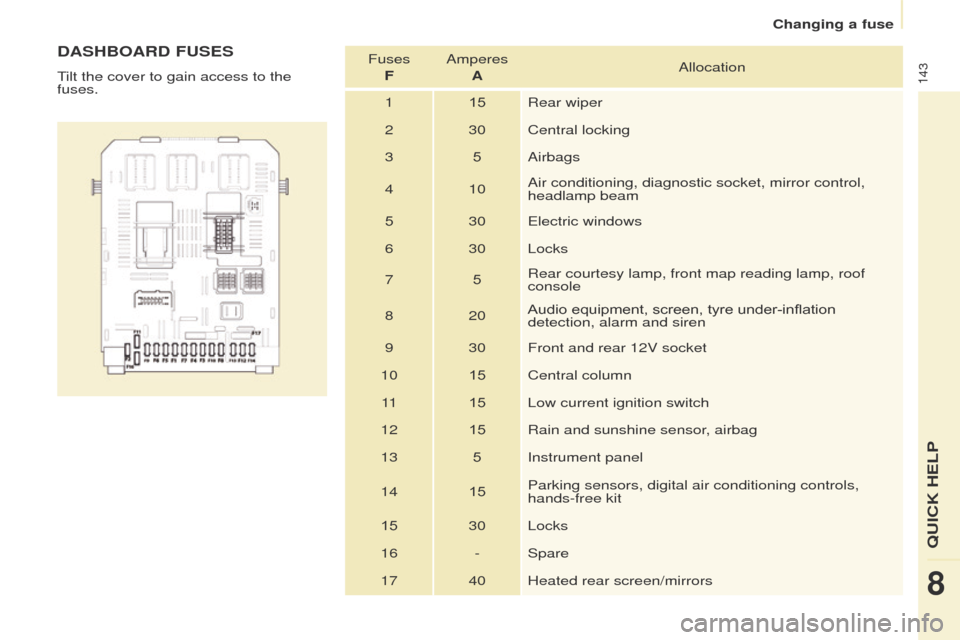
DASHBOARD FUSES
Tilt the cover to gain access to the
fuses.Fuses
F Amperes
A Allocation
1 15Rear wiper
2 30 Central locking
3 5Airbags
4 10 Air conditioning, diagnostic socket, mirror control,
headlamp beam
5 30 Electric windows
6 30 Locks
7 5Rear courtesy lamp, front map reading lamp, roof
console
8 20 Audio equipment, screen, tyre under-inflation
detection, alarm and siren
9 30 Front and rear 12V socket
10 15Central column
11 15Low current ignition switch
12 15Rain and sunshine sensor, airbag
13 5Instrument panel
14 15Parking sensors, digital air conditioning controls,
hands-free kit
15 30 Locks
16 - Spare 17 40 Heated rear screen/mirrors
QUICK HELP
8
Changing a fuse
Page 165 of 244
03
10.7
Partner-2-VU_en_Chap10b_RT6-2-8_ed02-2014
For the details of the menus, refer to the "Screen menu map"
section.
For cleaning the screen, the use of a soft, non-abrasive cloth
(spectacles cloth) is recommended, with no additional product.
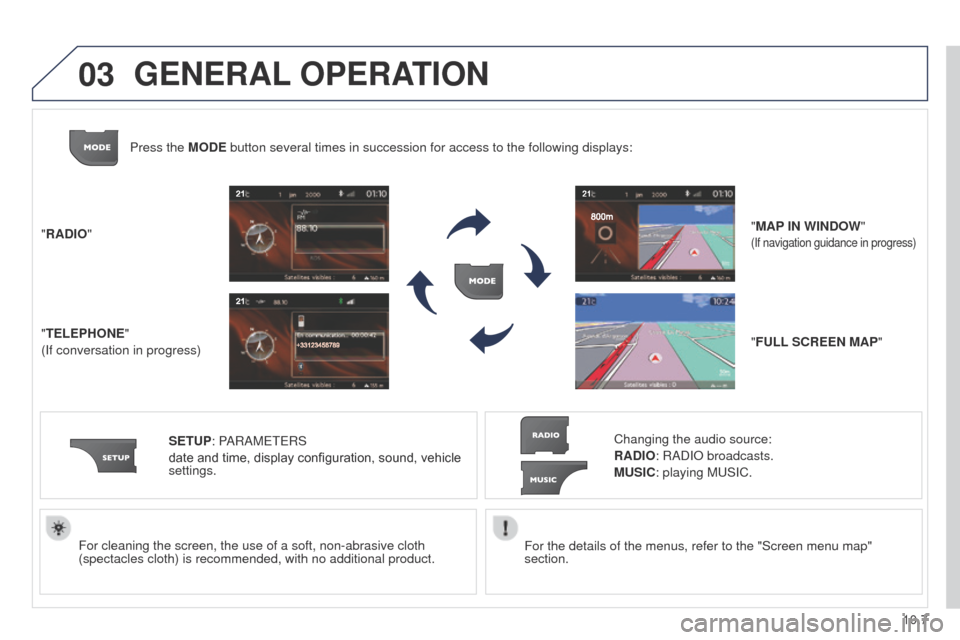
"RADIO"
"TELEPHONE"
(If conversation in progress)
SETUP: PARAMETERS
date and time, display configuration, sound, vehicle
settings. Changing the audio source:
RADIO: RADIO broadcasts.
MUSIC: playing MUSIC.
Press the MODE button several times in succession for access to the following displays\
:
"FULL SCREEN MAP" "MAP IN WINDOW"
(If navigation guidance in progress)
GENERAL OPERATION
Page 166 of 244
03
10.8
Partner-2-VU_en_Chap10b_RT6-2-8_ed02-2014
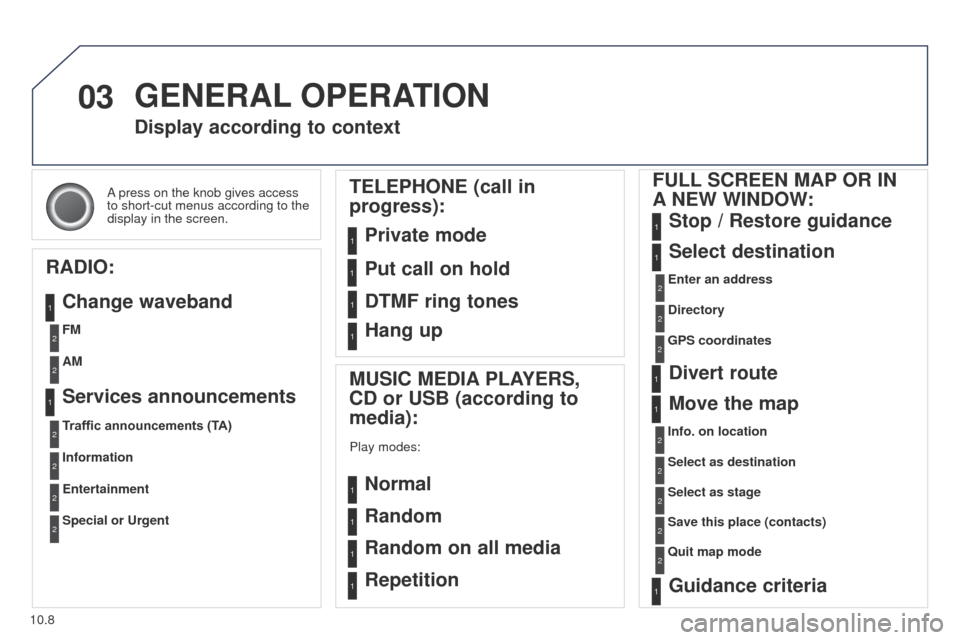
A press on the knob gives access
to short-cut menus according to the
display in the screen.
Display according to context
RADIO: Change waveband
MUSIC MEDIA PLAYERS,
CD or USB (according to
media):
Play modes:
Normal
Random
Random on all media
Repetition
TELEPHONE (call in
progress):
Private mode FULL SCREEN MAP OR IN
A
NEW WINDOW:
Stop / Restore guidance
Select destination
Enter an address
Directory
GPS coordinates
Divert route
Move the map
Info. on location
Select as destination Select as stage
Save this place (contacts)
Quit map mode
Guidance criteria
Put call on hold
DTMF ring tones
Hang up
1
1
1
1
1
1
1
2
2
2
2
2
1
2
2
2
1
1
1
1
1
1FM
Traffic announcements (TA) AM
Information
Entertainment
Special or Urgent2
2
2
2
2
2
Services announcements1
GENERAL OPERATION
Page 211 of 244
10.53
Partner-2-VU_en_Chap10b_RT6-2-8_ed02-2014
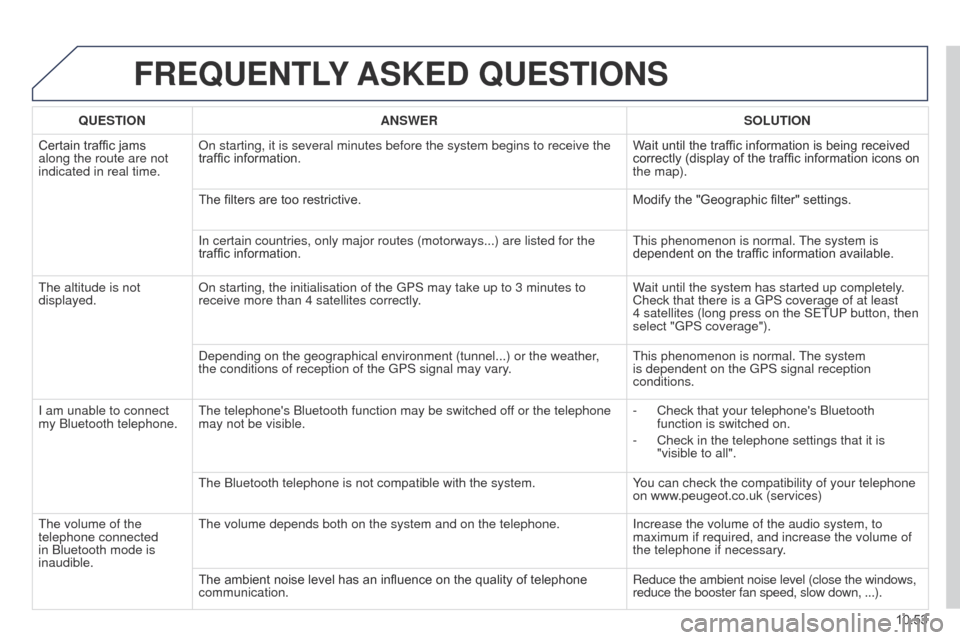
FREQUENTLY ASKED QUESTIONS
QUESTION ANSWER SOLUTION
Certain traffic jams
along the route are not
indicated in real time. On starting, it is several minutes before the system begins to receive t\
he
traffic information.
Wait until the traffic information is being received
correctly (display of the traffic information icons on
the map).
The filters are too restrictive. Modify the "Geographic filter" settings.
In certain countries, only major routes (motorways...) are listed for \
the
traffic information. This phenomenon is normal. The system is
dependent on the traffic information available.
The altitude is not
displayed. On starting, the initialisation of the GPS may take up to 3 minutes to
receive more than 4 satellites correctly. Wait until the system has started up completely.
Check that there is a GPS coverage of at least
4
satellites (long press on the SETUP button, then
select "GPS coverage").
Depending on the geographical environment (tunnel...) or the weather,
the conditions of reception of the GPS signal may vary. This phenomenon is normal. The system
is dependent on the GPS signal reception
conditions.
I am unable to connect
my Bluetooth telephone. The telephone's Bluetooth function may be switched off or the telephone
may not be visible. -
Check that your telephone's Bluetooth
function is switched on.
-
Check in the telephone settings that it is
"visible to all".
The Bluetooth telephone is not compatible with the system. Y
ou can check the compatibility of your telephone
on www.peugeot.co.uk (services)
The volume of the
telephone connected
in Bluetooth mode is
inaudible. The volume depends both on the system and on the telephone.
Increase the volume of the audio system, to
maximum if required, and increase the volume of
the telephone if necessary.
The ambient noise level has an influence on the quality of telephone
communication. Reduce the ambient noise level (close the windows,
reduce the booster fan speed, slow down, ...).
Page 227 of 244
06
10.69
Partner-2-VU_en_Chap10c_RD45_ed02_2014
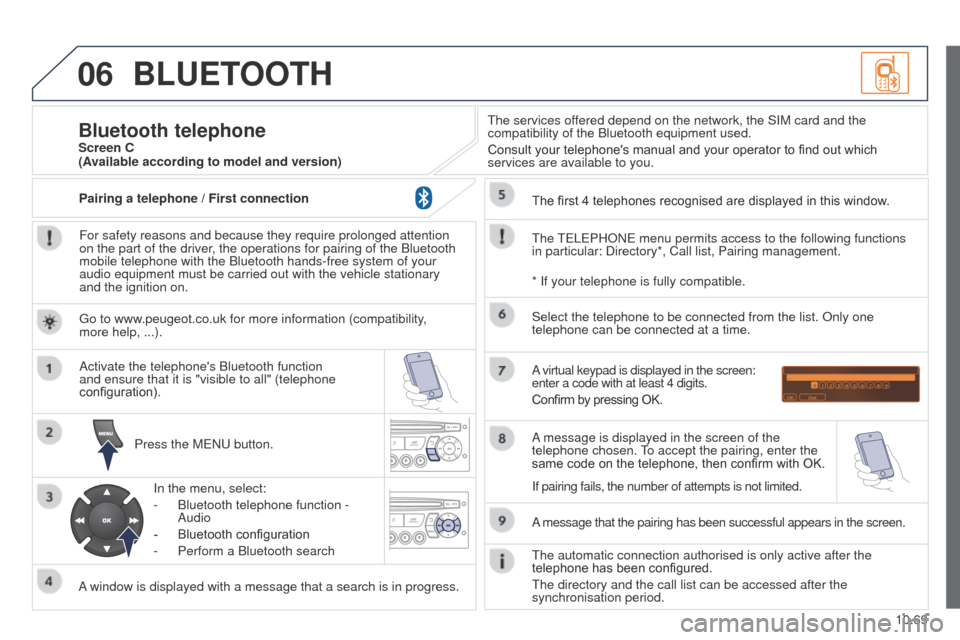
BLUETOOTH
For safety reasons and because they require prolonged attention
on the part of the driver, the operations for pairing of the Bluetooth
mobile telephone with the Bluetooth hands-free system of your
audio equipment must be carried out with the vehicle stationary
and the ignition on.Press the MENU button.
A window is displayed with a message that a search is in progress. Activate the telephone's Bluetooth function
and ensure that it is "visible to all" (telephone
configuration).
In the menu, select:
-
Bluetooth telephone function -
Audio
-
Bluetooth configuration
-
Perform a Bluetooth search The services of
fered depend on the network, the SIM card and the
compatibility of the Bluetooth equipment used.
Consult your telephone's manual and your operator to find out which
services are available to you.
Bluetooth telephoneScreen C
The TELEPHONE menu permits access to the following functions
in particular: Directory*, Call list, Pairing management. The first 4 telephones recognised are displayed in this window.
A virtual keypad is displayed in the screen:
enter a code with at least 4 digits.
Confirm by pressing OK.
A message that the pairing has been successful appears in the screen. Select the telephone to be connected from the list. Only one
telephone can be connected at a time.
A message is displayed in the screen of the
telephone chosen. To accept the pairing, enter the
same code on the telephone, then confirm with OK.
The automatic connection authorised is only active after the
telephone has been configured.
The directory and the call list can be accessed after the
synchronisation period.
(Available according to model and version)
* If your telephone is fully compatible.
If pairing fails, the number of attempts is not limited.
Go to www.peugeot.co.uk for more information (compatibility,
more
help, ...).
Pairing a telephone / First connection