Peugeot Partner 2020 Owner's Manual
Manufacturer: PEUGEOT, Model Year: 2020, Model line: Partner, Model: Peugeot Partner 2020Pages: 260, PDF Size: 7.76 MB
Page 131 of 260

129
Driving
6installed in accordance with the
manufacturer's recommendations.
In this case, the outline of a trailer is displayed
at the rear of the image of the vehicle.
Operating limits
If the boot is heavily loaded, the vehicle may tilt,
affecting distance measurements.
Malfunction
In the event of a malfunction when
changing into reverse, this warning lamp
comes on on the instrument panel, accompanied
by an onscreen message and an audible signal
(short beep).
Contact a PEUGEOT dealer or a qualified
workshop to have the system checked.
Reversing camera
Refer to the General recommendations on the
use of driving and manoeuvring aids .
With the ignition on, this system uses a camera
located near the third brake lamp to display
a view of the rear of your vehicle on the
reproduction screen (if it is a panel van or has a
solid partition).
The reversing camera is activated automatically
when reverse gear is engaged. The image
is displayed on the reproduction screen. The
reproduction screen switches off when the
gearbox is in neutral or in a forward gear.
The blue lines 1 represent the general direction
of the vehicle (the gap corresponds to the width
of your vehicle with the mirrors).
The red line 2 represents a distance of about
30
cm beyond the edge of your vehicle's rear
bumper.
The green lines 3 represent distances of about 1
and 2 metres beyond the edge of your vehicle's
rear bumper.
The turquoise blue curves 4 represent the
maximum turning circle.
Some objects may not be seen by the
camera.
Certain vehicles may be difficult to see
(dark colours, lamps off) when the
brightness of the screen is reduced using the
vehicle’s lighting dimmer.
The image quality may be affected by the surroundings, the exterior conditions
(rain, dirt, dust), the driving mode and the
lighting conditions (night, low sun).
In the presence of areas in shade, or in
conditions of bright sunlight or inadequate
lighting, the image may be darkened and with
lower contrast.
Obstacles may appear further away than
they actually are.
During parking manoeuvres and lane
changes, it is important to check the sides of
the vehicle using the mirrors.
The rear parking sensors also supplement the
information on the vehicle's surroundings.
Operating limits
The system may be disrupted (or even
damaged) and not work in the following
situations:
–
Installation of a bicycle carrier on the tailgate
or side-hinged door (depending on version).
–
Attachment of a trailer to the towball.
–
Driving with a door open.
Please note, the camera must not be
obscured (by a sticker, a bicycle carrier,
etc.).
Page 132 of 260
130
Driving
The field of vision of the camera may vary depending on the load in vehicle.
Maintenance
recommendations
In bad or wintry weather, ensure that the camera
is not covered by mud, frost or snow.
Check the cleanliness of the camera lens
regularly.
If necessary, clean the camera with a soft, dry
cloth.
When washing the vehicle using a high-pressure
jet, keep the spray directed at least 30
cm away
from the camera.
Surround Rear Vision
Refer to the General recommendations on the
use of driving and manoeuvring aids .
With the ignition on, in order to improve visibility
of the passenger side blind spot and the rear
of the vehicle, this system uses two cameras
to display the views of the vehicle’s close
surroundings on the reproduction screen (panel
van or fitted with a solid partition).
This system has three sub-functions:
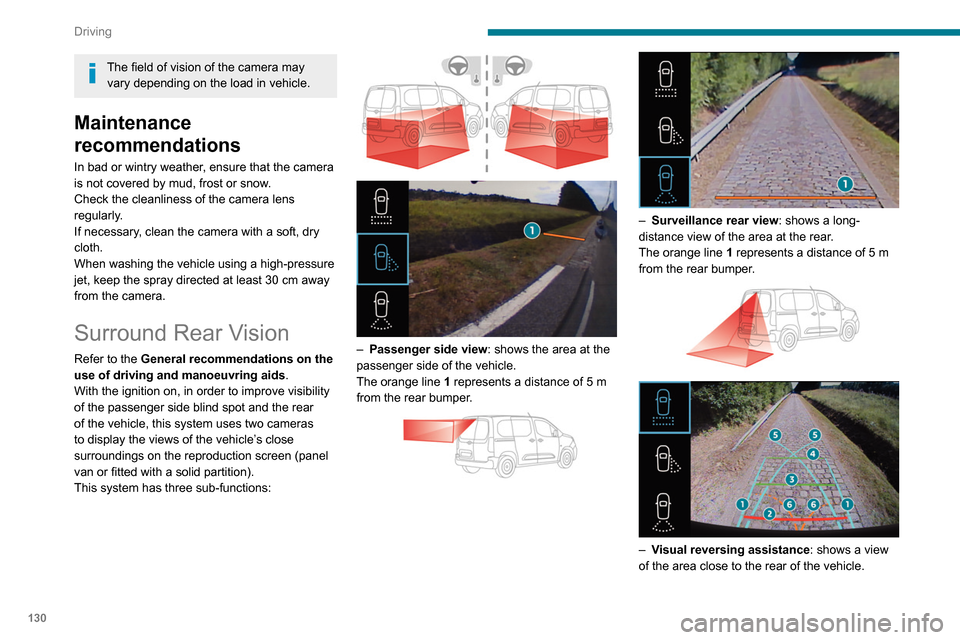
– Passenger side view : shows the area at the
passenger side of the vehicle.
The orange line 1 represents a distance of 5
m
from the rear bumper.
– Surveillance rear view : shows a long-
distance view of the area at the rear.
The orange line 1 represents a distance of 5
m
from the rear bumper.
– Visual reversing assistance : shows a view
of the area close to the rear of the vehicle.
Page 133 of 260

131
Driving
6The blue dimension lines 1 represent the width
of your vehicle with the mirrors unfolded.
The red line 2 represents a distance of 30
cm
from the rear bumper; the two green lines 3 and
4 represent 1
m and 2 m, respectively.
The blue curves 5 appear successively; they
are based on the position of the steering wheel
and represent the turning circle radius of your
vehicle.
The orange dashes 6 represent the opening radii
of the rear doors.
Please routinely check your exterior
mirrors while driving and during
manoeuvres.
Some items may not be seen by the rear
camera.
Certain vehicles may be difficult to see
(dark colours, lamps off) when the
brightness of the screen is reduced using the
vehicle’s lighting dimmer.
The image quality may be affected by the environment, the exterior conditions
(rain, dirt, dust), the driving mode and the
lighting conditions (night, low sun).
In the presence of areas in shade, or in
conditions of bright sunlight or inadequate
lighting, the image may be darkened and with
lower contrast.
Obstacles may appear further away than
they actually are.
During parking manoeuvres and lane
changes, it is important to check the sides of
the vehicle using the mirrors.
The rear parking sensors also supplement the
information on the vehicle's surroundings.
Activation / Deactivation
The system starts when the ignition is switched
on.
► With the ignition on, press button 2 to switch
the reproduction screen on / off.
A message appears.
►
T
ake note of this message and validate
with button 1 corresponding to the “ Accept”
response.
The reproduction screen comes on.
► With the engine running, press button 2 to
switch the reproduction screen off.
The function is automatically paused (the reproduction screen becomes grey) in
reverse , above 9 mph (15
km/h).
The function restarts when the vehicle is
once more travelling at a speed below this
threshold.
Operation
► In neutral , the monitoring rear view is
displayed by default.
►
When reverse is engaged
, the visual
reversing aid is displayed on the screen (even if
it is switched off).
► To change the view , press the end of the
lighting control stalk or press the corresponding
button located below the screen.
Page 134 of 260

132
Driving
The area around the vehicle is shown by the monitoring rear view and the
passenger side view only.
Operating limits
The system may be disrupted (or even
damaged) and not work in the following
situations:
–
Installation of a bicycle carrier on the tailgate
or side-hinged door (depending on version).
–
Attachment of a trailer to the towball.
–
Driving with a door open.
Please note, the cameras must not be
obscured (by a sticker, a bicycle carrier,
etc.).
The field of vision of the rear camera (surveillance rear view and visual
reversing aid) may vary depending on the
load in the vehicle.
If the side-hinged door is opened during
use of the surveillance rear view or the
visual aid for reversing, in forward gear or
reverse gear, the output screen becomes
grey.
If the front passenger door is opened during
use of the passenger side view, in forward
gear or reverse gear, the output screen
becomes grey.
If a trailer is attached to the towball,
when reverse gear is engaged the visual
reversing aid will no longer work until the
trailer is disconnected. The surveillance rear
view becomes the default view.
If the system develops a malfunction, go
to a PEUGEOT dealer to avoid any
safety problems.
Maintenance
recommendations
In bad or wintry weather, ensure that the sensors
and cameras are not covered with mud, ice or
snow.
Regularly inspect the camera lenses to check
that they are clean. If necessary, clean the cameras with a soft, dry
cloth.
Page 135 of 260
For over 20 years, the PEUGEOT TOTAL partnership has set new performance
standards in achieving success in the toughest conditions, with victories in
the Le Mans 24 Hours, the World Rally Championship and the Dakar Rally.
To obtain these exceptional results, the Peugeot
Sport teams chose TOTAL
QUARTZ, a high-tech lubricant that protects the engine in the most extreme
conditions.
T QUARTZ pr
eff ects of time
TOTAL QUAR TZ INEO FIRST is a very high-performance lubricant developed
jointly by the Peugeot and Total R&D teams. Specially formulated for the
0048
CO2 emissions and keeps your engine clean.
PEUGEO & T
P ARTNERS IN PERF
Page 136 of 260
134
Practical information
Compatibility of fuels
Petrol fuels conforming to the EN228 standard
containing up to 5% and 10% ethanol
respectively.
Diesel fuels conforming to the EN590, EN16734
and EN16709 standards and containing up to
7%, 10%, 20% and 30% fatty acid methyl ester
respectively. The use of B20 or B30 fuels, even
occasionally, imposes special maintenance
conditions referred to as "Arduous conditions".
Paraffinic Diesel fuel conforming to the EN15940
standard.
The use of any other type of (bio) fuel (vegetable or animal oils, pure or diluted,
domestic fuel, etc.) is strictly prohibited (risk
of damage to the engine and fuel system).
The only fuel additives authorised for use are those that meet the B715001 (petrol)
or B715000 (Diesel) standards.
Diesel at low temperature
At temperatures below 0 °C (+32 °F), the
formation of paraffins in summer-type Diesel fuels could prevent the engine from operating
correctly
. In these temperature conditions, use
winter-type Diesel fuel and keep the fuel tank
more than 50 % full.
At temperatures below -15 °C (+5 °F) to avoid
problems starting, it is best to park the vehicle
under shelter (heated garage).
Travelling abroad
Certain fuels could damage your vehicle’s
engine.
In certain countries, the use of a particular
fuel may be required (specific octane rating,
specific trade name, etc.) to ensure correct
operation of the engine.
For all additional information, consult a dealer.
Refuelling
Fuel tank capacity: approximately 61 litres
(petrol) or 50 litres (Diesel).
Reserve level: approximately 6 litres.
Low fuel level
/2
1 1When the low fuel level is reached,
this warning lamp comes on on the
instrument panel, accompanied by an onscreen
message and an audible signal. When it first
comes on, about 6 litres of fuel remain in the
tank.
Until sufficient fuel is added, this warning lamp
appears every time the ignition is switched on,
accompanied by an onscreen message and
an audible signal. When driving, this message
and audible signal are repeated with increasing
frequency as the fuel level drops towards 0.
You must refuel as soon as possible to avoid
running out of fuel.
For more information on Running out of fuel
(Diesel), refer to the corresponding section.
Stop & Start
Never refuel with the engine in STOP
mode; you must switch off the ignition.
Refuelling
At least 10 litres of fuel must be added, in order
to be registered by the fuel gauge.
Opening the filler cap may create a noise caused
by an inrush of air. This is entirely normal and
results from the sealing of the fuel system.
To refuel in complete safety:
►
Always switch off the engine.
►
Unlock the vehicle using the Keyless Entry
and Starting.
►
Open the fuel filler flap.
Page 137 of 260
135
Practical information
7
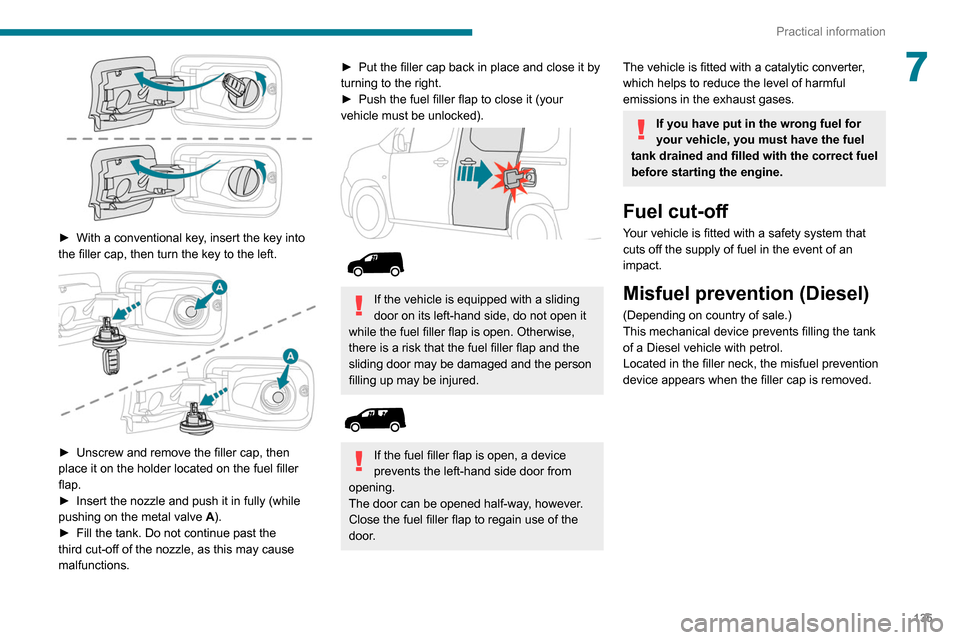
► With a conventional key, insert the key into
the filler cap, then turn the key to the left.
► Unscrew and remove the filler cap, then
place it on the holder located on the fuel filler
flap.
►
Insert the nozzle and push it in fully (while
pushing on the metal valve A
).
►
Fill the tank. Do not continue past the
third cut-off of the nozzle, as this may cause
malfunctions.
► Put the filler cap back in place and close it by
turning to the right.
►
Push the fuel filler flap to close it (your
vehicle must be unlocked).
If the vehicle is equipped with a sliding
door on its left-hand side, do not open it
while the fuel filler flap is open. Otherwise,
there is a risk that the fuel filler flap and the
sliding door may be damaged and the person
filling up may be injured.
If the fuel filler flap is open, a device
prevents the left-hand side door from
opening.
The door can be opened half-way, however.
Close the fuel filler flap to regain use of the
door.
The vehicle is fitted with a catalytic converter,
which helps to reduce the level of harmful
emissions in the exhaust gases.
If you have put in the wrong fuel for
your vehicle, you must have the fuel
tank drained and filled with the correct fuel
before starting the engine.
Fuel cut-off
Your vehicle is fitted with a safety system that
cuts off the supply of fuel in the event of an
impact.
Misfuel prevention (Diesel)
(Depending on country of sale.)
This mechanical device prevents filling the tank
of a Diesel vehicle with petrol.
Located in the filler neck, the misfuel prevention
device appears when the filler cap is removed.
Page 138 of 260
136
Practical information
Towing devices
Depending on equipment, the vehicle can be fitted with one of the following towing devices:
Approval No.: E1 R55 (reference 2)Mounting position then towing device reference
Type of towing device
Plate fixed at the bottom and
towing device fixed at the top
Plate fixed at the bottom and
towing device fixed at the bottom
Plate
+
G1 towball –
LCV std (standard) L1
– LCV std (standard) L2 –
LCV cross (worksite) L1
– LCV cross (heavy-duty) L2
Operation
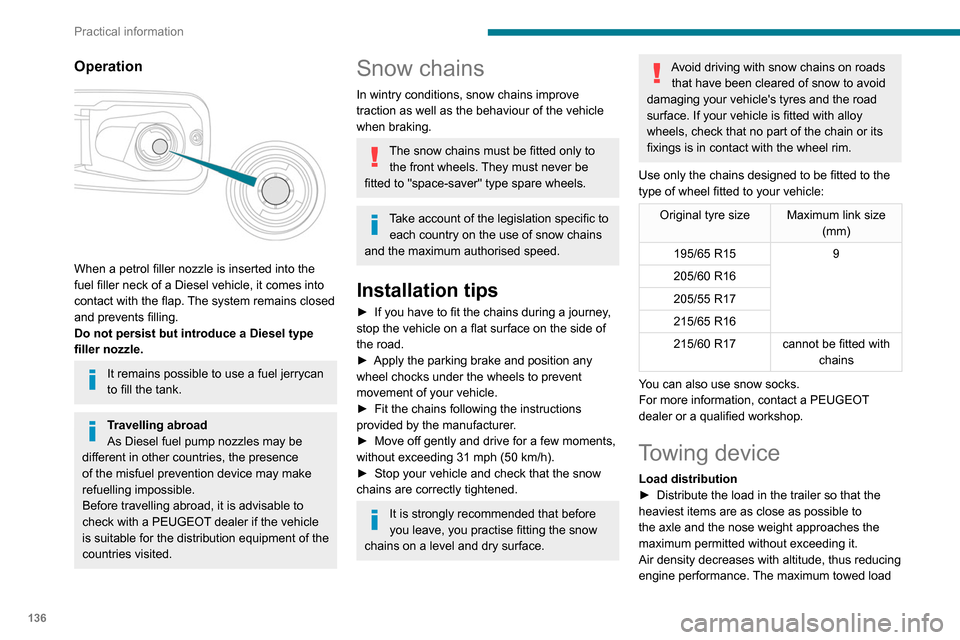
When a petrol filler nozzle is inserted into the
fuel filler neck of a Diesel vehicle, it comes into
contact with the flap. The system remains closed
and prevents filling.
Do not persist but introduce a Diesel type
filler nozzle.
It remains possible to use a fuel jerrycan
to fill the tank.
Travelling abroad
As Diesel fuel pump nozzles may be
different in other countries, the presence
of the misfuel prevention device may make
refuelling impossible.
Before travelling abroad, it is advisable to
check with a PEUGEOT dealer if the vehicle
is suitable for the distribution equipment of the
countries visited.
Snow chains
In wintry conditions, snow chains improve
traction as well as the behaviour of the vehicle
when braking.
The snow chains must be fitted only to the front wheels. They must never be
fitted to "space-saver" type spare wheels.
Take account of the legislation specific to each country on the use of snow chains
and the maximum authorised speed.
Installation tips
► If you have to fit the chains during a journey ,
stop the vehicle on a flat surface on the side of
the road.
►
Apply the parking brake and position any
wheel chocks under the wheels to prevent
movement of your vehicle.
►
Fit the chains following the instructions
provided by the manufacturer
.
►
Move off gently and drive for a few moments,
without exceeding 31 mph (50 km/h).
►
Stop your vehicle and check that the snow
chains are correctly tightened.
It is strongly recommended that before
you leave, you practise fitting the snow
chains on a level and dry surface.
Avoid driving with snow chains on roads that have been cleared of snow to avoid
damaging your vehicle's tyres and the road
surface. If your vehicle is fitted with alloy
wheels, check that no part of the chain or its
fixings is in contact with the wheel rim.
Use only the chains designed to be fitted to the
type of wheel fitted to your vehicle:
Original tyre size Maximum link size (mm)
195/65 R15 9
205/60 R16
205/55 R17
215/65 R16
215/60 R17 cannot be fitted with
chains
You can also use snow socks.
For more information, contact a PEUGEOT
dealer or a qualified workshop.
Towing device
Load distribution
► Distribute the load in the trailer so that the
heaviest items are as close as possible to
the axle and the nose weight approaches the
maximum permitted without exceeding it.
Air density decreases with altitude, thus reducing
engine performance.
The maximum towed load
Page 139 of 260

137
Practical information
7must be reduced by 10 % for every 1,000 metres
of altitude.
Use towing devices and their unmodified
harnesses approved by PEUGEOT. It is
recommended that the installation be
performed by a PEUGEOT dealer or a
qualified workshop.
If the towing device is not fitted by a
PEUGEOT dealer, it must still be fitted in
accordance with the vehicle manufacturer's
instructions.
Certain driving assistance or manoeuvring
assistance functions are automatically
disabled if an approved towbar is used.
Observe the maximum authorised
towable weight, indicated on your
vehicle's registration certificate, the
manufacturer's label as well as in the
Technical data section of this guide.
Complying with the maximum authorised
nose weight (towball) also includes the
use of accessories (bicycle carriers, tow
boxes, etc.).
Observe the legislation in force in the
country in which you are driving.
Towing devices
Depending on equipment, the vehicle can be fitted with one of the following towing devices:
Approval No.: E1 R55 (reference 2)
Mounting position then towing device reference
Type of towing device
Plate fixed at the bottom and
towing device fixed at the top
Plate fixed at the bottom and
towing device fixed at the bottom
Plate
+
G1 towball –
LCV std (standard) L1
– LCV std (standard) L2 –
LCV cross (worksite) L1
– LCV cross (heavy-duty) L2
Page 140 of 260
138
Practical information
Operation
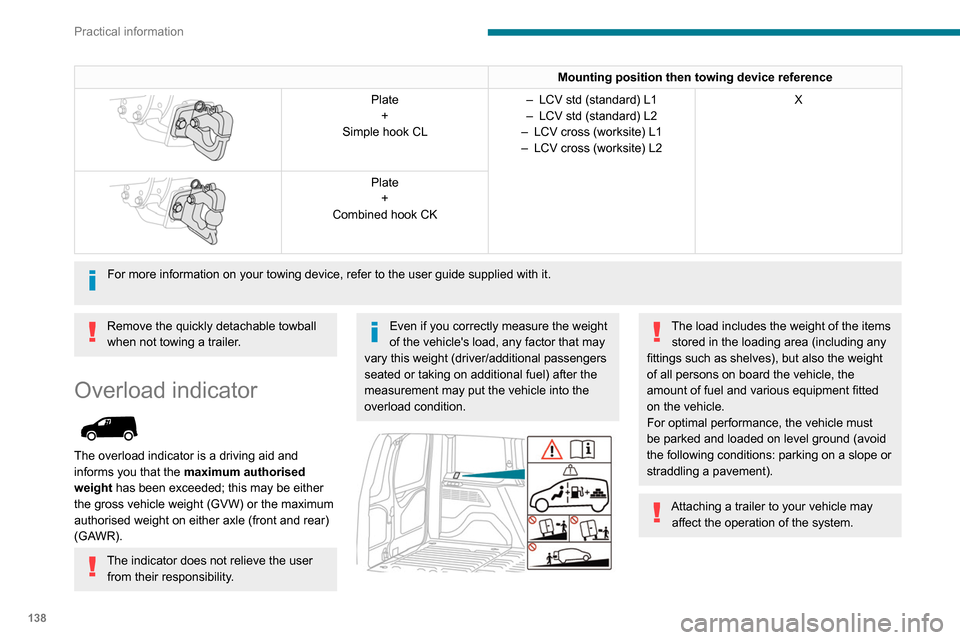
The measurement of the weight present on
board your vehicle is triggered:
► when starting the engine, automatically;
ON► when stationary, by pressing this
button located in the loading area. The
system is then active for 5 minutes.
Measurement display in the loading area
ON
If the mass on board the vehicle approaches
the maximum authorised weight , the indicator
lamps on these buttons come on.
ON
If the mass on board the vehicle exceeds the
maximum authorised weight , the indicator
lamps on these buttons come on.
Mounting position then towing device reference
Plate +
Simple hook CL –
LCV std (standard) L1
– LCV std (standard) L2
–
LCV cross (worksite) L1
–
LCV cross (worksite) L2 X
Plate
+
Combined hook CK
For more information on your towing device, refer to the user guide supp\
lied with it.
Remove the quickly detachable towball
when not towing a trailer.
Overload indicator
The overload indicator is a driving aid and
informs you that the maximum authorised
weight has been exceeded; this may be either
the gross vehicle weight (GVW) or the maximum
authorised weight on either axle (front and rear)
(GAWR).
The indicator does not relieve the user from their responsibility.
Even if you correctly measure the weight
of the vehicle's load, any factor that may
vary this weight (driver/additional passengers
seated or taking on additional fuel) after the
measurement may put the vehicle into the
overload condition.
The load includes the weight of the items stored in the loading area (including any
fittings such as shelves), but also the weight
of all persons on board the vehicle, the
amount of fuel and various equipment fitted
on the vehicle.
For optimal performance, the vehicle must
be parked and loaded on level ground (avoid
the following conditions: parking on a slope or
straddling a pavement).
Attaching a trailer to your vehicle may affect the operation of the system.