automatic illumination Peugeot Partner 2020 User Guide
[x] Cancel search | Manufacturer: PEUGEOT, Model Year: 2020, Model line: Partner, Model: Peugeot Partner 2020Pages: 260, PDF Size: 7.76 MB
Page 93 of 260
91
Driving
6Before setting off
Nose weight
► Distribute the load in the trailer so that the
heaviest items are as close as possible to the
axle and the nose weight (at the point where it
joins your vehicle) approaches the maximum
permitted without exceeding it.
Tyres
► Check the tyre pressures of the towing
vehicle and of the trailer , observing the
recommended pressures.
Lighting
► Check the electrical signalling on the trailer
and the headlamp beam height of your vehicle.
If a genuine PEUGEOT towing device is
used, the rear parking sensors will be
deactivated automatically to avoid the audible
signal.
When driving
Cooling
Towing a trailer uphill increases the temperature
of the coolant. The maximum towable load
depends on the gradient and the exterior
temperature. The cooling capacity of the fan
does not increase with engine speed.
►
Reduce speed and lower the engine speed,
so as to limit the heating-up. In all cases, pay attention to the coolant
temperature.
If this warning lamp and the
STOP
warning lamp come on, stop the vehicle
and switch off the engine as soon as possible.
Brakes
Braking distances are increased when towing a
trailer. To avoid overheating of the brakes, the
use of engine braking is recommended.
Side wind
Bear in mind the increased susceptibility to the
wind that the vehicle will have.
Anti-theft protection
Electronic immobiliser
The remote control contains an electronic chip
which has a special code. When the ignition is
switched on, this code must be recognised in
order for starting to be possible.
A few seconds after switching off the ignition,
this system locks the engine control system,
therefore preventing the engine from being
started in the event of a break-in.
In the event of a fault, you are informed
by illumination of this warning lamp, an
audible signal and a message on the screen.
The vehicle will not start; contact a PEUGEOT
dealer as soon as possible.
Starting/switching off the
engine
Starting
The parking brake must be applied.
►
With a manual gearbox, shift the gear lever
into neutral, press the clutch pedal to the floor
and keep the pedal down until the engine runs.
►
With
an automatic gearbox, place the selector
in position P then depress the brake pedal.
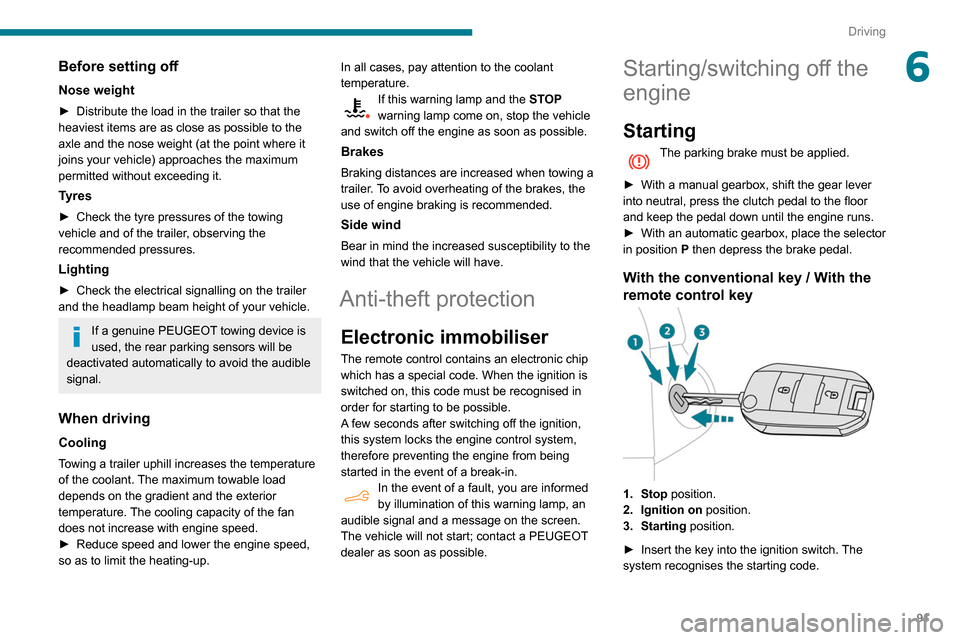
With the conventional key / With the
remote control key
1. Stop position.
2. Ignition on position.
3. Starting position.
►
Insert the key into the ignition switch.
The
system recognises the starting code.
Page 98 of 260
96
Driving
towards the kerb and select mode P with an
automatic gearbox.
When towing, the vehicle is approved for
parking on slopes of up to 12%.
Manual operation
Manual release
With the ignition on or engine running:
► Press the brake pedal.
►
While maintaining pressure on the brake
pedal, briefly push the control lever
.
The complete release of the parking brake is
confirmed by the braking indicator lamp and the
P indicator lamp in the control lever going off,
accompanied by the display of the message
"Parking brake released".
If you push the control lever without
pressing the brake pedal, the parking
brake will not be released and a message is
displayed.
Manual application
With the vehicle stationary:
► Pull briefly on the control lever .
Confirmation of the application instruction is
signalled by flashing of the indicator lamp in the
control lever.
The application of the parking brake is confirmed
by illumination of the braking indicator lamp
and of the P indicator lamp in the control lever,
accompanied by the display of the message
"Parking brake applied".
Automatic operation
Automatic release
Ensure first that the engine is running and the
driver's door is properly closed.
The electric parking brake releases
automatically and progressively when the
vehicle moves off.
With a manual gearbox
►
Fully depress the clutch pedal, engage first
gear or reverse.
►
Press the accelerator pedal and release the
clutch pedal.
W
ith an automatic gearbox
►
Press the brake pedal.
►
Select position
D
, M or R.
►
Release the brake pedal and press the
accelerator pedal.
With an automatic gearbox, if the brake
does not release automatically, check
that the front doors are correctly closed.
When stationary with the engine running,
do not press the accelerator pedal
unnecessarily - risk of parking brake release.
Automatic application
With the vehicle stationary, the parking brake
is applied automatically when the engine is
switched off .
When the parking brake is applied, the brake
indicator lamp and the P indicator lamp in the
control lever come on, accompanied by the
onscreen message "Parking brake applied".
It is not applied automatically if the
engine stalls or enters STOP mode with
Stop & Start.
With automatic operation, it is also
possible to manually apply or release the
parking brake using the control lever.
Special cases
Immobilisation of the vehicle with the
engine running
To immobilise the vehicle with the engine
running, briefly pull the control lever.
Application of the parking brake is confirmed
by illumination of the braking indicator lamp
and the P indicator lamp in the control lever,
accompanied by the display of the message
"Parking brake applied".
Parking the vehicle with the brake
released
In very cold conditions (ice), applying the
parking brake is not recommended.
To immobilise the vehicle, engage a gear or
place the chocks against one of the wheels.
With an automatic gearbox, mode P is
automatically selected when the ignition
is switched off. The wheels are blocked.
For more information on Free-wheeling, refer
to the corresponding section.
With an automatic gearbox, while mode
N is selected, opening the driver’s door
triggers an audible signal. It stops when the
driver's door closes again.
Deactivating automatic
operation
In some situations, for example when it is
extremely cold or when towing (e.g. caravan,
breakdown), it may be necessary to deactivate
automatic operation of the system.
► Start the engine.
► Apply the parking brake with the control lever,
if it is released.
► Take your foot fully off the brake pedal.
Page 99 of 260
97
Driving
6Parking the vehicle with the brake
released
In very cold conditions (ice), applying the
parking brake is not recommended.
To immobilise the vehicle, engage a gear or
place the chocks against one of the wheels.
With an automatic gearbox, mode P is
automatically selected when the ignition
is switched off. The wheels are blocked.
For more information on Free-wheeling, refer
to the corresponding section.
With an automatic gearbox, while mode
N is selected, opening the driver’s door
triggers an audible signal. It stops when the
driver's door closes again.
Deactivating automatic
operation
In some situations, for example when it is
extremely cold or when towing (e.g. caravan,
breakdown), it may be necessary to deactivate
automatic operation of the system.
►
Start the engine.
►
Apply the parking brake with the control lever
,
if it is released.
►
T
ake your foot fully off the brake pedal. ►
Push and hold the control lever in the release
direction for at least 10 seconds and no more
than 15
seconds.
►
Release the control lever
.
►
Press and hold the brake pedal.
►
Pull the control lever in the application
direction for 2
seconds.
Deactivation of the automatic functions is
confirmed by illumination of this indicator
lamp in the instrument panel.
►
Release the control lever and the brake
pedal.
From now on, the parking brake can only be
applied and released manually using the control
lever
.
Repeat this procedure to reactivate automatic
operation (confirmed by the indicator lamp in the
instrument panel going off).
Emergency braking
In the event of a fault with the brake pedal or
in an exceptional situation (e.g. driver taken ill,
driver under instruction), a continuous pull on
the electric parking brake control lever will brake
the vehicle. Braking takes place while the control
lever is being pulled; it is interrupted when the
control lever is released.
The ABS and DSC systems ensure stability of
the vehicle during emergency braking.
If the emergency braking malfunctions, the
message "Parking brake control faulty" will be
displayed in the instrument panel.
If the ABS and DSC systems malfunction,
signalled by the illumination of one or both
warning lamps in the instrument panel, then
stability of the vehicle is no longer guaranteed.
In this event, stability must be assured by the
driver by repeating alternate "pull-release"
actions on the control lever until the vehicle is
immobilised.
Hill start assist
This system keeps your vehicle briefly stationary
(for approximately 2 seconds) when making a hill
start, while you transfer your foot from the brake
pedal to the accelerator pedal.
This system is only active when:
–
the vehicle is completely stationary
, with your
foot on the brake pedal,
–
certain slope conditions are met,
–
the driver
’s door is closed.
Do not leave the vehicle while it is being
held temporarily by hill start assist.
If someone needs to get out of the vehicle
with the engine running, apply the parking
brake manually. After that, ensure that the
parking brake indicator lamp and the indicator
lamp
P in the electric parking brake control
lever are on fixed.
Page 106 of 260
104
Driving
• With the selector in position D or M: with the
brake pedal released.
•
With the selector in position N
and the brake
pedal released: with the selector at D or M.
•
With the selector in position P
and the brake
pedal depressed: with the selector at R, N,
D or M.
Special cases
The engine will restart automatically if all
conditions for operation are met again and in the
following case.
–
Speed of the vehicle exceeds 2 mph (3
km/h)
(depending on the engine).
In this case, this indicator lamp flashes for
a few seconds, then goes off.
Malfunctions
Depending on the vehicle’s equipment:In the event of a system malfunction, this
warning lamp flashes on the instrument
panel.
The warning lamp in this button flashes and a message appears, accompanied by
an audible signal.
Have the vehicle checked by a PEUGEOT
dealer or a qualified workshop.
The vehicle stalls in STOP mode
All of the instrument panel warning lamps come
on if there is a fault.
Depending on version, a warning message
may also be displayed, prompting you to place
the gear selector in position N and depress the
brake pedal.
►
Switch off the ignition then start the engine
again with the key or the " ST
ART/STOP" button.
The Stop & Start system requires a 12 V
battery of specific technology and
specification.
All work concerning the battery must be
carried out only by a PEUGEOT
dealer or a
qualified workshop.
Under-inflation detection
This system automatically checks the pressures of the tyres while driving.
It compares the information given by the wheel
speed sensors with reference values, which
must be reinitialised every time the tyre
pressures are adjusted or a wheel changed.
The system triggers an alert as soon as it
detects a drop in the inflation pressure of one or
more tyres.
Under-inflation detection does not
replace the need for vigilance on the part
of the driver.
This system does not avoid the need to
regularly check the tyre pressures (including
the spare wheel) as well as before a long
journey.
Driving with under-inflated tyres, particularly
in adverse conditions (heavy load, high
speed, long journey):
–
worsens road-holding.
–
lengthens braking distances.
–
causes premature wear of the tyres.
–
increases fuel consumption.
The inflation pressures defined for the vehicle can be found on the tyre pressure
label.
For more information on the Identification
markings, refer to the corresponding section.
Checking tyre pressures
This check should be done when the
tyres are "cold" (vehicle stopped for 1 hour or
after a journey of less than 6 miles (10
km) at
moderate speeds).
Otherwise, add 0.3 bar to the pressures
shown on the label.
Snow chains
The system does not have to be
reinitialised after fitting or removing snow
chains.
Spare wheel
The steel spare wheel does not have an
under-inflation detection sensor.
Under-inflation alert
This is signalled by the fixed illumination of this warning lamp, accompanied by an
audible signal and, depending on equipment, the
display of a message.
► Reduce speed immediately, avoid excessive
steering movements and avoid sudden braking.
► Stop the vehicle as soon as it is safe to do
so.
The loss of pressure detected does not always cause visible bulging of the tyre.
Do not rely on just a visual check.
► Using a compressor, such as the one in
the temporary puncture repair kit, check the
pressures of the four tyres when cold.
► If it is not possible to make this check
immediately, drive carefully at reduced speed.
► In the event of a puncture, use the
temporary puncture repair kit or the spare wheel
(depending on equipment).
The alert is kept active until the system is reinitialised.
Reinitialisation
Reinitialise the system after adjusting one or
more tyre pressures and after changing one or
more wheels.
Before reinitialising the system, make
sure that the pressures of the four tyres
Page 122 of 260
120
Driving
Active Safety Brake
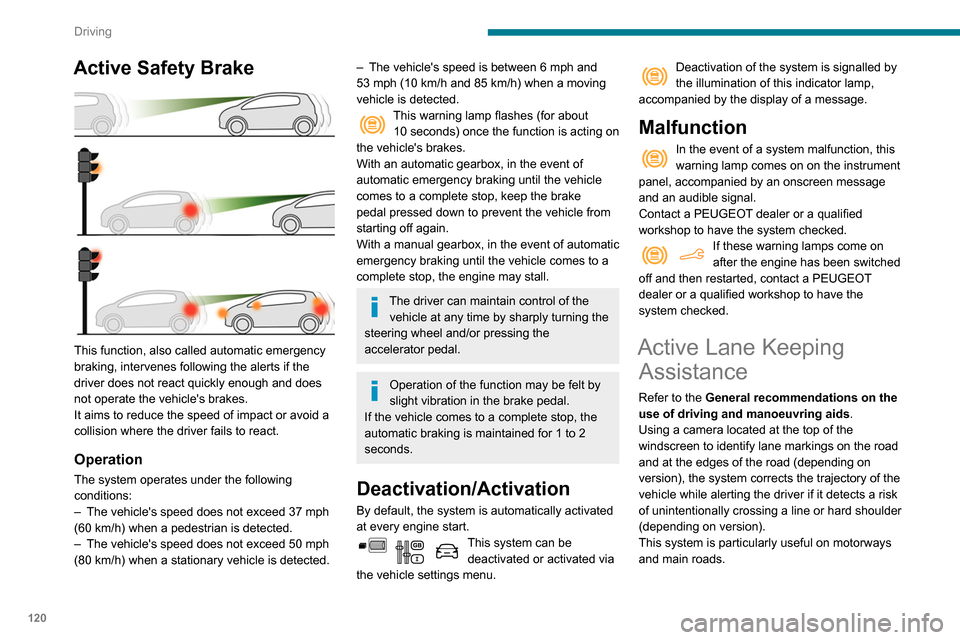
This function, also called automatic emergency
braking, intervenes following the alerts if the
driver does not react quickly enough and does
not operate the vehicle's brakes.
It aims to reduce the speed of impact or avoid a
collision where the driver fails to react.
Operation
The system operates under the following
conditions:
–
The vehicle's speed does not exceed 37 mph
(60 km/h) when a pedestrian is detected.
–
The vehicle's speed does not exceed 50 mph
(80 km/h) when a stationary vehicle is detected.
– The vehicle's speed is between 6 mph and
53 mph (10 km/h and 85 km/h) when a moving
vehicle is detected.
This warning lamp flashes (for about 10 seconds) once the function is acting on
the vehicle's brakes.
With an automatic gearbox, in the event of
automatic emergency braking until the vehicle
comes to a complete stop, keep the brake
pedal pressed down to prevent the vehicle from
starting off again.
With a manual gearbox, in the event of automatic
emergency braking until the vehicle comes to a
complete stop, the engine may stall.
The driver can maintain control of the vehicle at any time by sharply turning the
steering wheel and/or pressing the
accelerator pedal.
Operation of the function may be felt by
slight vibration in the brake pedal.
If the vehicle comes to a complete stop, the
automatic braking is maintained for 1 to 2
seconds.
Deactivation/Activation
By default, the system is automatically activated
at every engine start.
This system can be deactivated or activated via
the vehicle settings menu.
Deactivation of the system is signalled by
the illumination of this indicator lamp,
accompanied by the display of a message.
Malfunction
In the event of a system malfunction, this
warning lamp comes on on the instrument
panel, accompanied by an onscreen message
and an audible signal.
Contact a PEUGEOT dealer or a qualified
workshop to have the system checked.
If these warning lamps come on
after the engine has been switched
off and then restarted, contact a PEUGEOT
dealer or a qualified workshop to have the
system checked.
Active Lane Keeping Assistance
Refer to the General recommendations on the
use of driving and manoeuvring aids .
Using a camera located at the top of the
windscreen to identify lane markings on the road
and at the edges of the road (depending on
version), the system corrects the trajectory of the
vehicle while alerting the driver if it detects a risk
of unintentionally crossing a line or hard shoulder
(depending on version).
This system is particularly useful on motorways
and main roads.
Conditions for operation
– The speed of the vehicle must be between 40
and 112 mph (65 and 180 km/h).
– The traffic lane must be delimited by a dividing
line.
– The driver must hold the wheel with both
hands.
– The change of trajectory must not be
accompanied by operation of the direction
indicators.
– The ESC system must be activated and not
faulty.
The system helps the driver only when there is a risk of the vehicle involuntarily
wandering from the lane it is being driven in. It
Driving situations and related alerts
The table below describes the alerts and messages displayed in different driving situations.
These alerts are not displayed sequentially.
Page 156 of 260
154
In the event of a breakdown
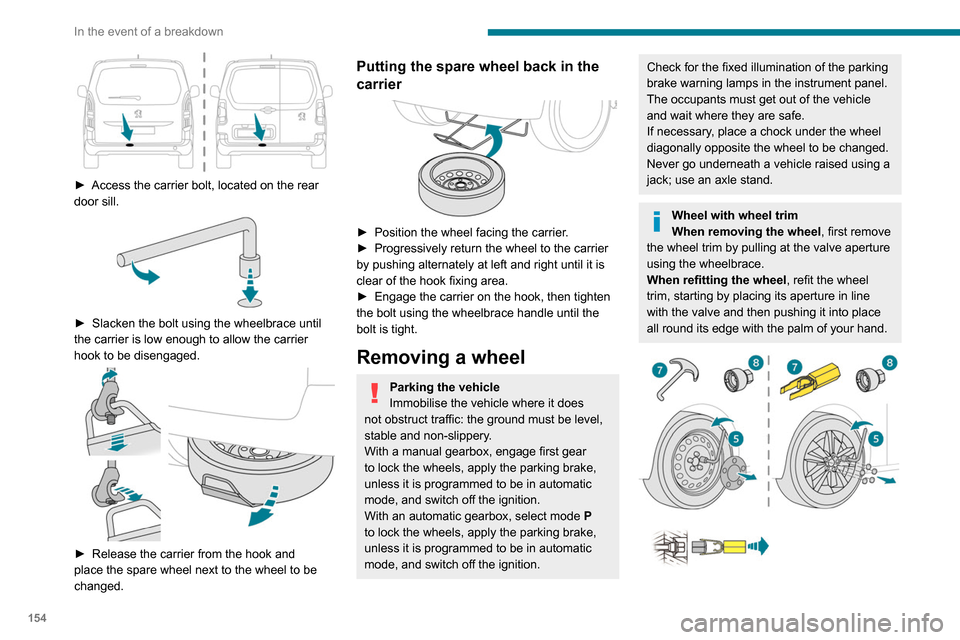
► Access the carrier bolt, located on the rear
door sill.
► Slacken the bolt using the wheelbrace until
the carrier is low enough to allow the carrier
hook to be disengaged.
► Release the carrier from the hook and
place the spare wheel next to the wheel to be
changed.
Putting the spare wheel back in the
carrier
► Position the wheel facing the carrier .
► Progressively return the wheel to the carrier
by pushing alternately at left and right until it is
clear of the hook fixing area.
►
Engage the carrier on the hook, then tighten
the bolt using the wheelbrace handle until the
bolt is tight.
Removing a wheel
Parking the vehicle
Immobilise the vehicle where it does
not obstruct traffic: the ground must be level,
stable and non-slippery.
With a manual gearbox, engage first gear
to lock the wheels, apply the parking brake,
unless it is programmed to be in automatic
mode, and switch off the ignition.
With an automatic gearbox, select mode
P
to lock the wheels, apply the parking brake,
unless it is programmed to be in automatic
mode, and switch off the ignition.
Check for the fixed illumination of the parking
brake warning lamps in the instrument panel.
The occupants must get out of the vehicle
and wait where they are safe.
If necessary, place a chock under the wheel
diagonally opposite the wheel to be changed.
Never go underneath a vehicle raised using a
jack; use an axle stand.
Wheel with wheel trim
When removing the wheel , first remove
the wheel trim by pulling at the valve aperture
using the wheelbrace.
When refitting the wheel , refit the wheel
trim, starting by placing its aperture in line
with the valve and then pushing it into place
all round its edge with the palm of your hand.
Page 232 of 260
230
Alphabetical index
Fitting a wheel 154, 156
Fitting roof bars
140
Fittings, interior
47
Flap, fuel filler
134–135
Flap, removable
51
Flashing indicators
64–65, 160
Fluid, brake
143
Fluid, engine coolant
143
Foglamp, rear
160
Foglamps
159
Foglamps, front
63, 157
Foglamps, rear
63
Folding the rear seats
46
Frequency (radio)
218
Fuel
7, 134
Fuel consumption
7
Fuel tank
134–136
Fusebox, dashboard
161
Fusebox, engine compartment
161, 163
Fuses
161–163
G
Gauge, fuel 134–135
Gearbox, automatic
94, 98–103, 145
Gearbox, manual
98–99, 103, 145
Gear lever, automatic gearbox
99–101
Gear lever, manual gearbox
98–99
Gear shift indicator ~ Gear efficiency
indicator
102
Glove box
47
G.P.S. 2 11
H
Hazard warning lamps 74
headlamp adjustment
67
Headlamp adjustment
67
Headlamps, automatic dipping
65–66, 124
Headlamps, automatic illumination
64–65
Headlamps, dipped beam
63, 157–158
Headlamps, halogen
157
Headlamps, main beam
63, 157, 159
Head restraints, front
46
Head restraints, rear
46
Heating
55–56, 58, 60–61
Heating, additional
37, 60–61
Heating, programmable
37, 60–61
Hill Assist Descent Control (HADC)
78–79
Hill Descent Control
78–79
Hill start assist
97–98
Horn
75
I
Ignition 94, 222
Ignition on
94
Immobiliser, electronic
91
Indicator, coolant temperature
16
Indicator lamps, operation
63
Indicators, direction
64
Inflating tyres 145, 176
Inflating tyres and accessories
(using the kit)
151, 153
Infrared camera
106
Instrument panel
9, 107
Internet browser
212, 216
J
Jack 153, 219
Jump starting
164
K
Key 24–27, 29–30
Key, electronic
24, 94
Keyless Entry and Starting
24, 26–29, 92, 94
Key with remote control
29
Kit, hands-free
184–185, 197, 220–221
Kit, puncture repair
150
Kit, temporary puncture repair
150–151, 153
L
Labels 4
Labels, identification
176
Lamps, front
159
Lamps, parking
65
Lamps, rear
160