Reverse switch Peugeot Partner Tepee 2016 Owner's Manual
[x] Cancel search | Manufacturer: PEUGEOT, Model Year: 2016, Model line: Partner Tepee, Model: Peugeot Partner Tepee 2016Pages: 296, PDF Size: 10.76 MB
Page 55 of 296

53
StoP & StARt
The Stop & Start system puts the
engine temporarily on standby - STo P
mode - during stops in the traffic (red
lights, traffic jams, or other...). The
engine restarts automatically - START
mode - as soon as you want to move
off. The restart takes place instantly,
quickly and silently.
Perfect for urban use, the Stop & Start
system reduces fuel consumption and
exhaust emissions as well as the noise
level when stationary.
operation
going into engine StoP mode
The " e C o " warning lamp
comes on in the instrument
panel and the engine goes
into standby:
-
with a manual gearbox
, at speeds
below 12 mph (20 km/h), when you
put the gear lever into neutral and
release the clutch pedal,
-
with
a 6-speed electronic
gearbox, at speeds below 5 mph
(8 km/h), when you press the brake
pedal or put the gear lever into
position N. If your vehicle is fitted with the system,
a time counter calculates the sum of
the periods in ST
o
P mode during a
journey. It rests itself to zero every time
the ignition is switched on with the key.
With a 6-speed electronic
gearbox, for your comfort during
parking manoeuvres, ST
o
P mode
is not available for a few seconds after
coming out of reverse gear.
ST
o
P mode does not affect the
functionality of the vehicle, such as
braking, power steering, for example.
Never refuel with the engine in
ST
o
P mode; you must switch off
the ignition with the key. Special cases: S to P mode
unavailable
ST
o
P mode is not invoked when:
-
the driver's door is open,
-
the driver's seat belt is not
fastened,
-
the vehicle has not exceeded
6
mph (10 km/h) since the last
engine start using the key,
-
the engine is needed to maintain
a comfortable temperature in the
passenger compartment,
-
demisting is on,
-
some special conditions (battery
charge, engine temperature,
braking assistance, ambient
temperature...) where the engine
is needed to assure control of a
system.
In this case, the
" e C o "
warning lamp flashes for a
few seconds, then goes off.
t
his operation is perfectly normal.
Stop & Start
ReADY To go
3
Page 56 of 296

54
going into engine StARt mode
The " e C o " warning lamp
goes off and the engine
starts:
-
with a manual gearbox
, when you
fully depress the clutch pedal,
-
with
a 6-speed electronic
gearbox:
●
gear lever in position
A or M,
when you release the brake
pedal,
●
or gear lever in position
N and
the brake pedal released, when
you move the gear lever to
position A or M,
●
or when you engage reverse
gear
.
With a manual gearbox in ST
o
P
mode, if a gear is engaged without
fully depressing the clutch pedal, a
warning lamp comes on or a message
is displayed asking you to depress the
clutch pedal to restart the engine. Special cases: S
tAR t invoked
automatically
For your safety and comfort, START is
invoked automatically when:
-
you open the driver's door
,
-
you unfasten the driver's seat belt,
-
the speed of the vehicle exceeds
15 mph (25 km/h) with a manual
gearbox or 7 mph (1
1 km/h) with
the 6-speed electronic gearbox
system,
-
some special conditions (battery
charge, engine temperature,
braking assistance, ambient
temperature...) where the engine
is needed to assure control of a
system.In this case the
" e C o "
warning lamp flashes for
few
seconds, then goes off.
t
his operation is perfectly normal.
Deactivation
At any time, press the "eCo oFF" switch to deactivate the
system.
This is confirmed by the switch warning
lamp coming on accompanied by a
message in the screen.
If the system has been deactivated
in ST
o
P mode, the engine restarts
immediately.
Reactivation
Press the "eCo oFF" switch again.
The system is active again; this is
confirmed by the switch warning
lamp going of
f and a message in the
instrument panel.
The system is reactivated
automatically at every new start
using the key.
operating fault
In the event of a malfunction
with the system, the " e C o
o
FF" switch warning lamp
flashes, then comes on
continuously.
Have it checked by a P
eugeo T
dealer or a qualified workshop.
In the event of a fault in ST
o
P mode,
the vehicle may stall. All of the warning
lamps in the instrument panel come
on. It is then necessary to switch off
the ignition and start the engine again
using the key.
Stop & Start
Page 58 of 296

Starting and switching off
56
HILL StAR t ASSIS t
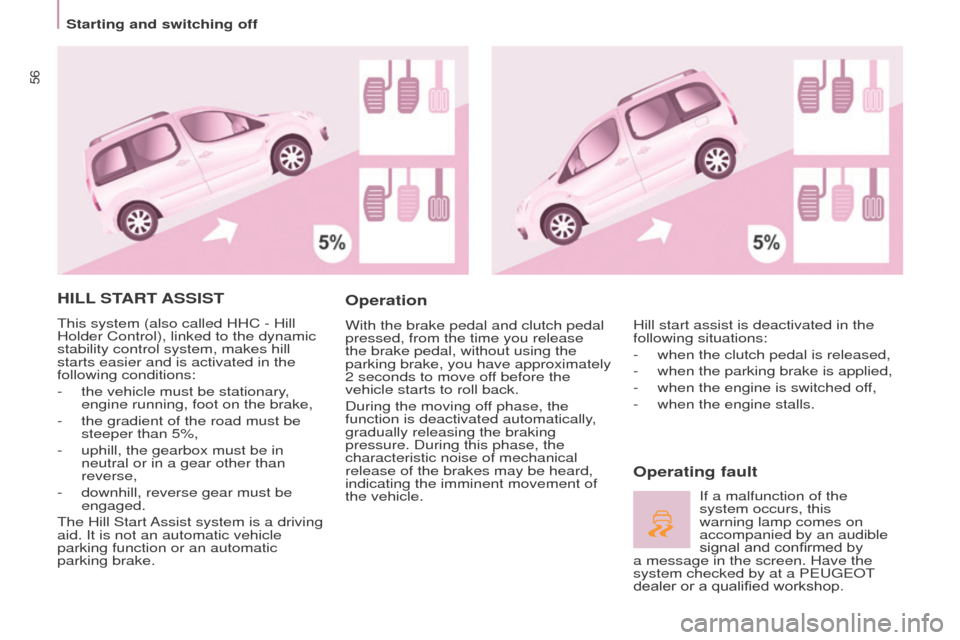
This system (also called HHC - Hill
Holder Control), linked to the dynamic
stability control system, makes hill
starts easier and is activated in the
following conditions:
-
the vehicle must be stationary
,
engine running, foot on the brake,
-
the gradient of the road must be
steeper than 5%,
-
uphill, the gearbox must be in
neutral or in a gear other than
reverse,
-
downhill, reverse gear must be
engaged.
The Hill Start
Assist system is a driving
aid. It is not an automatic vehicle
parking function or an automatic
parking brake.
operation
With the brake pedal and clutch pedal
pressed, from the time you release
the brake pedal, without using the
parking brake, you have approximately
2
seconds to move off before the
vehicle starts to roll back.
During the moving off phase, the
function is deactivated automatically,
gradually releasing the braking
pressure. During this phase, the
characteristic noise of mechanical
release of the brakes may be heard,
indicating the imminent movement of
the vehicle.
operating fault
Hill start assist is deactivated in the
following situations:
-
when the clutch pedal is released,
-
when the parking brake is applied,
-
when the engine is switched of
f,
-
when the engine stalls.
If a malfunction of the
system occurs, this
warning lamp comes on
accompanied by an audible
signal and confirmed by
a message in the screen. Have the
system checked by at a P
eugeo T
dealer or a qualified workshop.
Page 62 of 296

60
If the sunshine sensor
does not function correctly,
the lighting comes on
accompanied by the service
warning lamp, an audible
signal and a message in the screen.
Contact a P
eugeo T dealer or a
qualified workshop.
guide-me-home lighting
Keeping the dipped beam headlamps
on temporarily with the ignition off,
makes the driver's exit easier when the
light is poor.
HeADLAMP B e AM
The beam setting must be adjusted to
suit the load in the vehicle.
0 - No load.
1 - Partial load.
2 - Average load.
3 - Maximum authorised load.
Manual operation
-
With the ignition of
f, "flash" the
headlamps within one minute after
switching off the ignition.
The guide-me-home lighting switches
off automatically after a set time.
Automatic operation
Refer to chapter 10, "Screen
menu map" section. Initial setting is position 0.
Activate the function via the
vehicle configuration menu.
Programming
The system is activated or deactivated
in the vehicle configuration menu.
The system is activated by default. Switching off
The system does not operate:
-
below a certain angle of rotation of
the steering wheel,
-
above 25 mph (40 km/h),
-
when reverse gear is engaged.
Switching on
This function starts:
-
when the corresponding direction
indicator is switched on,
or
-
from a certain angle of rotation of
the steering wheel.
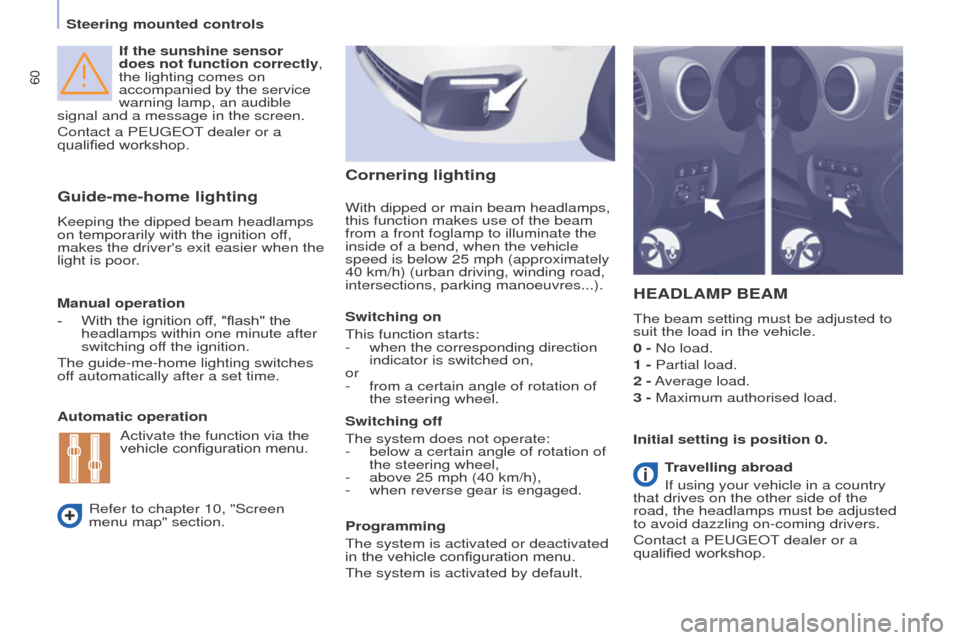
With dipped or main beam headlamps,
this function makes use of the beam
from a front foglamp to illu
minate the
inside of a bend, when the vehicle
speed is below 25 mph (approximately
40 km/h) (urban driving, winding road,
intersections, parking manoeuvres...).
Cornering lighting
travelling abroad
If using your vehicle in a country
that drives on the other side of the
road, the headlamps must be adjusted
to avoid dazzling on-coming drivers.
Contact a P
eugeo T dealer or a
qualified workshop.
Steering mounted controls
Page 115 of 296

11 3
eLeCtRIC WINDoWS
Lower the window fully, then raise it, it
will rise in steps of a few centimetres
each time the control is pressed.
Repeat the operation until the window
is fully closed.
Continue to press the control for at
least one second after the window
closed position has been reached.
The safety anti-pinch does not operate
during these operations.
Safety anti-pinch
When the window rises and meets an
obstacle, it stops and partially lowers.
Manual mode
This mode is available
depending on equipment; it is
identified by this symbol on the
control in question.
good practice
If the electric windows meet an
obstacle during operation, you must
reverse the movement of the window.
To do this, press the control concerned.
When the driver operates the
passenger electric window controls,
they must ensure that no one is
preventing correct closing of the
windows.
The driver must ensure that the
passengers use the electric windows
correctly.
Be aware of children when operating
the windows.
Following several consecutive closing/
opening operations of the electric
window control, a protection system
is triggered which only allows closing
of the window. After closing, wait
approximately 40 minutes. o nce this
time has elapsed, the control becomes
operational again.
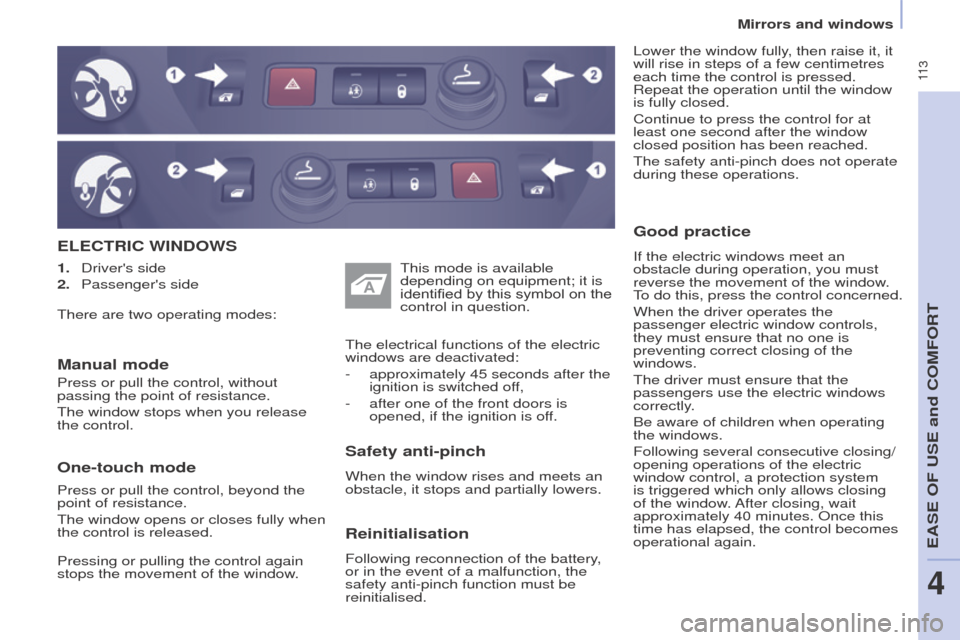
1.
Driver's side
2.
Passenger's side
Reinitialisation
Following reconnection of the battery,
or in the event of a malfunction, the
safety anti-pinch function must be
reinitialised. The electrical functions of the electric
windows are deactivated:
-
approximately 45 seconds after the
ignition is switched of
f,
-
after one of the front doors is
opened, if the ignition is of
f.
There are two operating modes:
Press or pull the control, without
passing the point of resistance.
The window stops when you release
the control.
one-touch mode
Press or pull the control, beyond the
point of resistance.
The window opens or closes fully when
the control is released.
Pressing or pulling the control again
stops the movement of the window.
eASe oF uSe and CoMFoRT
4
Mirrors and windows
Page 174 of 296

172
1. Parking the vehicle
- The occupants must get out of the
vehicle and wait in a safe location.
-
If possible, park the vehicle on level,
stable and non-slippery ground.
-
Apply the parking brake, switch
of
f the ignition and engage first or
reverse gear. -
Place a chock under the wheel
diagonally opposite the one to be
changed.
CHANgINg A WH
ee L
2.
t
ools
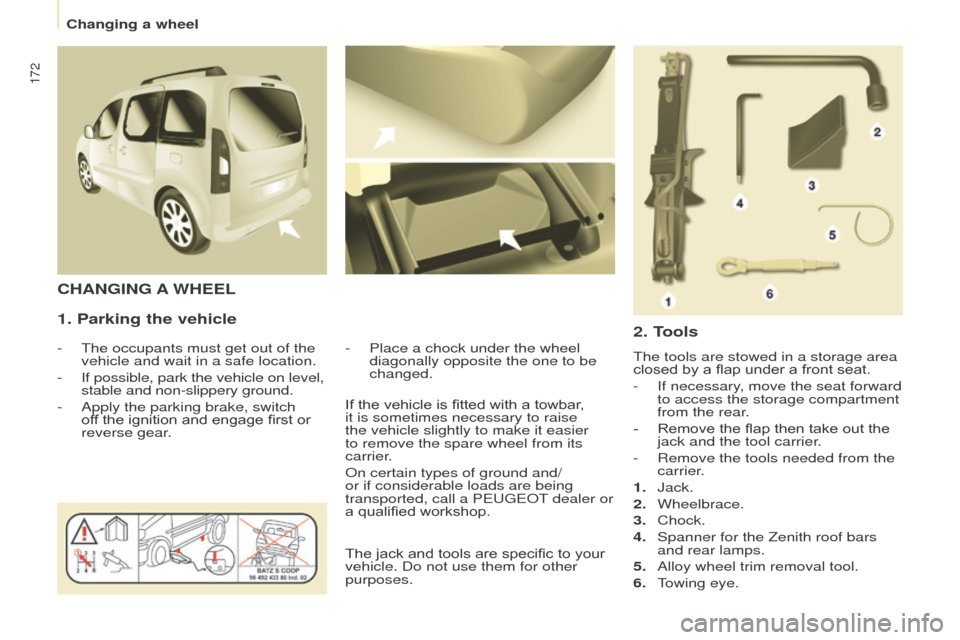
The tools are stowed in a storage area
closed by a flap under a front seat.
-
If necessary
, move the seat forward
to access the storage compartment
from the rear.
-
Remove the flap then take out the
jack and the tool carrier
.
-
Remove the tools needed from the
carrier
.
1.
Jack.
2.
Wheelbrace.
3.
Chock.
4.
Spanner for the Zenith roof bars
and rear lamps.
5.
Alloy wheel trim removal tool.
6.
T
owing eye.
If the vehicle is fitted with a towbar,
it is sometimes necessary to raise
the vehicle slightly to make it easier
to remove the spare wheel from its
carrier.
o
n certain types of ground and/
or if considerable loads are being
transported, call a P
eugeo
T dealer or
a qualified workshop.
The jack and tools are specific to your
vehicle. Do not use them for other
purposes.
Changing a wheel