child lock Peugeot Partner Tepee 2016 Owner's Manual
[x] Cancel search | Manufacturer: PEUGEOT, Model Year: 2016, Model line: Partner Tepee, Model: Peugeot Partner Tepee 2016Pages: 296, PDF Size: 10.76 MB
Page 4 of 296
2
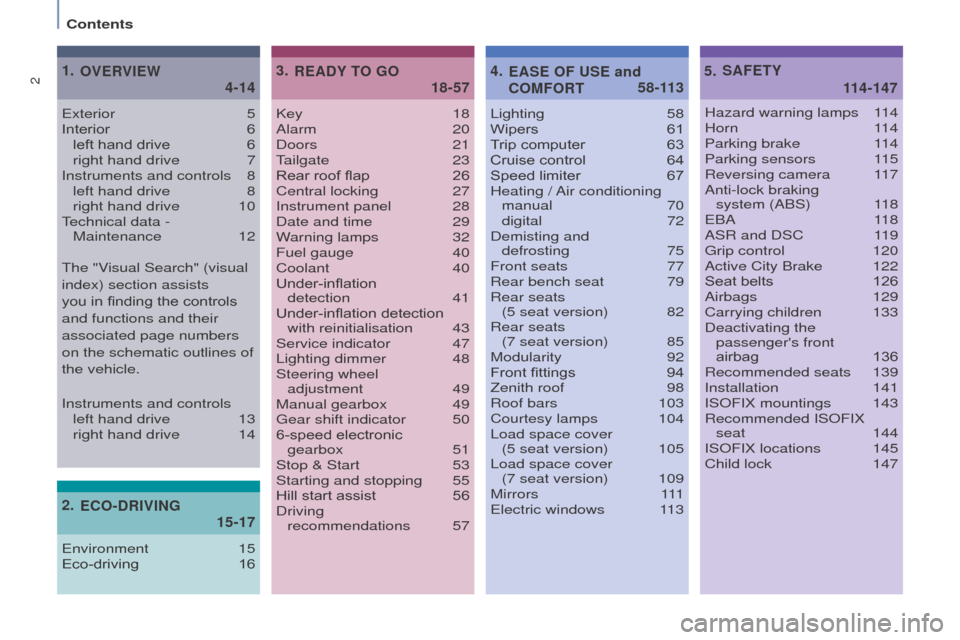
ContentsKey 18
Alarm
20
Doors
21
T
ailgate 23
Rear roof flap
26
Central locking
27
Instrument panel
28
Date and time
29
W
arning lamps
32
Fuel gauge
40
Coolant
40
Under-inflation detection
41
Under-inflation detection with reinitialisation
43
Service indicator
47
Lighting dimmer
48
Steering wheel
adjustment
49
Manual gearbox
49g
ear shift indicator
50
6-speed electronic
gearbox
51
Stop & Start
53
Starting and stopping
55
Hill start assist
56
Driving
recommendations
57Lighting
58
Wipers
61
T
rip computer
63
Cruise control
64
Speed limiter
67
Heating /
Air conditioning
manual
70
digital
72
Demisting and
defrosting
75
Front seats
77
Rear bench seat
79
Rear seats
(5 seat version)
82
Rear seats
(7 seat version)
85
Modularity
92
Front fittings
94
Zenith roof
98
Roof bars
103
Courtesy lamps
104
Load space cover
(5 seat version)
105
Load space cover
(7 seat version)
109
Mirrors
111
e
lectric windows
1
13
3.
18-57
R
e ADY to go5 .
1
14-147
SAF
et Y
exterior 5
Interior 6 left hand drive
6 right hand drive
7
Instruments and controls
8 left hand drive
8 right hand drive
10
T
echnical data - Maintenance
12
oVeRVIeW
1
.
4-14
Hazard warning lamps 1 14
Horn 114
Parking brake
1
14
Parking sensors
1
15
Reversing camera
1
17
Anti-lock braking system
(ABS)
1
18
e
BA
118
ASR and DSC
1
19
g
rip control
120
Active City Brake
122
Seat belts
126
Airbags
129
Carrying children
133
Deactivating the passenger's front
airbag
136
Recommended seats
139
Installation
141
IS
o FIX mountings
143
Recommended IS
o FIX
seat
144
IS
o FIX locations
145
Child lock
147
4.
58-113eAS e o F u S e and
C
o MF o R t
2
.
15-17
e
C
o
-DRIVIN
g
environment 15
Eco-driving 16
The "V
isual Search" (visual
index) section assists
you in finding the controls
and functions and their
associated page numbers
on the schematic outlines of
the vehicle.
Instruments and controls
left hand drive
13 right hand drive
14
Page 7 of 296
5
Location
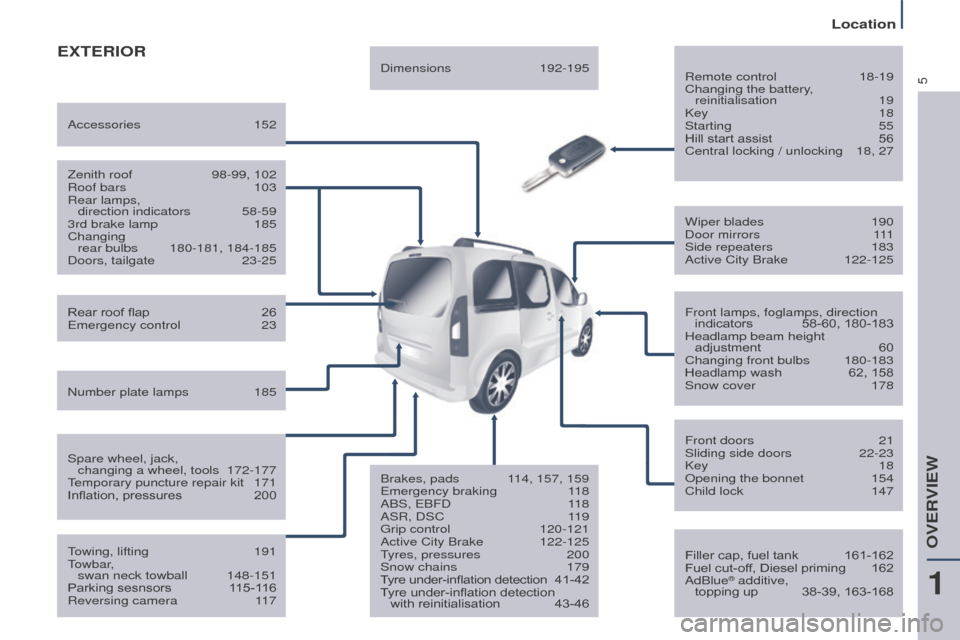
exteRIoR
Remote control 18-19
Changing the battery ,
reinitialisation
19
Key
18
Starting
55
Hill start assist
56
Central locking / unlocking
18, 27
Filler cap, fuel tank
161-162
Fuel cut-of
f, Diesel priming
162
AdBlue® additive,
topping up 38-39, 163-168
Wiper blades
190
Door mirrors
1
11
Side repeaters
183
Active City Brake
122-125
Front lamps, foglamps, direction indicators
58-60, 180-183
Headlamp beam height adjustment
60
Changing front bulbs
180-183
Headlamp wash
62, 158
Snow cover
178
Front doors
21
Sliding side doors
22-23
Key
18o
pening the bonnet
154
Child lock
147
T
owing, lifting
191
T
owbar,
swan neck towball
148-151
Parking sesnsors
1
15-116
Reversing camera
1
17
Rear roof flap
26e
mergency control
23
Spare wheel, jack,
changing a wheel, tools
172-177
T
emporary puncture repair kit
171
Inflation, pressures
200
Zenith roof
98-99, 102
Roof bars
103
Rear lamps,
direction indicators
58-59
3rd brake lamp
185
Changing
rear bulbs
180-181, 184-185
Doors, tailgate
23-25
Accessories
152
Dimensions
192-195
Brakes, pads
1
14, 157, 159
e
mergency braking
1
18
ABS,
e
BFD
1
18
ASR, DSC
1
19
g
rip control
120-121
Active City Brake
122-125
T
yres, pressures
200
Snow chains
179
T
yre under-inflation detection
4
1-42
Tyre under-inflation detection with reinitialisation
43-46
Number plate lamps
185
1
oVeRVIeW
Page 11 of 296
9
Location
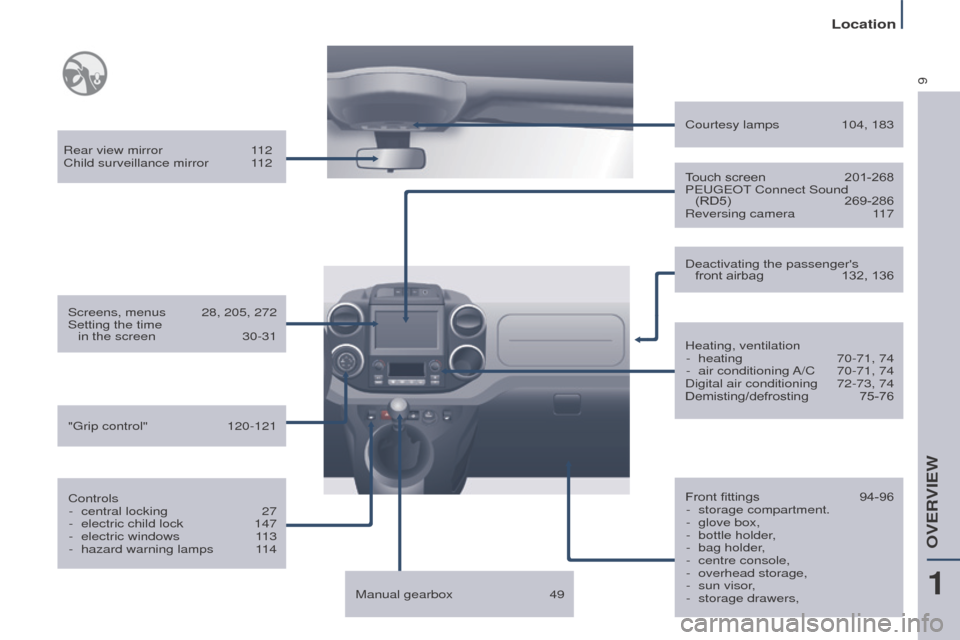
Rear view mirror 112
Child surveillance mirror 1 12
Screens, menus
28, 205, 272
Setting the time
in the screen
30-31
Controls -
central locking
27
-
electric child lock
147
-
electric windows
1
13
-
hazard warning lamps
1
14 Heating, ventilation
-
heating
70-71, 74
-
air conditioning
A/C
70-71, 74
Digital air conditioning
72-73, 74
Demisting/defrosting
75-76
Courtesy lamps
104, 183
Front fittings
94-96
-
storage compartment.
-
glove box,
-
bottle holder
,
-
bag holder
,
-
centre console,
-
overhead storage,
-
sun visor
,
-
storage drawers,
T
ouch screen
201-268
Peugeo
T
Connect Sound
(RD5)
269-286
Reversing camera
1
17
Deactivating the passenger's front airbag
132, 136
Manual gearbox
49
"
g rip control"
120-121
1
oVeRVIeW
Page 12 of 296
10
Location
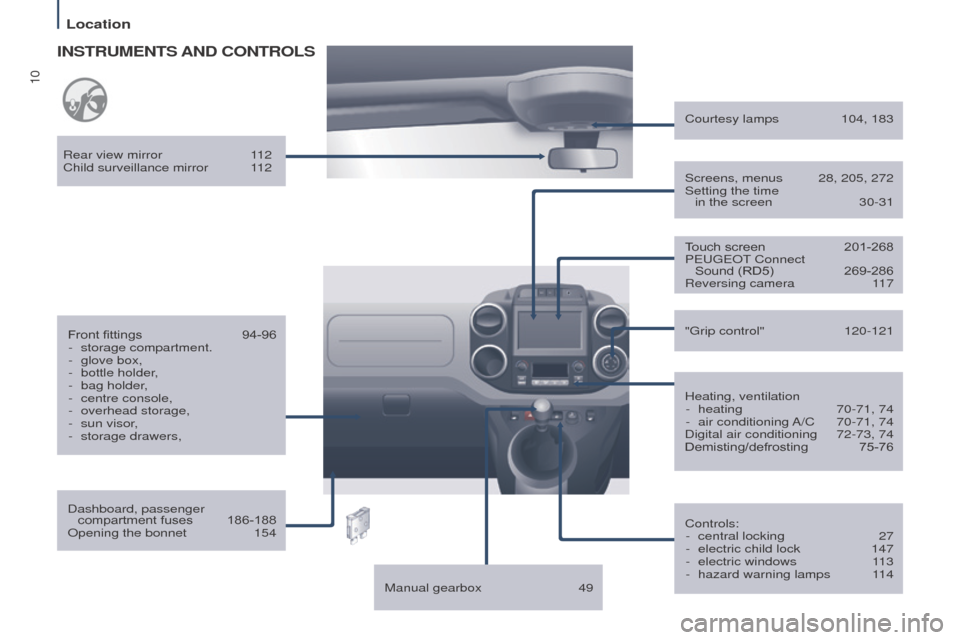
INStRuMeNtS AND Co N t R o LS
Dashboard, passenger
compartment fuses 186-188o
pening the bonnet
154
Front fittings
94-96
-
storage compartment.
-
glove box,
-
bottle holder
,
-
bag holder
,
-
centre console,
-
overhead storage,
-
sun visor
,
-
storage drawers,
Rear view mirror
1
12
Child surveillance mirror
1
12
Manual gearbox
49T
ouch screen
201-268
Peugeo
T
Connect
Sound (RD5)
269-286
Reversing camera
1
17
Controls: -
central locking
27
-
electric child lock
147
-
electric windows
1
13
-
hazard warning lamps
1
14
"
g rip control"
120-121
Heating, ventilation -
heating
70-71, 74
-
air conditioning
A/C
70-71, 74
Digital air conditioning
72-73, 74
Demisting/defrosting
75-76
Courtesy lamps
104, 183
Screens, menus
28, 205, 272
Setting the time
in the screen
30-31
Page 15 of 296
13
Presentation
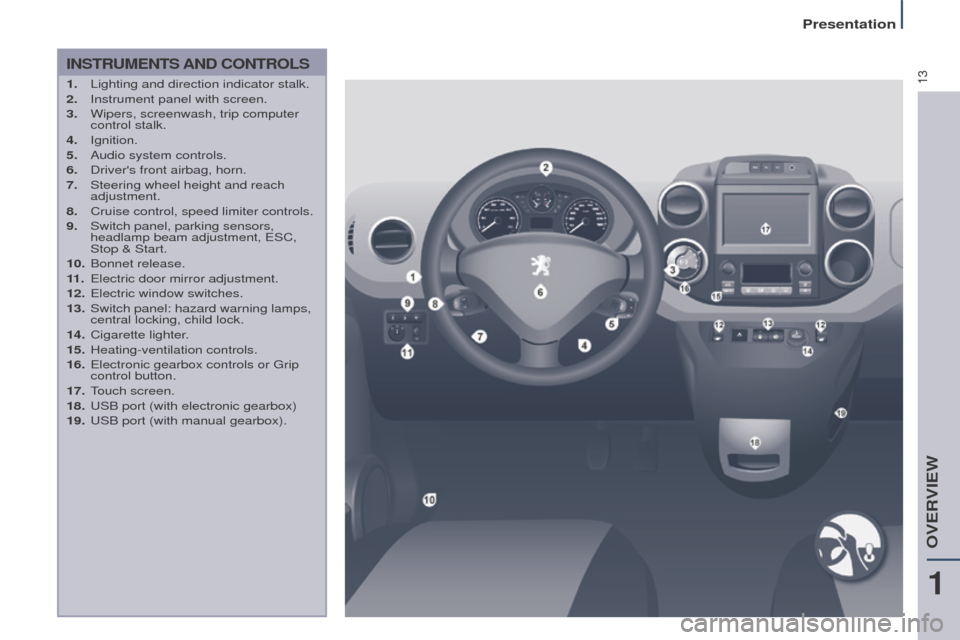
INStRuMeNtS AND Co N t R o LS
1. Lighting and direction indicator stalk.
2. Instrument panel with screen.
3.
Wipers, screenwash, trip computer
control stalk.
4.
Ignition.
5.
Audio system controls.
6.
Driver's front airbag, horn.
7.
Steering wheel height and reach
adjustment.
8.
Cruise control, speed limiter controls.
9.
Switch panel, parking sensors,
headlamp beam adjustment,
e SC,
Stop & Start.
10.
Bonnet release.
11
.
e lectric door mirror adjustment.
12.
e lectric window switches.
13.
Switch panel: hazard warning lamps,
central locking, child lock.
14.
Cigarette lighter
.
15.
Heating-ventilation controls.
16.
e lectronic gearbox controls or g rip
control button.
17.
T
ouch screen.
18.
u
SB port (with electronic gearbox)
19.
u
SB port (with manual gearbox).
1
oVeRVIeW
Page 16 of 296
14
Presentation
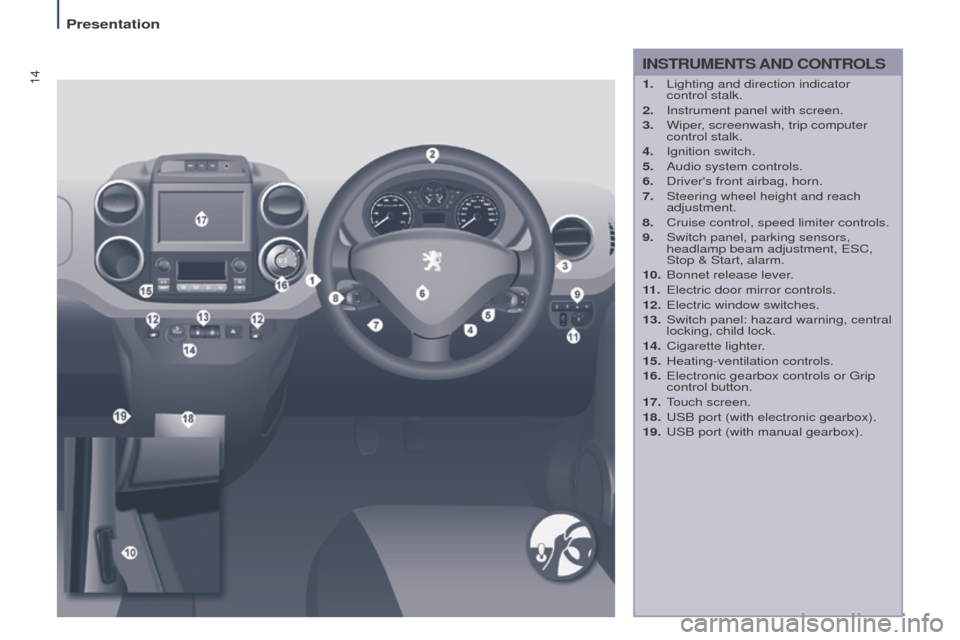
INStRuMeNtS AND Co N t R o LS
1. Lighting and direction indicator
control stalk.
2.
Instrument panel with screen.
3.
Wiper
, screenwash, trip computer
control stalk.
4.
Ignition switch.
5.
Audio system controls.
6.
Driver's front airbag, horn.
7.
Steering wheel height and reach
adjustment.
8.
Cruise control, speed limiter controls.
9.
Switch panel, parking sensors,
headlamp beam adjustment,
e SC,
Stop & Start, alarm.
10.
Bonnet release lever
.
11 .
e lectric door mirror controls.
12.
e lectric window switches.
13.
Switch panel: hazard warning, central
locking, child lock.
14.
Cigarette lighter
.
15.
Heating-ventilation controls.
16.
e lectronic gearbox controls or g rip
control button.
17.
T
ouch screen.
18.
u SB port (with electronic gearbox).
19.
u SB port (with manual gearbox).
Page 22 of 296
20
AccessDon't forget
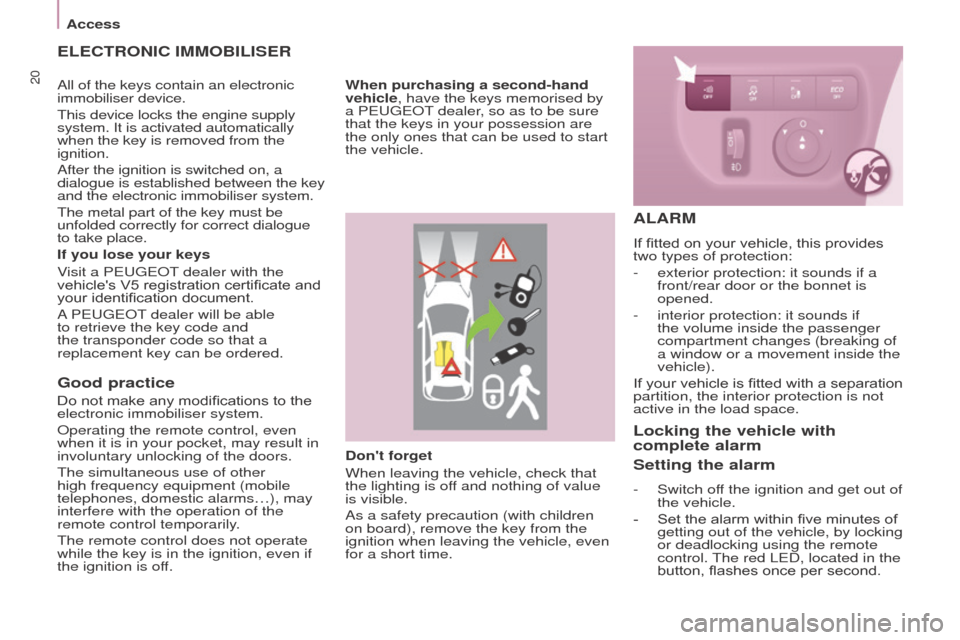
When leaving the vehicle, check that
the lighting is off and nothing of value
is visible.
As a safety precaution (with children
on board), remove the key from the
ignition when leaving the vehicle, even
for a short time.
good practice
Do not make any modifications to the
electronic immobiliser system.
o
perating the remote control, even
when it is in your pocket, may result in
involuntary unlocking of the doors.
The simultaneous use of other
high frequency equipment (mobile
telephones, domestic alarms…), may
interfere with the operation of the
remote control temporarily.
The remote control does not operate
while the key is in the ignition, even if
the ignition is off.
eLeCtRoNIC IMMoBILISeR
If you lose your keys
Visit a P
eugeo T dealer with the
vehicle's V5 registration certificate and
your identification document.
A P
eugeo T dealer will be able
to retrieve the key code and
the transponder code so that a
replacement key can be ordered. When purchasing a second-hand
vehicle, have the keys memorised by
a P
eugeo T dealer, so as to be sure
that the keys in your possession are
the only ones that can be used to start
the vehicle.
ALARM
If fitted on your vehicle, this provides
two types of protection:
-
exterior protection: it sounds if a
front/rear door or the bonnet is
opened.
-
interior protection: it sounds if
the volume inside the passenger
compartment changes (breaking of
a window or a movement inside the
vehicle).
If
your vehicle is fitted with a separation
partition, the interior protection is not
active in the load space.
Locking the vehicle with
complete alarm
Setting the alarm
- Switch of f the ignition and get out of
the vehicle.
-
Set the alarm within five minutes of
getting out of the vehicle, by locking
or deadlocking using the remote
control.
The red L e D, located in the
button, flashes once per second.
All of the keys contain an electronic
immobiliser device.
This device locks the engine supply
system. It is activated automatically
when the key is removed from the
ignition.
After the ignition is switched on, a
dialogue is established between the key
and the electronic immobiliser system.
The metal part of the key must be
unfolded correctly for correct dialogue
to take place.
Page 103 of 296
101
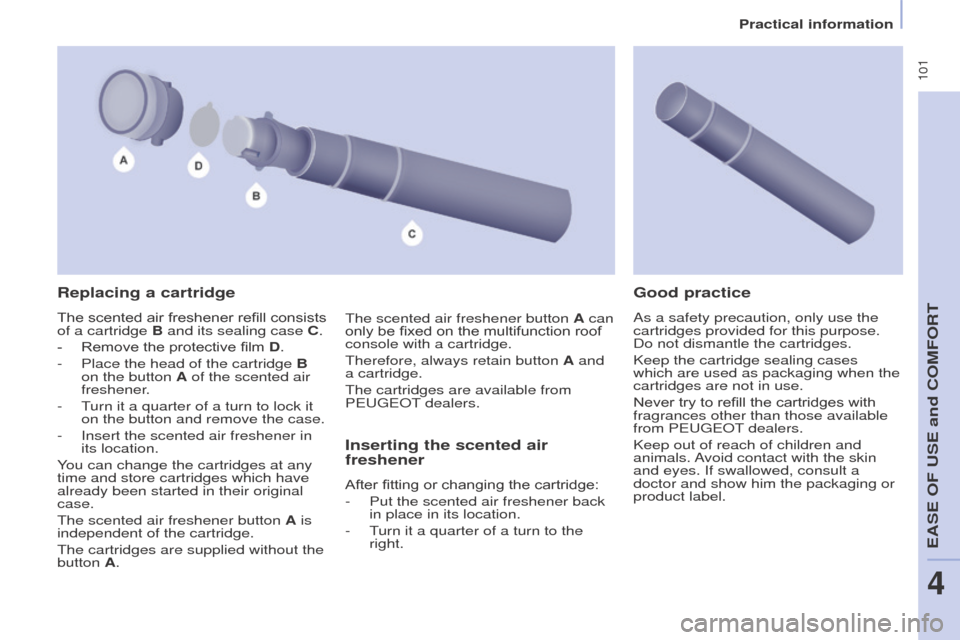
Replacing a cartridge
The scented air freshener refill consists
of a cartridge B and its sealing case C.
-
Remove the protective film
D.
-
Place the head of the cartridge
B
on the button A of the scented air
freshener.
-
T
urn it a quarter of a turn to lock it
on the button and remove the case.
-
Insert the scented air freshener in
its location.
Y
ou can change the cartridges at any
time and store cartridges which have
already been started in their original
case.
The scented air freshener button A is
independent of the cartridge.
The cartridges are supplied without the
button A.
Inserting the scented air
freshener
After fitting or changing the cartridge:
-
Put the scented air freshener back
in place in its location.
-
T
urn it a quarter of a turn to the
right.
good practice
As a safety precaution, only use the
cartridges provided for this purpose.
Do not dismantle the cartridges.
Keep the cartridge sealing cases
which are used as packaging when the
cartridges are not in use.
Never try to refill the cartridges with
fragrances other than those available
from P
eugeo T dealers.
Keep out of reach of children and
animals. Avoid contact with the skin
and eyes. If swallowed, consult a
doctor and show him the packaging or
product label.
The scented air freshener button A can
only be fixed on the multifunction roof
console with a cartridge.
Therefore, always retain button A and
a cartridge.
The cartridges are available from
P
eugeo
T dealers.
eASe oF uSe and CoMFoRT
4
Practical information
Page 129 of 296
127
Recommendations for children:
-
use a suitable child seat if the
passenger is less than 12 years old
or shorter than one metre fifty
,
-
never allow a child to travel on
your lap, even with the seat belt
fastened. For more information on child
seats, refer to the "Child safety"
section of chapter 5.
Clean the seat belt straps with
soapy water or a textile cleaning
product, sold by P
eugeo T
dealers.
In accordance with current safety
regulations, your P
eugeo T dealer
can guarantee all work or any checks,
from testing to maintenance, on your
seat belt equipment.
Have the seat belts checked regularly
(even after a minor impact) by a
PEUGEOT dealer or a qualified
workshop: they must not show any
signs of wear, cutting or fraying
and they must not be converted or
modified.
The force limiter reduces the pressure
of the seat belt against the body of the
occupants.
The pretensioning seat belts are active
when the ignition is switched on.
The inertia reels are fitted with a device
which automatically locks the strap in
the event of a collision or emergency
braking or if the vehicle rolls over.
You can unfasten the seat belt by
pressing the red button on the buckle.
g
uide the seat belt after unfastening.
The airbag warning lamp comes on
if the pretensioners are deployed.
Contact a P
eugeo
T dealer or a
qualified workshop.
In order to be effective, a seat belt:
-
must restrain one person only
,
-
must not be twisted, check by
pullin
g in front of you with an even
movement,
-
must be tightened as close to the
body as possible.
The upper part of the seat belt should
be positioned in the hollow of the
shoulder
.
The lap part should be placed as low
as possible on the pelvis.
Do not interchange the seat belt
buckles as they will not fulfil their role
properly. If the seats are fitted with
armrests, the lap part of the seat belt
should always pass under the armrest.
Check that the seat belt is fastened
correctly by pulling the strap firmly.Front seat belts
The front seats are fitted with
pretensioners and force limiters.
Rear seat belts
(5 seat version)
The rear seats are fitted with
three-point inertia reel seat belts.
SAFeTY
5
Seat belts
Page 148 of 296
146
ADVICe oN CHILD SeAtS
At the rear, always leave sufficient
space between the front seat and:
-
a rearward facing child seat,
-
the feet of a child seated in a
forward facing child seat.
For this, move the front seat forward
and, if necessary
, straighten its
backrest as well. The incorrect installation of a child seat
in a vehicle compromises the child's
protection in the event of an accident.
Check that there is no seat belt or seat
belt buckle under the child seat, as this
could destabilise the seat.
Remember to fasten the seat belts or
the child seat harnesses keeping the
slack relative to the child's body to a
minimum, even for short journeys.
For the installation of a child seat using
the seat belt, ensure that the seat belt
is well tensioned on the child seat
and that it is holding the child seat
firmly against the vehicle's seat. If the
passenger seat is adjustable, move it
forward if necessary. For the optimum installation of a
forward facing child seat, ensure that
the back of the child seat is as close as
possible to the backrest of the vehicle's
seat, or in contact if possible.
The head restraint must be removed
before installing a child seat with a
backrest on the passenger seat.
e
nsure that the head restraint is
stowed or attached securely so that it
is not thrown around the vehicle in the
event of sharp braking.
Refit the head restraint as soon as the
child seat is removed.Children at the front
The legislation on carrying a child on
the front passenger seat is specific to
each country. Refer to the legislation in
force in your country.
Deactivate the passenger's airbag
when a rearward facing child seat is
installed on the front seat.
o
therwise, the child would risk being
seriously injured or killed if the airbag
were deployed.
Installing a booster seat
The chest part of the seat belt must
be positioned on the child's shoulder
without touching the neck.
e
nsure that the lap part of the seat belt
passes correctly over the child's thighs.
P
eugeo T recommends the use of a
booster seat which has a back, fitted
with a seat belt guide at shoulder level.
As a safety precaution, never leave:
-
one or more children alone and
unsupervised in a vehicle,
-
a child or an animal in a vehicle
which is exposed to the sun, with
the windows closed,
-
the keys within reach of children
inside the vehicle.
T
o prevent accidental opening of the
doors, use the "Child Lock".
Take care not to open the rear windows
by more than one third.
To protect young children from the rays
of the sun, fit side blinds to the rear
windows.
For an installation in row 3, put the
backrests of the outer and centre
seats in row 2 in the table position, or
remove these seats in row 2, so that
the child seat or the child's legs do not
touch the seats in row 2.
Child safety