reset PONTIAC BONNEVILLE 1993 Owners Manual
[x] Cancel search | Manufacturer: PONTIAC, Model Year: 1993, Model line: BONNEVILLE, Model: PONTIAC BONNEVILLE 1993Pages: 322, PDF Size: 16.31 MB
Page 77 of 322
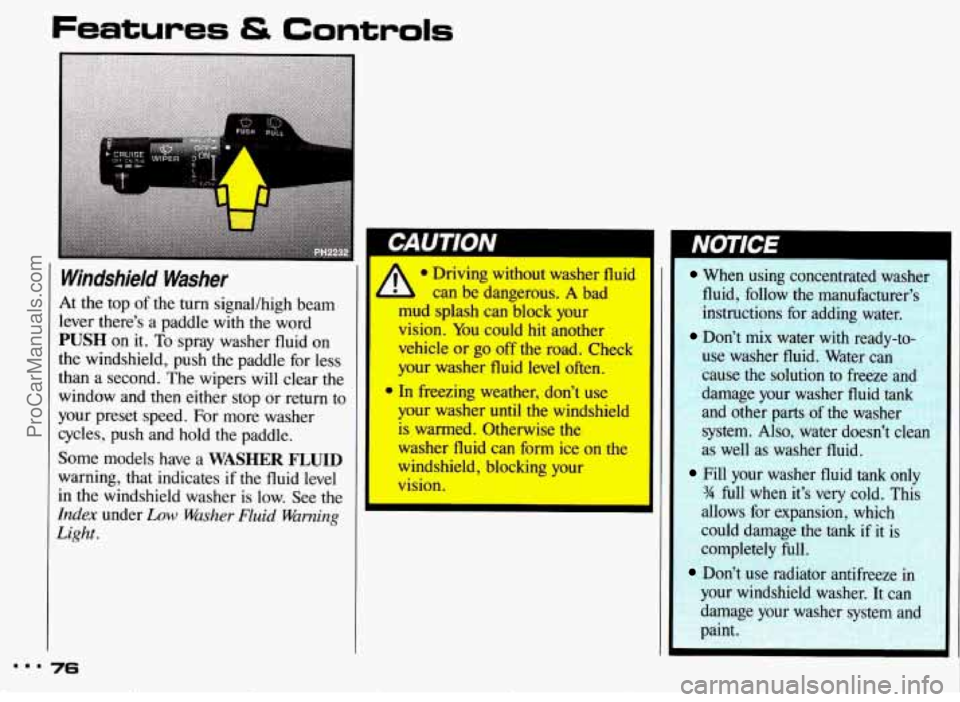
Windshield Washer
At the top of the turn signal/high beam
lever there’s a paddle with the word
PUSH on it. To spray washer fluid on
the windshield, push the paddle for less
than a second. The wipers will clear the
window and then either stop or return to
your preset speed. For more washer
cycles, push and hold the paddle.
Some models have a
WASHER FLUID
warning, that indicates if the fluid level
in the windshield washer is low. See the
Index under Low Washer Fluid Warning
Light.
When using concentrated washer
fluid, follow the manufacturer’s
instructions for adding water.
Don’t mix water with ready-to-
use washer fluid. Water can
cause the solution
to freeze an ’
damage your washer fluid tank
and other parts of the washer
system.
Also, water doesn’t clean
as well as washer fluid.
Fill your washer fluid tank only
% full when it’s very cold. This
allows for expansion, which
could damage the
tank if it is
completely full.
Don’t use radiator antifreeze in
your windshield washer. It can
damage your washer system and
paint.
Y ProCarManuals.com
Page 79 of 322
Features & Controls
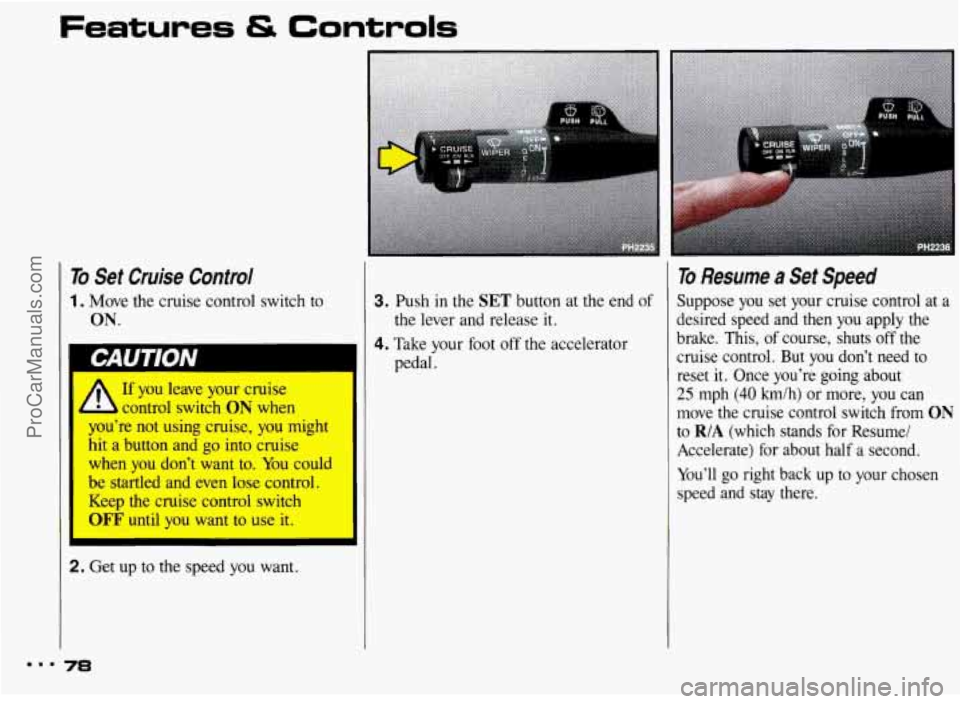
To Set Cruise Control
1. Move the cruise control switch to
ON.
I CAUlfON
A If you leave your cruise
control switch
ON when
u’re not using cruise,
you might
hit
a button and go into cruise
when
you don’t want to. You could
be startled and even lose control.
Keep the cruise control switch
OFF until you want to use it.
2. Get up to the speed you want.
78
3. Push in the SET button at the end of
4. Take your foot off the accelerator
the lever and release
it.
pedal.
To Resume a Set Speed
Suppose
you set your cruise control at a
desired speed and then you apply the
brake. This,
of course, shuts off the
cruise control. But you don’t need to
reset it. Once you’re going about
25 mph (40 b/h) or more, you can
move the cruise control switch from
ON
to R/A (which stands for Resume/
Accelerate) for about half a second.
You’ll go right back up to your chosen speed and stay there.
ProCarManuals.com
Page 96 of 322
r
The Instrument &ne/-
bur Information System
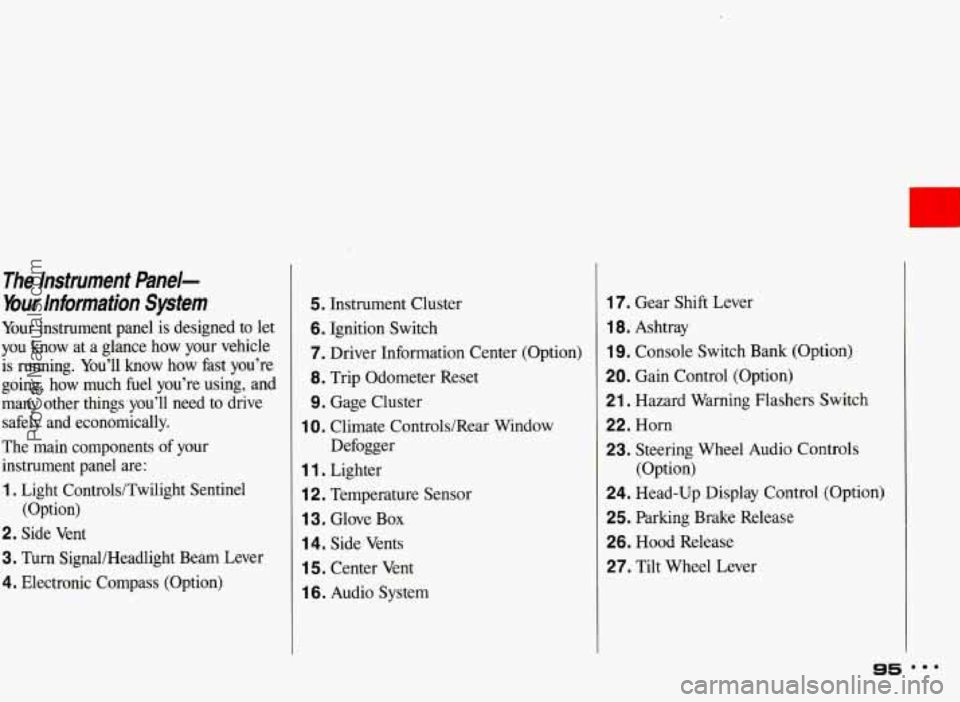
Your instrument panel is designed to let
you know at a glance how your vehicle
is running. You’ll know how fast you’re
going, how much fuel you’re using, and
many other things you’ll need to drive
safely and economically.
The main components of your
instrument panel are:
1. Light Controls/Twilight Sentinel
2. Side Vent
3. Turn SignaUHeadlight Beam Lever
4. Electronic Compass (Option) (Option)
5. Instrument Cluster
6. Ignition Switch
7. Driver Information Center
(Option)
8. Trip Odometer Reset
9. Gage Cluster
Defogger
1 0. Climate Controls/Rear Window
1 1 . Lighter
i 2. Temperature Sensor
1 3. Glove Box
14. Side Vents
1 5. Center Vent
1 6. Audio System
17. Gear Shift Lever
1 8. Ashtray
19. Console Switch Bank (Option)
20. Gain Control (Option)
21. Hazard Warning Flashers Switch
22. Horn
23. Steering Wheel Audio Controls
24. Head-Up Display Control (Option)
25. Parking Brake Release
26. Hood Release
27. Tilt Wheel Lever (Option)
95 mmm
ProCarManuals.com
Page 99 of 322
Features & Controls
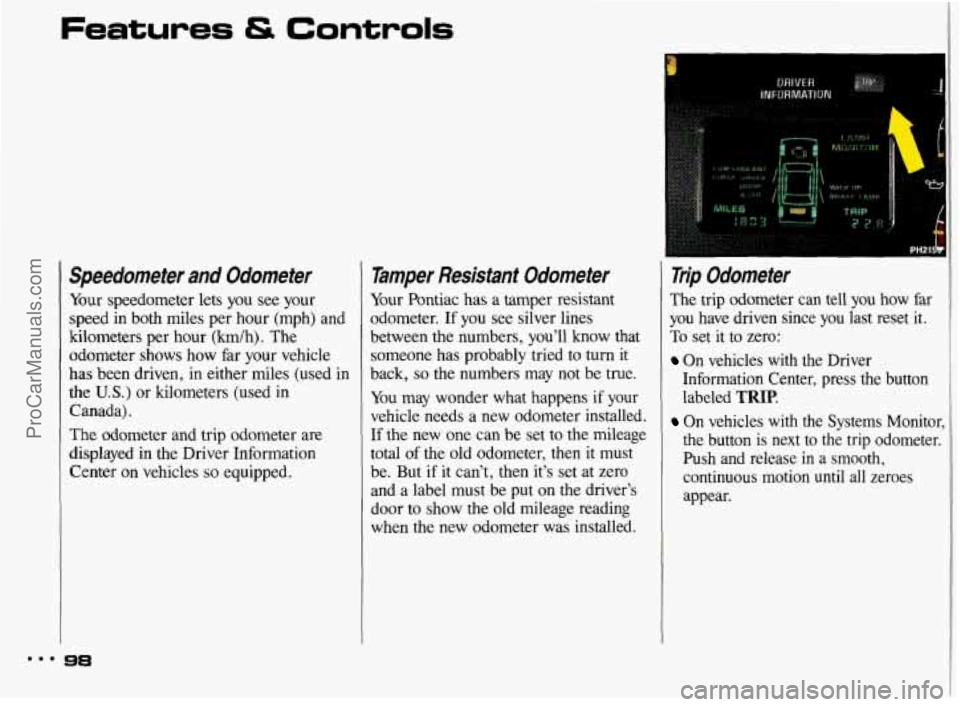
Speedometer and Odometer
Your speedometer lets you see your
speed in both miles per hour (mph) and
kilometers per hour
(km/h). The
odometer shows how far your vehicle
has been driven, in either miles (used in
the U.S.) or kilometers (used in
Canada).
The odometer and trip odometer are
displayed
in the Driver Information
Center on vehicles
so equipped.
Tamper Resistant Odometer
Your Pontiac has a tamper resistant
odometer. If you see silver lines
between the numbers, you’ll know that
someone has probably tried to turn
it
back, so the numbers may not be true.
You may wonder what happens if your
vehicle needs a new odometer installed.
If the new one can be set to the mileage
total of the old odometer, then it must
be. But if it can’t, then it’s set at zero
and a label must be put on the driver’s
door to show the old mileage reading
when the new odometer was installed.
Trip Odometer
The trip odometer can tell you how far
you have driven since you last reset it.
To set it to zero:
On vehicles with the Driver
Information Center, press the button
labeled
TRIP.
On vehicles with the Systems Monitor,
the button
is next to the trip odometer.
Push and release in a smooth,
continuous motion
until all zeroes
appear.
ProCarManuals.com
Page 107 of 322
Features Controls
Brake System Warning Light
(CONT.)
Your brake system may not be
working properly if the brake
warning light is on. Driving with
the brake warning light
on can lead
to an accident. If the light is still
on after you’ve pulled off the road
and stopped carefully, have the
vehicle towed for service.
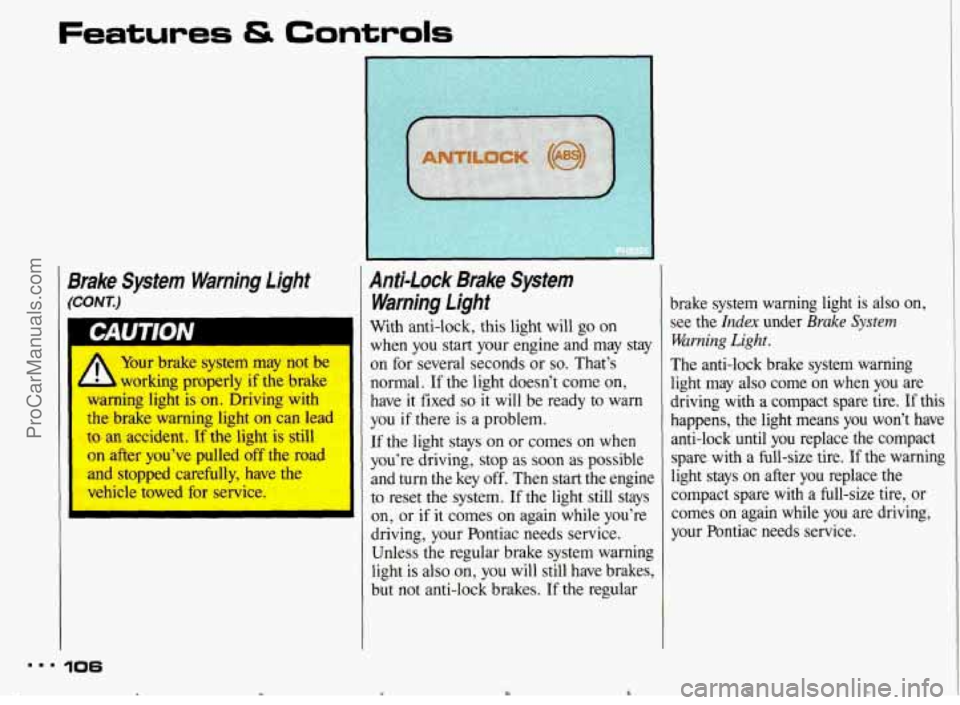
Anti-lock Brake System
Warning light
With anti-lock, this light will go on
when you start your engine and may stay
on for several seconds or
so. That’s
normal. If the light doesn’t come on,
have it fixed
so it will be ready to warn
you
if there is a problem.
If the light stays on or comes on when
you’re driving, stop as soon as possible
and turn the key off. Then start the engine
to reset the system.
If the light still stays
on, or if it comes on again while you’re
driving, your Pontiac needs service.
Unless the regular brake system warning
light is also on, you will still have brakes,
but not anti-lock brakes.
If the regular
mm. 106
c Y
brake system warning light is also on,
see the
Index under Brake System
Warning Light.
The anti-lock brake system warning
light may also come on when you are
driving with a compact spare tire.
If this
happens, the light means you won’t have
anti-lock until you replace the compact
spare with a full-size tire.
If the warning
light stays
on after you replace the
compact spare with a full-size tire, or
comes
on again while you are driving,
your Pontiac needs service.
ProCarManuals.com
Page 129 of 322
m..
Comfort Controls & Audio Systems
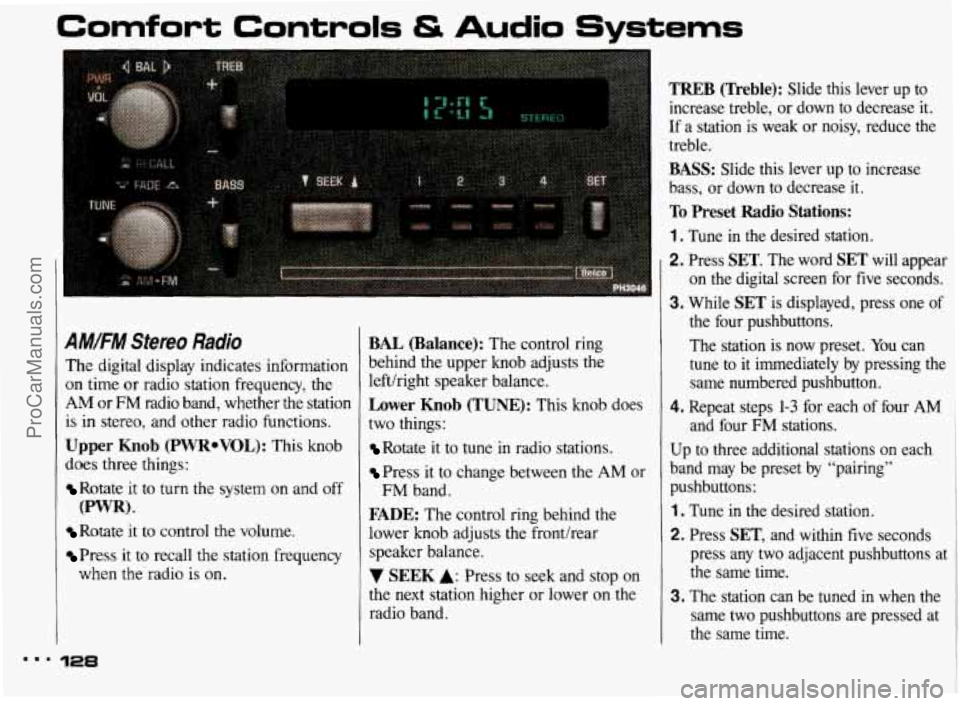
A#.FM Stereo Radio
The digital display indicates information
on time or radio station frequency, the
AM or FM radio band, whether the station
is
in stereo, and other radio functions.
Upper Knob (PWRoVOL): This knob
does three things:
Rotate it to turn the system on and off
Rotate it to control the volume.
Press it to recall the station frequency
(PWR).
when the radio is on.
128
BAL (Balance): The control ring
behind the upper knob adjusts the
lefthight speaker balance.
Lower Knob (TUNE): This knob does
two things:
Rotate it to tune in radio stations.
Press it to change between the AM or
FADE: The control ring behind the
lower knob adjusts the fronthear
speaker balance.
7 SEEK A: Press to seek and stop on
the next station higher or lower
on the
radio band.
FM band.
TREB (Treble): Slide this lever up to
increase treble, or down to decrease it.
If a station is weak or noisy, reduce the
treble.
BASS: Slide this lever up to increase
bass, or down to decrease
it.
To Preset Radio Stations:
1 . Tune in the desired station.
2. Press SET. The word SET will appear
on the digital screen for five seconds.
3. While SET is displayed, press one of
the four pushbuttons.
The station is now preset. You can
tune to
it immediately by pressing the
same numbered pushbutton.
4. Repeat steps 1-3 for each of four AM
and four FM stations.
Up to three additional stations on each
band may be preset by “pairing”
pushbuttons:
1 . Tune in the desired station.
2. Press SET, and within five seconds
press any two adjacent pushbuttons at
the same time.
3. The station can be tuned in when the
same two pushbuttons are pressed at
the same time.
ProCarManuals.com
Page 130 of 322
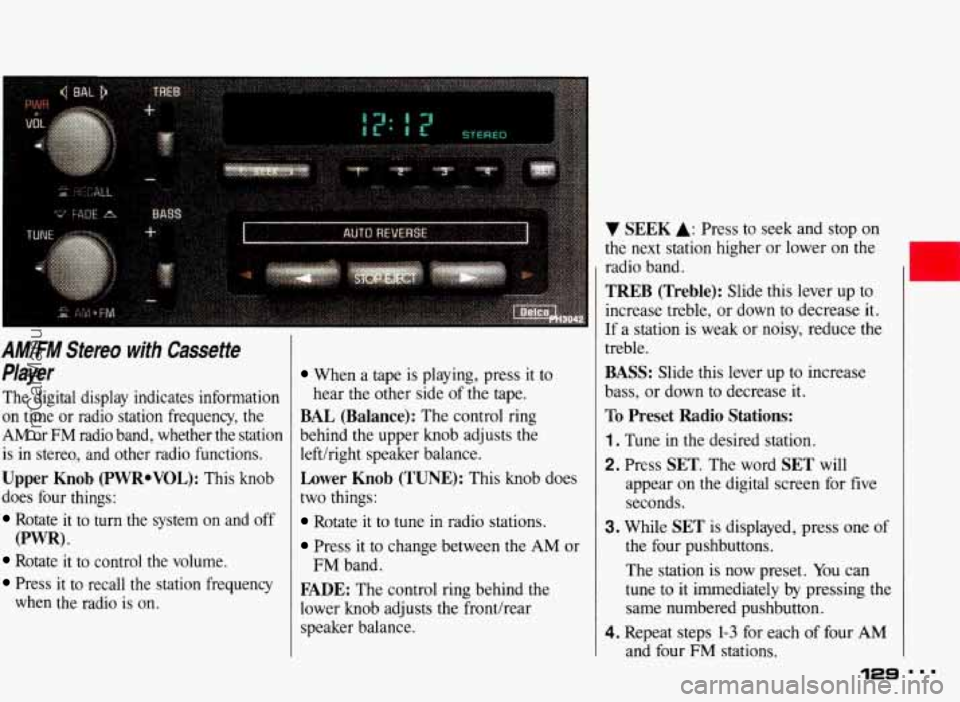
AM/FM Stereo with Cassette
Player
The digital display indicates information
on time or radio station frequency, the
AM or FM radio band, whether the station
is in stereo, and other radio functions.
Upper Knob (PWRoVOL): This knob
does four things:
Rotate it to turn the system on and off
Rotate it to control the volume.
Press it to recall the station frequency
(PWR) *
when the radio is on.
When a tape is playing, press it to
hear the other side
of the tape.
BAL (Balance): The control ring
behind the upper knob adjusts the
lefthight speaker balance.
Lower Knob (TUNE): This knob does
two things:
Rotate it to tune in radio stations.
Press it to change between the AM or
FADE: The control ring behind the
lower knob adjusts the fronthear
speaker balance.
FM band.
V SEEK A: Press to seek and stop on
the next station higher or lower
on the
radio band.
TREB (Treble): Slide this lever up to
increase treble, or down
to decrease it.
If a station is weak or noisy, reduce the
treble.
BASS: Slide this lever up to increase
bass, or down to decrease it.
To Preset Radio Stations:
1. Tune in the desired station.
2. Press SET. The word SET will
appear
on the digital screen for five
seconds.
3. While SET is displayed, press one of
the four pushbuttons.
The station is
now preset. You can
tune
to it immediately by pressing the
same numbered pushbutton.
4. Repeat steps 1-3 for each of four AM
and four FM stations.
129 ...
ProCarManuals.com
Page 131 of 322
Comfort Controls & Audio Systems
AMIFM Stereo with Cassette
Player
(CONX:)
Up to three additional stations on each
band may be preset by “pairing”
pushbuttons:
1. Tune in the desired station.
2. Press SET, and within five seconds
press any two adjacent pushbuttons at
the same time.
3. The station can be tuned in when the
same two pushbuttons are pressed at
the same time.
To Play a Cassette Tape:
With the power switch on, insert a tape
into the cassette door. Do not use tapes
that are longer than
45 minutes on each
side.
When the right indicator arrow is lit,
selections listed on the bottom side
of
the cassette are playing. When the left
arrow is lit, selections listed on the top
side
of the cassette are playing. To
change sides of the tape, press the upper
control knob while the cassette is
playing. When the end
of a tape is
reached, the other side will then play.
FAST FORWARD: Depress the button
with the arrow pointing
in the same
direction that the tape is playing.
To stop
fast forward, press the
STOP-EJECT
button.
REWRSE: Depress the button with the
arrow pointing in the opposite direction
that the tape is playing.
To stop reverse,
press the
STOP-EJECT button.
STOP-EJECT To stop playing a tape,
fully press this button (the cassette will be partially ejected, and the radio will
begin playing).
ProCarManuals.com
Page 132 of 322
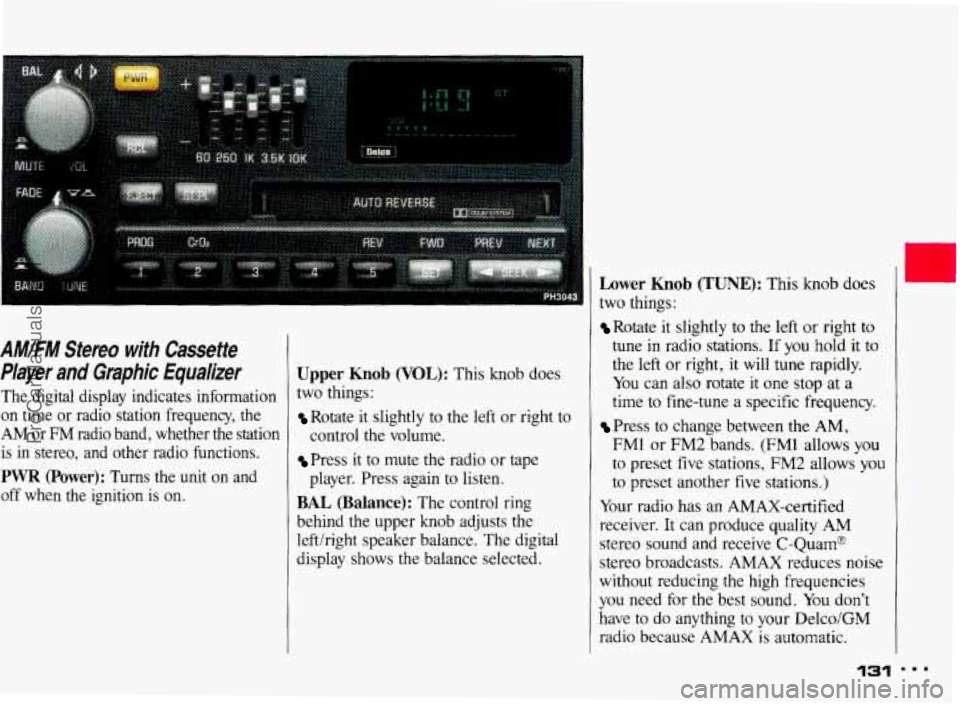
AM/FM Stereo with Cassette
Player and Graphic Equalizer
The digital display indicates information
on time
or radio station frequency, the
AM or FM radio band, whether the station is in stereo, and other radio functions.
PWR (Power): Turns the unit on and
off when the ignition
is on.
Upper Knob (VOL): This knob does
two things:
Rotate it slightly to the left or right to
control the volume.
Press it to mute the radio or tape
BAL (Balance): The control ring
behind the upper knob adjusts the
lefthight speaker balance. The digital
display shows the balance selected. player.
Press again to listen.
Lower Knob (TUNE): This knob does
two things:
Rotate it slightly to the left or right to
tune in radio stations. If you hold it to
the
left or right, it will tune rapidly.
You can also rotate
it one stop at a
time to fine-tune a specific frequency.
Press to change between the AM,
FM1 or FM2 bands. (FM1 allows
you
to preset five stations, FM2 allows you
to preset another five stations.)
Your radio has an AMAX-certified
receiver. It can produce quality AM
stereo sound and receive C-Quam@
stereo broadcasts. AMAX reduces noise
without reducing the high frequencies
you need for the best sound. You don’t
have
to do anything to your Delco/GM
radio because AMAX is automatic.
1,
131
ProCarManuals.com
Page 133 of 322
Comfort Controls & Audio Systems
AM/FM Stereo with Cassette
Player and Graphic Equalizer
(CONI)
FADE: The control ring behind the
lower knob adjusts the fronthear
speaker balance. The digital display
shows the degree of fade selected,
4SEEKb: Press to seek and stop on
the next station higher or lower on the
radio band.
RCL: Press to alternate the display
between the time and station frequency.
EQUALIZER: Boost the bass,
emphasize a voice in a song, brighten
the treble-your equalizer gives you
freedom to adjust five separate
frequencies of sound
to your individual
taste. Move a lever up to emphasize a
frequency, move
it down to de-emphasize.
It’s best to begin with the levers in the
middle position, then adjust each lever
as you like.
To Preset Radio Stations:
The five pushbuttons under the digital ~
display can be used to preset UP to 15 I
radio stations (five AM, five FMl and
five FM2). The buttons have other uses
when you are playing a tape (see
Tape
Player).
1. Tune the digital display to the station
you want.
2. Press SET. The SET indicator will
appear
on the digital screen for five
seconds.
3. While the SET indicator is displayed,
press one
of the five pushbuttons.
4. Repeat steps 1-3 for each of five AM,
five FM1 and five FM2 stations.
m.. 132
ProCarManuals.com