steering wheel PONTIAC BONNEVILLE 1995 User Guide
[x] Cancel search | Manufacturer: PONTIAC, Model Year: 1995, Model line: BONNEVILLE, Model: PONTIAC BONNEVILLE 1995Pages: 338, PDF Size: 16.19 MB
Page 154 of 338
Off-Road Recovery
You may find sometime that your right wheels have
dropped off the edge of a road onto the shoulder while
you’re driving.
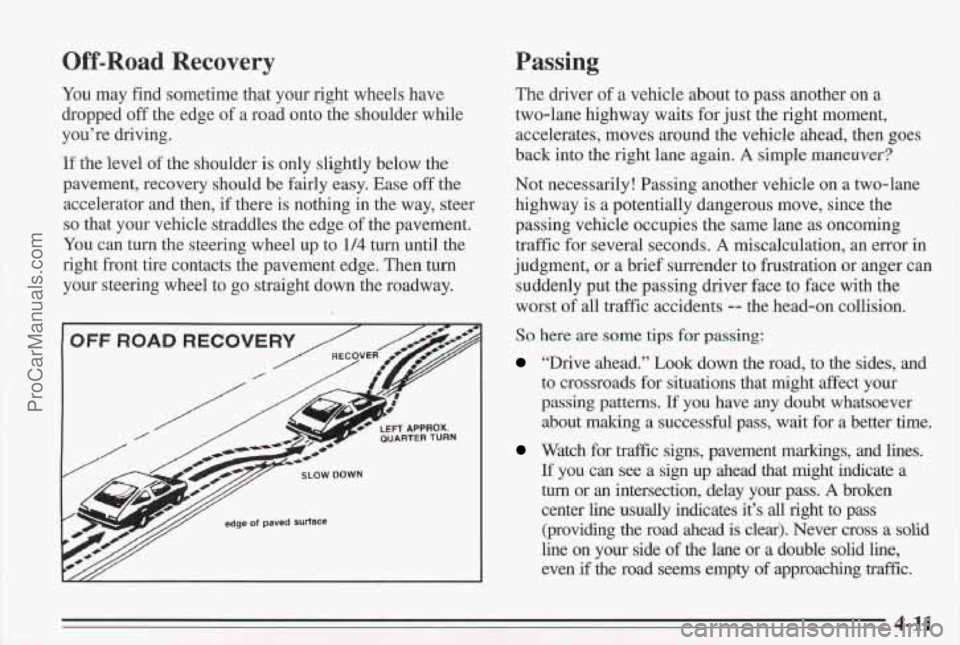
If the level of the shoulder is only slightly below the
pavement, recovery should be fairly easy. Ease off the
accelerator and then, if there is nothing in the way, steer
so that your vehicle straddles the edge of the pavenient.
You can turn the steering wheel up to
1/4 turn until the
right front tire contacts the pavement edge. Then turn
your steering wheel to go straight down the roadway.
IC* QUARTER TURN LEFT APPROX.
Passing
The driver of a vehicle about to pass another on a
two-lane highway waits for just the right moment,
accelerates, moves around the vehicle ahead, then goes
back into the right lane again.
A simple mmeuver?
Not necessarily! Passing another vehicle on a two-lane
highway is a potentially dangerous move, since the
passing vehicle occupies the same lane as oncoming
traffic for several seconds.
A miscalculation, an error in
judgment, or
a brief surrender to frustration or anger can
suddenly put the passing driver face to face with the
worst of
all traffic accidents -- the head-on collision.
So here are some tips for passing:
“Drive ahead.” Look down the road, to the sides, and
to crossroads for situations that might affect your
passing patterns.
If you have any doubt whatsoever
about making a successful pass, wait for a better time.
Watch for trfik signs, pavement markings, and lines.
If you can see a sign up ahead that might indicate a
turn or an intersection, delay your pass. A broken
center line usually indicates it’s
all right to pass
(providing
the road ahead is clear). Never cross a solid
line on your side of the lane or a double solid line,
even if the road seems empty of approaching traftic.
4-11
ProCarManuals.com
Page 156 of 338
Loss of Control
Let’s review what driving experts say about what
happens when the three control systems (brakes, steering
and acceleration) don’t have enough friction where the
tires meet
the road to do what the driver has asked.
In any emergency, don’t give up. Keep trying to steer
and constantly seek an escape route or area of less
danger.
Skidding
In a skid, a driver can lose control of the vehicle.
Defensive drivers avoid most skids by taking reasonable
care suited to existing conditions, and by not
“overdriving” those conditions. But
skids are always
possible.
The three types of skids correspond to your Pontiac’s
three control systems. In the braking skid your wheels
aren’t rolling.
In the steering or cornering skid, too
much speed or steering in a curve causes tires to slip and
lose cornering force. And in the acceleration skid too
much throttle causes the driving wheels to spin.
A cornering skid is best handled by easing your foot off
the accelerator pedal.
If you have the traction control system, remember: It
helps avoid only the acceleration skid.
If you do not have traction control, or if the system is
off, then an acceleration skid is also best handled by
easing your foot off the accelerator pedal.
If your vehicle starts to slide, ease your foot
off the
accelerator pedal and quickly steer the way
you want the
vehicle to go. If you start steering quickly enough, your
vehicle may straighten out. Always be ready for a
second skid if it occurs.
Of course, traction is reduced when water, snow, ice,
gravel, or other material is on the road. For safety, you’ll
want
to slow down and adjust your driving to these
conditions. It
is important to slow down on slippery
surfaces because stopping distance
will be longer and
vehicle control more limited.
While driving on a surface with reduced traction, txy your
best to avoid sudden steering, acceleration, or braking
(including engine braking by shifting to a lower gear).
Any sudden changes could cause
the tires to slide. YOU
may not realize the surface is slippery until your vehicle
is skidding. Leam to recognize warning clues -- such as
enough water, ice or packed snow on
the road to make a
“mirrored surface”
-- and slow down when you have
any doubt.
Remember: Any anti-lock brake system (ABS) helps
avoid only the braking
skid.
4-13 ProCarManuals.com
Page 177 of 338
Driving with a Trailer
Towing a trailer requires a certain mount of experience.
Before setting out for the open road, you’ll want to get
to
know your rig. Acquaint yourself with the feel of
handling and braking with the added weight of the
trailer. And always keep in mind that the vehicle you are
driving
is now a good deal longer and not nearly as
responsive as your vehicle
is by itself.
Before you start, check the trailer hitch and platform
(and attachments), safety chains, electrical connector,
lamps, tires
and mirror adjustment. If the trailer has
electric brakes, start your vehicle and trailer moving and
then apply the trailer brake controller by
hand to be sure
the brakes are working. This lets you check your
electrical connection at the same time.
During your trip, check occasionally to be sure that the
load is secure,
and that the lamps and any trailer brakes
are still working.
Following Distance
Stay at least twice as far behind the vehicle ahead as you
would when driving your vehicle without a trailer. This
can help you avoid situations that require heavy braking
and sudden turns.
Passing
You’ll need more passing distance up ahead when
you’re towing
a trailer. And, because you’re a good deal
longer, you’ll need to
go much farther beyond the
passed vehicle before you can return to your lane.
Backing Up
Hold the bottom of the steering wheel with one hand.
Then, to move the trailer to the left,
just move that hand
to the left. To move the trailer to the right, move your
hand to the right. Always back up slowly and, if
possible, have someone guide you.
4-34
ProCarManuals.com
Page 187 of 338
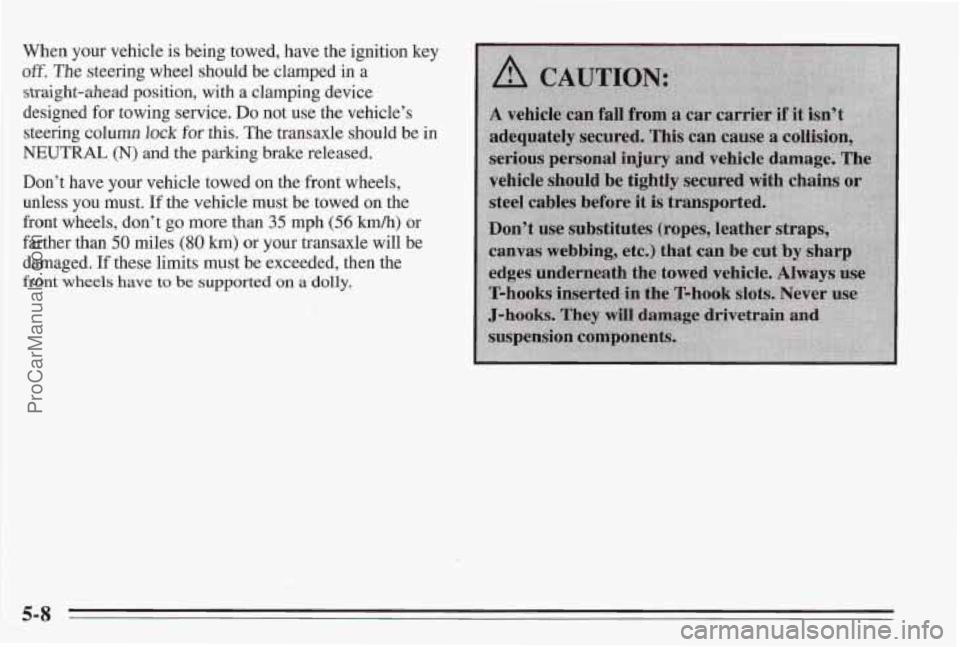
When your vehicle is being towed, have the ignition key
off. The steering wheel should be clamped in a
straight-ahead position, with a clamping device
designed for towing service.
Do not use the vehicle’s
steering column
lock for this. The transaxle should be in
NEUTRAL (N) and the parking brake released.
Don’t have
your vehicle towed on the front wheels,
unless you must. If the vehicle must be towed on the
front wheels, don’t
go more than 35 mph (56 km/h) or
farther than
50 miles (80 km) or your transaxle will be
damaged.
If these limits must be exceeded, then the
front wheels have to be supported on a dolly.
ProCarManuals.com
Page 199 of 338
If a front tire fails, the flat tire will create a drag that
pulls the vehicle toward that side. Take your foot
off the
accelerator pedal and grip the steering wheel firmly.
Steer to maintain lane position, then gently brake to a
ston well aut of the traffic lane. .,
If a tire goes flat, the next p,ar$ shows how to use your
jacking equipment to change a flat tire safely.
5-20
ProCarManuals.com
Page 212 of 338
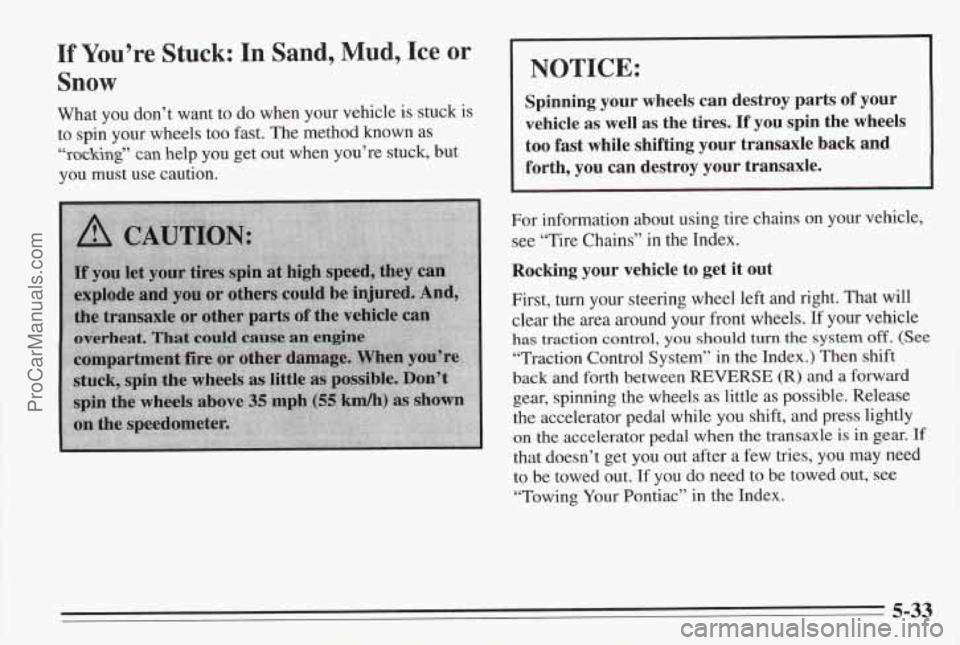
If You’re Stuck: In Sand, Mud, Ice or
Snow
What you don’t want to do when your vehicle is stuck is
to spin your wheels too fast. The method known as
“rocking” can help you get out when you’re stuck, but
you must use caution.
L
NOTICE:
Spinning your wheels can destroy parts of your
vehicle
as well as the tires. If you spin the wheels
too fast while shifting your transaxle back and
forth, you can destroy your transaxle.
For information about using tire chains on your vehicle,
see “Tire Chains”
in the Index.
Rocking your vehicle to get it out
First, turn your steering wheel left and right. That will
clear the area around your front wheels.
If your vehicle
has traction control, you should turn the system off. (See
“Traction Control System” in the Index.) Then shift
back and forth between
REVERSE (R) and a forward
gear, spinning the wheels as little as possible. Release
the accelerator pedal while you shift, and press lightly
on the accelerator pedal when the transaxle is in gear. If
that doesn’t get you out after a few tries, you may need
to be towed out. If
you do need to be towed out, see
“Towing Your Pontiac” in the Index.
5-33
ProCarManuals.com
Page 262 of 338
Fuses and Circuit Breakers
The wiring circuits in your vehicle are protected from
short circuits by a combination of fuses and circuit
breakers.
The main fuse panel is located to the left of the steering
wheel, under the instrument panel. that
explains the features and controls governed by each
fuse and relay.
Headlamp Wiring
The headlamp wiring is protected by a circuit breaker in
the lamp switch. An electrical overload will
cause the
lamps to
go on and off, or in some cases to remain off. If
Snap off the cover to reveal the fuses. You’ll find
a fuse this happens,
have your headlamp system checked right
puller clipped to the inside of the cover. Place the wide away.
end of the fuse puller over the plastic end of the fuse.
Squeeze the ends over the fuse and pull it out.
Spare fuses
are located in the slots labeled “Spare” on
the chart on the next page.
Look at the silver-colored band inside the fuse. If the
band is broken or melted, replace the fuse. Be sure you
replace a bad fuse with a new one of the correct size.
When finished, replace the cover and pinch the release
levers again
to unlock the panel. Press it back up into
place.
Maxifusemelay Center
To check the fuses in this underhood fuse center, turn
the two knobs 1/4 turn counterclockwise and loosen the
metal wing nut on the passenger side of the cover. Then
remove the cover. The inside of the cover has a chart
Windshield Wipers
The windshield wiper motor is protected by a circuit
breaker and a fuse. If the motor overheats due to heavy
snow, etc., the wiper will stop until the motor cools.
If
the overload is caused by some electrical problem, have
it fixed.
Power Windows and Other Power Options
Circuit breakers in the fuse panel protect the power
windows and other power accessories. When the current
load is too heavy, the circuit breaker opens and closes,
protecting the circuit until the problem is fixed.
6-49
ProCarManuals.com
Page 263 of 338
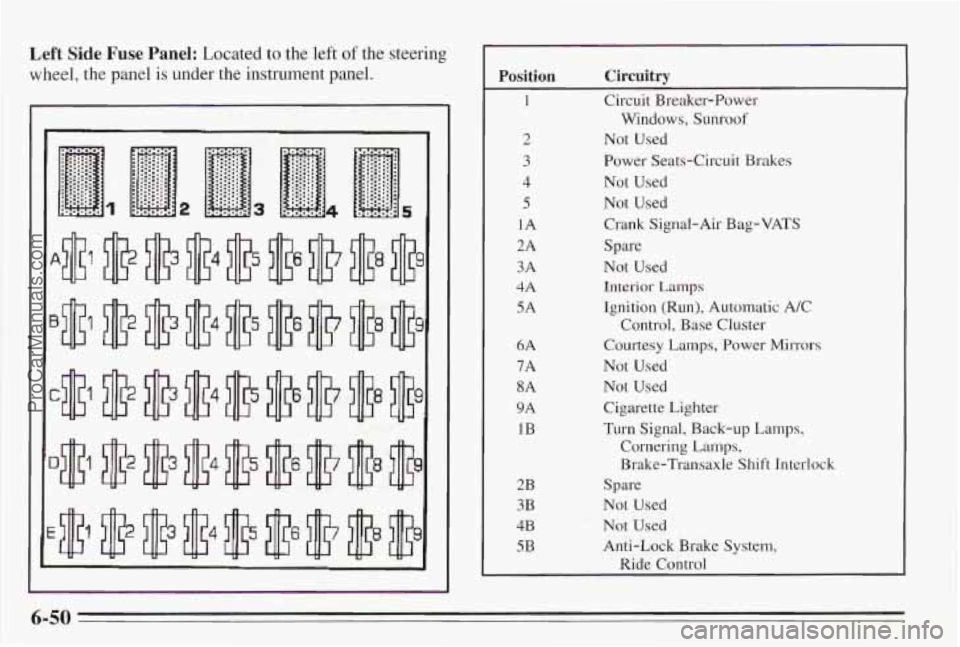
Left Side Fuse Panel: Located to the left of the steering
wheel, the panel
is under the instrument panel. Position Circuitry
1 Circuit Breaker-Power
2 Not Used
3 Power Seats-Circuit Brakes
4 Not Used
5 Not Used
1A Crank Signal-Air Bag-VATS
2A Spare
3A Not Used
4A Interior Lamps
5A Ignition (Run), Automatic A/C
6A Courtesy Lamps, Power Mirrors
7A Not Used
8A Not Used
9A Cigarette Light.er
1B Turn Signal, Back-up Lamps,
Windows, Sunroof
Control, Base Cluster
Cornering
Lamps,
Brake-Transaxle Shift Interlock
2B Spare
3B Not Used
4B Not Used
5B Anti-Lock Brake System,
Ride
Control
6-50
ProCarManuals.com
Page 268 of 338

Capacities and Specifications for Engine Code K (L36) and Code 1 (L67)
Automatic Transaxle AT 4T60E (Overdrive)
When draining or replacing torque convertec more fluid may be needed.
Pan Removal and Replacement .............................. 6 1/2 quarts 6.00 L
After Complete Overhaul ..................................... 11 quarts 10.50 L
Coolingsystem .............................................. 13 quarts 12.00 L
Air Conditioning Refrigerant (R134a) ........................... See refrigerant charge label under hood.
...............................
4.75 L
Not all air conditioning refrigerants are the same. If the air conditioning system in your vehicle needs refrigerant, be sure the
proper refrigerant is used.
If you’re not sure, ask your Pontiac dealel: For additional information see your “Warranty and
Owner Assistance Information
” booklet.
Enginecrankcase ........................................... 5 quarts
Fuel Tank ................. 18 gallons
Power Steering
Oil change with filter change.
Pump Only ..... ................. 1 pint 0.50 L
Complete System ........................................... 1 11’2 pints 0.75 L
68.00 L
Tire Pressures, Sizes .......................................... See Tire-Loading Information label on
Wheel Nut Torque ... 100 lb-ft
driver’s
door. ,.. ... (140 Nam)
NOTE: All capacities are approximate. When adding, be sure to fill to the appropriate level, as recommended in this manual.
ProCarManuals.com
Page 309 of 338
Park on a fairly steep hill, with the vehicle facing
downhill. Keeping your foot on the regular brake, set the
parking brake.
To check the parking brake: With the engine running
and transaxle in
NEUTRAL (N), slowly remove foot
pressure from the regular brake pedal.
Do this until
the vehicle is held by the parking brake only.
To check the PARK (P) mechanism’s holding ability:
Shift to PARK
(P). Then release all brakes.
Underbody Flushing
At least every spring, use plain water to flush any
corrosive materials
from the underbody. Take care to
clean thoroughly any areas where mud and other debris
can collect.
Part C: Periodic Maintenance
Inspections
Listed below are inspections and services which should
be performed at least twice a year (for instance, each
spring
and fall). You should let your GM dealer’s
service department or other qualified service center do
these
jobs. Make sure any necessary repairs are
completed at once.
Restraint Systems
Now and then, make sure all your belts, buckles, latch
plates, retractors, anchorages and reminder systems are
working properly.
Look for any loose parts or damage.
If you see anything that might keep a restraint system
from doing its
job, have it repaired.
Steering, Suspension and Front-Wheel-
Drive
Axle Boot and Seal Inspection
Inspect the front and rear suspension and steering
system for damaged, loose or missing parts, signs of
wear, or lack
of lubrication. Inspect the power steering
lines and hoses for proper hookup, binding,
leaks,
cracks, chafing, etc. Clean and then inspect the drive
axle boot seals for damage, tears or leakage. Replace
seals
if necessary.
7-40
ProCarManuals.com