turn signal bulb PONTIAC BONNEVILLE 2002 Owners Manual
[x] Cancel search | Manufacturer: PONTIAC, Model Year: 2002, Model line: BONNEVILLE, Model: PONTIAC BONNEVILLE 2002Pages: 427, PDF Size: 2.78 MB
Page 104 of 427

2-41 Turn and Lane-Change Signals
The turn signal has two upward (for right) and two
downward (for left) positions. These positions allow you
to signal a turn or a lane change.
To signal a turn, move the lever all the way up
or down. When the turn is finished, the lever will
return automatically.
An arrow on the instrument
panel cluster will flash in
the direction of the turn or
lane change.
To signal a lane change, just raise or lower the lever
until the arrow starts to flash. Hold it there until you
complete your lane change. The lever will return by
itself when you release it.
If the arrows flash very fast as you signal a turn or a lane
change, a signal bulb may be burned out and other
drivers won't see your turn signal.If a bulb is burned out, replace it to help avoid an
accident. See ªBulb Replacementº in the Index. If the
arrows don't go on at all when you signal a turn, check
the fuse. See ªFuses and Circuit Breakersº in the Index.
Turn Signal On Chime
If your turn signal is left on for more than 3/4 of a mile
(1.2 km), a chime will sound at each flash of the turn
signal. To turn off the chime, move the turn signal lever
to the off position.
Headlamp High/Low-Beam Changer
To change the headlamps from low beam to high beam,
push the lever forward. To change from high beam to
low beam, pull the turn signal lever toward you, then
release it.
When the high beams are
on, this light on the
instrument panel cluster
will also be on.
Page 261 of 427

4-39 Making Turns
NOTICE:
Making very sharp turns while trailering could
cause the trailer to come in contact with the
vehicle. Your vehicle could be damaged. Avoid
making very sharp turns while trailering.
When you're turning with a trailer, make wider
turns than normal. Do this so your trailer won't
strike soft shoulders, curbs, road signs, trees or other
objects. Avoid jerky or sudden maneuvers. Signal well
in advance.
Turn Signals When Towing a Trailer
When you tow a trailer, your vehicle may need a different
turn signal flasher and/or extra wiring. Check with your
dealer. All of the electrical circuits required for your trailer
lighting system can be accessed at the left rear lamp
connector. This connector is located under the carpet on
the driver's side in the rear corner of your trunk
compartment. The arrows on your instrument panel will
flash whenever you signal a turn or lane change. Properly
hooked up, the trailer lamps will also flash, telling other
drivers you're about to turn, change lanes or stop.
When towing a trailer, the arrows on your instrument
panel will flash for turns even if the bulbs on the trailer
are burned out. Thus, you may think drivers behind
you are seeing your signal when they are not. It's
important to check occasionally to be sure the trailer
bulbs are still working.
Your vehicle has bulb warning lights. When you plug a
trailer lighting system into your vehicle's lighting
system, its bulb warning lights may not let you know if
one of your lamps goes out. So, when you have a trailer
lighting system plugged in, be sure to check your
vehicle and trailer lamps from time to time to be sure
they're all working. Once you disconnect the trailer
lamps, the bulb warning lights again can tell you if one
of your vehicle lamps is out.
Page 339 of 427

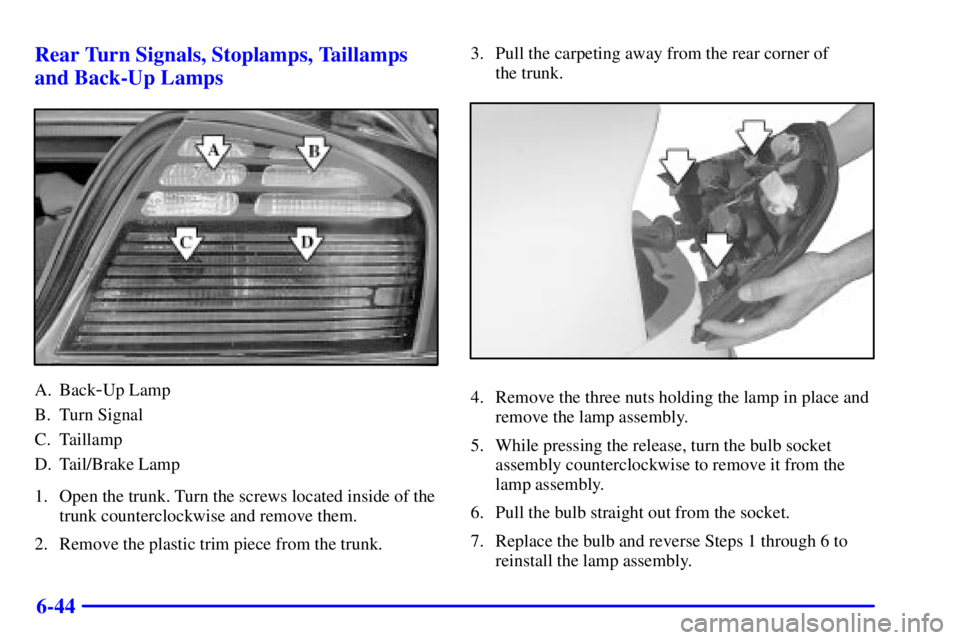
6-44 Rear Turn Signals, Stoplamps, Taillamps
and Back-Up Lamps
A. Back-Up Lamp
B. Turn Signal
C. Taillamp
D. Tail/Brake Lamp
1. Open the trunk. Turn the screws located inside of the
trunk counterclockwise and remove them.
2. Remove the plastic trim piece from the trunk.3. Pull the carpeting away from the rear corner of
the trunk.4. Remove the three nuts holding the lamp in place and
remove the lamp assembly.
5. While pressing the release, turn the bulb socket
assembly counterclockwise to remove it from the
lamp assembly.
6. Pull the bulb straight out from the socket.
7. Replace the bulb and reverse Steps 1 through 6 to
reinstall the lamp assembly.