tail light PONTIAC BONNEVILLE 2003 Owners Manual
[x] Cancel search | Manufacturer: PONTIAC, Model Year: 2003, Model line: BONNEVILLE, Model: PONTIAC BONNEVILLE 2003Pages: 418, PDF Size: 20.24 MB
Page 71 of 418
Remote Keyless Entry System
Operation
If your vehicle has this feature, you can lock and unlock
your doors or unlock your trunk from about
3 feet (1 m) up
to
30 feet (9 m) away using the remote keyless entry
transmitter supplied with your vehicle.
The numbers on the back
of the transmitters correspond
to DRIVER
#1 and DRIVER #2 on the DIC (if equipped).
See
Driver Information Center (DIC) on page 3-57 for
more information.
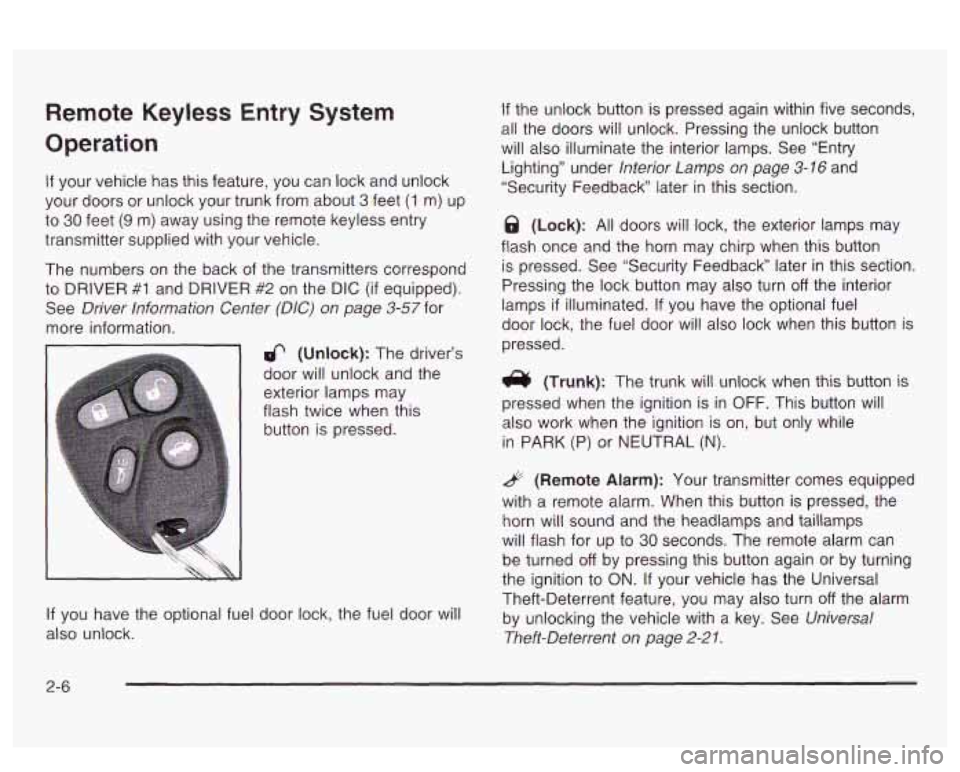
6 (Unlock): The driver’s
door will unlock and the
exterior lamps may
flash twice when this
button is pressed.
If you have the optional fuel door lock, the fuel door will
also unlock.
If the unlock button is pressed again within five seconds,
all the doors will unlock. Pressing the unlock button
will also illuminate the interior lamps. See “Entry
Lighting” under
Interior Lamps on page 3-16 and
“Security Feedback later in this section.
@ (Lock): All doors will lock, the exterior lamps may
flash once and the horn may chirp when this button
is pressed. See “Security Feedback” later in this section.
Pressing the lock button may also turn
off the interior
lamps
if illuminated. If you have the optional fuel
door lock, the fuel door will also lock when this button is
pressed.
(Trunk): The trunk will unlock when this button is
pressed when the ignition is in
OFF. This button will
also work when the ignition is on, but only while
in
PARK (P) or NEUTRAL (N).
& (Remote Alarm): Your transmitter comes equipped
with a remote alarm. When this button
is pressed, the
horn will sound and the headlamps and taillamps
will flash for up to
30 seconds. The remote alarm can
be turned
off by pressing this button again or by turning
the ignition to ON. If your vehicle has the Universal
Theft-Deterrent feature, you may also turn
off the alarm
by unlocking the vehicle with a key. See
Universal
Theft-Deterrent on page
2-21.
2-6
Page 124 of 418
Windshield Wipers
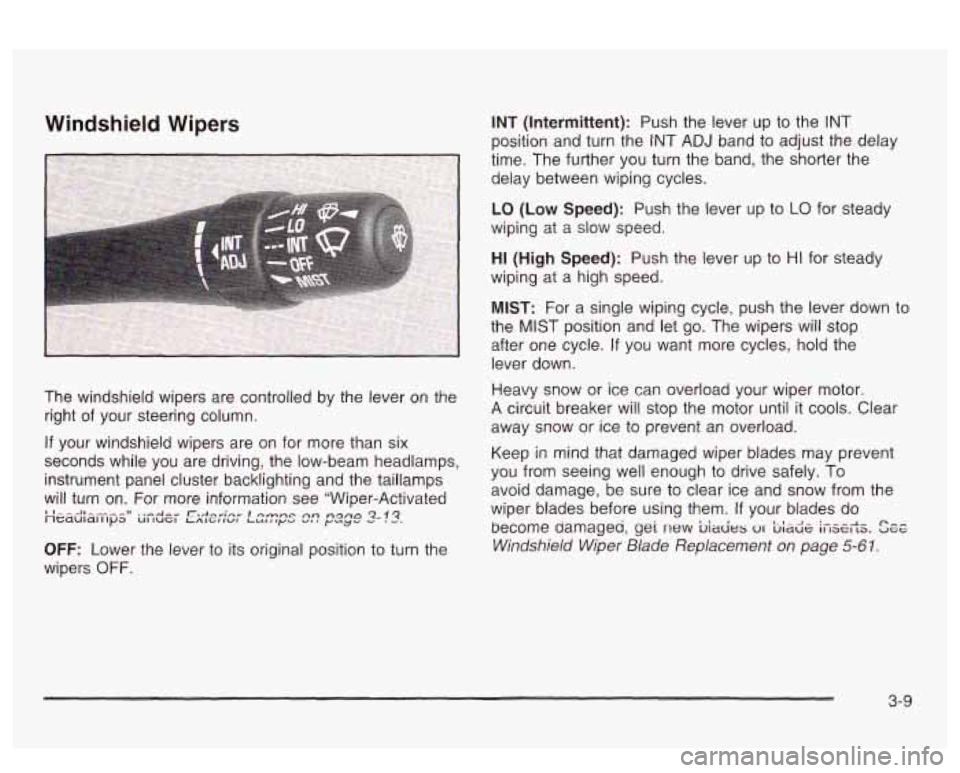
The windshield wipers are controlled by the lever on the
right of your steering column.
If your windshield wipers are on for more than six
seconds while you are driving, the low-beam headlamps,
instrument panel cluster backlighting and the taillamps
will turn on. For more information see "Wiper-Activated
''---Il----~~ ..-Am" r.,+...";nn. I0rn-c An ngfla 2-!3. neduldlllpa UI IUGI LALGIIWL LULlly.2 V. # y"y'
OFF: Lower the lever to its original position to turn the
wipers
OFF. INT
(Intermittent): Push the lever
up to the INT
position and turn the INT ADJ band to adjust the delay
time. The further you turn the band, the shorter the
delay between wiping cycles.
LO (Low Speed): Push the lever up to LO for steady
wiping at a slow speed.
HI (High Speed): Push the lever up to HI for steady
wiping at a high speed.
MIST: For a single wiping cycle, push the lever down to
the
MIST position and let go. The wipers will stop
after one cycle.
If you want more cycles, hold the
lever down.
Heavy snow or ice can overload your wiper motor.
A circuit breaker will stop the motor until it cools. Clear
away snow or ice to prevent an overload.
Keep in mind that damaged wiper blades may prevent
you from seeing well enough
to drive safely. To
avoid damage, be sure to clear ice and snow from the
wiper blades before using them.
If your blades do
become damageu,
gei new biacies 01 bia& ifiserts. See
Windshield Wiper Blade Replacement on page 5-61.
3-9
Page 128 of 418
Erasing Speed Memory
When you turn off the cruise control or the ignition, your
cruise control set speed memory is erased.
Exterior Lamps
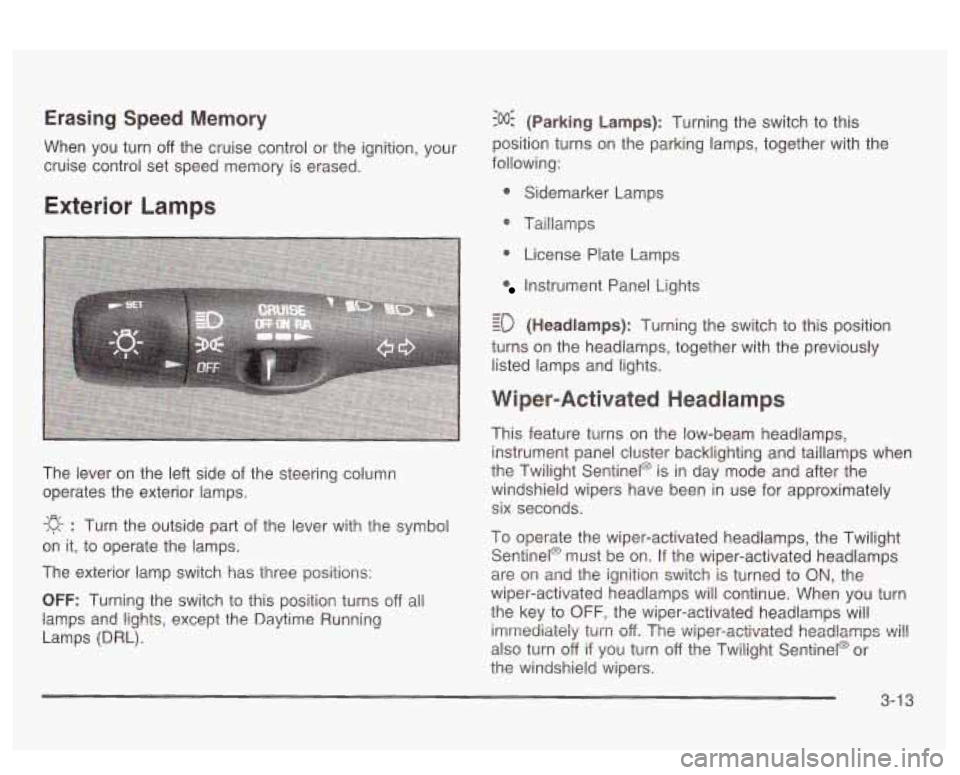
The lever on the left side of the steering column
operates the exterior lamps.
-g- : Turn the outside part of the lever with the symbol
on it, to operate the lamps.
The exterior lamp switch has three positions:
OFF: Turning the switch to this position turns off all
lamps
and lights, except the Daytime Running
Lamps (DRL).
:o@ (Parking Lamps): Turning the switch to this
position turns on the parking lamps, together with the
following:
0 Sidemarker Lamps
@ Taillamps
0 License Plate Lamps
Instrument Panel Lights
- - ED (Headlamps): Turning the switch to this position
turns on the headlamps, together with the previously
listed lamps and lights.
Wiper-Activated Headlamps
This feature turns on the low-beam headlamps,
instrument panel cluster backlighting and taillamps when
the Twilight Sentinel@ is in day mode and after the
windshield wipers have been in use for approximately
six seconds.
To operate the wiper-activated headlamps, the Twilight Sentinel@ must be on. If the wiper-activated headlamps
are on and the ignition switch is turned to
ON, the
wiper-activated headlamps will continue. When you turn
the key to
OFF, the wiper-activated headlamps will
imrrtediaieiy
turn off. The v~iper-activated headlamps ~i!!
also turn off if you turn off the Twilight Sentinel@ or
the windshield wipers.
3-1 3
Page 129 of 418
Daytime Running Lamps
Daytime Running Lamps (DRL) can make it easier for
others to see the front of your vehicle during the
day. DRL can be helpful in many different driving
conditions, but they can be especially helpful in the
short
periods after dawn and before sunset. Fully functional
daytime running lamps are required on all vehicles
first sold in Canada.
A light sensor on top of the instrument panel monitors
the exterior light level for the operation of DRL and
Twilight Sentinel@,
so be sure it isn’t covered. The DRL
system will make your high-beam headlamps come
on at a reduced brightness when the following conditions
are met:
The ignition is on,
the exterior lamp control is off, and
the transaxle is not in PARK (P).
When the DRL are on, only your high-beam headlamps
will be
on at reduced intensity. The taillamps,
sidemarker and other lamps won’t be on. Your
instrument panel won’t be lit either. When it’s
dark enough outside, your regular intensity
headlamps will come on
at full brightness and the DRL
lighting will turn
off. The parking lamps that normally
come on with your headlamps will also come on. When
it’s bright enough outside, the regular intensity
headlamps and parking lamps will turn back
off, and the
reduced brightness
DRL lighting will turn back on.
To idle your vehicle during the day with the DRL
off,
shift the transaxle into PARK (P). The DRL will stay off
until you shift out of P.4RK (P).
At night, you can turn off all exterior lamps when you
are in PARK
(P) by turning the Twilight Sentinel@ knob
all the way to
OFF.
If the knob was already in OFF, it must be cycled to ON
and back to OFF. Turn the knob clockwise to turn the
exterior lighting back on. The lamps will come back
on automatically when you put the transaxle in gear.
As with any vehicle, you should turn on the regular
headlamp system when you need it.
3-1 4
Page 149 of 418
Warning Lights, Gages and
Indicators
This part describes the warning lights and gages that
may be on your vehicle. The pictures will help you
locate them.
Warning lights and gages can signal that something is
wrong before it becomes serious enough to cause
an expensive repair or replacement. Paying attention to
your warning lights and gages could also save you
or others from injury.
Warning lights come on when there may be or is a
problem with one of your vehicle’s functions.
As you will
see
in the details on the next few pages, some
warning lights come on briefly when you start the
engine just to let you know they’re working.
If you are
familiar with this section, you should not be alarmed
when this happens. Gages
can indicate when there may be or
is a problem
with one
of your vehicle’s functions. Often gages
and warning lights work together to let you know when
there’s a problem with your vehicle.
When one of the warning lights comes on and stays on
when you are driving,
or when one of the gages
shows there may be a problem, check the section that
tells you what to do about
it. Please follow this
manual’s advice. Waiting to
do repairs can be
costly
- and even dangerous. So please get to know
your warning lights and gages. They’re
a big help.
Your vehicle may also have a
DIG that works along with
the warning lights and gages. See
Driver lnformation
Center
(DIC) on page 3-57.
The volume of your vehicle’s warning chimes can be
adjusted. For information see
Chime Level Adjustment
on page 3- 10 1.
3-34
Page 401 of 418
Automatic Transaxle Fluid
.......................................................... 5-23
Operation
................................................... 2-28
Automatic Transaxle Check
.............................. 6-1 9
Automatic Transaxle Shift Lock Control
System Check
......................................... 6-20
Backing Up
................................................. 4-40
Battery
.......................... ......................... 5-44
Battery Load Management
............................ 3-20
Battery Replacement
......................................... 2-9
Battery Warning Light
...................................... 3-41
Before Leaving on a Long Trip
......................... 4-22
Body Lubrication Service
.................................. 6-1 9
Boost Gage
................................................... 3-54
Brake
Parking
...................................................... 2-31
System Inspection
....................................... 6-23
Brake Fluid
.................................................... 5-42
Brake Wear
................................................... 5-43
Brakes
.......................................................... 5-42
Braking
........................................................... 4-6
Braking in Emergencies
..................................... 4-9
Break-In, New Vehicle
..................................... 2-25
Bulb Replacement
........................................... 5-56
Front Turn Signal and Parking Lamps ............. 5-57
Halogen Bulbs
............................................ 5-56
System Warning
Light
.................................. 3-42 Bulb
Replacement (cont.)
Headlamp Aiming
........................................ 5-52
Headlamps
................................................. 5-56
Replacement Bulbs
...................................... 5-60
Taillamps. Turn Signal. Stoplamps and Back-up Lamps
........................................ 5-59
Buying New Tires
........................................... 5-67
C
Calibrating the Compass .................................. 3-70
California Fuel
.................................................. 5-6
Canada
........................................................... 7-4
Canadian Owners ................................................ ii
Canadian Roadside Assistance ........................... 7-6
Capacities and Specifications
.......................... 5-1 00
Carbon Monoxide ................... 4-26, 4-36, 2-16, 2-36
Care
of
Care of Your
Safety Belts
............................................ 5-85
Cassette Tape Player
................................. 3-100
CD Player
................................................. 3-101
CDS
......................................................... 3-100
Cassette Tape Messages
................................. 3-91
Cassette Tape Player Service
........................... 6-18
CD Adapter Kits
............................................. 3-92
CD Changer, Trunk-Mounted
............................ 3-94
Center Console Storage Area
........................... 2-46
Center Front Passenger Position, Safety Belts
.... 1-19
Chains, Tires
.................................................. 5-71
2
Page 412 of 418
Service Bulletins .............................. ..... 7-9
Service Engine Soon Light
............................... 3-46
Service Manuals
............................................... 7-9
Setting Preset PTY Stations (RDS Only)
............ 3-86
Setting Preset PTYs (RDS Only)
....................... 3-76
Setting Preset Stations
............................ 3-74, 3-84
Setting the Tone (Bass/Treble)
.................. 3-74, 3-84
Shifting Into Park (P)
....................................... 2-32
Setting the Time
............................................. 3-71
Sheet Metal Damage
....................................... 5-87
Shifting Out of Park (P)
................................... 2-35
Short Trip/City Definition
.................................... 6-5
Short Trip/City Scheduled Maintenance
................ 6-6
Skidding
........................................................ 4-1 5
Some Other Rainy Weather Tips ....................... 4-19
Special Fabric Cleaning Problems
................. 5-83
Specifications, Capacities
............................ 5-1 00
Speedometer .................................................. 3-38
Starter Switch Check
....................................... 6-20
Steering
........................................................ 4-1 1
Steering in Emergencies .................................. 4-12
Boot and Seal Inspection
.............................. 6-22
Steering Wheel Controls, Audio
......................... 3-98
Short Trip/City
Intervals
..................................... 6-5
Starting Your Engine
....................................... 2-26
Steering
&urrlrl 31111~ ieveI L-JL
Steering, Suspension and Front Drive Axle
Steering Tips
.................................................. 4-1 1
A -I .I. r) r)r) .............................
Storage Areas
Center Console Storage Area
........................ 2-46
Convenience Net
......................................... 2-46
Front Storage Area
...................................... 2-46
Glove Box .............................................. 2-46
Storing the Spare Tire and Tools
....................... 5-80
Sun Visors
..................................................... 2-20
Sunroof
......................................................... 2-47
Systems Monitor
.......................................... 3-55
Storing the Flat Tire
and Tools
...................... 5-80
Stuck in Sand, Mud, Ice or Snow ...................... 4-30
..... 3-39
Tachometer ................................ ~ ~ ~ ~ ~
Taillamps
Turn Signal. Stoplamps and Back-up Lamps
.... 5-59
TCS Warning Light
.......................................... 3-43
Testing the Alarm
............................................ 2-22
Theater Dimming
............................................ 3-17
Theft-Deterrent, Radio
..................................... 3-98
Theft-Deterrent Svstems
................................... 2-21
Content Theft-Deterrent
................................ 2-22
PASS-Key@
Ill ............................................. 2-22
PASS-Key@
Ill Operation .............................. 2-23
Universal Theft-Deterrent
.............................. 2-21
Throttle System Inspection
............................... 6-23
13