steering PONTIAC FIREBIRD 1994 Owner's Manual
[x] Cancel search | Manufacturer: PONTIAC, Model Year: 1994, Model line: FIREBIRD, Model: PONTIAC FIREBIRD 1994Pages: 290, PDF Size: 14.84 MB
Page 171 of 290

Problems on the Road
9. Shut the engine off and replace the
pressure cap. Be sure the arrows
on
the cap line up like this.
I
0. Then fill the coolant recovery tank to
;or a complete drain, flush and refill, see
‘our Pontiac dealer or a Pontiac Firebird
Iervice Manual. To purchase a service
nanual, see “Service Publications’’ in
he Index. the proper
level.
If a Tire Goes Flat
[t’s unusual for a tire to “blow out” while
you’re driving, especially
if you maintain
your tires properly. If air goes out of a
;ire, it’s much more likely to leak out
jlowly. But if you should ever have a
‘blowout,” here are a few tips about what
:o expect and what to do:
[fa front tire fails, the
flat tire will create
3 drag that pulls the vehicle toward that
side. Take your foot off the accelerator
pedal and grip the steering wheel firmly.
Steer to maintain lane position,
then
gently brake to a stop well out of the
traffic lane.
A rear blowout, particularly on a curve,
acts much like a
slud and may require the
same correction you’d use in a skid. In
any rear blowout, remove your foot from
the accelerator pedal. Get the vehicle
under control by steering the way you
want the vehicle to go.
It may be very
bumpy and noisy, but you can still steer.
Gently brake to a stop, well
off the road
if possible.
[f a tire goes flat, the next section shows
how to use your jacking equipment to
change a flat tire safely.
. . .I70
ProCarManuals.com
Page 182 of 290

NOTICE:
Spinning your wheels can destroy
parts of your vehicle as well as the
tires.
If you spin the wheels too fast
while shifting your transmission back
and forth, you can destroy your trans-
mission.
Rocking your vehicle to get it out:
First, turn your steering wheel left and
right. That will clear the area around your
front wheels. If your vehicle has traction
control, you should
turn the system off.
(See “Traction Control System” in the
Index.) Then shift back and forth’ between
“R’ (Reverse) and a forward gear (or with
a manual transmission, between First or
Second gear and Reverse), spinning the
wheels as little as possible. Release the
accelerator pedal while you shift, and
press lightly on the accelerator pedal
when the transmission is in gear.
If that
doesn’t get you out after a few tries,
you
may need to be towed out. If you:do need
to be towed out, see “Towing
Yow
Vehicle” in the Index. .’
181 ...
ProCarManuals.com
Page 184 of 290

I I
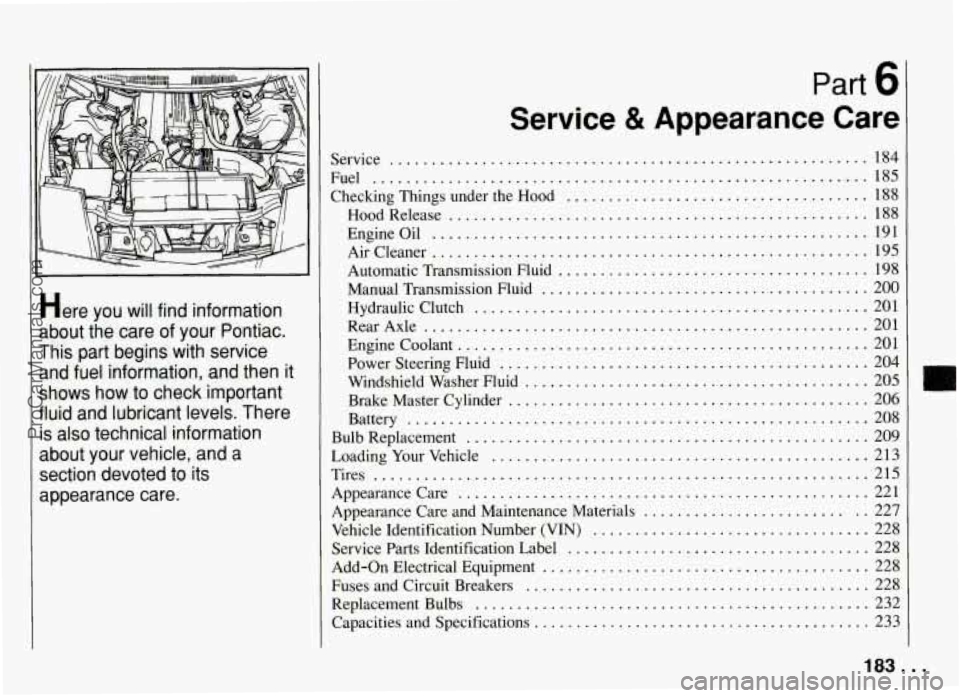
Here you will find information
about the care of your Pontiac
.
This part begins with service and fuel information. and then
it
shows how to check important
fluid and lubricant levels
. There
is also technical information
about your vehicle. and a section devoted
to its
appearance care
.
Part b
Service 8t Appearance Care
Service .........................................................
Fuel ...........................................................
Checking Things under the Hood ....................................
HoodRelease ..................................................
184
185
188
188
Engineoil
.................................................... 191
Aircleaner
.................................................... 195
Automatic Transmission Fluid
..................................... 198
Manual Transmission Fluid
....................................... 200
Hydraulic Clutch
............................................... 201
RearAxle
..................................................... 201
Enginecoolant
................................................. 201
Power Steering fluid
............................................ 204
Windshield Washer Fluid
......................................... 205
Brake Master Cylinder
........................................... 206
Bulb Replacement
................................................ 209
Battery
....................................................... 208
LoadingYourVehicle
............................................. 213
Tires
........................................................... 215
Appearance Care
................................................. 221
Appearance Care and Maintenance Materials
.......................... 227
Vehicle Identification Number (VIN)
................................. 228
Service Parts Identification Label
.................................... 228
Add-on Electrical Equipment
....................................... 228
Fuses and Circuit Breakers
......................................... 228
ReplacementBulbs
............................................... 232
Capacities and Specifications
........................................ 233
183 ...
ProCarManuals.com
Page 190 of 290

3.4L L32 (Code !
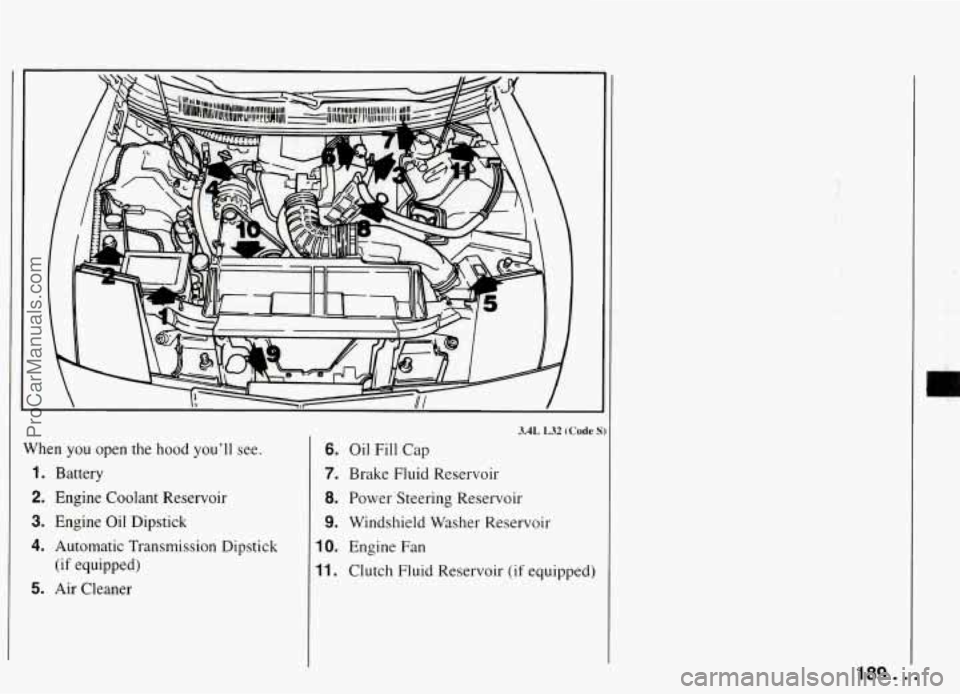
When you open the hood you'll see.
1. Battery
2. Engine Coolant Reservoir
3. Engine Oil Dipstick
4. Automatic Transmission Dipstick
5. Air Cleaner (if equipped)
6. Oil Fill
Cap
7. Brake Fluid Reservoir
8. Power Steering Reservoir
9. Windshield Washer Reservoir
10. Engine Fan
11. Clutch Fluid Reservoir (if equipped)
B
189 ...
ProCarManuals.com
Page 191 of 290

Service and Appearance Care
5.7L LTl (Code
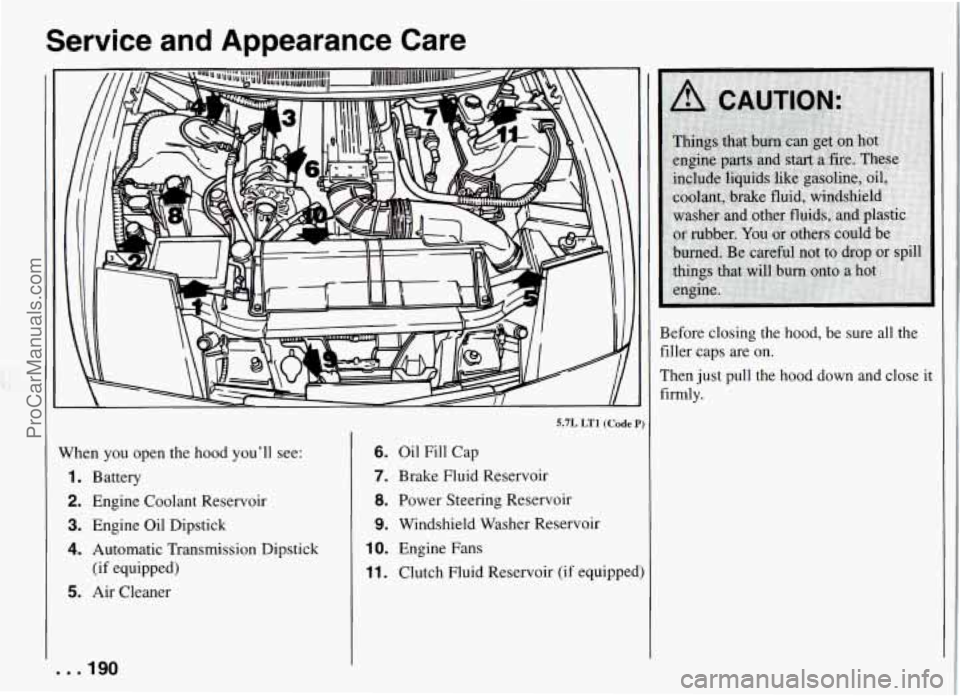
When you open the hood you'll see:
1. Battery
2. Engine Coolant Reservoir
3. Engine Oil Dipstick
4. Automatic Transmission Dipstick
5. Air Cleaner (if equipped)
6. Oil Fill
Cap
7. Brake Fluid Reservoir
8. Power Steering Reservoir
9. Windshield Washer Reservoir
IO. Engine Fans
11. Clutch Fluid Reservoir (if equippec Before closing the hood,
be sure all the
filler caps are on.
Then just pull the hood down and close it firmly.
-. .190
ProCarManuals.com
Page 205 of 290

Service and Appearance Care
Radiator Pressure Cap (All Engines)
NOTICE:
Your radiator cap is a 18 psi (124 kPa)
pressure-type cap and must be tightly
installed to prevent coolant loss and
possible engine damage from over-
heating. Be sure the arrows on the
cap line up with the overflow tube
on the radiator filler neck.
When you replace your radiator pressure
cap,
an AC@ cap is recommended.
Thermostat
Engine coolant temperature is controlled
by a thermostat in the engine coolant
system. The thermostat stops the flow of
coolant through the radiator until the
coolant reaches a preset temperature.
When you replace your thermostat, an
AC@ thermostat is recommended.
3.4L L32 (Code S)
Power Sfeering Fiuid
How to Check Power Steering Fluid:
Unscrew the cap and wipe the dipstick
with a clean rag. Replace the cap and
completely tighten it. Then remove the
cap again and look at the fluid level on
the dipstick.
0
0
5.7L LT1 (Code P)
When the engine compartment is hot,
the level should be at the
“H” or
“HOT” mark.
When the engine compartment is
cool, the level should be at the
“C”
or “FULL COLD” mark.
. . .204
ProCarManuals.com
Page 206 of 290

i w
R€
de
“€4
thc
1
hat to Add:
:fer to the Maintenance Schedule to
termine what kind
of fluid to use. See
!ecommended Fluids and Lubricants” ir
: Index.
NOTICE:
When adding power steering fluid or
making a complete fluid change,
always use the proper fluid. Failure
to use the proper fluid can cause leaks and damage hoses and seals.
Windshield Washer Fluid
To Add:
Open the cap labeled “WASHER FLUID
ONLY.” Add washer fluid until the bottle
is full.
NOTICE:
0
0
0
0
When using concentrated washer
fluid, follow the manufacturer’s
instructions for adding water.
Don’t mix water with
ready-to-use washer fluid; Water
can cause the solution to freeze
and damage your washer fluid
tank and other parts of the washer
system. Also, water doesn’t clean
as well as washer fluid.
Fill your washer fluid tank only
3/4 full when it’s very cold. This
allows for expansion, which could
damage the tank if it is completely
full.
Don’t use radiator antifreeze in
your windshield washer. It can
damage your washer system and
paint.
205. . . ProCarManuals.com
Page 231 of 290

Service and Appearance Care
Main Fuse Block
1 - Air Bag: SIR Components
2 - Backup Lights; Daytime Running (15
Amp.)
Lights Module (Canada); Turn
Flasher
(20 Amp.)
3 - HVAC Selector Switch (Heater/Ail
Conditioner); Rear Defogger
(25 Amp.)
4 - Powertrain Control Module;
Instrument Cluster; PASS-Key
II@
Decoder Module (10 Amp.)
5 - Powertrain Control Module;
PASS-Key
11s Decoder Module;
Fuel Pump Relay (15 Amp.)
;
6 - Brake LightKruise Release
Switch; Hazard Flasher
(20 Amp.)
7 - Power Door Locks; Power Mirrors;
Hatch Release (15 Amp.)
8
- Audio Alarm Module; Base@
Relay; Courtesy Lights: Console
Compartment, Glove Box, Dome,
Trunk, Rear Courtesy, Rearview
Mirror and Radio (15 Amp.)
9 - Audio Alarm Module; Daytime
Running Lights Module (Canada);
Diagnostic Energy Reserve
Module; Instrument Cluster; Remote Lock Control Module
( 10 Amp.)
10 - Exterior Lighting (20 Amp.)
11 - Cigarette Lighter; Horn Relay
12 - Power Seats; Rear Defogger
13 - Brightness Control (5 Amp.)
14 - Windshield Wipermasher
(25 Amp.)
15 - Power Windows, Convertible
Top Switch
(30 Amp. Circuit
Breaker)
Module
(3 Amp.)
(15 Amp.)
(25 Amp.)
(30 Amp. Circuit Breaker)
16 - Diagnostic Energy Reserve
17 - Radio; Steering Wheel Controls
. . ,230
ProCarManuals.com
Page 247 of 290

Maintenance Schedule
Section A: Scheduled Maintenance Services (Cont.)
Explanation of Scheduled
Maintenance Services
Following are explanations of the services
listed in Schedule I and Schedule
II.
The proper fluids and lubricants to use are
listed in Section
D. Make sure whoever
services your vehicle uses these. All parts
should be replaced and all necessary
repairs done before you or anyone else
drives the vehicle.
NOTE: To determine your engine’s
displacement and code, see
“Engine Identification” in the
Index.
ITEM
NO. SERVICE
1 Engine Oil and Filter Change* -
Always use SH or SG Energy
Conserving
I1 oils of proper
viscosity. The “SH” or “SG”
designation may be shown alone
or in combination with others,
such as “SH/CD,”
“SH, SG,
CD,” “SG/CD,” etc. To deter-
mine the preferred viscosity for
your vehicle’s engine (e.g., SAE
ITEM
NO.
2
3
4
SERVICE
5W-30 or SAE 10W-30), see
“Engine Oil” in the Index.
Chassis Lubrication
- Lubricate
the suspension and steering
linkage. Lubricate the
transmission
shift linkage.
Tire and Wheel Rotation and
InsDection
- For proper wear
and maximum tire life, rotate
your tires following the
instructions in this manual. See
“Tires, Inspection and Rotation”
in the Index. Check the tires for
uneven wear or damage. If you
see irregular or premature wear,
check the wheel alignment.
Check for damaged wheels also.
Engine Accessorv Drive Belt!s)
InsDection
- Inspect the belt(s)
for cracks, fraying, wear and
proper tension. Replace as
needed. (Belts can have many small cracks in individual ribs
without affecting performance.)
ITEM
NO. SERVICE
5 Cooling: System Service* -
Drain, flush and refill the system
with new or approved recycled
coolant conforming to GM
Specification 1825M. Keep
coolant at the proper mixture as specified. See “Coolant”
in the
Index. This provides proper
freeze and boil protection, corrosion inhibitor level and
maintains proper engine operating temperature.
Inspect hoses and replace if they
are cracked, swollen or deterior-
ated. Tighten screw-type hose
clamps. Clean the outside of the
radiator and air conditioning
condenser. Wash the pressure cap and neck.
To help ensure proper operation,
we recommend a pressure test of
both the cooling system and the
pressure cap.
* An Emission Control Service.
. . .246
ProCarManuals.com
Page 251 of 290

Maintenance Schedule
Section B: Owner Checks and Services (Cont.)
At least Once a Year (CONK)
CHECK
OR SERVICE
Steering Column Lock
Parking Brake and
Automatic Transmission “P” (Park) Mechanism
Check
Underbody Flushing
WHAT TO DO
While parked, and with the parking brake set, try to turn the key to “LOCK” in each shift lever
position.
With an automatic transmission, the key should turn to “LOCK” only when the shift lever is
0 With a manual transmission, the key should turn to “LOCK” only when the shift lever is in
On vehicles with a key release button, try to turn the key to “LOCK” without pressing the
button. The key should turn to “LOCK” only with the key button depressed. On all vehicles,
the kev should come out only in “LOCK.”
in
“P” (Park).
“R” (Reverse).
brake, set the parking brake.
0 To check the parhng brake: With the engine running and transmission in “N” (Neutral),
slowly remove foot pressure from the regular brake pedal.
Do this until the vehicle is held by
the parking brake only.
brakes.
0 To check the “P” (Park) mechanism’s holding ability: Shift to “P” (Park). Then release all
~~ ~
At least every spring, use plain water to flush any corrosive materials from the underbody. Take
care to clean thoroughly any areas where mud and other debris can collect.
. . .250
ProCarManuals.com