window PONTIAC FIREBIRD 1998 User Guide
[x] Cancel search | Manufacturer: PONTIAC, Model Year: 1998, Model line: FIREBIRD, Model: PONTIAC FIREBIRD 1998Pages: 406, PDF Size: 18.23 MB
Page 111 of 406

Front Map Lamps
I
I
’I
L I 4
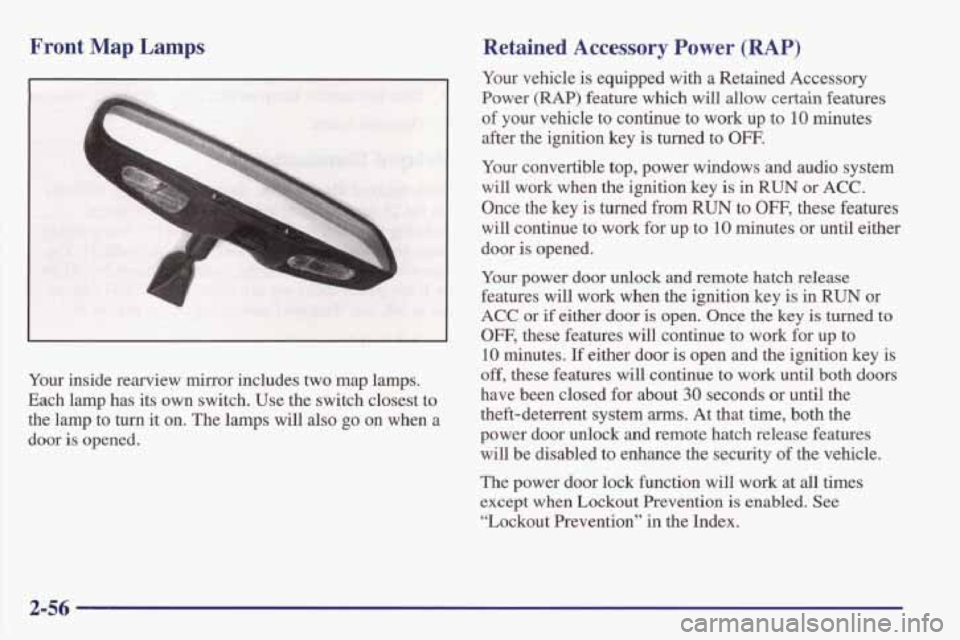
Your inside rearview mirror includes two map lamps.
Each lamp has its own switch. Use the switch closest to
the lamp to turn it on. The
lamps will also go on when a
door
is opened.
Retained Accessory Power (RAP)
Your vehicle is equipped with a Retained Accessory
Power
(RAP) feature which will allow certain features
of your vehicle to continue to work up to
10 minutes
after the ignition key is turned to
OFF.
Your convertible top, power windows and audio system
will work when the ignition key
is in RUN or ACC.
Once the key is turned from RUN to OFF, these features
will continue to work for up to
10 minutes or until either
door is opened.
Your power door unlock and remote hatch release
features will work when the ignition key is in
RUN or
ACC or if either door is open. Once the key is turned to
OFF, these features will continue to work for up to
10 minutes. If either door is open and the ignition key is
off, these features will continue to work until both doors
have been closed
for about 30 seconds or until the
theft-deterrent system
arms. At that time, both the
power door unlock and remote hatch release features
will be disabled to enhance the security of the vehicle.
The power door lock function will work at all times
except when Lockout Prevention is enabled. See
“Lockout Prevention” in the Index.
Page 118 of 406

The door key unlocks the panels. The lock is over the
front door window. Turn the key counterclockwise to
unlock the panel.
1 I I
Then push on the release handle to unlatch the panel.
Lift the outer edge of the panel and pull it toward
you. Then carry the panel to the rear of the vehicle
for storage.
2-63
Page 127 of 406

Raising Your Convertible Top
1. It is recommended that you park on a level surface.
Set the parking brake firmly. If you have an
automatic transmission, shift into PARK
(P).
If you have a manual transmission, shift into
REVERSE (R). The ignition must be in ACC, RUN
or RAP must be on. Lower both sun visors. Lower
both windows at least three inches
(8 cm). If the boot
cover is in place, it must be removed first.
I NOTICE:
I
It is not recommended that you raise or lower the
top while the vehicle is moving.
L
2. Open the hatch. Remove the middle piece of the
cover by pushing in on the latch and lifting up
on
the cover.
2-72
Page 132 of 406

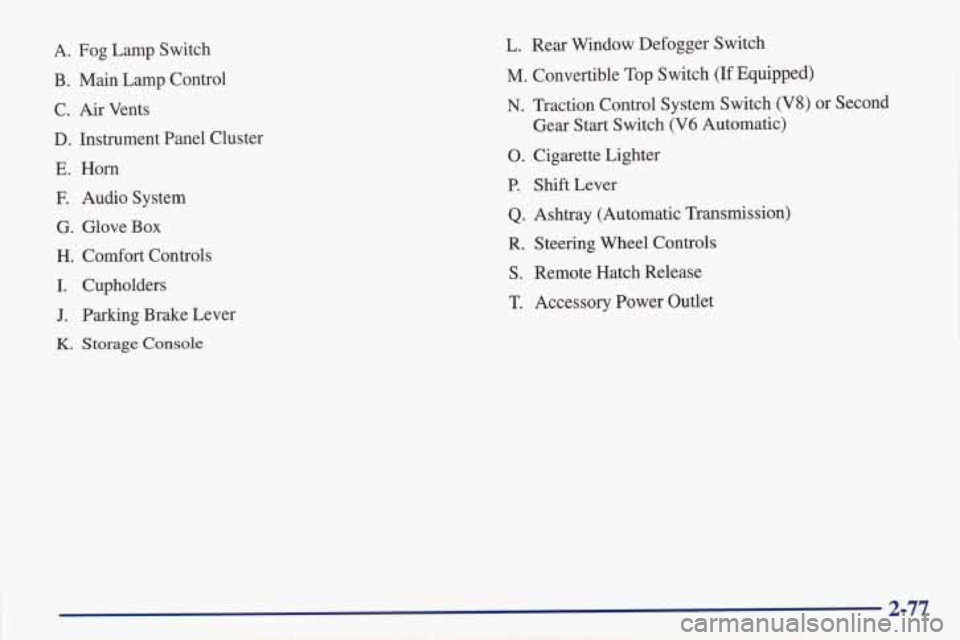
A. Fog Lamp Switch
B. Main Lamp Control C. Air Vents
D. Instrument Panel Cluster
E. Horn
E Audio System
G. Glove
Box
H. Comfort Controls
I. Cupholders
J. Parking Brake Lever
K. Storage Console
L. Rear Window Defogger Switch
M. Convertible Top Switch (If Equipped)
N. Traction Control System Switch (V8) or Second
Gear Start Switch (V6 Automatic)
0. Cigarette Lighter
P. Shift Lever
Q. Ashtray (Automatic Transmission)
R. Steering Wheel Controls
S. Remote Hatch Release
T. Accessory Power Outlet
2-77
Page 146 of 406

Section 3 Comfort Controls and Audio Systems
In this section, you’ll find out how to operate the comfort control and audio systems offered with your vehicle. Be
sure to read about the particular systems supplied with your v\
ehicle.
3-2
3-3
3-4
3-4
3-5
3-6
3-7
3-7
3-8 3-11 Comfort Controls
Air Conditioning
Heating
Defogging and Defrosting
Rear Window Defogger
Ventilation System
Setting the Clock
AM-FM Stereo with Cassette Tape Player and
Equalizer (If Equipped)
Monsoonm
AM-FM Stereo with Cassette
Tape Player and Equalizer (If Equipped)
AM-€34 Stereo with Compact Disc Player and
Equalizer (If Equipped)
3-12
3-14
3-17
3-19
3-20
3
-20
3-21
3-22
3-22
3-22
MonsoonTM AM-FM Stereo with Compact
Disc Player and Equalizer
(If Equipped)
Trunk Mounted CD Changer (If Equipped)
Theft-Deterrent Feature
Audio Steering Wheel Controls (If Equipped)
Understanding Radio Reception
Tips About Your Audio System
Care of Your Cassette Tape Player
Care of Your Compact Discs
Care of Your Compact Disc Player
Power Antenna Mast Care
3-1
Page 148 of 406

Air Conditioning
The air conditioning system uses the same controls as
the heating system, except that the air control knob has
two extra settings, described below.
MAX: Provides maximum cooling or quick cool-down
on very hot days. This setting recirculates most
of the air
inside your vehicle. If it is used for long periods of time,
the
air may become dry. This setting directs air through
the upper
air vents.
A/C: Use for normal cooling on hot days. This
setting cools outside air and directs it through the
upper air vents.
The
air conditioner compressor operates in MAX, NC,
bi-level, blend and defrost when the outside temperature is above
freezing. When the air conditioner is on, you may
sometimes notice slight changes in your vehicle's engine
speed and power. This is normal because the system is
designed to cycle the compressor on and off to keep the
desired cooling and help fuel economy.
Cooling
The air conditioner works best if you keep your
windows closed. On very hot days, open the windows
just long enough for the hot air to escape.
1. Turn the air control knob to A/C for normal cooling.
2. Turn the temperature control knob to a
For faster cooling move
the knob to MAX.
comfortable setting.
3. Move the fan control knob to the desired speed.
3-3
Page 149 of 406

Heating Ventilation
The heater works best if you keep your windows closed
while using it.
1. Turn the air control knob to heater.
2. Turn the fan control knob to the desired speed.
3. Turn the temperature control knob to a
comfortable setting.
During initial start-up only, if your vehicle
is equipped
with
an optional engine coolant heater, you can use it in
cold weather (around
2OoF/-8 “C or lower) to improve
heater performance
on start up. See “Engine Coolant
Heater” in the Index.
Bi-Level Heating
You may want to use bi-level heating on cool, but sunny
days. This setting directs cool air toward your body and
warmer air toward your feet.
1. Turn the air control knob to bi-level.
2. Turn the temperature control knob to a
comfortable setting.
3. Turn the fan control knob to the desired speed. For mild outside temperatures when little heating
or
cooling is needed,
you can still direct outside air through
your vehicle.
1. Turn the air control knob to vent.
2. Turn the temperature control knob to a
comfortable setting.
3. Turn the fan control knob to the desired speed.
Defogging and Defrosting
1. Turn the air control knob to defrost.
2. Turn the temperature control knob to the
desired setting.
3. Turn the fan control knob to the desired speed.
3-4
Page 150 of 406

Rear Window Defogger (If Equipped)
0
The rear window defogger
uses a warming grid to
remove fog from the
rear window.
Press the button to
turn on the defogger. An indicator
light
will come on to remind you that the defogger
is
on. The defogger will turn off automatically after
about
10 minutes of use. If you turn it on again, the
defogger will operate for about five minutes only.
You can turn the defogger off by pressing the
button again.
Do not attach anything like a temporary vehicle license
or
a decal across the defogger grid on the rear window.
NOTICE:
Don’t use a razor blade or something else sharp
on the inside
of the rear window. If you do, you
could cut
or damage the warming grid, and the
repairs wouldn’t be covered by your warranty.
3-5
Page 151 of 406

Ventilation System
Your vehicle’s flow-through ventilation system
supplies outside air into the vehicle when it is moving.
Outside air will
also enter the vehicle when the blower
fan is running.
Ventilation Tips
Keep the hood and front air inlet free of ice, snow or
any other obstruction (such as leaves). The heater
and defroster will work far better, reducing the
chance of fogging the inside of your windows.
When you enter a vehicle in cold weather, turn the
fan control
knob to the right for a few moments
before driving
off. This helps clear the intake ducts
of
snow and moisture, and reduces the chance of
fogging the inside of your windows.
objects. This helps
air to circulate throughout
your vehicle.
Keep the air path under the front seats clear of
Page 153 of 406

MonsoonTM AM-FM Stereo with Cassette RECALL: Display the time with the ignition off by
Tape Player and Equalizer (If Equipped) pressing this button. When the radio is playing, press
this knob to recall the station frequency.
Included
with the Monsoon AM-FM Stereo with
Cassette Tape Player and Equalizer are 10
high
performance speakers and a powerful 8 channel
amplifier.
This feature requires power windows and
door locks. Please see your dealer for details.
Playing the Radio
POWER-VOL:
Push this knob to turn the system on
and
off. To increase volume, turn the knob to the right.
Turn it to the left to decrease volume.
Finding a Station
AM-FM: Press this button to switch between AM, FM1
and
FM2. The display shows your selection.
TUNE: Press this knob lightly so it extends. Turn it to
choose radio stations.
Push the knob back into its stored
position when you’re not using it.
SEEK: Press the up or down arrow to go to the next
higher
or lower station and stay there.
PUSHBUTTONS: The six numbered pushbuttons let
you return to your favorite stations.
You can set up to
18 stations (six
AM, six FM1 and six FM2). Just:
1. Turn the radio on.
2. Press AM-FM to select the band.
3. Tune in the desired station.
4. Press and hold one of the six numbered buttons until
SET appears on the display. Whenever you press that
numbered button, the station you set
will return.
5. Repeat the steps for each pushbutton.