clock PONTIAC G3 2010 User Guide
[x] Cancel search | Manufacturer: PONTIAC, Model Year: 2010, Model line: G3, Model: PONTIAC G3 2010Pages: 368, PDF Size: 3.94 MB
Page 166 of 368

This light comes on
when the vehicle is
started, and it will flash
for a few seconds. When
the light goes out this
indicates the system is
functioning properly.
If the airbag readiness light stays on or comes on while
driving, the airbag system may not work properly. Have
the vehicle serviced right away.
{WARNING:
If the airbag readiness light stays on after the
vehicle is started or comes on while driving, it
means the airbag system might not be working
properly. The airbags in the vehicle might not
inflate in a crash, or they could even inflate
without a crash. To help avoid injury, have the
vehicle serviced right away.
Passenger Airbag Status Indicator
The vehicle has the passenger sensing system. See
Passenger Sensing Systemon page 2‑65for important
safety information. The vehicle has a passenger airbag
status indicator near the clock, located in the center of
the instrument panel.
United StatesCanada
When the vehicle is started, the passenger airbag
status indicator will light PASSENGER AIRBAG ON and
PASSENGER AIRBAG OFF or the symbol for on and
off, for several seconds as a system check. Then, after
several more seconds, the status indicator will light
either PASSENGER AIRBAG ON or PASSENGER
AIRBAG OFF, or either the on or off symbol, to let you
know the status of the right front passenger frontal and
seat-mounted side impact airbag (if equipped).
4-24
Page 202 of 368
If there is a need to reduce speed, do it before entering
the curve, while the front wheels are straight.
Try to adjust the speed so you can drive through the
curve. Maintain a reasonable, steady speed. Wait to
accelerate until out of the curve, and then accelerate
gently into the straightaway.
Steering in Emergencies
There are times when steering can be more effective
than braking. For example, you come over a hill and
find a truck stopped in your lane, or a car suddenly pulls
out from nowhere, or a child darts out from between
parked cars and stops right in front of you. These
problems can be avoided by braking—if you can stop
in time. But sometimes you cannot stop in time because
there is no room. That is the time for evasive
action —steering around the problem.
The vehicle can perform very well in emergencies like
these. First apply the brakes —but, unless the vehicle
has antilock brakes, not enough to lock the wheels. See
Braking
on page 5‑3. It is better to remove as much
speed as possible from a collision. Then steer around
the problem, to the left or right depending on the space
available.
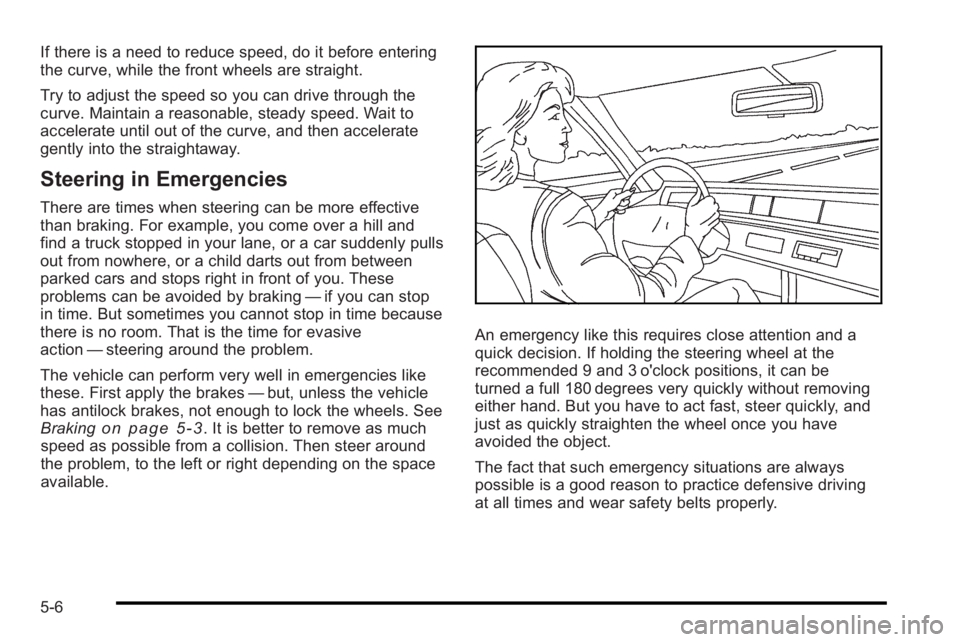
An emergency like this requires close attention and a
quick decision. If holding the steering wheel at the
recommended 9 and 3 o'clock positions, it can be
turned a full 180 degrees very quickly without removing
either hand. But you have to act fast, steer quickly, and
just as quickly straighten the wheel once you have
avoided the object.
The fact that such emergency situations are always
possible is a good reason to practice defensive driving
at all times and wear safety belts properly.
5-6
Page 233 of 368
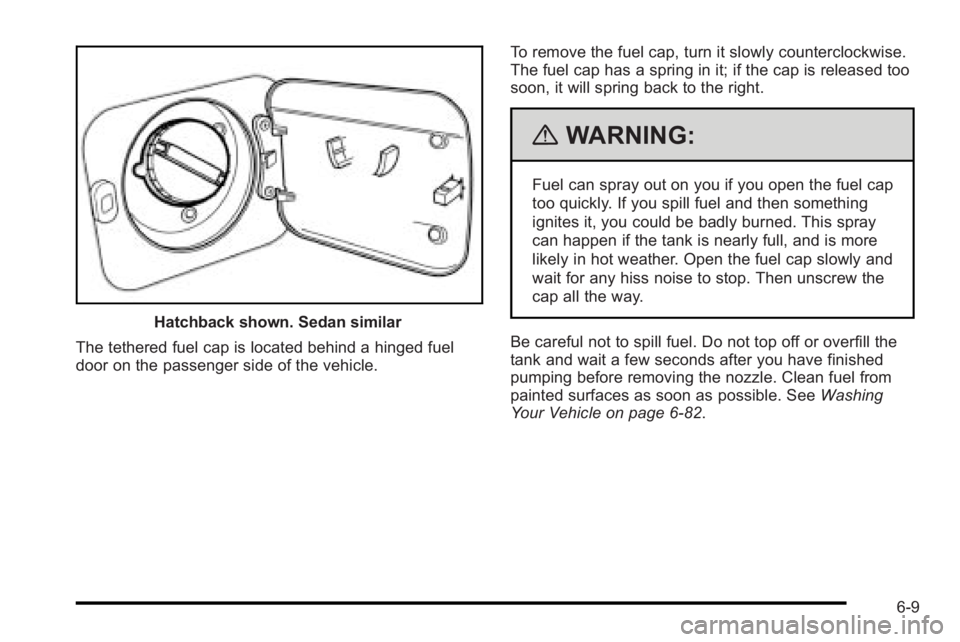
Hatchback shown. Sedan similar
The tethered fuel cap is located behind a hinged fuel
door on the passenger side of the vehicle. To remove the fuel cap, turn it slowly counterclockwise.
The fuel cap has a spring in it; if the cap is released too
soon, it will spring back to the right.
{WARNING:
Fuel can spray out on you if you open the fuel cap
too quickly. If you spill fuel and then something
ignites it, you could be badly burned. This spray
can happen if the tank is nearly full, and is more
likely in hot weather. Open the fuel cap slowly and
wait for any hiss noise to stop. Then unscrew the
cap all the way.
Be careful not to spill fuel. Do not top off or overfill the
tank and wait a few seconds after you have finished
pumping before removing the nozzle. Clean fuel from
painted surfaces as soon as possible. See Washing
Your Vehicle on page 6‑82.
6-9
Page 234 of 368
When replacing the fuel cap, turn it clockwise until it
clicks. Make sure the cap is fully installed. The
diagnostic system can determine if the fuel cap has
been left off or improperly installed. This would allow
fuel to evaporate into the atmosphere. SeeMalfunction
Indicator Lamp on page 4‑29.
{WARNING:
If a fire starts while you are refueling, do not
remove the nozzle. Shut off the flow of fuel by
shutting off the pump or by notifying the station
attendant. Leave the area immediately.
Notice: If a new fuel cap is needed, be sure to get
the right type. Your dealer/retailer can get one for
you. The wrong type might not fit properly. This can
cause the malfunction indicator lamp to light and
can damage the fuel tank and emissions system.
See Malfunction Indicator Lamp on page 4‑29.
Filling a Portable Fuel Container
{WARNING:
Never fill a portable fuel container while it is in the
vehicle. Static electricity discharge from the
container can ignite the fuel vapor. You can be
badly burned and the vehicle damaged if this
occurs. To help avoid injury to you and others:
.Dispense fuel only into approved containers.
.Do not fill a container while it is inside a
vehicle, in a vehicle's trunk, pickup bed, or on
any surface other than the ground.
.Bring the fill nozzle in contact with the inside
of the fill opening before operating the nozzle.
Contact should be maintained until the filling is
complete.
.Do not smoke while pumping fuel.
.Do not use a cellular phone while
pumping fuel.
6-10
Page 252 of 368

How to Add Coolant to the Coolant
Surge Tank
{WARNING:
You can be burned if you spill coolant on hot
engine parts. Coolant contains ethylene glycol
and it will burn if the engine parts are hot enough.
Do not spill coolant on a hot engine.
Notice: This vehicle has a specific coolant fill
procedure. Failure to follow this procedure could
cause the engine to overheat and be severely
damaged.
{WARNING:
An electric engine cooling fan under the hood can
start up even when the engine is not running and
can cause injury. Keep hands, clothing, and tools
away from any underhood electric fan.
{WARNING:
Steam and scalding liquids from a hot cooling
system can blow out and burn you badly. They are
under pressure, and if you turn the surge tank
pressure cap —even a little —they can come out
at high speed. Never turn the cap when the
cooling system, including the surge tank pressure
cap, is hot. Wait for the cooling system and surge
tank pressure cap to cool if you ever have to turn
the pressure cap.
If no coolant is visible in the surge tank, add coolant as
follows: 1. Remove the coolant surge tank pressure cap when the cooling system, including the coolant surge
tank pressure cap and upper radiator hose, is no
longer hot. Turn the pressure cap slowly
counterclockwise about two or two and one-half
turns.
If you hear a hiss, wait for that to stop. This will
allow any pressure still left to be vented out the
discharge hose.
6-28
Page 269 of 368

Front Turn Signal, Sidemarker and
Parking Lamps
To replace a front turn signal or parking lamp bulb:1. Open the hood. See Hood Release
on page 6‑12for more information.
2. Remove the three bolts to remove the headlamp
assembly.
3. Disconnect the wiring harness connector from the rear of the bulb.
4. Turn the front turn signal bulb socketcounterclockwise.
5. Pull the front turn signal bulb socket out of the lamp housing.
6. Press the bulb inward and turn it counterclockwise to remove it from the bulb socket.
7. Install the new bulb into the socket by pressing it in and turning it clockwise.
8. Install the socket into the lamp housing by turning it clockwise.
9. Reconnect the wiring harness connector at the rear of the bulb.
6-45
Page 272 of 368
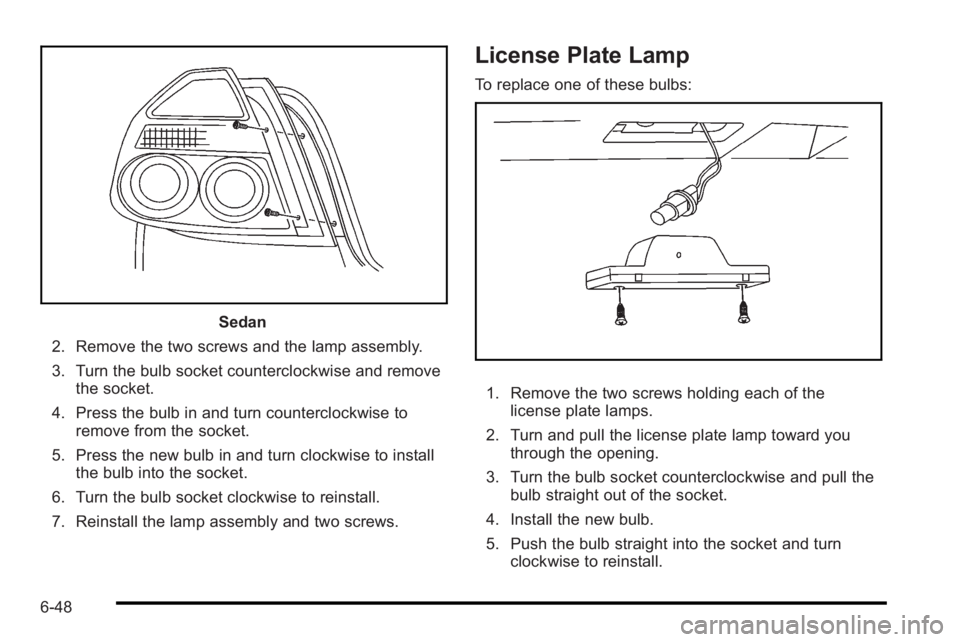
Sedan
2. Remove the two screws and the lamp assembly.
3. Turn the bulb socket counterclockwise and remove the socket.
4. Press the bulb in and turn counterclockwise to remove from the socket.
5. Press the new bulb in and turn clockwise to install the bulb into the socket.
6. Turn the bulb socket clockwise to reinstall.
7. Reinstall the lamp assembly and two screws.
License Plate Lamp
To replace one of these bulbs:
1. Remove the two screws holding each of the license plate lamps.
2. Turn and pull the license plate lamp toward you through the opening.
3. Turn the bulb socket counterclockwise and pull the bulb straight out of the socket.
4. Install the new bulb.
5. Push the bulb straight into the socket and turn clockwise to reinstall.
6-48
Page 296 of 368
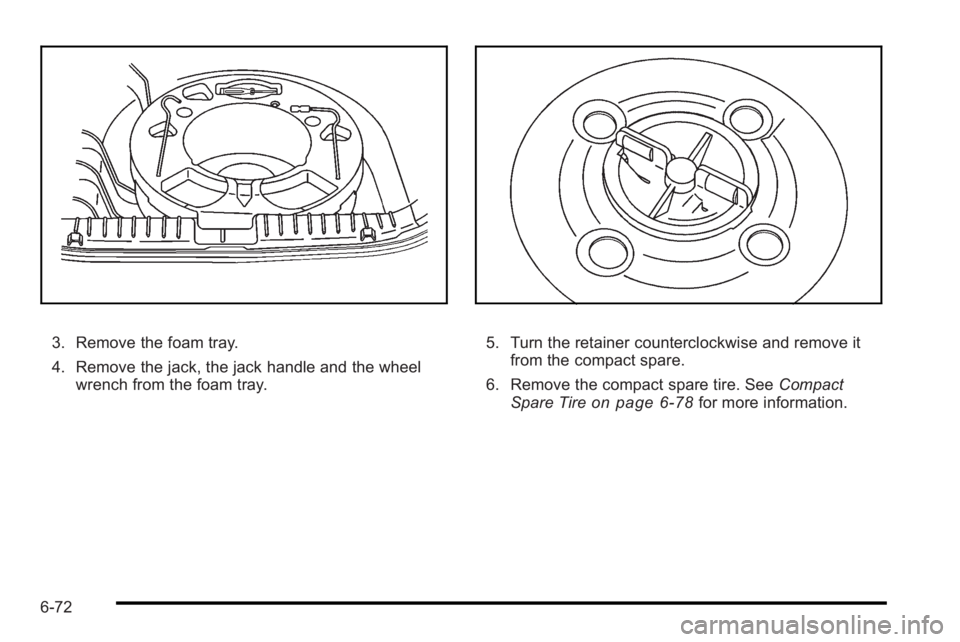
3. Remove the foam tray.
4. Remove the jack, the jack handle and the wheelwrench from the foam tray.5. Turn the retainer counterclockwise and remove itfrom the compact spare.
6. Remove the compact spare tire. See Compact
Spare Tire
on page 6‑78for more information.
6-72
Page 297 of 368
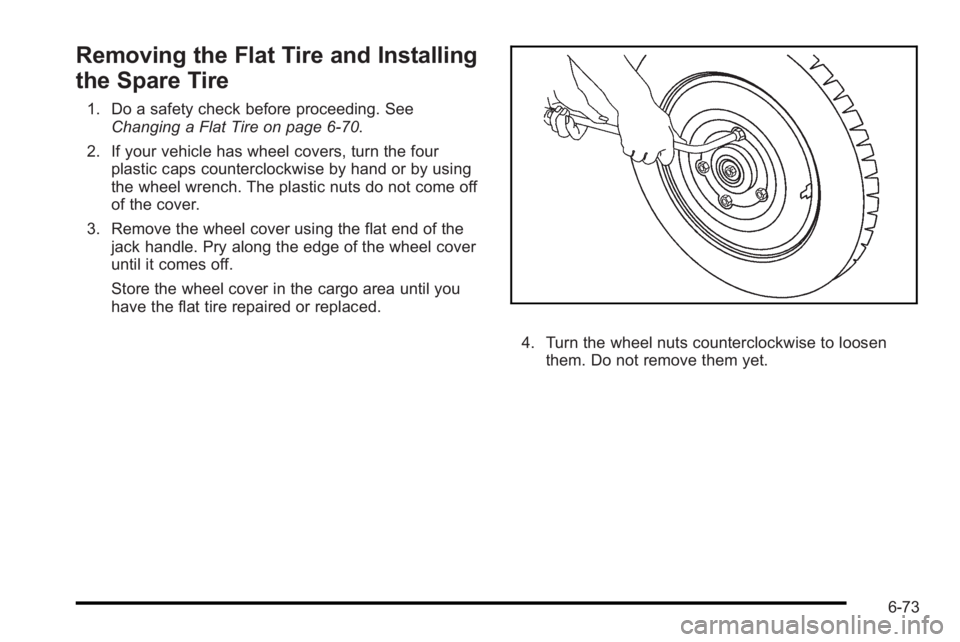
Removing the Flat Tire and Installing
the Spare Tire
1. Do a safety check before proceeding. SeeChanging a Flat Tire on page 6‑70.
2. If your vehicle has wheel covers, turn the four plastic caps counterclockwise by hand or by using
the wheel wrench. The plastic nuts do not come off
of the cover.
3. Remove the wheel cover using the flat end of the jack handle. Pry along the edge of the wheel cover
until it comes off.
Store the wheel cover in the cargo area until you
have the flat tire repaired or replaced.
4. Turn the wheel nuts counterclockwise to loosenthem. Do not remove them yet.
6-73
Page 299 of 368
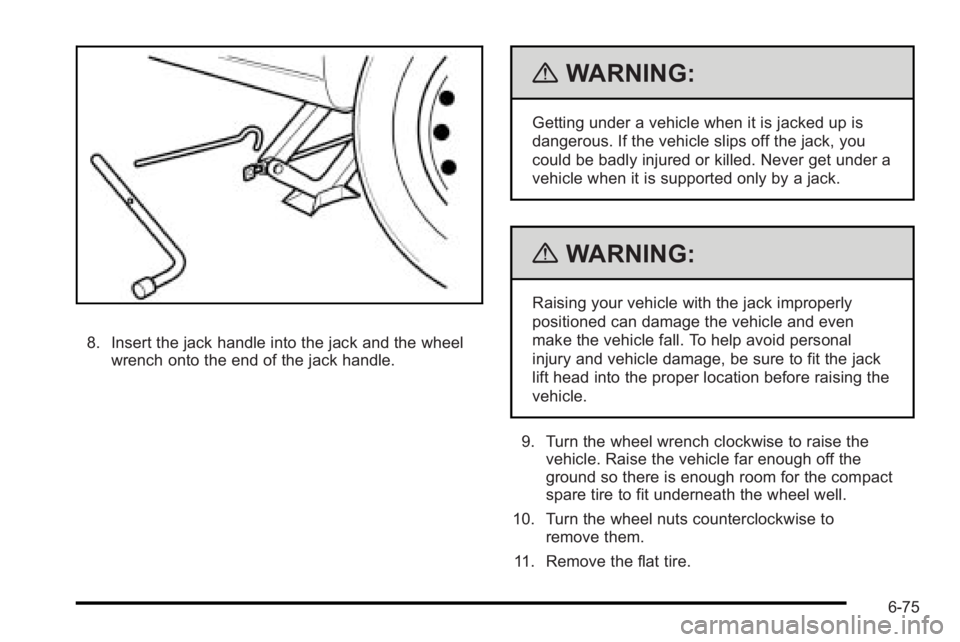
8. Insert the jack handle into the jack and the wheelwrench onto the end of the jack handle.
{WARNING:
Getting under a vehicle when it is jacked up is
dangerous. If the vehicle slips off the jack, you
could be badly injured or killed. Never get under a
vehicle when it is supported only by a jack.
{WARNING:
Raising your vehicle with the jack improperly
positioned can damage the vehicle and even
make the vehicle fall. To help avoid personal
injury and vehicle damage, be sure to fit the jack
lift head into the proper location before raising the
vehicle.
9. Turn the wheel wrench clockwise to raise the vehicle. Raise the vehicle far enough off the
ground so there is enough room for the compact
spare tire to fit underneath the wheel well.
10. Turn the wheel nuts counterclockwise to remove them.
11. Remove the flat tire.
6-75