warning light PONTIAC G5 2010 Owners Manual
[x] Cancel search | Manufacturer: PONTIAC, Model Year: 2010, Model line: G5, Model: PONTIAC G5 2010Pages: 422, PDF Size: 2.22 MB
Page 1 of 422
In Brief........................................................... 1-1
Instrument Panel ........................................ 1-2
Initial Drive Information ............................... 1-4
Vehicle Features ...................................... 1-14
Performance and Maintenance ...................1-18
Seats and Restraint System ............................. 2-1
Front Seats ............................................... 2-2
Rear Seats ............................................... 2-9
Safety Belts ............................................. 2-11
Child Restraints ....................................... 2-32
Airbag System ......................................... 2-55
Restraint System Check ............................2-71
Features and Controls ..................................... 3-1
Keys ........................................................ 3-2
Doors and Locks ....................................... 3-8
Windows ................................................. 3-13
Theft-Deterrent Systems ............................3-15
Starting and Operating Your Vehicle ...........3-19 Mirrors
.................................................... 3-35
Storage Areas ......................................... 3-36
Sunroof .................................................. 3-37
Instrument Panel ............................................. 4-1
Instrument Panel Overview .......................... 4-3
Climate Controls ...................................... 4-14
Warning Lights, Gages, and Indicators ........4-19
Driver Information Center (DIC) ..................4-35
Audio System(s) ....................................... 4-49
Driving Your Vehicle ....................................... 5-1
Your Driving, the Road, and the Vehicle ....... 5-2
Towing ................................................... 5-30
Service and Appearance Care .......................... 6-1
Service ..................................................... 6-3
Fuel ......................................................... 6-5
Checking Things Under the Hood ...............6-10
Headlamp Aiming ..................................... 6-38
Bulb Replacement .................................... 6-41
2010 Pontiac G5 Owner ManualM
Page 5 of 422
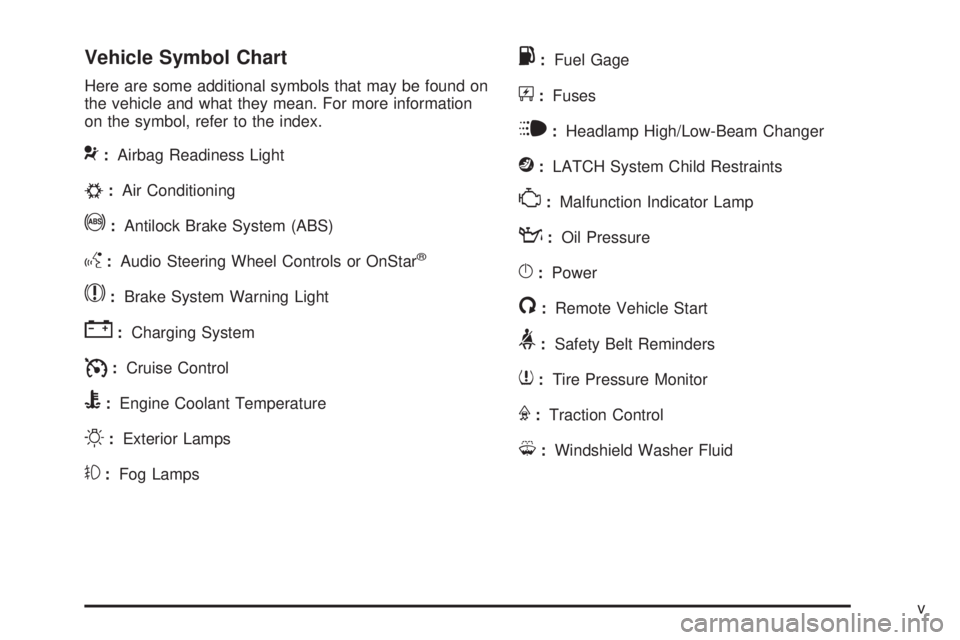
Vehicle Symbol Chart
Here are some additional symbols that may be found on
the vehicle and what they mean. For more information
on the symbol, refer to the index.
9:Airbag Readiness Light
#:Air Conditioning
!:Antilock Brake System (ABS)
g:Audio Steering Wheel Controls or OnStar®
$:Brake System Warning Light
":Charging System
I:Cruise Control
B:Engine Coolant Temperature
O:Exterior Lamps
#:Fog Lamps
.:Fuel Gage
+:Fuses
i:Headlamp High/Low-Beam Changer
j:LATCH System Child Restraints
*:Malfunction Indicator Lamp
::Oil Pressure
}:Power
/:Remote Vehicle Start
>:Safety Belt Reminders
7:Tire Pressure Monitor
F:Traction Control
M:Windshield Washer Fluid
v
Page 9 of 422
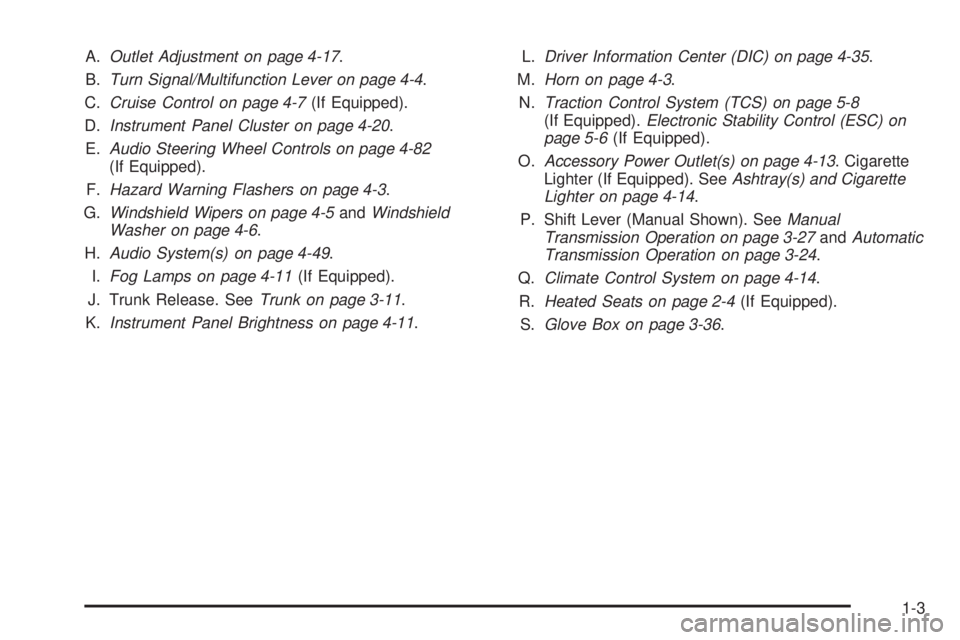
A.Outlet Adjustment on page 4-17 .
B. Turn Signal/Multifunction Lever on page 4-4 .
C. Cruise Control on page 4-7 (If Equipped).
D. Instrument Panel Cluster on page 4-20 .
E. Audio Steering Wheel Controls on page 4-82
(If Equipped).
F. Hazard Warning Flashers on page 4-3 .
G. Windshield Wipers on page 4-5 andWindshield
Washer on page 4-6.
H. Audio System(s) on page 4-49 .
I. Fog Lamps on page 4-11 (If Equipped).
J. Trunk Release. See Trunk on page 3-11.
K. Instrument Panel Brightness on page 4-11 .L.
Driver Information Center (DIC) on page 4-35 .
M. Horn on page 4-3.
N. Traction Control System (TCS) on page 5-8
(If Equipped). Electronic Stability Control (ESC) on
page 5-6 (If Equipped).
O. Accessory Power Outlet(s) on page 4-13 . Cigarette
Lighter (If Equipped). See Ashtray(s) and Cigarette
Lighter on page 4-14 .
P. Shift Lever (Manual Shown). See Manual
Transmission Operation on page 3-27 andAutomatic
Transmission Operation on page 3-24 .
Q. Climate Control System on page 4-14 .
R. Heated Seats on page 2-4 (If Equipped).
S. Glove Box on page 3-36 .
1-3
Page 24 of 422

Cruise Control
The cruise control buttons
are located on the left side
of the steering wheel.
J:On/Off.
RES+: Press to resume or accelerate speed.
SET−: Press to set or decrease speed.
For more information, see Cruise Control on page 4-7 .
Power Outlets
Accessory power outlets can be used to connect
electrical equipment, such as a cellular phone.
The accessory power outlet is located in the center
console, rearward of the shift lever.
To use the accessory power outlet, remove the cover.
SeeAccessory Power Outlet(s) on page 4-13 and
Ashtray(s) and Cigarette Lighter on page 4-14
(If Equipped).
Performance and Maintenance
Traction Control System (TCS)
The traction control system limits wheel spin. The
system turns on automatically every time the vehicle is
started.
•To turn off traction control, press and releasedon
the instrument panel.
Filluminates and the
appropriate DIC message displays. See DIC
Warnings and Messages on page 4-38 .
•Press and release the button again to turn on
traction control.
For more information, see Traction Control System
(TCS) on page 5-8.
1-18
Page 25 of 422

Electronic Stability Control (ESC)
The Electronic Stability Control system assists with
directional control of the vehicle in difficult driving
conditions. The system turns on automatically every
time the vehicle is started.
•To turn off both traction control and Electronic
Stability Control, press and hold
duntilF
illuminates and the appropriate DIC message
displays. SeeDIC Warnings and Messages on
page 4-38.
•Press and release the button again to turn on both
systems.
For more information, see Electronic Stability Control
(ESC) on page 5-6.
Tire Pressure Monitor
This vehicle may have a Tire Pressure Monitor
System (TPMS).
The Tire Pressure Monitor
alerts you when a
significant reduction in
pressure occurs in one or
more of the vehicle’s tires
by illuminating the low tire
pressure warning light on
the instrument cluster.
The warning light will remain on until the tire pressure is
corrected. The proper tire pressures for your vehicle
are listed on the Tire and Loading Information label
located on the driver side center pillar (B pillar). See
Loading the Vehicle on page 5-24 .
1-19
Page 26 of 422
You may notice during cooler conditions that the low tire
pressure warning light will appear when the vehicle is
first started and then turn off as you drive. This may be
an early indicator that your tire pressures are getting
low and the tires need to be inflated to the proper
pressure.
Note:The Tire Pressure Monitor can alert you about
low tire pressure, but it does not replace normal monthly
tire maintenance. It is the driver’s responsibility to
maintain correct tire pressures.
See Tire Pressure Monitor System on page 6-56 and
Tire Pressure Monitor Operation on page 6-58 .
Tire Sealant and Compressor Kit
This vehicle may come with a jack and spare tire or a
tire sealant and compressor kit. The kit can be used
to seal small punctures in the tread area of the tire.
SeeTire Sealant and Compressor Kit on page 6-72 for
complete operating information.
Engine Oil Life System
The engine oil life system calculates engine oil life
based on vehicle use and displays a DIC message when
it is necessary to change the engine oil and filter. The
oil life system should be reset to 100% only following an
oil change.
Resetting the Oil Life System
1. Turn the ignition to ON/RUN, with the engine off.
2. Press the DIC information and reset buttons at the same time to enter the personalization menu.
3. Press the information button until the DIC display shows OIL-LIFE RESET.
4. Press and hold the reset button until the DIC display shows ACKNOWLEDGED.
5. Turn the key to LOCK/OFF.
See Engine Oil Life System on page 6-16 .
1-20
Page 34 of 422

Heated Seats
Your vehicle may have heated front seats. The switches
are located on the instrument panel above the climate
control system.Press the side of the
switch with the double
indicator lights to turn on
the heated seat at the
highest setting.
Both indicator lights will be lit to indicate that the setting
is on high. Press the side of the switch with the single
indicator light to go to the low setting. The indicator light
will be lit to indicate that the setting is on low. Return
the switch to the center to turn off the heated seat.
If your vehicle has been turned off, the last heated seat
setting will be retained when the vehicle is started
again.
Reclining Seatbacks
{WARNING:
You can lose control of the vehicle if you try to
adjust a manual driver’s seat while the vehicle is
moving. The sudden movement could startle and
confuse you, or make you push a pedal when you
do not want to. Adjust the driver’s seat only when
the vehicle is not moving.
{WARNING:
If either seatback is not locked, it could move
forward in a sudden stop or crash. That could
cause injury to the person sitting there. Always
push and pull on the seatbacks to be sure they
are locked.
Your seats have manual reclining seatbacks. The lever
used to operate them is located on the outboard
side of the seats.
Driver’s Switch Shown,
Passenger’s Switch Similar
2-4
Page 87 of 422
{WARNING:
Children who are up against, or very close to, any
airbag when it inflates can be seriously injured or
killed. Airbags plus lap-shoulder belts offer
protection for adults and older children, but not for
young children and infants. Neither the vehicle’s
safety belt system nor its airbag system is
designed for them. Young children and infants
need the protection that a child restraint system
can provide. Always secure children properly in
your vehicle. To read how, seeOlder Children on
page 2-32 orInfants and Young Children on
page 2-35. There is an airbag
readiness light on the
instrument panel, which
shows the airbag symbol.
The system checks the airbag electrical system for
malfunctions. The light tells you if there is an electrical
problem. See Airbag Readiness Light on page 4-23
for more information.
2-57
Page 95 of 422
{WARNING:
A child in a rear-facing child restraint can be
seriously injured or killed if the right front
passenger airbag inflates. This is because the
back of the rear-facing child restraint would be
very close to the inflating airbag. A child in a
forward-facing child restraint can be seriously
injured or killed if the right front passenger airbag
inflates and the passenger seat is in a forward
position.
Even if the passenger sensing system has turned
off the right front passenger frontal airbag, no
system is fail-safe. No one can guarantee that an
airbag will not deploy under some unusual
circumstance, even though the airbag is turned off.
Secure rear-facing child restraints in a rear seat,
even if the airbag is off. If you secure a
forward-facing child restraint in the right front seat,
always move the front passenger seat as far back
as it will go. It is better to secure the child restraint
in a rear seat.The passenger sensing system is designed to turn off
the right front passenger frontal airbag if:
•The right front passenger seat is unoccupied.
•The system determines that an infant is present in
a child restraint.
•A right front passenger takes his/her weight off of
the seat for a period of time.
•Or, if there is a critical problem with the airbag
system or the passenger sensing system.
When the passenger sensing system has turned off the
right front passenger frontal airbag, the off indicator
will light and stay lit to remind you that the airbag is off.
See Passenger Airbag Status Indicator on page 4-24 .
The passenger sensing system is designed turn on (may
inflate) the right front passenger frontal airbag anytime
the system senses that a person of adult size is sitting
properly in the right front passenger seat. When the
passenger sensing system has allowed the airbag to be
enabled, the on indicator will light and stay lit to remind
you that the airbag is active.
2-65
Page 96 of 422
For some children, including children in child restraints,
and for very small adults, the passenger sensing system
may or may not turn off the right front passenger frontal
airbag, depending upon the person’s seating posture
and body build. Everyone in the vehicle who has
outgrown child restraints should wear a safety belt
properly — whether or not there is an airbag for that
person.
{WARNING:
If the airbag readiness light ever comes on and
stays on, it means that something may be wrong
with the airbag system. To help avoid injury to
yourself or others, have the vehicle serviced right
away. SeeAirbag Readiness Light on page 4-23
for more information, including important safety
information.
If the On Indicator is Lit for a Child
Restraint
If a child restraint has been installed and the on
indicator is lit:
1. Turn the vehicle off.
2. Remove the child restraint from the vehicle. 3. Remove any additional items from the seat such as
blankets, cushions, seat covers, seat heaters, or
seat massagers.
4. Reinstall the child restraint following the directions provided by the child restraint manufacturer and
refer to Securing a Child Restraint in the Right Front
Seat Position on page 2-52 .
5. If, after reinstalling the child restraint and restarting the vehicle, the on indicator is still lit, turn the
vehicle off. Then slightly recline the vehicle seatback
and adjust the seat cushion, if adjustable, to
make sure that the vehicle seatback is not pushing
the child restraint into the seat cushion.
Also make sure the child restraint is not trapped
under the vehicle head restraint. If this happens,
adjust the head restraint. See Head Restraints
on page 2-7.
6. Restart the vehicle. The passenger sensing system may or may not turn
off the airbag for a child in a child restraint
depending upon the child’s seating posture and
body build. It is better to secure the child restraint in
a rear seat.
2-66