battery PONTIAC G5 2010 User Guide
[x] Cancel search | Manufacturer: PONTIAC, Model Year: 2010, Model line: G5, Model: PONTIAC G5 2010Pages: 422, PDF Size: 2.22 MB
Page 153 of 422
Battery Run-Down Protection
The vehicle has a battery saver feature designed to
protect the vehicle’s battery.
When any interior lamp is left on and the ignition is
turned off, the battery rundown protection system
automatically turns the lamp off after 20 minutes.
This prevents draining of the battery.
Accessory Power Outlet(s)
Accessory power outlets can be used to connect
electrical equipment, such as a cellular phone.
The accessory power outlet is located in the center
console, rearward of the shift lever.
To use the accessory power outlet, remove the cover.
When not in use, always cover the accessory power
outlet with the protective cap.
Notice:Leaving electrical equipment on for
extended periods will drain the battery. Always
turn off electrical equipment when not in use and
do not plug in equipment that exceeds the maximum
amperage rating of 20 amperes. Certain electrical accessories may not be compatible
with the accessory power outlet and could result
in blown vehicle or adapter fuses. If you experience
a problem, see your dealer/retailer for additional
information on the accessory power outlet.
Notice:
Adding any electrical equipment to the
vehicle can damage it or keep other components
from working as they should. The repairs would
not be covered by the vehicle warranty. Do not use
equipment exceeding maximum amperage rating of
20 amperes. Check with your dealer/retailer before
adding electrical equipment.
When adding electrical equipment, be sure to follow the
installation instructions included with the equipment.
Notice: Improper use of the power outlet can
cause damage not covered by the vehicle warranty.
Do not hang any type of accessory or accessory
bracket from the plug because the power outlets
are designed for accessory power plugs only.
4-13
Page 172 of 422

If none of the above have made the light turn off, your
dealer/retailer can check the vehicle. The dealer/retailer
has the proper test equipment and diagnostic tools to
fix any mechanical or electrical problems that might have
developed.
Emissions Inspection and Maintenance
Programs
Some state/provincial and local governments have or
might begin programs to inspect the emission control
equipment on the vehicle. Failure to pass this inspection
could prevent getting a vehicle registration.
Here are some things to know to help the vehicle pass
an inspection:
•The vehicle will not pass this inspection if the check
engine light is on with the engine running, or if the
key is in ON/RUN and the light is not on.
•The vehicle will not pass this inspection if the OBD II
(on-board diagnostic) system determines that critical
emission control systems have not been completely
diagnosed by the system. The vehicle would be
considered not ready for inspection. This can happen
if the battery has recently been replaced or if the
battery has run down. The diagnostic system is
designed to evaluate critical emission control
systems during normal driving. This can take several
days of routine driving. If this has been done and the
vehicle still does not pass the inspection for lack of
OBD II system readiness, your dealer/retailer can
prepare the vehicle for inspection.
4-32
Page 180 of 422

ESC (Electronic Stability Control) NOT
READY
If your vehicle has Electronic Stability Control (ESC), this
message may display briefly after starting the vehicle if
the system’s sensors are not yet calibrated. The system
is not functional until the message stops displaying.
Adjust your driving accordingly. When the message is no
longer displayed, the system is functional. SeeElectronic
Stability Control (ESC) on page 5-6 for more information.
ESC (Electronic Stability Control) OFF
If your vehicle has Electronic Stability Control (ESC),
this message displays and the ESC/TCS light on the
instrument panel cluster comes on solid when ESC is
turned off. Adjust your driving accordingly. See Electronic
Stability Control (ESC) on page 5-6 andElectronic
Stability Control (ESC)/Traction Control System (TCS)
Indicator/Warning Light on page 4-28 for more
information.
ICE POSSIBLE
This message displays when the outside air temperature
is cold enough to create icy road conditions. Adjust
your driving accordingly.
KEY FOB BATT (Battery) LOW
This message displays if the Remote Keyless Entry
(RKE) transmitter battery is low. Replace the battery
in the transmitter. See “Battery Replacement” under
Remote Keyless Entry (RKE) System Operation
on page 3-3.
LEARN COMPLETE
On vehicles without the Remote Keyless Entry (RKE)
system, this message displays when the Tire Pressure
Monitor System (TPMS) has completed the tire learning
process. See Tire Pressure Monitor System on page 6-56
for more information.
LOW FUEL
This message displays when your vehicle is low on
fuel. Refill the fuel tank as soon as possible. See Fuel
Gage on page 4-34 ,Fuel on page 6-5, and Filling
the Tank on page 6-8 for more information.
4-40
Page 183 of 422

TRACTION OFF
If your vehicle has the Enhanced Traction System (ETS)
or Traction Control System (TCS), this message displays
and the ETS light or the ESC/TCS light on the instrument
panel cluster comes on solid when the system is turned
off. Adjust your driving accordingly. SeeEnhanced
Traction System (ETS) on page 5-11 orTraction Control
System (TCS) on page 5-8 andEnhanced Traction
System (ETS) Indicator/Warning Light on page 4-27
or Electronic Stability Control (ESC)/Traction Control
System (TCS) Indicator/Warning Light on page 4-28
for more information.
TRUNK AJAR
This message displays when the trunk is not closed
completely. Make sure that the trunk is closed
completely. See Trunk on page 3-11.
DIC Vehicle Personalization
Your vehicle has personalization capabilities that allow
you to program certain features to a preferred setting.
All of the features listed may not be available on your
vehicle. Only the features available will be displayed
on the DIC.
The default settings for the features were set when your
vehicle left the factory, but may have been changed
from their default state since that time.
To change feature settings, use the following procedure:
Entering Personalization Menu
1. Turn the ignition on while the vehicle is stopped.
To avoid excessive drain on the battery, it is
recommended that the headlamps are turned off.
2. Press and hold the information and reset buttons at the same time for one second, then release to enter
the personalization menu.
If the vehicle speed is greater than 3 km/h (2 mph),
only the UNITS menu will be accessible.
3. Press the information button to scroll through the available personalization menu modes.
Press the reset button to scroll through the available
settings for each mode.
If you do not make a selection within ten seconds,
the display will go back to the previous information
displayed.
4-43
Page 206 of 422
To listen to files by another artist, press the softkey
located below either arrow tab. The disc goes to the next
or previous artist in alphabetical order. Continue pressing
either softkey below the arrow tab until the desired artist
displays.
To change from playback by artist to playback by
album:1. Press the softkey located below the Sort By tab.
2. Press one of the softkeys below the album tab from the sort screen.
3. Press the softkey below the back tab to return to the main music navigator screen.
The album name displays on the second line between
the arrows and songs from the current album begins
to play. Once all songs from that album have played, the
player moves to the next album in alphabetical order
on the CD and begins playing MP3 files from that album.
To exit music navigator mode, press the softkey
below the Back tab to return to normal MP3 playback.Connecting a USB Storage Device
or iPod®
The USB Port can be used to control an iPod or a USB
storage device.
To connect a USB storage device, connect the device
to the USB port located on the front of the radio.
To connect an iPod, connect one end of the USB cable
that came with the iPod to the iPod’s dock connector and
connect the other end to the USB port located on the front
of the radio. If the vehicle is on and the USB connection
works, “OK to disconnect” and a GM logo may appear
on the iPod and iPod appears on the radio’s display.
The iPod music appears on the radio’s display and
begins playing.
The iPod charges while it is connected to the vehicle if
the vehicle is in the ACC/ACCESSORY or ON/RUN
position. When the vehicle is turned off, the iPod
automatically powers off and will not charge or draw
power from the vehicle’s battery.
If you have an older iPod model that is not supported,
it can still be used by connecting it to the Auxiliary Input
Jack using a standard 3.5 mm (1/8 in) stereo cable.
See “Using the Auxiliary Input Jack” earlier for
more information.
4-66
Page 224 of 422
XM™ Satellite Radio Service
XM Satellite Radio Service gives digital radio reception
from coast-to-coast in the 48 contiguous United States,
and in Canada. Just as with FM, tall buildings or hills can
interfere with satellite radio signals, causing the sound to
fade in and out. In addition, traveling or standing under
heavy foliage, bridges, garages, or tunnels may cause
loss of the XM signal for a period of time.
Cellular Phone Usage
Cellular phone usage may cause interference with the
vehicle’s radio. This interference may occur when making
or receiving phone calls, charging the phone’s battery,
or simply having the phone on. This interference causes
an increased level of static while listening to the radio.
If static is received while listening to the radio, unplug
the cellular phone and turn it off.
Fixed Mast Antenna
The fixed mast antenna can withstand most car washes
without being damaged as long as it is securely attached
to the base. If the mast becomes slightly bent, straighten
it out by hand. If the mast is badly bent, replace it.
Occasionally check to make sure the antenna is
tightened to its base. If tightening is required, tighten
by hand until fully seated plus one quarter turn.
XM™ Satellite Radio Antenna
System
The XM Satellite Radio antenna is located on the roof
or the rear of the vehicle. Keep the antenna clear
of obstructions for clear radio reception.
4-84
Page 247 of 422

Repeat this until help arrives but only when you feel
really uncomfortable from the cold. Moving about
to keep warm also helps.
If it takes some time for help to arrive, now and then
when you run the engine, push the accelerator
pedal slightly so the engine runs faster than the idle
speed. This keeps the battery charged to restart
the vehicle and to signal for help with the headlamps.
Do this as little as possible to save fuel.
If Your Vehicle is Stuck in Sand,
Mud, Ice, or Snow
Slowly and cautiously spin the wheels to free the
vehicle when stuck in sand, mud, ice, or snow. See
Rocking Your Vehicle to Get It Out on page 5-24.
If the vehicle has a traction system, it can often help to
free a stuck vehicle. Refer to the vehicle’s traction
system in the Index. If stuck too severely for the traction
system to free the vehicle, turn the traction system off
and use the rocking method.
{WARNING:
If the vehicle’s tires spin at high speed, they can
explode, and you or others could be injured. The
vehicle can overheat, causing an engine
compartment fire or other damage. Spin the
wheels as little as possible and avoid going above
55 km/h (35 mph) as shown on the speedometer.
For information about using tire chains on the vehicle,
see Tire Chains on page 6-70 .
5-23
Page 255 of 422
Dinghy Towing
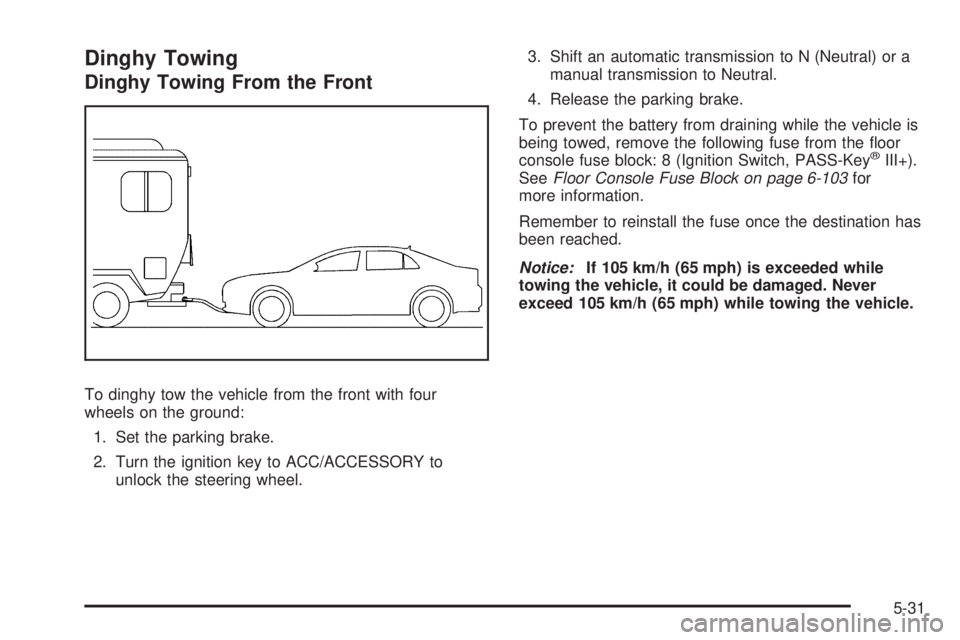
Dinghy Towing From the Front
To dinghy tow the vehicle from the front with four
wheels on the ground:1. Set the parking brake.
2. Turn the ignition key to ACC/ACCESSORY to unlock the steering wheel. 3. Shift an automatic transmission to N (Neutral) or a
manual transmission to Neutral.
4. Release the parking brake.
To prevent the battery from draining while the vehicle is
being towed, remove the following fuse from the floor
console fuse block: 8 (Ignition Switch, PASS-Key
®III+).
See Floor Console Fuse Block on page 6-103 for
more information.
Remember to reinstall the fuse once the destination has
been reached.
Notice: If 105 km/h (65 mph) is exceeded while
towing the vehicle, it could be damaged. Never
exceed 105 km/h (65 mph) while towing the vehicle.
5-31
Page 265 of 422

Service........................................................... .6-3
Accessories and Modifications ..........................6-3
California Proposition 65 Warning .....................6-4
California Perchlorate Materials Requirements .....6-4
Doing Your Own Service Work .........................6-4
Adding Equipment to the Outside of the Vehicle ..................................................... .6-5
Fuel ............................................................... .6-5
Gasoline Octane ........................................... .6-6
Gasoline Specifications ................................... .6-6
California Fuel .............................................. .6-6
Additives ...................................................... .6-6
Fuels in Foreign Countries ...............................6-7
Filling the Tank ............................................. .6-8
Filling a Portable Fuel Container .....................6-10
Checking Things Under the Hood ....................6-10
Hood Release ............................................. .6-11
Engine Compartment Overview .......................6-12
Engine Oil .................................................. .6-13
Engine Oil Life System ................................. .6-16
Engine Air Cleaner/Filter ................................6-18
Automatic Transmission Fluid .........................6-19
Hydraulic Clutch .......................................... .6-19
Cooling System ........................................... .6-20
Engine Coolant ............................................ .6-24
Engine Overheating ...................................... .6-27Windshield Washer Fluid
................................6-28
Brakes ....................................................... .6-29
Battery ....................................................... .6-33
Jump Starting .............................................. .6-34
Headlamp Aiming .......................................... .6-38
Bulb Replacement ......................................... .6-41
Halogen Bulbs ............................................. .6-41
Headlamps, Front Turn Signal, Sidemarker, and Parking Lamps ................................... .6-42
Center High-Mounted Stoplamp (CHMSL) .........6-43
Taillamps
and Turn Signal Lamps (Coupe) .......6-44
Taillamps, Turn Signal, Stoplamps and Back-up Lamps (Sedan) .............................6-44
Back-Up Lamps (Coupe) ................................6-45
License Plate Lamp ..................................... .6-46
Replacement Bulbs ...................................... .6-47
Windshield Wiper Blade Replacement ..............6-47
Tires ............................................................. .6-48
Tire Sidewall Labeling .................................. .6-49
Tire Terminology and Definitions .....................6-52
Inflation - Tire Pressure .................................6-55
Tire Pressure Monitor System .........................6-56
Tire Pressure Monitor Operation .....................6-58
Tire Inspection and Rotation ...........................6-62
When It Is Time for New Tires .......................6-64
Section 6 Service and Appearance Care
6-1
Page 297 of 422
Battery
Refer to the replacement number on the original battery
label when a new battery is needed.
The battery is in the trunk. Access to the battery is not
necessary to jump start the vehicle. SeeJump Starting on
page 6-34.
{DANGER:
Battery posts, terminals, and related accessories
contain lead and lead compounds, chemicals
known to the State of California to cause cancer
and reproductive harm. Wash hands after handling.
Vehicle Storage
{WARNING:
Batteries have acid that can burn you and gas that
can explode. You can be badly hurt if you are not
careful. See Jump Starting on page 6-34 for tips
on working around a battery without getting hurt.
Infrequent Usage: Remove the black, negative ( −) cable
from the battery to keep the battery from running down.
Extended Storage: Remove the black, negative ( −) cable
from the battery or use a battery trickle charger.
6-33