brake PONTIAC G5 2010 Repair Manual
[x] Cancel search | Manufacturer: PONTIAC, Model Year: 2010, Model line: G5, Model: PONTIAC G5 2010Pages: 422, PDF Size: 2.22 MB
Page 330 of 422
Vehicles that have a tire pressure monitoring
system could give an inaccurate low-pressure
warning if non-TPC Spec rated tires are installed
on your vehicle. Non-TPC Spec rated tires
may give a low-pressure warning that is higher or
lower than the proper warning level you would
get with TPC Spec rated tires. SeeTire Pressure
Monitor System on page 6-56 .
Your vehicle’s original equipment tires are listed
on the Tire and Loading Information Label.
See Loading the Vehicle on page 5-24 , for more
information about the Tire and Loading Information
Label and its location on your vehicle.
Different Size Tires and Wheels
If you add wheels or tires that are a different size than
your original equipment wheels and tires, this may
affect the way your vehicle performs, including its
braking, ride and handling characteristics, stability, and
resistance to rollover. Additionally, if your vehicle
has electronic systems such as, antilock brakes, traction
control, and electronic stability control, the performance
of these systems can be affected.
{WARNING:
If you add different sized wheels, your vehicle may
not provide an acceptable level of performance
and safety if tires not recommended for those
wheels are selected. You may increase the
chance that you will crash and suffer serious
injury. Only use GM specific wheel and tire
systems developed for your vehicle, and have
them properly installed by a GM certified
technician.
See Buying New Tires on page 6-64 andAccessories
and Modi�cations on page 6-3 for additional information.
6-66
Page 333 of 422

Each new wheel should have the same load-carrying
capacity, diameter, width, offset, and be mounted
the same way as the one it replaces.
If you need to replace any of your wheels, wheel bolts,
wheel nuts, or Tire Pressure Monitor System (TPMS)
sensors, replace them only with new GM original
equipment parts. This way, you will be sure to have the
right wheel, wheel bolts, wheel nuts, and TPMS
sensors for your vehicle.
{WARNING:
Using the wrong replacement wheels, wheel bolts,
or wheel nuts on your vehicle can be dangerous. It
could affect the braking and handling of your
vehicle, make your tires lose air and make you
lose control. You could have a collision in which
you or others could be injured. Always use the
correct wheel, wheel bolts, and wheel nuts for
replacement.Notice:
The wrong wheel can also cause problems
with bearing life, brake cooling, speedometer or
odometer calibration, headlamp aim, bumper height,
vehicle ground clearance, and tire or tire chain
clearance to the body and chassis.
See Changing a Flat Tire on page 6-80 for more
information.
Used Replacement Wheels
{WARNING:
Putting a used wheel on the vehicle is dangerous.
You cannot know how it has been used or how far
it has been driven. It could fail suddenly and
cause a crash. If you have to replace a wheel, use
a new GM original equipment wheel.
6-69
Page 334 of 422
Tire Chains
{WARNING:
If your vehicle has P205/55R16 or P205/50R17
size tires, do not use tire chains. They can
damage your vehicle because there is not enough
clearance.
Tire chains used on a vehicle without the proper
amount of clearance can cause damage to the
brakes, suspension, or other vehicle parts. The
area damaged by the tire chains could cause you
to lose control of your vehicle and you or others
may be injured in a crash.
Use another type of traction device only if its
manufacturer recommends it for use on your
vehicle and tire size combination and road
conditions. Follow that manufacturer’s instructions.
To help avoid damage to your vehicle, drive
slowly, readjust, or remove the device if it is
contacting your vehicle, and do not spin your
vehicle’s wheels.
If you do find traction devices that will fit, install
them on the front tires.Notice:
If your vehicle has a tire size other than
P205/55R16 or P205/50R17, use tire chains only
where legal and only when you must. Use only SAE
Class S-type chains that are the proper size for
your tires. Install them on the front tires and tighten
them as tightly as possible with the ends securely
fastened. Drive slowly and follow the chain
manufacturer’s instructions. If you can hear the
chains contacting your vehicle, stop and retighten
them. If the contact continues, slow down until
it stops. Driving too fast or spinning the wheels with
chains on will damage your vehicle.
If a Tire Goes Flat
It is unusual for a tire to blowout while you are driving,
especially if you maintain the tires properly. See
Tires on page 6-48 . If air goes out of a tire, It is much
more likely to leak out slowly. But if you should ever
have a blowout, here are a few tips about what to expect
and what to do:
If a front tire fails, the flat tire will create a drag that
pulls the vehicle toward that side. Take your foot off the
accelerator pedal and grip the steering wheel firmly.
Steer to maintain lane position, and then gently brake to
a stop well out of the traffic lane.
6-70
Page 335 of 422
A rear blowout, particularly on a curve, acts much like a
skid and may require the same correction you would
use in a skid. In any rear blowout, remove your foot from
the accelerator pedal. Get the vehicle under control
by steering the way you want the vehicle to go. It may
be very bumpy and noisy, but you can still steer. Gently
brake to a stop, well off the road if possible.
If a tire goes flat, avoid further tire and wheel damage
by driving slowly to a level place and stopping.1. Turn on the hazard warning flashers. See Hazard
Warning Flashers on page 4-3 .
2. Park the vehicle. Set the parking brake firmly and put the shift lever in P (Park).
3. Turn off the engine.
4. Inspect the flat tire.
{WARNING:
Lifting a vehicle and getting under it to do
maintenance or repairs is dangerous without the
appropriate safety equipment and training. If a jack
is provided with the vehicle, it is designed only for
changing a flat tire. If it is used for anything else,
you or others could be badly injured or killed if the
vehicle slips off the jack. If a jack is provided with
the vehicle, only use it for changing a flat tire.
This vehicle may come with a jack and spare tire or a
tire sealant and compressor kit. To use the jack and
spare tire, see Changing a Flat Tire on page 6-80 .To
use the tire sealant and compressor kit, see Tire Sealant
and Compressor Kit on page 6-72 .
6-71
Page 344 of 422

3. Remove the retainer that holds the tire sealant andcompressor kit.
4. Remove the kit from the foam container.
To store the tire sealant and compressor kit, reverse the
steps.
Changing a Flat Tire
If a tire goes flat, avoid further tire and wheel damage
by driving slowly to a level place. Turn on the hazard
warning flashers. See Hazard Warning Flashers
on page 4-3.
{WARNING:
Changing a tire can be dangerous. The vehicle
can slip off the jack and roll over or fall on you or
other people. You and they could be badly injured
or even killed. Find a level place to change your
tire. To help prevent the vehicle from moving:
1. Set the parking brake firmly.
2. Put an automatic transmission shift lever in P (Park), or shift a manual transmission to
1 (First) or R (Reverse).
3. Turn off the engine and do not restart while the vehicle is raised.
4. Do not allow passengers to remain in the vehicle.
To be even more certain the vehicle will not move,
you should put blocks at the front and rear of the
tire farthest away from the one being changed.
That would be the tire on the other side, at the
opposite end of the vehicle.
6-80
Page 354 of 422
{WARNING:
Wheel nuts that are improperly or incorrectly
tightened can cause the wheels to become loose or
come off. The wheel nuts should be tightened with a
torque wrench to the proper torque specification
after replacing. Follow the torque specification
supplied by the aftermarket manufacturer when
using accessory locking wheel nuts. SeeCapacities
and Speci�cations on page 6-109 for original
equipment wheel nut torque specifications.
Notice: Improperly tightened wheel nuts can lead
to brake pulsation and rotor damage. To avoid
expensive brake repairs, evenly tighten the wheel
nuts in the proper sequence and to the proper
torque speci�cation. See Capacities and
Specifications on page 6-109 for the wheel nut
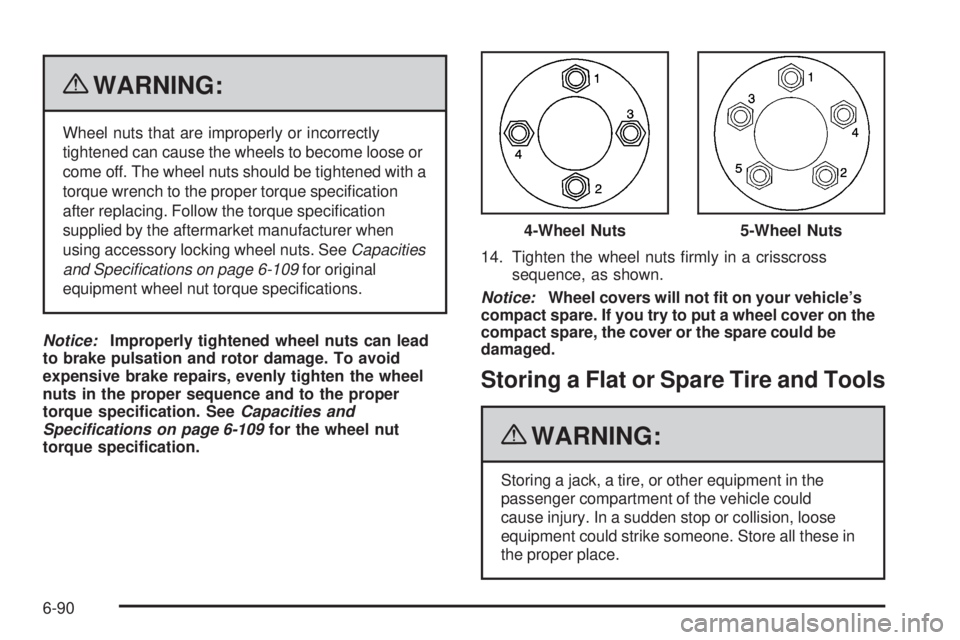
torque speci�cation. 14. Tighten the wheel nuts firmly in a crisscross
sequence, as shown.
Notice: Wheel covers will not �t on your vehicle’s
compact spare. If you try to put a wheel cover on the
compact spare, the cover or the spare could be
damaged.
Storing a Flat or Spare Tire and Tools
{WARNING:
Storing a jack, a tire, or other equipment in the
passenger compartment of the vehicle could
cause injury. In a sudden stop or collision, loose
equipment could strike someone. Store all these in
the proper place. 4-Wheel Nuts
5-Wheel Nuts
6-90
Page 370 of 422
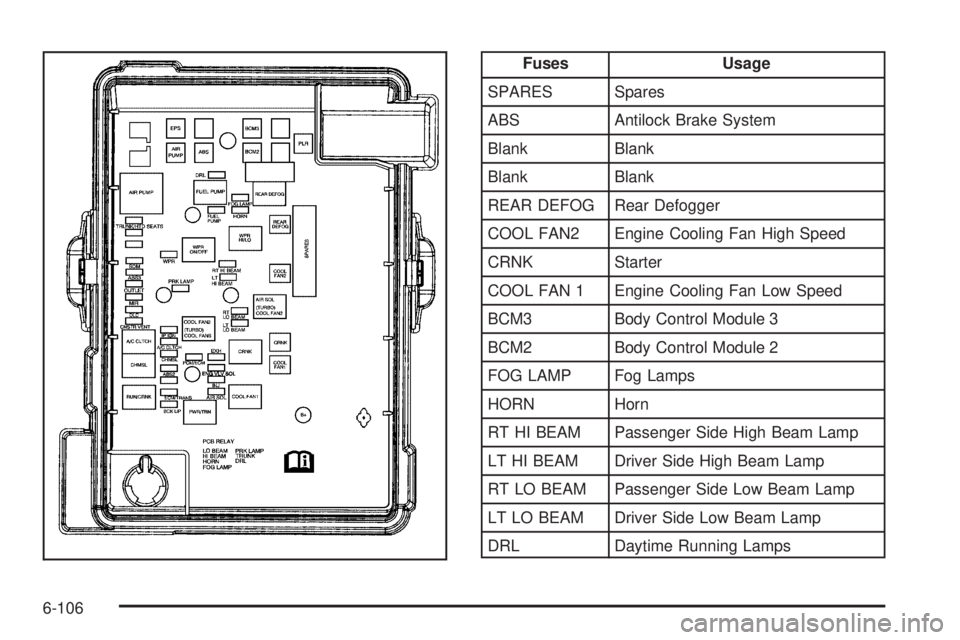
FusesUsage
SPARES Spares
ABS Antilock Brake System
Blank Blank
Blank Blank
REAR DEFOG Rear Defogger
COOL FAN2 Engine Cooling Fan High Speed
CRNK Starter
COOL FAN 1 Engine Cooling Fan Low Speed
BCM3 Body Control Module 3
BCM2 Body Control Module 2
FOG LAMP Fog Lamps
HORN Horn
RT HI BEAM Passenger Side High Beam Lamp
LT HI BEAM Driver Side High Beam Lamp
RT LO BEAM Passenger Side Low Beam Lamp
LT LO BEAM Driver Side Low Beam Lamp
DRL Daytime Running Lamps
6-106
Page 371 of 422
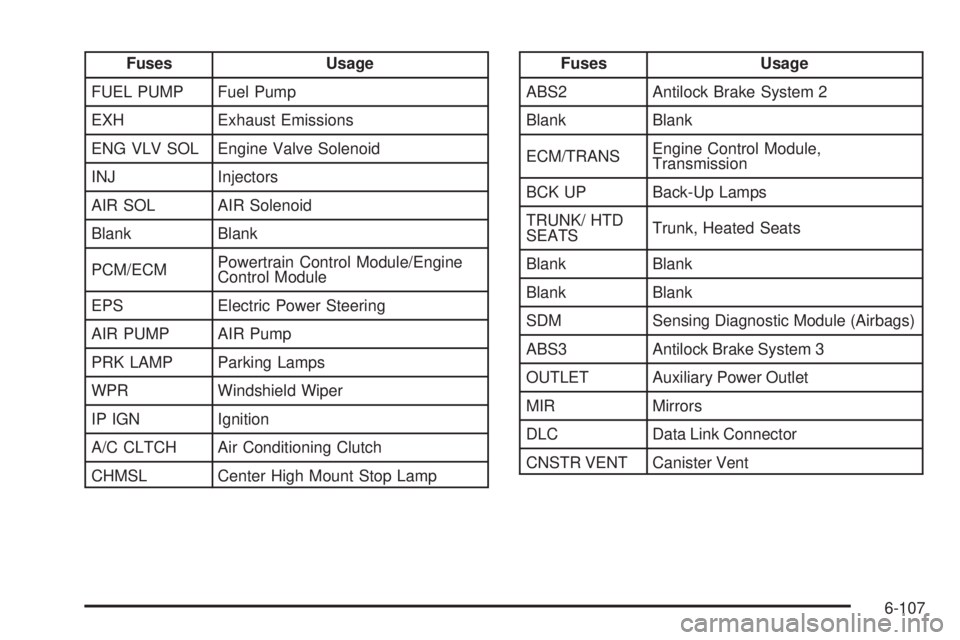
FusesUsage
FUEL PUMP Fuel Pump
EXH Exhaust Emissions
ENG VLV SOL Engine Valve Solenoid
INJ Injectors
AIR SOL AIR Solenoid
Blank Blank
PCM/ECM Powertrain Control Module/Engine
Control Module
EPS Electric Power Steering
AIR PUMP AIR Pump
PRK LAMP Parking Lamps
WPR Windshield Wiper
IP IGN Ignition
A/C CLTCH Air Conditioning Clutch
CHMSL Center High Mount Stop LampFuses Usage
ABS2 Antilock Brake System 2
Blank Blank
ECM/TRANS Engine Control Module,
Transmission
BCK UP Back-Up Lamps
TRUNK/ HTD
SEATS Trunk, Heated Seats
Blank Blank
Blank Blank
SDM Sensing Diagnostic Module (Airbags)
ABS3 Antilock Brake System 3
OUTLET Auxiliary Power Outlet
MIR Mirrors
DLC Data Link Connector
CNSTR VENT Canister Vent
6-107
Page 378 of 422

•Fluids visual leak check (or every 12 months,
whichever occurs first). A leak in any system must
be repaired and the fluid level checked.
•Engine air cleaner filter inspection (vehicles driven
in dusty conditions only). SeeEngine Air Cleaner/
Filter on page 6-18.
•Brake system inspection (or every 12 months,
whichever occurs first).
Maintenance II
•Perform all services described in Maintenance I.
•Steering and suspension inspection. Visual
inspection for damaged, loose, or missing parts or
signs of wear.
•Engine cooling system inspection. Visual inspection
of hoses, pipes, fittings, and clamps and
replacement, if needed.
•Windshield wiper blade inspection for wear, cracking,
or contamination and windshield and wiper blade
cleaning, if contaminated. SeeWindshield and Wiper
Blades on page 6-98. Worn or damaged wiper blade
replacement. See Windshield Wiper Blade
Replacement on page 6-47 .
•Body hinges and latches, key lock cylinders, and
trunk lid hinges and latches lubrication. See
Recommended Fluids and Lubricants on page 7-10 .
More frequent lubrication may be required when
vehicle is exposed to a corrosive environment.
Applying silicone grease on weatherstrips with a
clean cloth makes them last longer, seal better, and
not stick or squeak.
•Restraint system component check. See Checking
the Restraint Systems on page 2-71 .
•Automatic transmission fluid level check and adding
fluid, if needed. SeeAutomatic Transmission Fluid
on page 6-19.
•Engine air cleaner filter inspection. See Engine Air
Cleaner/Filter on page 6-18 .
•Passenger compartment air filter replacement (or
every 12 months, whichever occurs first). More
frequent replacement may be required if vehicle is
driven regularly under dusty conditions.
7-4
Page 379 of 422

Additional Required Services
At Each Fuel Stop•
Engine oil level check. See Engine Oil on page 6-13.
•Engine coolant level check. See Engine Coolant on
page 6-24.
•Windshield washer fluid level check. See Windshield
Washer Fluid on page 6-28 .
Once a Month
•
Tire inflation check. See In�ation - Tire Pressure on
page 6-55.
•Tire wear inspection. See Tire Inspection and
Rotation on page 6-62 .
Once a Year
•
Starter switch check. See Owner Checks and
Services on page 7-8 .
•Parking brake and automatic transmission P (Park)
mechanism check. See Owner Checks and
Services on page 7-8 .
•Automatic transmission shiftlock control system
check. SeeOwner Checks and Services on
page 7-8.
•Ignition transmission lock check. See Owner
Checks and Services on page 7-8 .
•Engine cooling system and pressure cap pressure
check. Radiator and air conditioning condenser
outside cleaning. SeeCooling System on
page 6-20.
•Exhaust system and nearby heat shields inspection
for loose or damaged components.
•Throttle system inspection for interference, binding
or for damaged or missing parts. Replace parts as
needed. Replace any components that have
high effort or excessive wear. Do not lubricate
accelerator or cruise control cables.
•If the vehicle has a Tire Sealant and Compressor
Kit, check the sealant expiration date printed on
the instruction label of the kit. See Tire Sealant and
Compressor Kit on page 6-72 .
First Engine Oil Change After Every
40 000 km/25,000 Miles
•
Fuel system inspection for damage or leaks.
7-5