Automatic Transaxle PONTIAC G6 2006 User Guide
[x] Cancel search | Manufacturer: PONTIAC, Model Year: 2006, Model line: G6, Model: PONTIAC G6 2006Pages: 416, PDF Size: 2.66 MB
Page 110 of 416
SECOND (2) Gear Start Feature
When accelerating your vehicle from a stop in
snowy and icy conditions, you may want to shift into
SECOND (2) gear. A higher gear allows you to
gain more traction on slippery surfaces.
With the MSM feature, the vehicle can be set to pull
away in SECOND (2) gear.
1. Move the shift lever from AUTOMATIC
OVERDRIVE (D) into the MANUAL MODE (M).
2. With the vehicle stopped, move the lever forward to
select SECOND (2) gear. The vehicle will start from
a stop position in SECOND (2) gear.
3. Once moving select the desired drive gear.
While using the MSM feature the vehicle will have
�rmer shifting and increased performance. You can use
this for sport driving or when climbing hills to stay in gear
longer or to downshift for more power or engine braking.
The transaxle will only allow you to shift into gears
appropriate for the vehicle speed and engine revolutions
per minute (RPM). The transaxle will not automatically
shift to the next higher gear if the engine RPM is
too high.
When coming to a stop in the manual mode, the vehicle
will automatically downshift to the proper gear based
on speed. Upon acceleration you will need to manually
upshift to the desired gear.Manual Transaxle Operation
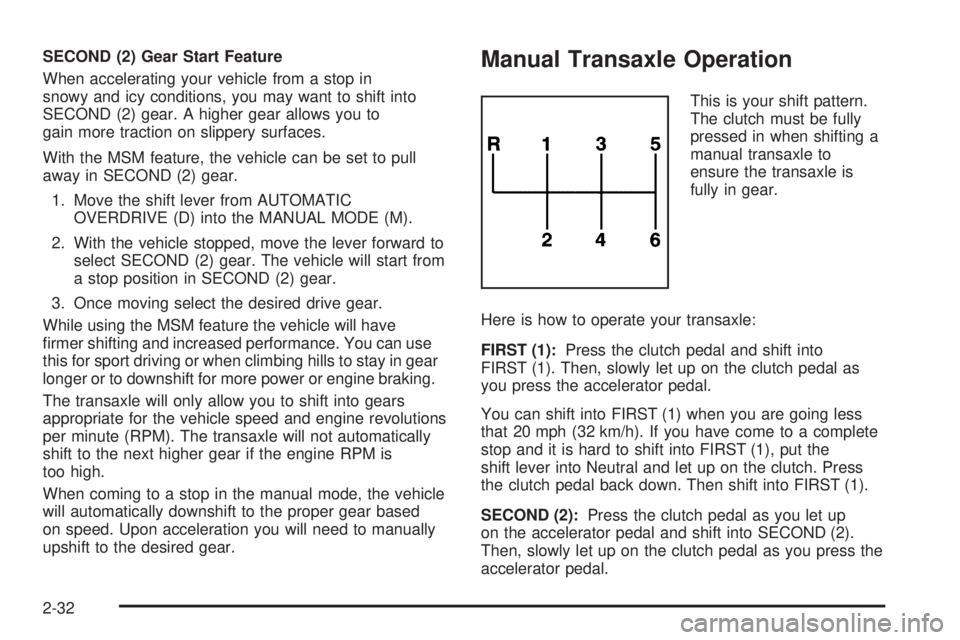
This is your shift pattern.
The clutch must be fully
pressed in when shifting a
manual transaxle to
ensure the transaxle is
fully in gear.
Here is how to operate your transaxle:
FIRST (1):Press the clutch pedal and shift into
FIRST (1). Then, slowly let up on the clutch pedal as
you press the accelerator pedal.
You can shift into FIRST (1) when you are going less
that 20 mph (32 km/h). If you have come to a complete
stop and it is hard to shift into FIRST (1), put the
shift lever into Neutral and let up on the clutch. Press
the clutch pedal back down. Then shift into FIRST (1).
SECOND (2):Press the clutch pedal as you let up
on the accelerator pedal and shift into SECOND (2).
Then, slowly let up on the clutch pedal as you press the
accelerator pedal.
2-32
Page 112 of 416
To release the parking brake, hold the brake pedal
down. Pull the parking brake handle up until you can
press the release button. Hold the release button in as
you move the brake handle all the way down.
Notice:Driving with the parking brake on can
overheat the brake system and cause premature
wear or damage to brake system parts. Verify that
the parking brake is fully released and the brake
warning light is off before driving.
If you are towing a trailer and you are parking on a hill,
seeTowing a Trailer on page 4-40.Shifting Into Park (P)
(Automatic Transaxle)
{CAUTION:
It can be dangerous to get out of your vehicle
if the shift lever is not fully in PARK (P) with
the parking brake �rmly set. Your vehicle can
roll. If you have left the engine running, the
vehicle can move suddenly. You or others
could be injured. To be sure your vehicle will
not move, even when you are on fairly level
ground, use the steps that follow. If you are
pulling a trailer, seeTowing a Trailer on
page 4-40.
2-34
Page 113 of 416

Use the following procedure to shift into PARK (P):
1. Hold the brake pedal down with your right foot and
set the parking brake.
2. Move the shift lever into PARK (P) by holding in the
button on the shift lever and pushing the lever all
the way toward the front of the vehicle.
3. Turn the ignition key to OFF.
4. Remove the key and take it with you. If you can
leave your vehicle with the ignition key in your
hand, your vehicle is in PARK (P).Leaving Your Vehicle With the Engine
Running (Automatic Transaxle)
{CAUTION:
It can be dangerous to leave your vehicle with
the engine running. Your vehicle could move
suddenly if the shift lever is not fully in
PARK (P) with the parking brake �rmly set.
And, if you leave the vehicle with the engine
running, it could overheat and even catch �re.
You or others could be injured. Do not leave
your vehicle with the engine running.
If you have to leave your automatic transaxle vehicle
with the engine running, be sure your vehicle is in
PARK (P) and your parking brake is �rmly set before
you leave it. After you have moved the shift lever
into PARK (P), hold the regular brake pedal down. Then,
see if you can move the shift lever away from PARK (P)
without �rst pushing the button.
If you can, it means that the shift lever was not fully
locked into PARK (P).
2-35
Page 114 of 416

Torque Lock (Automatic Transaxle)
If you are parking on a hill and you do not shift your
automatic transaxle into PARK (P) properly, the weight
of the vehicle may put too much force on the parking
pawl in the transaxle. You may �nd it difficult to pull
the shift lever out of PARK (P). This is called “torque
lock.” To prevent torque lock, set the parking brake
and then shift into PARK (P) properly before you leave
the driver’s seat. To �nd out how, see “Shifting Into
Park (P)” previously in the section.
When you are ready to drive, move the shift lever out
of PARK (P) before you release the parking brake.
If torque lock does occur, you may need to have another
vehicle push yours a little uphill to take some of the
pressure from the parking pawl in the transaxle, so you
can pull the shift lever out of PARK (P).
Shifting Out of Park (P)
(Automatic Transaxle)
The automatic transaxle shift lock control system locks
the shift lever in PARK when the ignition is in OFF.
In addition, you have to fully apply your regular brakes
before you can shift from PARK (P) when the ignition
is in ON. SeeAutomatic Transaxle Operation on
page 2-28.
If you cannot shift out of PARK (P), ease pressure on
the shift lever and push the shift lever all the way
into PARK (P) as you maintain brake application.
Then move the shift lever into the desired gear.
Parking Your Vehicle
(Manual Transaxle)
Before leaving your vehicle, fully press the clutch pedal
in, �rmly apply the parking brake, and move the shift
lever into REVERSE (R). Once the shift lever has been
placed in REVERSE (R) with the clutch pedal pressed
in, you can turn the ignition key to OFF, remove the key
and release the clutch. SeeManual Transaxle
Operation on page 2-32.
2-36
Page 116 of 416
Running the Engine While Parked
It is better not to park with the engine running. But if you
ever have to, here are some things to know.
{CAUTION:
Idling the engine with the climate control
system off could allow dangerous exhaust into
your vehicle. See the earlier caution under
Engine Exhaust on page 2-37.
Also, idling in a closed-in place can let deadly
carbon monoxide (CO) into your vehicle even if
the climate control fan is at the highest setting.
One place this can happen is a garage.
Exhaust — with CO — can come in easily.
NEVER park in a garage with the engine
running.
Another closed-in place can be a blizzard.
SeeWinter Driving on page 4-27.
{CAUTION:
It can be dangerous to get out of your vehicle
if the automatic transaxle shift lever is not fully
in PARK (P) with the parking brake �rmly set.
Your vehicle can roll. Do not leave your vehicle
when the engine is running unless you have
to. If you have left the engine running, the
vehicle can move suddenly. You or others
could be injured. To be sure your vehicle will
not move, even when it is on fairly level
ground, always set the parking brake and
move the automatic transaxle shift lever to
PARK (P), or the manual transaxle shift lever
to NEUTRAL.
Follow the proper steps to be sure your vehicle will
not move. If you have an automatic transaxle, see
Shifting Into Park (P) (Automatic Transaxle) on
page 2-34.
If you are parking on a hill and if you are pulling a
trailer, seeTowing a Trailer on page 4-40.
2-38
Page 128 of 416
Notice:If you lower the retractable hardtop in cold
weather (0°F/−18°C or lower), you may damage
top components. Do not lower the retractable
hardtop in cold weather.
1. Park on a level surface and shift the automatic
transaxle into PARK (P), or a manual transaxle
into NEUTRAL with the parking brake set.
2. The vehicle’s engine must be on or turned to ACC,
the trunk cargo cover must be in place, and the
trunk must be closed.
3. Lower both sun visors.
4. Make sure that nothing or no one is on or around
the top. Make sure there is nothing on top or in
front of the cargo cover.
{CAUTION:
Moving parts of the retractable hardtop can
be dangerous. People can be injured by the
hardtop and its mechanism. Keep people away
from your vehicle when you are lowering or
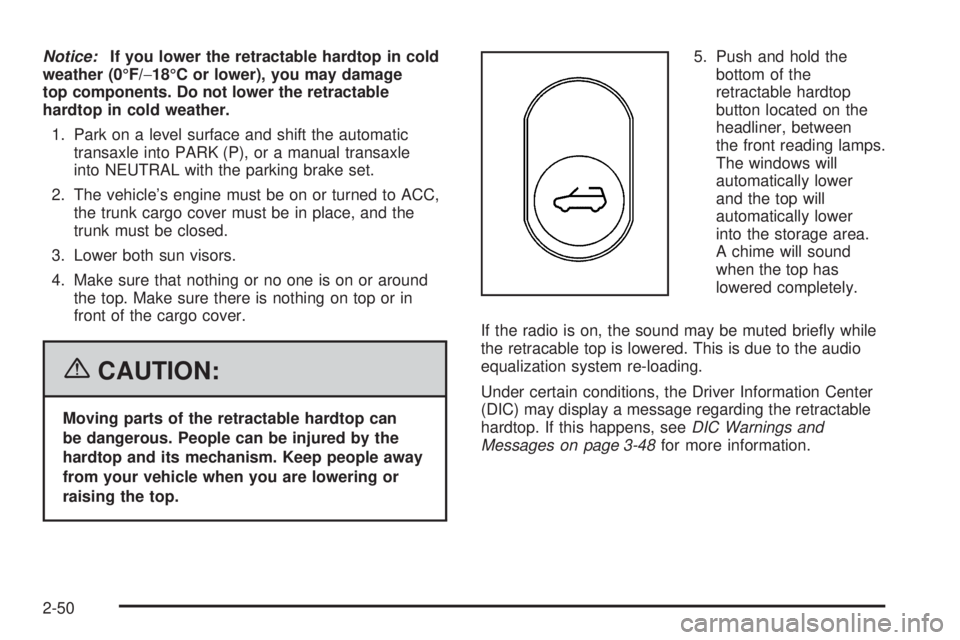
raising the top.5. Push and hold the
bottom of the
retractable hardtop
button located on the
headliner, between
the front reading lamps.
The windows will
automatically lower
and the top will
automatically lower
into the storage area.
A chime will sound
when the top has
lowered completely.
If the radio is on, the sound may be muted brie�y while
the retracable top is lowered. This is due to the audio
equalization system re-loading.
Under certain conditions, the Driver Information Center
(DIC) may display a message regarding the retractable
hardtop. If this happens, seeDIC Warnings and
Messages on page 3-48for more information.
2-50
Page 129 of 416
Raising the Retractable Hardtop
1. Park on a level surface and shift the automatic
transaxle into PARK (P), or a manual transaxle
into NEUTRAL with the parking brake set.
2. The vehicle’s engine must be on or in ACC, and
the trunk cargo cover must be in place.
3. Lower both sun visors.
Notice:Raising or lowering the top while the
vehicle is in motion can cause damage to the top
or top mechanism. Make sure the vehicle is in
PARK (P) to lower or raise the top.
4. Make sure nothing or no one is on or around the
top. Make sure there is no cargo on top of or in
front of the trunk cargo cover.
{CAUTION:
Moving parts of the retractable hardtop can be
dangerous. People can be injured by the
hardtop and its mechanism. Keep people away
from your vehicle when you are lowering or
raising the top.5. Push and hold the top
of the retractable
hardtop button located
on the headliner
between the front
reading lamps.
The windows will
automatically lower
and the top will raise.
A chime will sound
when the top has
raised completely.
After the top is fully raised, release the retractable
hardtop button. If you press the button again within
�ve seconds, the windows will automatically close.
If your radio is on, you may notice a brief mute in sound.
This is normal and due to the audio system equalization
re-loading for the vehicle with the top raised.
Under certain conditions, the Driver Information Center
(DIC) may display a message regarding the retractable
hardtop. If this happens, seeDIC Warnings and
Messages on page 3-48for more information.
2-51
Page 135 of 416
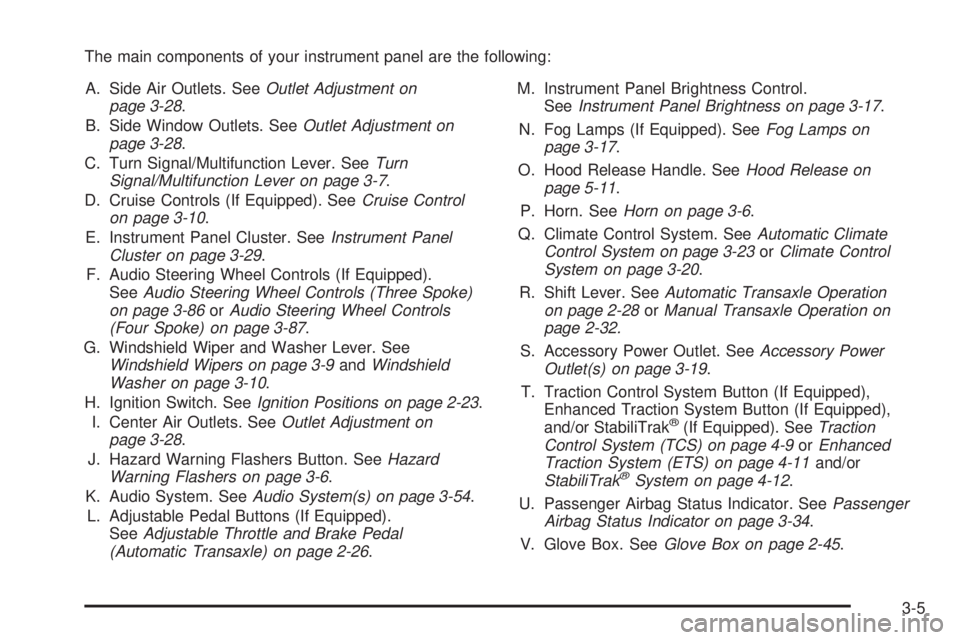
The main components of your instrument panel are the following:
A. Side Air Outlets. SeeOutlet Adjustment on
page 3-28.
B. Side Window Outlets. SeeOutlet Adjustment on
page 3-28.
C. Turn Signal/Multifunction Lever. SeeTurn
Signal/Multifunction Lever on page 3-7.
D. Cruise Controls (If Equipped). SeeCruise Control
on page 3-10.
E. Instrument Panel Cluster. SeeInstrument Panel
Cluster on page 3-29.
F. Audio Steering Wheel Controls (If Equipped).
SeeAudio Steering Wheel Controls (Three Spoke)
on page 3-86orAudio Steering Wheel Controls
(Four Spoke) on page 3-87.
G. Windshield Wiper and Washer Lever. See
Windshield Wipers on page 3-9andWindshield
Washer on page 3-10.
H. Ignition Switch. SeeIgnition Positions on page 2-23.
I. Center Air Outlets. SeeOutlet Adjustment on
page 3-28.
J. Hazard Warning Flashers Button. SeeHazard
Warning Flashers on page 3-6.
K. Audio System. SeeAudio System(s) on page 3-54.
L. Adjustable Pedal Buttons (If Equipped).
SeeAdjustable Throttle and Brake Pedal
(Automatic Transaxle) on page 2-26.M. Instrument Panel Brightness Control.
SeeInstrument Panel Brightness on page 3-17.
N. Fog Lamps (If Equipped). SeeFog Lamps on
page 3-17.
O. Hood Release Handle. SeeHood Release on
page 5-11.
P. Horn. SeeHorn on page 3-6.
Q. Climate Control System. SeeAutomatic Climate
Control System on page 3-23orClimate Control
System on page 3-20.
R. Shift Lever. SeeAutomatic Transaxle Operation
on page 2-28orManual Transaxle Operation on
page 2-32.
S. Accessory Power Outlet. SeeAccessory Power
Outlet(s) on page 3-19.
T. Traction Control System Button (If Equipped),
Enhanced Traction System Button (If Equipped),
and/or StabiliTrak
®(If Equipped). SeeTraction
Control System (TCS) on page 4-9orEnhanced
Traction System (ETS) on page 4-11and/or
StabiliTrak
®System on page 4-12.
U. Passenger Airbag Status Indicator. SeePassenger
Airbag Status Indicator on page 3-34.
V. Glove Box. SeeGlove Box on page 2-45.
3-5
Page 144 of 416

Headlamps
The lever on the left side of the steering column
operates the exterior lamps.
The exterior lamp switch has the following four positions:
2(Headlamps):This position turns on the
headlamps, parking lamps, and taillamps.
;(Parking Lamps):This position turns on the
parking lamps and taillamps only.
AUTO (Automatic Headlamp System):This position
automatically turns on the Daytime Running Lamps
during daytime, and the headlamps, parking lamps, and
taillamps at night.
P(Off/On):This position is the momentary Off/On
switch for the Automatic Headlamp System. In Canada,
this only works when a vehicle with an automatic
transaxle is in PARK (P).
When operating in AUTO, a momentary turn of the
switch to off/on will turn off the Automatic Headlamp
System. Rotating the switch to off/on again will turn the
Automatic Headlamp System back on. The Automatic
Headlamp System is always turned on at the beginning
of an ignition cycle.
Headlamps on Reminder
If you open the driver’s door and turn off the
ignition while leaving the lamps on, you will hear a
warning chime.
Headlamps Off in PARK (P)
This feature works for vehicles with an automatic
transaxle when the ignition is on and it is dark outside.
To turn the headlamps off when it is dark outside
but keep other exterior lights on, turn the exterior lamp
control to the parking lamp position. In this position,
the parking lamps, sidemarker lamps, taillamps, license
plate lamps and instrument panel lights will be on,
but the headlamps will be off.
To turn on the headlamps along with the other lamps
when it is dark outside, turn the exterior lamp control to
the AUTO or headlamp position.
3-14
Page 145 of 416

Delayed Headlamps
The delayed headlamps feature will continue to
illuminate the headlamps for 20 seconds after the key is
turned to OFF, then the headlamps will automatically
turn off.
To override the 20 second delayed headlamp feature
while it is active turn the turn signal/multifunction
lever up one position and then back to AUTO.
Daytime Running Lamps (DRL)
Daytime Running Lamps (DRL) can make it easier for
others to see the front of your vehicle during the
day. DRL can be helpful in many different driving
conditions, but they can be especially helpful in the short
periods after dawn and before sunset. Fully functional
daytime running lamps are required on all vehicles
�rst sold in Canada. The vehicle has a light sensor on
top of the instrument panel. Make sure it is not covered,
or the head lamps will be on when not needed.The DRL system will make your low-beam headlamps
come on at a reduced brightness when the following
conditions are met:
The ignition is on.
The exterior lamps control is in AUTO.
The exterior lamps control is in the parking lamps
only position (this applies only to vehicles that are
�rst sold in Canada).
The light sensor detects daytime light.
The parking brake is released (manual transaxle) or
the vehicle is not in PARK (automatic transaxle).
When the DRL system is on, the taillamps, sidemarker
lamps, parking lamps, and instrument panel lights
will not be illuminated unless you have turned the
exterior lamps control to the parking lamp position.
As with any vehicle, you should turn on the regular
headlamp system when you need it.
3-15