climate control PONTIAC G6 2009 Owners Manual
[x] Cancel search | Manufacturer: PONTIAC, Model Year: 2009, Model line: G6, Model: PONTIAC G6 2009Pages: 410, PDF Size: 2.33 MB
Page 1 of 410
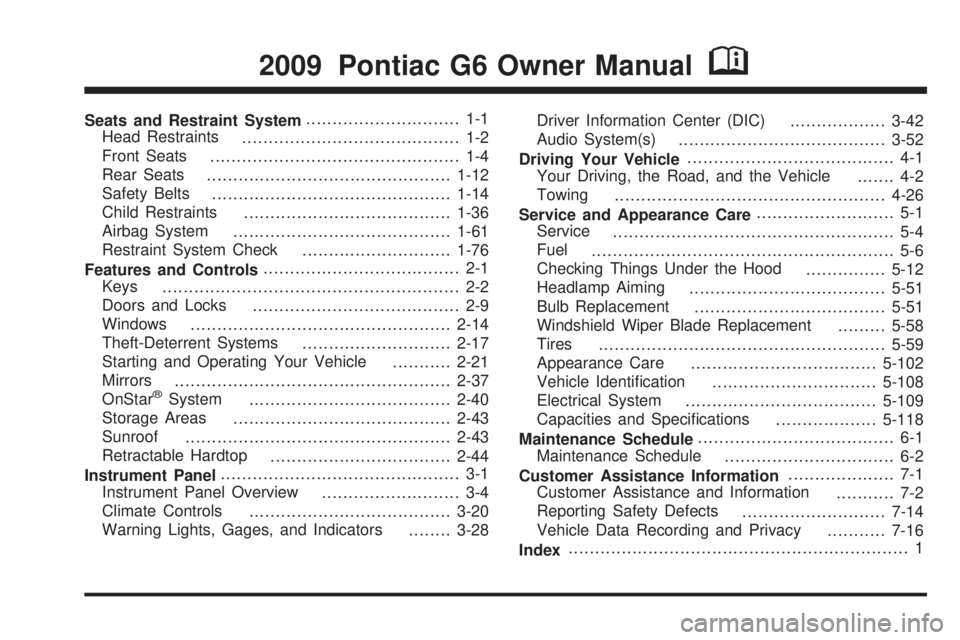
Seats and Restraint System............................. 1-1
Head Restraints
......................................... 1-2
Front Seats
............................................... 1-4
Rear Seats
..............................................1-12
Safety Belts
.............................................1-14
Child Restraints
.......................................1-36
Airbag System
.........................................1-61
Restraint System Check
............................1-76
Features and Controls..................................... 2-1
Keys
........................................................ 2-2
Doors and Locks
....................................... 2-9
Windows
.................................................2-14
Theft-Deterrent Systems
............................2-17
Starting and Operating Your Vehicle
...........2-21
Mirrors
....................................................2-37
OnStar
®System
......................................2-40
Storage Areas
.........................................2-43
Sunroof
..................................................2-43
Retractable Hardtop
..................................2-44
Instrument Panel............................................. 3-1
Instrument Panel Overview
.......................... 3-4
Climate Controls
......................................3-20
Warning Lights, Gages, and Indicators
........3-28Driver Information Center (DIC)
..................3-42
Audio System(s)
.......................................3-52
Driving Your Vehicle....................................... 4-1
Your Driving, the Road, and the Vehicle
....... 4-2
Towing
...................................................4-26
Service and Appearance Care.......................... 5-1
Service
..................................................... 5-4
Fuel
......................................................... 5-6
Checking Things Under the Hood
...............5-12
Headlamp Aiming
.....................................5-51
Bulb Replacement
....................................5-51
Windshield Wiper Blade Replacement
.........5-58
Tires
......................................................5-59
Appearance Care
...................................5-102
Vehicle Identi�cation
...............................5-108
Electrical System
....................................5-109
Capacities and Speci�cations
...................5-118
Maintenance Schedule..................................... 6-1
Maintenance Schedule
................................ 6-2
Customer Assistance Information.................... 7-1
Customer Assistance and Information
........... 7-2
Reporting Safety Defects
...........................7-14
Vehicle Data Recording and Privacy
...........7-16
Index................................................................ 1
2009 Pontiac G6 Owner ManualM
Page 88 of 410
Battery Replacement
Replace the battery if the KEY FOB BATT LOW
message displays in the DIC. See “KEY FOB BATT
LOW” underDIC Warnings and Messages on page 3-46.
Notice:When replacing the battery, do not touch
any of the circuitry on the transmitter. Static
from your body could damage the transmitter.
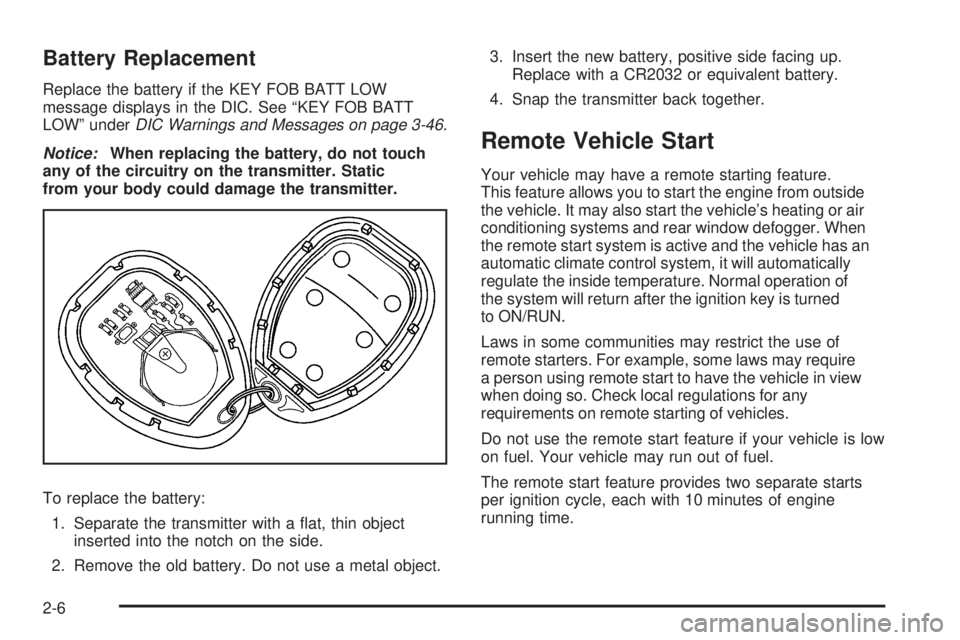
To replace the battery:
1. Separate the transmitter with a �at, thin object
inserted into the notch on the side.
2. Remove the old battery. Do not use a metal object.3. Insert the new battery, positive side facing up.
Replace with a CR2032 or equivalent battery.
4. Snap the transmitter back together.
Remote Vehicle Start
Your vehicle may have a remote starting feature.
This feature allows you to start the engine from outside
the vehicle. It may also start the vehicle’s heating or air
conditioning systems and rear window defogger. When
the remote start system is active and the vehicle has an
automatic climate control system, it will automatically
regulate the inside temperature. Normal operation of
the system will return after the ignition key is turned
to ON/RUN.
Laws in some communities may restrict the use of
remote starters. For example, some laws may require
a person using remote start to have the vehicle in view
when doing so. Check local regulations for any
requirements on remote starting of vehicles.
Do not use the remote start feature if your vehicle is low
on fuel. Your vehicle may run out of fuel.
The remote start feature provides two separate starts
per ignition cycle, each with 10 minutes of engine
running time.
2-6
Page 94 of 410
Trunk
To open the trunk from the outside, press and hold the
trunk release button on the Remote Keyless Entry (RKE)
transmitter. You can also use the key in the trunk lock,
except on retractable hardtop models.
{CAUTION:
Exhaust gases may enter the vehicle if it is driven
with the liftgate, trunk/hatch open, or with any
objects that pass through the seal between the
body and the trunk/hatch or liftgate. Engine exhaust
contains Carbon Monoxide (CO) which cannot be
seen or smelled. It can cause unconsciousness and
even death.
CAUTION: (Continued)
CAUTION: (Continued)
If the vehicle must be driven with the liftgate, or
trunk/hatch open:
Close all of the windows
Fully open the air outlets on or under the
instrument panel
Adjust the Climate Control system to a setting
that brings in only outside air and set the fan
speed to the highest setting. See Climate
Control System in the Index.
If the vehicle is equipped with a power liftgate,
disable the power liftgate function.
For more information about carbon monoxide, see
Engine ExhaustEngine Exhaust on page 2-35.
2-12
Page 133 of 410
Instrument Panel Overview...............................3-4
Hazard Warning Flashers................................3-6
Horn .............................................................3-6
Tilt Wheel.....................................................3-6
Turn Signal/Multifunction Lever.........................3-7
Turn and Lane-Change Signals........................3-7
Headlamp High/Low-Beam Changer..................3-8
Flash-to-Pass.................................................3-8
Windshield Wipers..........................................3-8
Windshield Washer.........................................3-9
Cruise Control..............................................3-10
Headlamps..................................................3-13
Headlamps on Reminder................................3-13
Headlamps Off in Park..................................3-14
Delayed Headlamps......................................3-14
Daytime Running Lamps (DRL).......................3-14
Automatic Headlamp System..........................3-15
Fog Lamps ..................................................3-15
Instrument Panel Brightness...........................3-16
Courtesy Lamps...........................................3-16
Dome Lamps ...............................................3-16
Entry/Exit Lighting.........................................3-16
Parade Dimming...........................................3-17
Reading Lamps............................................3-17
Trunk Lamp.................................................3-17
Electric Power Management...........................3-17
Battery Run-Down Protection..........................3-18Accessory Power Outlet(s).............................3-19
Climate Controls............................................3-20
Climate Control System.................................3-20
Automatic Climate Control System...................3-24
Outlet Adjustment.........................................3-28
Warning Lights, Gages, and Indicators............3-28
Instrument Panel Cluster................................3-29
Speedometer and Odometer..........................
.3-30
Trip Odometer..............................................3-30
Tachometer.................................................3-30
Safety Belt Reminders...................................3-31
Airbag Readiness Light..................................3-32
Passenger Airbag Status Indicator...................3-33
Charging System Light..................................3-34
Brake System Warning Light..........................3-34
Antilock Brake System (ABS) Warning Light.....3-35
Traction Control System (TCS)
Warning Light...........................................3-36
Traction Control System (TCS)
Active Light..............................................3-36
StabiliTrak
®Not Ready Light..........................3-36
StabiliTrak®Indicator Light.............................3-36
Engine Coolant Temperature Gage..................3-37
Tire Pressure Light.......................................3-37
Malfunction Indicator Lamp.............................3-38
Oil Pressure Light.........................................3-40
Section 3 Instrument Panel
3-1
Page 137 of 410
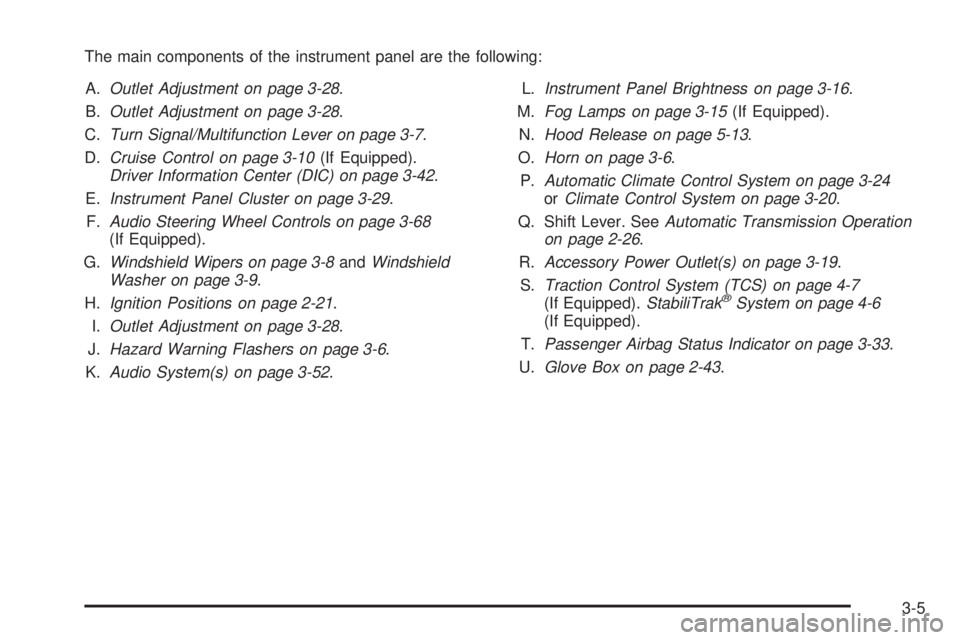
The main components of the instrument panel are the following:
A.Outlet Adjustment on page 3-28.
B.Outlet Adjustment on page 3-28.
C.Turn Signal/Multifunction Lever on page 3-7.
D.Cruise Control on page 3-10(If Equipped).
Driver Information Center (DIC) on page 3-42.
E.Instrument Panel Cluster on page 3-29.
F.Audio Steering Wheel Controls on page 3-68
(If Equipped).
G.Windshield Wipers on page 3-8andWindshield
Washer on page 3-9.
H.Ignition Positions on page 2-21.
I.Outlet Adjustment on page 3-28.
J.Hazard Warning Flashers on page 3-6.
K.Audio System(s) on page 3-52.L.Instrument Panel Brightness on page 3-16.
M.Fog Lamps on page 3-15(If Equipped).
N.Hood Release on page 5-13.
O.Horn on page 3-6.
P.Automatic Climate Control System on page 3-24
orClimate Control System on page 3-20.
Q. Shift Lever. SeeAutomatic Transmission Operation
on page 2-26.
R.Accessory Power Outlet(s) on page 3-19.
S.Traction Control System (TCS) on page 4-7
(If Equipped).StabiliTrak
®System on page 4-6
(If Equipped).
T.Passenger Airbag Status Indicator on page 3-33.
U.Glove Box on page 2-43.
3-5
Page 150 of 410
A high electrical load occurs when several of the
following are on, such as: headlamps, high beams,
fog lamps, rear window defogger, climate control fan at
high speed, heated seats, engine cooling fans, trailer
loads, and loads plugged into accessory power outlets.
EPM works to prevent excessive discharge of the
battery. It does this by balancing the generator’s output
and the vehicle’s electrical needs. It can increase
engine idle speed to generate more power, whenever
needed. It can temporarily reduce the power demands of
some accessories.
Normally, these actions occur in steps or levels, without
being noticeable. In rare cases at the highest levels
of corrective action, this action may be noticeable to
the driver. If so, a Driver Information Center (DIC)
message might be displayed, such as BATTERY
SAVER ACTIVE, BATTERY VOLTAGE LOW, or
LOW BATTERY. If this message is displayed, it is
recommended that the driver reduce the electrical loads
as much as possible. SeeDIC Warnings and Messages
on page 3-46.Battery Run-Down Protection
The battery run-down feature is designed to protect the
vehicle’s battery.
When any interior lamp (trunk, reading lamps, or dome
lamp) is left on when the ignition is turned off, the
battery run-down protection system automatically shuts
the lamp off after 20 minutes. This prevents draining
of the battery.
To reactivate the interior lamps, do one of the following:
Open any door.
Press any Remote Keyless Entry (RKE) transmitter
button.
Press the power door lock switch.
Press the remote trunk release.
Turn the lamp that was left on to off and then to
on again.
3-18
Page 151 of 410
Accessory Power Outlet(s)
Accessory power outlets can be used to connect
auxiliary electrical equipment, such as a cellular
telephone or CB radio.
There are two accessory power outlets, located on the
center console below the climate controls. If the
vehicle has a Traction Control System (TCS), one
accessory power outlet is in the center storage console
and the other is on the center console below the
climate controls.
To use an outlet, remove the protective cap. When not
in use, always cover the outlet with the protective cap.
The accessory power outlet is operational at all times.
Notice:If electrical devices are left plugged
into a power outlet, the battery may drain causing
the vehicle not to start or damage to the battery.
This would not be covered by the warranty.
Always unplug all electrical devices when turning
off the vehicle.Certain electrical accessories are not compatible with
the accessory power outlet and could result in blown
vehicle or adapter fuses. If you experience a problem,
see your dealer/retailer for additional information on
the accessory power outlet.
Notice:Adding any electrical equipment to the
vehicle can damage it or keep other components
from working as they should. The repairs would not
be covered by the vehicle warranty. Do not use
equipment exceeding maximum amperage rating of
20 amperes. Check with your dealer/retailer before
adding electrical equipment.
When adding electrical equipment, be sure to follow
the proper installation instructions included with
the equipment.
Notice:Improper use of the power outlet can cause
damage not covered by the warranty. Do not hang
any type of accessory or accessory bracket from the
plug because the power outlets are designed for
accessory power plugs only.
3-19
Page 152 of 410
Climate Controls
Climate Control System
The heating, cooling, and ventilation for the vehicle can
be controlled with this system. For vehicles with the
remote start feature, the climate control system functions
as part of the remote start feature. SeeRemote
Keyless Entry (RKE) System Operation on page 2-4.
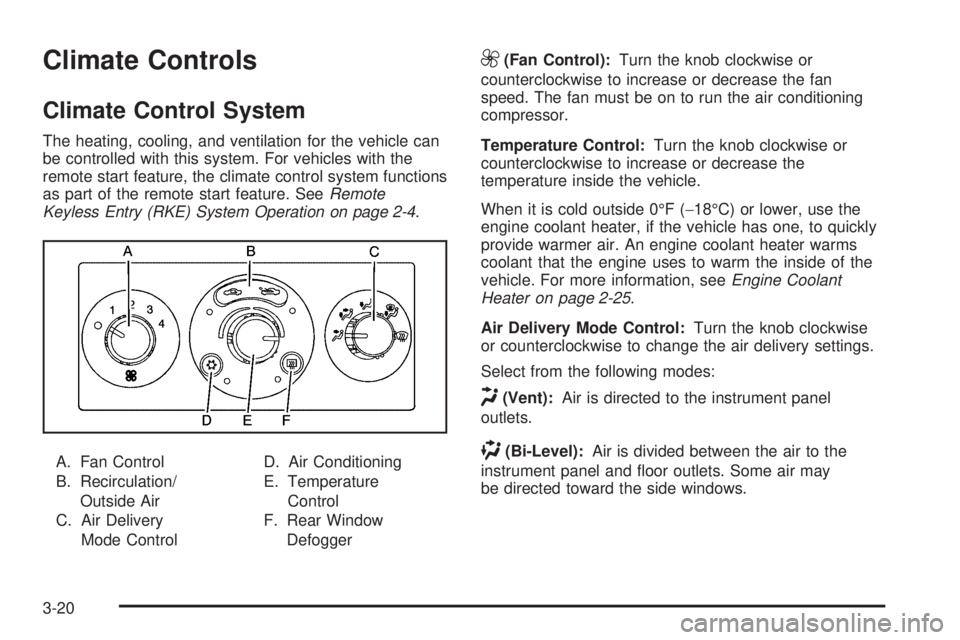
A. Fan Control
B. Recirculation/
Outside Air
C. Air Delivery
Mode ControlD. Air Conditioning
E. Temperature
Control
F. Rear Window
Defogger
9(Fan Control):Turn the knob clockwise or
counterclockwise to increase or decrease the fan
speed. The fan must be on to run the air conditioning
compressor.
Temperature Control:Turn the knob clockwise or
counterclockwise to increase or decrease the
temperature inside the vehicle.
When it is cold outside 0°F (−18°C) or lower, use the
engine coolant heater, if the vehicle has one, to quickly
provide warmer air. An engine coolant heater warms
coolant that the engine uses to warm the inside of the
vehicle. For more information, seeEngine Coolant
Heater on page 2-25.
Air Delivery Mode Control:Turn the knob clockwise
or counterclockwise to change the air delivery settings.
Select from the following modes:
H(Vent):Air is directed to the instrument panel
outlets.
)(Bi-Level):Air is divided between the air to the
instrument panel and �oor outlets. Some air may
be directed toward the side windows.
3-20
Page 154 of 410

?(Recirculation):Press the left side of the button
to turn the recirculation mode on. An indicator light
comes on to show that it is on. The air inside the vehicle
is recirculated through the climate control system and
throughout the vehicle, not from outside. This helps
to limit the odors entering the vehicle and maximize air
conditioning performance. The indicator light �ashes
three times if you try to use recirculation in a mode that
it can not be used in. Use this mode only when it is
needed for comfort, since window fogging occurs if the
air conditioning compressor is not engaged.
Press
?to cancel the outside air mode. When you
switch to the defog or defrost modes the system
automatically moves from recirculation to outside air.
When the vehicle or fan is turned off and back on,
the system automatically defaults to outside air.
#(Air Conditioning):Press to turn the air conditioning
system on or off. An indicator light comes on to
indicate that the air conditioning is on.
The air conditioning system removes moisture from the
air, so sometimes a small amount of water drips
under the vehicle while it is idling or after the engine is
turned off. This is normal.
Maximum Air Conditioning
On hot days, open the windows to let hot inside air
escape; then close them. This helps to reduce the time
it takes for the vehicle to cool down. It also helps the
system to operate more efficiently.
For quick cool down on hot days, do the following:
1. Select the
Cvent mode.
2. Select the highest fan speed.
3. Select
#air conditioning.
4. Select the
?recirculation mode.
5. Select the coolest temperature.
Using these settings together for long periods of time
can cause the air inside of the vehicle to become
too dry. To prevent this from happening, after the air in
the vehicle has cooled, turn the recirculation mode off.
3-22
Page 155 of 410
Rear Window Defogger
The rear window defogger uses a warming grid to
remove fog or frost from the rear window.
the rear window defogger is on. Be sure to clear as
much snow as possible from the rear window.
If driving below 50 mph (80 km/h), the rear window
defogger turns off about 15 minutes after the button is
pressed. If turned on again, the defogger only runs
for about seven and one-half minutes before turning off.
The defogger can also be turned off by turning off
the engine.
If the vehicle’s speed is maintained above 50 mph
(80 km/h), the rear window defogger remains on
once the button is pressed.
If the vehicle has the remote start feature, the rear
defogger automatically turns on if it is cold outside.
When the vehicle transitions out of the remote
start mode, the rear defogger turns off. SeeRemote
Keyless Entry (RKE) System Operation on page 2-4.Notice:Do not use anything sharp on the inside of
the rear window. If you do, you could cut or
damage the warming grid, and the repairs would not
be covered by the vehicle warranty. Do not attach
a temporary vehicle license, tape, a decal or
anything similar to the defogger grid.
Remote Vehicle Start
If the vehicle has the remote start feature, it will turn on
using the last settings selected on the climate control
before the vehicle was turned off.
The fan and air delivery knobs can be used during
remote start. The buttons will not work until the ignition
is turned on by the key.
The climate control system changes back to manual
operation when the vehicle key is turned to ON/RUN.
3-23