engine PONTIAC G6 2009 Owner's Manual
[x] Cancel search | Manufacturer: PONTIAC, Model Year: 2009, Model line: G6, Model: PONTIAC G6 2009Pages: 410, PDF Size: 2.33 MB
Page 117 of 410

Engine Exhaust
{CAUTION:
Engine exhaust contains Carbon Monoxide (CO)
which cannot be seen or smelled. Exposure to CO
can cause unconsciousness and even death.
Exhaust may enter the vehicle if:
The vehicle idles in areas with poor ventilation
(parking garages, tunnels, deep snow that
may block underbody air�ow or tail pipes).
The exhaust smells or sounds strange or
different.
The exhaust system leaks due to corrosion or
damage.
CAUTION: (Continued)
CAUTION: (Continued)
The vehicle’s exhaust system has been
modi�ed, damaged or improperly repaired.
There are holes or openings in the
vehicle body from damage or after-market
modi�cations that are not completely sealed.
If unusual fumes are detected or if it is suspected
that exhaust is coming into the vehicle:
Drive it only with the windows
completely down.
Have the vehicle repaired immediately.
Never park the vehicle with the engine running in an
enclosed area such as a garage or a building that
has no fresh air ventilation.
2-35
Page 118 of 410

Running the Vehicle While Parked
It is better not to park with the engine running. But if you
ever have to, here are some things to know.
{CAUTION:
Idling a vehicle in an enclosed area with poor
ventilation is dangerous. Engine exhaust may
enter the vehicle. Engine exhaust contains Carbon
Monoxide (CO) which cannot be seen or smelled.
It can cause unconsciousness and even death.
Never run the engine in an enclosed area that
has no fresh air ventilation. For more information,
seeEngine Exhaust on page 2-35.
{CAUTION:
It can be dangerous to get out of the vehicle if
the automatic transmission shift lever is not fully
in P (Park) with the parking brake �rmly set. The
vehicle can roll. Do not leave the vehicle when the
engine is running unless you have to. If you have
left the engine running, the vehicle can move
suddenly. You or others could be injured. To be
sure the vehicle will not move, even when you are
on fairly level ground, always set the parking brake
and move the shift lever to P (Park).
Follow the proper steps to be sure the vehicle will not
move. SeeShifting Into Park on page 2-32.
If parking on a hill and pulling a trailer, seeTowing a
Trailer on page 4-30.
2-36
Page 126 of 410

Sunshade Operation
The sunshade will open automatically when opening the
sunroof.
However, it can manually be pulled shut after the
sunroof is closed. To adjust the sunshade, push it
backward or pull it forward to the desired position.
The sunshade cannot be adjusted further than
the current closed position of the sunroof.
Notice:If you force the sunshade forward of the
sliding glass panel, damage will occur and the
sunroof may not open or close properly. Always
close the glass panel before closing the sunshade.
Do not leave the sunroof open for long periods of
time. Debris can collect in the tracks and possibly
damage the sunroof operation and plug the water
draining system.
Retractable Hardtop
The following procedures explain the proper operation
of the retractable hardtop. The retractable hardtop
will not operate if the trunk cargo cover is not in place.
If the retractable hardtop is lowered or raised multiple
times, the engine should be running while doing
so to prevent drain on the vehicle’s battery.
Lowering the Retractable Hardtop
Notice:Leaving the retractable hardtop down and
exposing the interior of the vehicle to outdoor
conditions may cause damage. Always close the
retractable hardtop if leaving the vehicle outdoors.
Notice:Lowering the top if it is damp, wet, or
dirty can cause stains, mildew, and damage to
the inside of your vehicle. Dry off the top before
lowering it.
Notice:If you lower the retractable hardtop in cold
weather (32°F/0°C or lower), you may damage top
components. Do not lower the retractable hardtop
in cold weather.
1. Park on a level surface, and shift the transmission
into (P) Park. The vehicle must be in (P) Park, and
the engine must be running, or the ignition turned
to the ON/RUN position, to operate the retractable
hardtop.
2-44
Page 128 of 410

4. The hardtop switch is located on the headliner .
To lower the hardtop, press and hold the switch
rearward until the cycle is complete.The windows and trunk lid will open. The hardtop will
automatically lower, and the trunk lid will close and latch.
If the engine is on, a chime will sound when the hardtop
has lowered completely. The Driver Information Center
(DIC) will display TOP MOVE COMPLT. SeeDIC
Warnings and Messages on page 3-46for more
information.
After the hardtop has lowered completely, release the
switch. If you continue to press the switch for about
two seconds after the hardtop has completely lowered,
the windows will automatically close.
2-46
Page 129 of 410

If pressure is released from the switch before the
hardtop cycle is complete, the cycle will stop and the
Driver Information Center (DIC) will display the TOP
NOT SECURE message. Always press and hold the
switch until a chime sounds, if the engine is on, and the
Driver Information Center (DIC) displays the TOP MOVE
COMPLT to signal the procedure is complete. SeeDIC
Warnings and Messages on page 3-46for more
information.
The hardtop will not operate if the vehicle has an
electrical failure. If an electrical failure occurs, see
your dealer/retailer for service.
If your vehicle has an electrical failure while operating
the hardtop, and must be towed to a dealer/retailer for
service, your vehicle should be towed by �atbed with the
vehicle facing backwards. Consult your dealer/retailer or
professional towing service if you need to have your
disabled vehicle towed. SeeRoadside Assistance
Program on page 7-7.Raising the Retractable Hardtop
1. Park on a level surface, and shift the transmission
into (P) Park. The vehicle must be in (P) Park,
and the engine must be running, or the ignition
turned to the ON/RUN position, to operate
the retractable hardtop.
2. The trunk cargo cover must be fully closed, and the
trunk must be closed before raising the hardtop.
2-47
Page 131 of 410

As the switch is being pulled, the hardtop will raise from
the trunk and move into place. The hardtop and trunk lid
will close and latch. If the engine is on, a chime will sound
when the hardtop has raised completely.
The Driver Information Center (DIC) will display the
TOP MOVE COMPLT message to signal the procedure
is complete. SeeDIC Warnings and Messages on
page 3-46for more information.After the hardtop has raised completely, release the
switch. If you continue to pull the switch for about
two seconds after the hardtop has raised completely,
the windows will automatically close.
If the switch is released before the hardtop cycle is
complete, the cycle will stop and the Driver Information
Center (DIC) will display the TOP NOT SECURE
message. Always pull and hold the switch until a chime
sounds, if the engine is on, and the Driver Information
Center (DIC) displays the TOP MOVE COMPLT to signal
the procedure is complete. SeeDIC Warnings and
Messages on page 3-46for more information.
The hardtop will not operate if the vehicle has an
electrical failure. If an electrical failure occurs, see
your dealer/retailer for service.
If your vehicle must be towed to a dealer/retailer for
service, your vehicle should be towed by �atbed with the
vehicle facing backwards. Consult your dealer/retailer
or professional towing service if you need to have your
disabled vehicle towed. SeeRoadside Assistance
Program on page 7-7.
2-49
Page 133 of 410

Instrument Panel Overview...............................3-4
Hazard Warning Flashers................................3-6
Horn .............................................................3-6
Tilt Wheel.....................................................3-6
Turn Signal/Multifunction Lever.........................3-7
Turn and Lane-Change Signals........................3-7
Headlamp High/Low-Beam Changer..................3-8
Flash-to-Pass.................................................3-8
Windshield Wipers..........................................3-8
Windshield Washer.........................................3-9
Cruise Control..............................................3-10
Headlamps..................................................3-13
Headlamps on Reminder................................3-13
Headlamps Off in Park..................................3-14
Delayed Headlamps......................................3-14
Daytime Running Lamps (DRL).......................3-14
Automatic Headlamp System..........................3-15
Fog Lamps ..................................................3-15
Instrument Panel Brightness...........................3-16
Courtesy Lamps...........................................3-16
Dome Lamps ...............................................3-16
Entry/Exit Lighting.........................................3-16
Parade Dimming...........................................3-17
Reading Lamps............................................3-17
Trunk Lamp.................................................3-17
Electric Power Management...........................3-17
Battery Run-Down Protection..........................3-18Accessory Power Outlet(s).............................3-19
Climate Controls............................................3-20
Climate Control System.................................3-20
Automatic Climate Control System...................3-24
Outlet Adjustment.........................................3-28
Warning Lights, Gages, and Indicators............3-28
Instrument Panel Cluster................................3-29
Speedometer and Odometer..........................
.3-30
Trip Odometer..............................................3-30
Tachometer.................................................3-30
Safety Belt Reminders...................................3-31
Airbag Readiness Light..................................3-32
Passenger Airbag Status Indicator...................3-33
Charging System Light..................................3-34
Brake System Warning Light..........................3-34
Antilock Brake System (ABS) Warning Light.....3-35
Traction Control System (TCS)
Warning Light...........................................3-36
Traction Control System (TCS)
Active Light..............................................3-36
StabiliTrak
®Not Ready Light..........................3-36
StabiliTrak®Indicator Light.............................3-36
Engine Coolant Temperature Gage..................3-37
Tire Pressure Light.......................................3-37
Malfunction Indicator Lamp.............................3-38
Oil Pressure Light.........................................3-40
Section 3 Instrument Panel
3-1
Page 150 of 410

A high electrical load occurs when several of the
following are on, such as: headlamps, high beams,
fog lamps, rear window defogger, climate control fan at
high speed, heated seats, engine cooling fans, trailer
loads, and loads plugged into accessory power outlets.
EPM works to prevent excessive discharge of the
battery. It does this by balancing the generator’s output
and the vehicle’s electrical needs. It can increase
engine idle speed to generate more power, whenever
needed. It can temporarily reduce the power demands of
some accessories.
Normally, these actions occur in steps or levels, without
being noticeable. In rare cases at the highest levels
of corrective action, this action may be noticeable to
the driver. If so, a Driver Information Center (DIC)
message might be displayed, such as BATTERY
SAVER ACTIVE, BATTERY VOLTAGE LOW, or
LOW BATTERY. If this message is displayed, it is
recommended that the driver reduce the electrical loads
as much as possible. SeeDIC Warnings and Messages
on page 3-46.Battery Run-Down Protection
The battery run-down feature is designed to protect the
vehicle’s battery.
When any interior lamp (trunk, reading lamps, or dome
lamp) is left on when the ignition is turned off, the
battery run-down protection system automatically shuts
the lamp off after 20 minutes. This prevents draining
of the battery.
To reactivate the interior lamps, do one of the following:
Open any door.
Press any Remote Keyless Entry (RKE) transmitter
button.
Press the power door lock switch.
Press the remote trunk release.
Turn the lamp that was left on to off and then to
on again.
3-18
Page 152 of 410

Climate Controls
Climate Control System
The heating, cooling, and ventilation for the vehicle can
be controlled with this system. For vehicles with the
remote start feature, the climate control system functions
as part of the remote start feature. SeeRemote
Keyless Entry (RKE) System Operation on page 2-4.
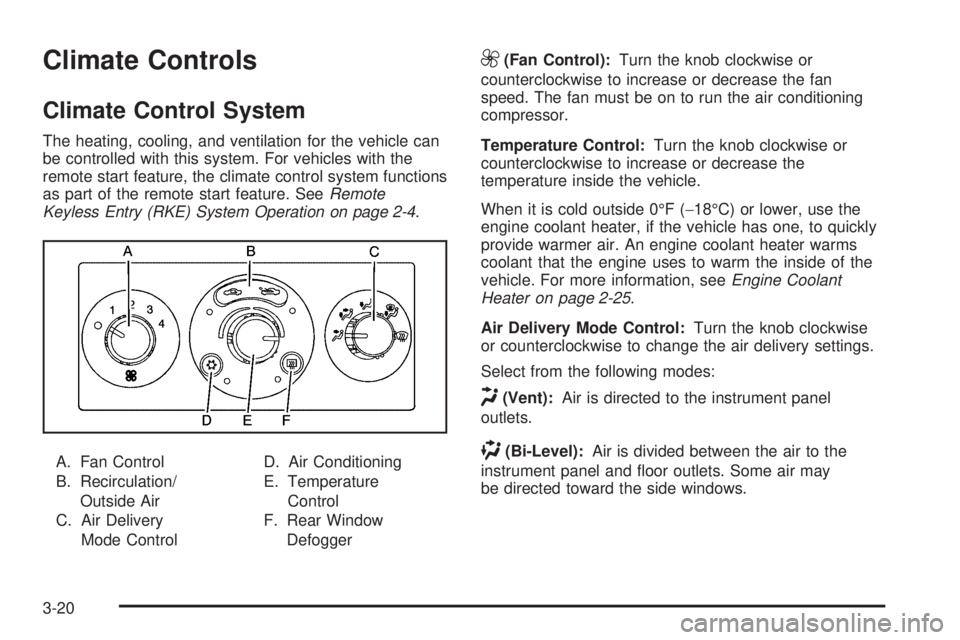
A. Fan Control
B. Recirculation/
Outside Air
C. Air Delivery
Mode ControlD. Air Conditioning
E. Temperature
Control
F. Rear Window
Defogger
9(Fan Control):Turn the knob clockwise or
counterclockwise to increase or decrease the fan
speed. The fan must be on to run the air conditioning
compressor.
Temperature Control:Turn the knob clockwise or
counterclockwise to increase or decrease the
temperature inside the vehicle.
When it is cold outside 0°F (−18°C) or lower, use the
engine coolant heater, if the vehicle has one, to quickly
provide warmer air. An engine coolant heater warms
coolant that the engine uses to warm the inside of the
vehicle. For more information, seeEngine Coolant
Heater on page 2-25.
Air Delivery Mode Control:Turn the knob clockwise
or counterclockwise to change the air delivery settings.
Select from the following modes:
H(Vent):Air is directed to the instrument panel
outlets.
)(Bi-Level):Air is divided between the air to the
instrument panel and �oor outlets. Some air may
be directed toward the side windows.
3-20
Page 154 of 410

?(Recirculation):Press the left side of the button
to turn the recirculation mode on. An indicator light
comes on to show that it is on. The air inside the vehicle
is recirculated through the climate control system and
throughout the vehicle, not from outside. This helps
to limit the odors entering the vehicle and maximize air
conditioning performance. The indicator light �ashes
three times if you try to use recirculation in a mode that
it can not be used in. Use this mode only when it is
needed for comfort, since window fogging occurs if the
air conditioning compressor is not engaged.
Press
?to cancel the outside air mode. When you
switch to the defog or defrost modes the system
automatically moves from recirculation to outside air.
When the vehicle or fan is turned off and back on,
the system automatically defaults to outside air.
#(Air Conditioning):Press to turn the air conditioning
system on or off. An indicator light comes on to
indicate that the air conditioning is on.
The air conditioning system removes moisture from the
air, so sometimes a small amount of water drips
under the vehicle while it is idling or after the engine is
turned off. This is normal.
Maximum Air Conditioning
On hot days, open the windows to let hot inside air
escape; then close them. This helps to reduce the time
it takes for the vehicle to cool down. It also helps the
system to operate more efficiently.
For quick cool down on hot days, do the following:
1. Select the
Cvent mode.
2. Select the highest fan speed.
3. Select
#air conditioning.
4. Select the
?recirculation mode.
5. Select the coolest temperature.
Using these settings together for long periods of time
can cause the air inside of the vehicle to become
too dry. To prevent this from happening, after the air in
the vehicle has cooled, turn the recirculation mode off.
3-22