tow PONTIAC G6 2010 Owner's Manual
[x] Cancel search | Manufacturer: PONTIAC, Model Year: 2010, Model line: G6, Model: PONTIAC G6 2010Pages: 448, PDF Size: 2.5 MB
Page 146 of 448
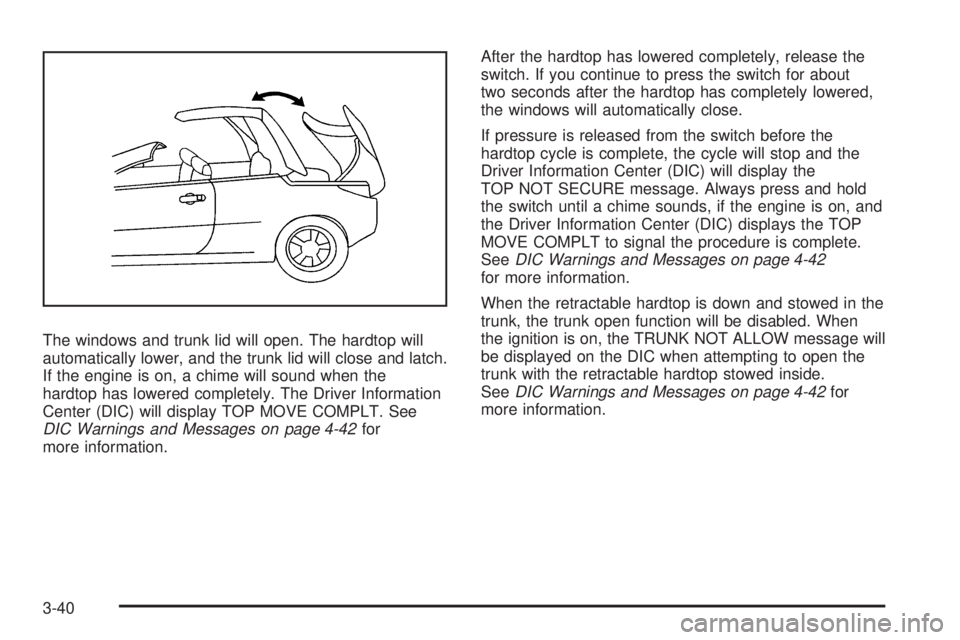
The windows and trunk lid will open. The hardtop will
automatically lower, and the trunk lid will close and latch.
If the engine is on, a chime will sound when the
hardtop has lowered completely. The Driver Information
Center (DIC) will display TOP MOVE COMPLT. See
DIC Warnings and Messages on page 4-42for
more information.After the hardtop has lowered completely, release the
switch. If you continue to press the switch for about
two seconds after the hardtop has completely lowered,
the windows will automatically close.
If pressure is released from the switch before the
hardtop cycle is complete, the cycle will stop and the
Driver Information Center (DIC) will display the
TOP NOT SECURE message. Always press and hold
the switch until a chime sounds, if the engine is on, and
the Driver Information Center (DIC) displays the TOP
MOVE COMPLT to signal the procedure is complete.
SeeDIC Warnings and Messages on page 4-42
for more information.
When the retractable hardtop is down and stowed in the
trunk, the trunk open function will be disabled. When
the ignition is on, the TRUNK NOT ALLOW message will
be displayed on the DIC when attempting to open the
trunk with the retractable hardtop stowed inside.
SeeDIC Warnings and Messages on page 4-42for
more information.
3-40
Page 149 of 448
After the hardtop has raised completely, release the
switch. If you continue to pull the switch for about
two seconds after the hardtop has raised completely,
the windows will automatically close.
If the switch is released before the hardtop cycle is
complete, the cycle stops and the Driver Information
Center (DIC) displays the TOP NOT SECURE message.
Always pull and hold the switch until a chime sounds,
if the engine is on, and the Driver Information Center
(DIC) displays the TOP MOVE COMPLT to signal
the procedure is complete. SeeDIC Warnings and
Messages on page 4-42for more information.The hardtop will not operate if the vehicle has an
electrical failure. If an electrical failure occurs,
see your dealer/retailer for service.
If your vehicle must be towed to a dealer/retailer for
service, your vehicle should be towed by flatbed with the
vehicle facing backwards. Consult your dealer/retailer
or professional towing service if you need to have
your disabled vehicle towed. SeeRoadside Assistance
Program on page 8-7.
3-43
Page 155 of 448

Headlamp High/Low-Beam Changer
To change the headlamps from low beam to high
beam, push the turn signal/multifunction lever away
from you.
This instrument panel cluster light
3comes on if the
high beam lamps are turned on while the ignition is
in ON/RUN.
To change the headlamps from high beam to low beam,
pull the turn signal lever toward you.
Flash-to-Pass
This feature lets the high-beam headlamps be used to
signal a driver in front of you that you want to pass.
Pull the turn signal/multifunction lever toward you until
the high-beam headlamps come on, then release
the lever to turn them off.
Windshield Wipers
The windshield wiper lever is on the right side of the
steering wheel.
Move the lever to control the windshield wipers.
9(Off):Turns the windshield wipers off.
&(Intermittent; Speed Sensitive Wipers):For
intermittent or speed sensitive operation. The amount of
delay time varies between wiping cycles due to the
delay setting selected or the speed of the vehicle. As
vehicle speed is increased or decreased, the wiper
interval also increases or decreases.
4-5
Page 167 of 448
9(Fan Control):Turn the knob clockwise or
counterclockwise to increase or decrease the fan speed.
The fan must be on to run the air conditioning
compressor.
Temperature Control:Turn the knob clockwise or
counterclockwise to increase or decrease the
temperature inside the vehicle.
When it is cold outside−18°C (0°F) or lower, use the
engine coolant heater, if the vehicle has one, to quickly
provide warmer air. An engine coolant heater warms
coolant that the engine uses to warm the inside of the
vehicle. For more information, seeEngine Coolant
Heater on page 3-23.
Air Delivery Mode Control:Turn the knob clockwise
or counterclockwise to change the air delivery settings.
Select from the following modes:
H(Vent):Air is directed to the instrument panel
outlets.
)(Bi-Level):Air is divided between the air to the
instrument panel and floor outlets. Some air may
be directed toward the side windows.
6(Floor):Air is directed to the floor outlets with
some air directed to the side window outlets and
windshield.
-(Defog):This mode clears the windows of fog or
moisture. Air is directed to the windshield and floor
outlets, with some air directed to the side windows.
When this mode is selected, the system automatically
turns off recirculation and tuns the air conditioning
compressor unless the outside temperature is at
or below freezing. The air conditioning compressor
operates although the indicator light is not on. The air
conditioning indicator light turns off when defog is
selected. If the air conditioning button is pressed while
in defog mode, the indicator light turns on. If the
button is pressed again, the light turns off. The
recirculation mode cannot be selected while in the defog
mode. Do not drive the vehicle until all the windows
are clear.
1(Defrost):This mode clears the windshield of fog
or frost more quickly. Air is directed to the windshield,
with some air directed to the floor vents. In this
mode, the system automatically forces outside air into
the vehicle. The air conditioning compressor runs unless
the outside temperature is at or below freezing. The
air conditioning compressor operates although the
indicator light is not on. The air conditioning indicator
light turns off when defrost is selected. If the air
conditioning button is pressed while in defrost mode, the
indicator light turns on. If the button is pressed again,
the light turns off. Recirculation cannot be selected while
in the defrost mode.
4-17
Page 181 of 448

When the ignition is on, the brake system warning light
also comes on when the parking brake is set. The
light will stay on if the parking brake does not fully
release. If it stays on after the parking brake is fully
released, it means there is a brake problem.
{WARNING:
The brake system might not be working properly if
the brake system warning light is on. Driving with
the brake system warning light on can lead to a
crash. If the light is still on after the vehicle has
been pulled off the road and carefully stopped,
have the vehicle towed for service.
If the light comes on while driving, pull off the road and
stop carefully. The pedal can be harder to push, or
the pedal could go closer to the floor. It could take
longer to stop. Try turning off and restarting the vehicle
one or two times, if the light is still on, have the
vehicle towed for service. SeeTowing Your Vehicle on
page 5-23.
Antilock Brake System (ABS)
Warning Light
The Antilock Brake
System (ABS) light comes
on briefly when the
engine is started.
If it does not, have the vehicle serviced by your
dealer/retailer. If the system is working normally the
indicator light then goes off.
If the ABS light stays on, turn the ignition off. If the light
comes on while driving, stop as soon as it is safely
possible and turn the ignition off. Then start the engine
again to reset the system. If the ABS light stays on,
or comes on again while driving, the vehicle needs
service. If the regular brake system warning light is not
on, the vehicle still has brakes, but not antilock
brakes. If the regular brake system warning light is also
on, the vehicle does not have antilock brakes and
there is a problem with the regular brakes. SeeBrake
System Warning Light on page 4-30.
For vehicles with a Driver Information Center (DIC), see
DIC Warnings and Messages on page 4-42for all
brake related DIC messages.
4-31
Page 185 of 448
Notice:If the vehicle is continually driven with this
light on, after a while, the emission controls
might not work as well, the vehicle’s fuel economy
might not be as good, and the engine might not
run as smoothly. This could lead to costly repairs
that might not be covered by the vehicle warranty.
Notice:Modi�cations made to the engine,
transmission, exhaust, intake, or fuel system of the
vehicle or the replacement of the original tires
with other than those of the same Tire Performance
Criteria (TPC) can affect the vehicle’s emission
controls and can cause this light to come on.
Modi�cations to these systems could lead to costly
repairs not covered by the vehicle warranty. This
could also result in a failure to pass a required
Emission Inspection/Maintenance test. See
Accessories and Modifications on page 6-4.
This light comes on during a malfunction in one of
two ways:
Light Flashing:A misfire condition has been detected.
A misfire increases vehicle emissions and could
damage the emission control system on the vehicle.
Diagnosis and service might be required.To prevent more serious damage to the vehicle:
•Reduce vehicle speed.
•Avoid hard accelerations.
•Avoid steep uphill grades.
•If towing a trailer, reduce the amount of cargo being
hauled as soon as it is possible.
If the light continues to flash, when it is safe to do so,
stop the vehicle. Find a safe place to park the vehicle.
Turn the key off, wait at least 10 seconds, and restart
the engine. If the light is still flashing, follow the previous
steps and see your dealer/retailer for service as soon
as possible.
Light On Steady:An emission control system
malfunction has been detected on the vehicle. Diagnosis
and service might be required.
An emission system malfunction might be corrected by
doing the following:
•Make sure the fuel cap is fully installed. SeeFilling
the Tank on page 6-11. The diagnostic system can
determine if the fuel cap has been left off or
improperly installed. A loose or missing fuel cap
allows fuel to evaporate into the atmosphere. A few
driving trips with the cap properly installed should
turn the light off.
4-35
Page 197 of 448

TOP TOO COLD
If your vehicle has a retractable hardtop, this message
displays when the retractable hardtop button is
pressed and the hardtop pump motor temperature is too
cold. Wait for the hardtop pump motor to warm up
before using the retractable hardtop. SeeLowering the
Retractable Hardtop on page 3-38andRaising the
Retractable Hardtop on page 3-41for more information.
TRACTION OFF
If your vehicle has the Traction Control System (TCS),
this message displays and the TCS light on the
instrument panel cluster comes on solid when the
system is turned off. Adjust your driving accordingly.
SeeTraction Control System (TCS) on page 5-6
andTraction Off Light on page 4-32for more
information. Have the system serviced by your
dealer/retailer as soon as possible.
TRUNK AJAR
This message displays when the trunk is not closed
completely. Make sure that the trunk is closed
completely. SeeTrunk on page 3-11for more
information.
TRUNK NOT ALLOW
This message will appear when attempting to open the
trunk with the ignition on while the retractable hard
top is down and stowed in the trunk. This is to protect
the hardtop against any possible damage. The trunk can
be opened once the hardtop is raised and secured.
SeeTrunk on page 3-11,Lowering the Retractable
Hardtop on page 3-38, andRaising the Retractable
Hardtop on page 3-41for more information.
DIC Vehicle Personalization
Your vehicle has personalization capabilities that allow
you to program certain features to a preferred setting.
All of the features listed may not be available on
your vehicle. Only the features available will be
displayed on the DIC.
The default settings for the features were set when your
vehicle left the factory, but may have been changed
from their default state since that time.
4-47
Page 235 of 448

Your Driving, the Road, and the Vehicle............5-2
Defensive Driving...........................................5-2
Drunk Driving.................................................5-2
Control of a Vehicle........................................5-3
Braking.........................................................5-3
Antilock Brake System (ABS)...........................5-4
Braking in Emergencies...................................5-5
Electronic Stability Control (ESC)......................5-5
Traction Control System (TCS).........................5-6
Steering........................................................5-8
Off-Road Recovery.........................................5-9
Passing.......................................................5-10
Loss of Control.............................................5-10
Driving at Night............................................5-11Driving in Rain and on Wet Roads..................5-12
Before Leaving on a Long Trip.......................5-13
Highway Hypnosis........................................5-13
Hill and Mountain Roads................................5-14
Winter Driving..............................................5-15
If Your Vehicle is Stuck in Sand,
Mud, Ice, or Snow.....................................5-17
Rocking Your Vehicle to Get It Out.................5-18
Loading the Vehicle......................................5-18
Towing..........................................................5-23
Towing Your Vehicle.....................................5-23
Recreational Vehicle Towing...........................5-23
Towing a Trailer...........................................5-27
Section 5 Driving Your Vehicle
5-1
Page 252 of 448
Rocking Your Vehicle to Get It Out
Turn the steering wheel left and right to clear the area
around the front wheels. Turn off any traction or stability
system. Shift back and forth between R (Reverse) and a
forward gear, spinning the wheels as little as possible.
To prevent transmission wear, wait until the wheels stop
spinning before shifting gears. Release the accelerator
pedal while shifting, and press lightly on the accelerator
pedal when the transmission is in gear. Slowly spinning
the wheels in the forward and reverse directions causes a
rocking motion that could free the vehicle. If that does not
get the vehicle out after a few tries, it might need to be
towed out. If the vehicle does need to be towed out, see
Towing Your Vehicle on page 5-23.
Loading the Vehicle
It is very important to know how much weight your
vehicle can carry. This weight is called the vehicle
capacity weight and includes the weight of all
occupants, cargo, and all nonfactory-installed
options. Two labels on the vehicle show how much
weight it may properly carry, the Tire and Loading
Information label and the Vehicle Certification label.
{WARNING:
Do not load the vehicle any heavier than the
Gross Vehicle Weight Rating (GVWR), or
either the maximum front or rear Gross Axle
Weight Rating (GAWR). If you do, parts on the
vehicle can break, and it can change the way
your vehicle handles. These could cause you
to lose control and crash. Also, overloading
can shorten the life of the vehicle.
5-18
Page 254 of 448
4.The resulting figure equals the available
amount of cargo and luggage load capacity.
For example, if the “XXX” amount equals
1400 lbs and there will be five 150 lb
passengers in your vehicle, the amount of
available cargo and luggage load capacity
is 650 lbs (1400−750 (5 x 150) = 650 lbs).
5.Determine the combined weight of luggage
and cargo being loaded on the vehicle.
That weight may not safely exceed the
available cargo and luggage load capacity
calculated in Step 4.
6.If your vehicle will be towing a trailer, the load
from your trailer will be transferred to your
vehicle. Consult this manual to determine how
this reduces the available cargo and luggage
load capacity for your vehicle.
If your vehicle can tow a trailer, seeTowing a
Trailer on page 5-27for important information
on towing a trailer, towing safety rules, and
trailering tips.
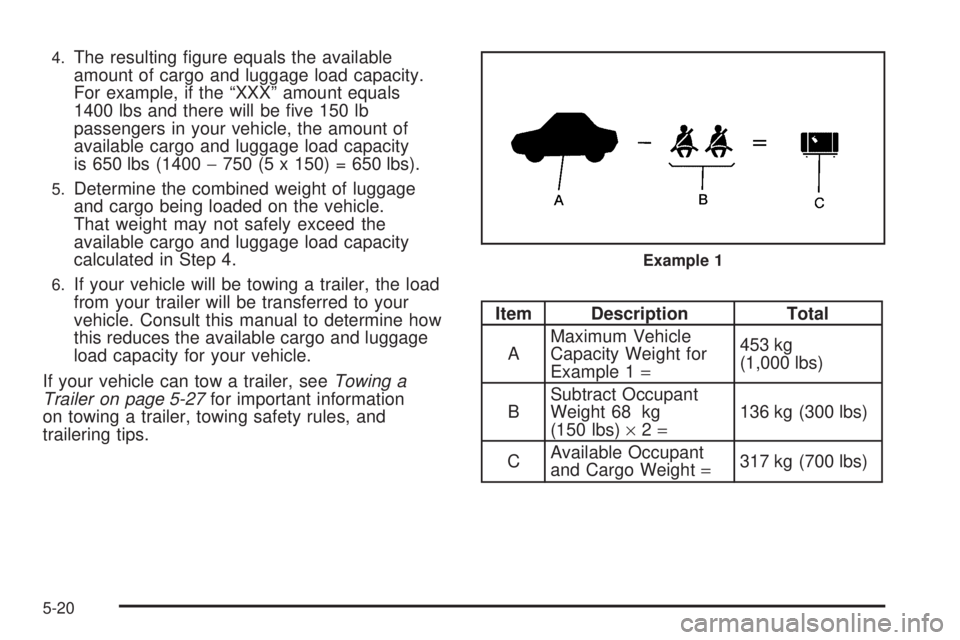
Item Description Total
AMaximum Vehicle
Capacity Weight for
Example 1=453 kg
(1,000 lbs)
BSubtract Occupant
Weight 68 kg
(150 lbs)×2=136 kg (300 lbs)
CAvailable Occupant
and Cargo Weight=317 kg (700 lbs)
Example 1
5-20