fuel cap PONTIAC GRAND-AM 1994 Owners Manual
[x] Cancel search | Manufacturer: PONTIAC, Model Year: 1994, Model line: GRAND-AM, Model: PONTIAC GRAND-AM 1994Pages: 274, PDF Size: 15.01 MB
Page 95 of 274
Features & Controls
Fuel Gage (CONT.)
0 It takes a little more or less fuel to fill
up than the gage indicated. For
example, the gage may have indicated
the tank was half full, but it actually
took a little more or less than half the
tank’s capacity to fill the tank.
0 The gage moves a little when you turn
a corner or speed up.
0 The gage doesn’t go back to “E” when
you turn off the ignition.
For your fuel tank capacity, see “Service
Station Information”
on the last page of
this manual.
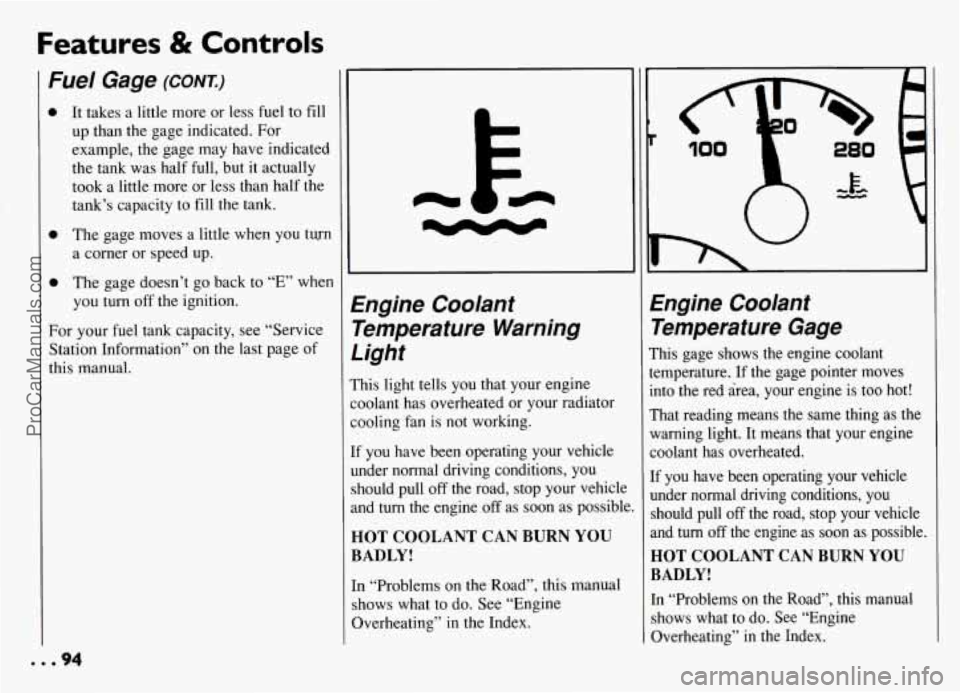
Engine Coolant Temperature Warning
Light
This light tells you that your engine
coolant has overheated or your radiator
cooling fan is not working.
If you have been operating your vehicle
under normal driving conditions, you should pull
off the road, stop your vehicle
and
turn the engine off as soon as possible
HOT COOLANT CAN BURN YOU
BADLY!
In “Problems on the Road”, this manual
shows what to do. See “Engine
Overheating” in the Index.
Engine Coolant
Temperature Gage
This gage shows the engine coolant
temperature. If the gage pointer moves
into the red area, your engine is too hot!
That reading means the same thing as the
warning light. It means that your engine
coolant has overheated.
If you have been operating your vehicle
under normal driving conditions, you
should pull
off the road, stop your vehicle
and
turn off the engine as soon as possible.
HOT COOLANT CAN BURN YOU
BADLY!
In “Problems on the Road”, this manual shows what to do. See “Engine
Overheating” in the Index.
ProCarManuals.com
Page 104 of 274
Air Conditioning
System (OPTION)
The air conditioner and heater work best
if you keep your windaws closed while
using them. Your vehicle also has the
flow-through ventilation system
described later
in this section.
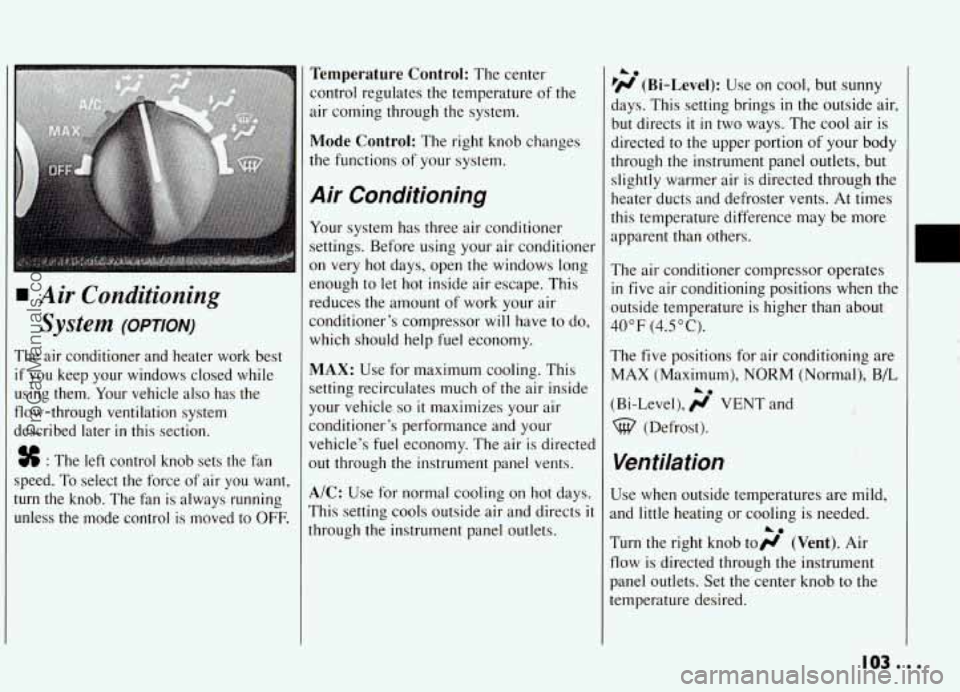
% : The left control knob sets the fan
speed. To select the force of air you want,
turn the knob. The fan is always running
unless the mode control is moved to
OFF.
Temperature Control: The center
control regulates the temperature of the
air coming through the system.
Mode Control: The right knob changes
the functions of your system.
A.ir Conditioning
Your system has three air conditioner
settings. Before using your air conditioner
on
very hot days, open the windows long
enough to let hot inside air escape. This
reduces the amount of work your air
conditioner’s compressor will have to do,
which should help fuel economy.
MAX: Use for maximum cooling. This
setting recirculates much of the air inside
your vehicle
SO it maximizes your air
conditioner’s performance and your
vehicle’s fuel economy. The air
is directed
out through the instrument panel vents.
A/C: Use for normal cooling on hot days.
This setting cools outside air and directs
it
through the instrument panel outlets.
he
lH (Bi-Level): Use on cool, but sunny
days. This setting brings
in the outside air,
but directs
it in two ways. The cool air is
directed to the upper portion of your body
through the instrument panel outlets, but
slightly warmer air is directed through the
heater ducts and defroster vents. At times
this temperature difference may be more
apparent than others.
The air conditioner compressor operates
in five air conditioning positions when the
outside temperature is higher than about
40°F (4.5”C).
The five positions for air conditioniqg are
MAX (Maximum), NORM (Normal.), B/L
(Bi-Level), ;j’ VENT and
%@ (Defrost). .. ._.
1. . ;>. w >%:
Ventilation
Use when outside temperatures are mild,
and little heating or cooling
is needed.
Turn the right knob toH (Vent). Air
flow is directed through the instrument
panel outlets. Set the center knob to the
temperature desired.
i.
IOS...
ProCarManuals.com
Page 142 of 274
Towing a Trailer
NOTICE:
Pulling a trailer improperly can
damage your vehicle and result
in
costly repairs not covered by your
warranty. To pull
a trailer correctly,
follow the advice
in this section, and
see your Pontiac dealer for important information about towing
a trailer
with your vehicle .
Do not tow a trailer if your vehicle is
equipped with the 2.3L OHC or Quad 4
Engine (Code 3 or D).
Your car can tow a trailer if it is equipped
with the
2.3L High Output Quad 4 (Code
A) or 3.1 L V6 (Code M) engine and
proper trailer towing equipment. To
identify what the vehicle trailering
capacity is for your vehicle, you should
read the information
in ‘‘Weight of the
Trailer” that appears later
in this section.
But trailering is different than just driving
your vehicle by itself. Trailering means
changes
in handling, durability, and fuel
economy. Successful, safe trailering takes
correct equipment, and
it has to be used
properly.
That’s the reason for this section. In it are
many time-tested, important trailering
tips and safety rules. Many of these are
important for your safety and that of your
passengers.
So please read this section
carefully before you puli a trailer.
Load-pulling components such as the
mgine, transaxle, wheel assemblies, and
tires are forced
to work harder against the
jrag of the added weight. The engine is
required to operate at relatively higher
speeds and under greater loads,
generating extra heat. What’s more, the
trailer adds considerably to wind
resistance, increasing the pulling
requirements.
If You Do Decide To Pull A Trailer
If you do, here are some important points.
0 There are many different laws,
including speed limit restrictions,
having to do with trailering. Make
sure your rig will be legal, not only
where you live but also where you’ll
be driving.
A good source for this
information can be state or provincial
police.
0 Consider using a sway control.
You can ask a hitch dealer about sway
controls.
Don’t tow a trailer at all during the
first 1000 miles (1 600 km) your new
vehicle is driven. Your engine, axle or
other parts could be damaged.
Then, during the first 500 miles (800
km) that you tow a trailer, don’t drive
over
50 mph (80 km/h) and don’t
make starts
at full throttle. This helps
141
ProCarManuals.com
Page 175 of 274
Service & Appearance Care
N Remote Fuel Filler
Door Release
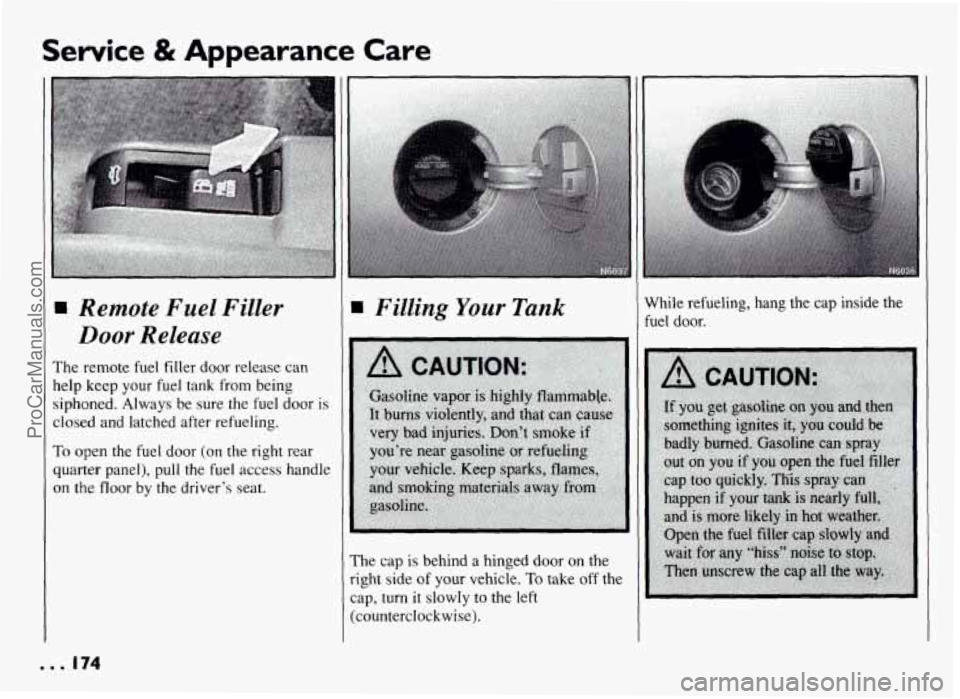
The remote fuel filler door release can
help keep your fuel
tank from being
siphoned. Always be sure the fuel door
is
closed and latched after refueling.
To open the fuel door (on the right rear
quarter panel),
pull the fuel access handle
on the floor by the driver's seat.
rn Filling Your Tank
The cap is behind a hinged door on the
right side of your vehicle. To take
off the
cap, turn it slowly to the left
(counterclockwise).
While refueling, hang the cap inside the
fuel
door.
ProCarManuals.com
Page 176 of 274
Be careful not to spill gasoline. Clean
gasoline from painted surfaces as soon as
possible. See “Cleaning the Outside of
Your Pontiac”
In the Index.
When you put the cap back on, turn it to
the right
until you hear at least three
clicks.
NOTICE:
If you need a new cap, be sure to get
the right type. Your dealer can get
one for you. If you get the wrong
type,
it may not fit or have proper
venting, and your fuel
tank and
emissions system might be
damaged.
Checking Things
Under the Hood
The following sections tell you how to
check fluids, lubricants and important
parts underhood.
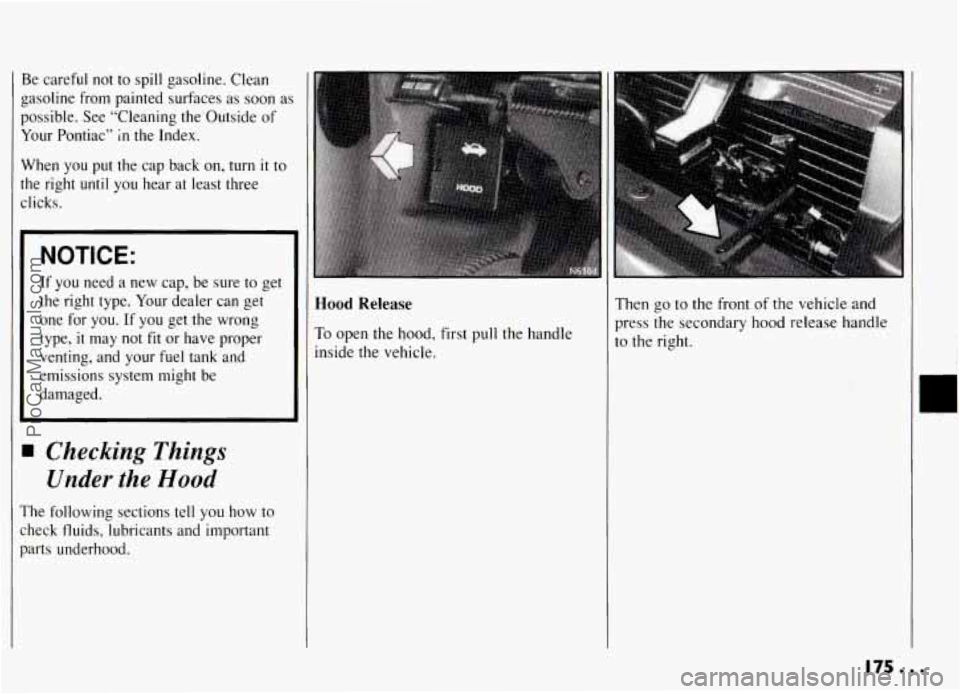
Hood Release
To open the hood, first pull the handle
inside the vehicle.
Then go to the front of the vehicle and
press the secondary hood release handle
to the right.
r
,.
4:
I. . ?? ;
ProCarManuals.com
Page 180 of 274
Engine Oil
If the CHECK OIL light on the
instrument panel comes on,
it means you
need to check your engine oil level right
away. For more information, see “Check
Oil Light”
in the Index. You should check
the engine
oil regularly; this is an added
reminder.
It’s a good idea to check your engine oil
every time you get fuel. In order to get an
accurate reading, the oil must be warm
and the vehicle must be on level ground.
Turn off the engine and give the oil a few
minutes to drain back into the oil pan.
If
you don’t, the oil dipstick might not show
the actual level.
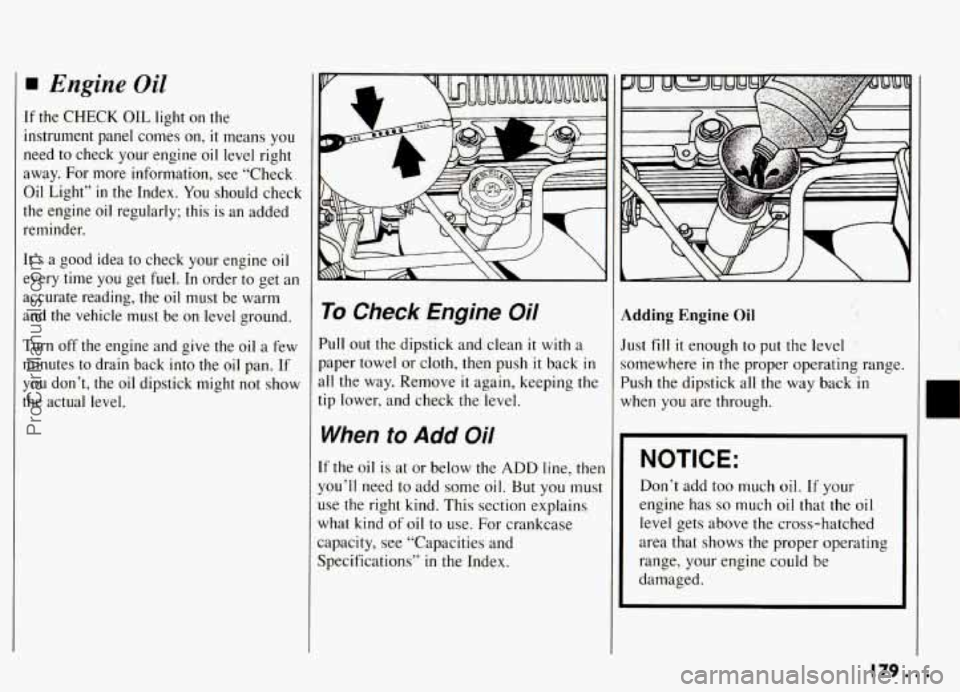
To Check Engine Oil
Pull out the dipstick and clean it with a
paper towel or cloth, then push
it back in
all the way. Remove it again, keeping the
tip lower, and check the level.
When to Add Oil
If the oil is at or below the ADD line, then
you’ll need to add some oil. But
you must
use the right kind. This section explains
what kind of oil
to use. For crankcase
capacity, see “Capacities and
Specifications” in the Index.
Adding Engine Oil
Just fill it enough to put the level
somewhere
in the proper operating range.
Push the dipstick all the way back
in
when you are through.
NOTICE:
Don’t add too much oil. If your
engine has
so much oil that the oil
level gets above the cross-hatched
area that shows the proper operating
range, your engine could
be
damaged.
179. . .
ProCarManuals.com
Page 198 of 274
I Loading Your Vehicle
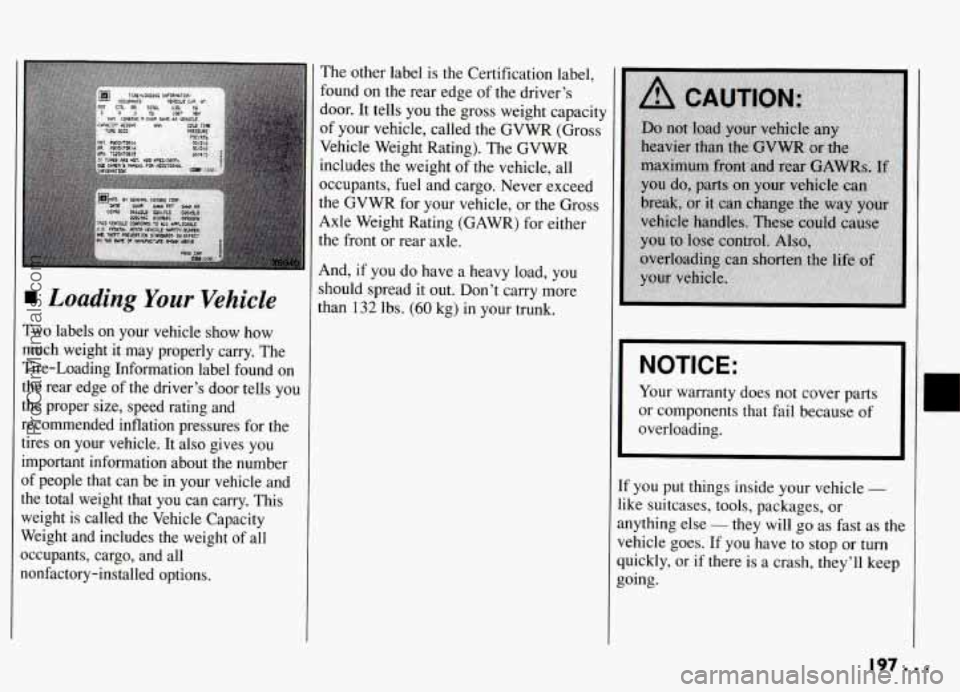
Two labels on your vehicle show how
much weight it may properly carry. The
Tire-Loading Information label found on
the rear edge of the driver’s door tells you
the proper size, speed rating and
recommended inflation pressures for the
tires on your vehicle. It also gives you
important information about the number
af people that can be in your vehicle and
the total weight that you can carry. This
weight is called the Vehicle Capacity
Weight and includes the weight of all
xcupants, cargo, and all
lonfactory-installed options.
The other label is the Certification label,
found on the rear edge of the driver’s
door. It tells you the gross weight capacity
of your vehicle, called the GVWR (Gross
Vehicle Weight Rating). The GVWR
includes the weight of the vehicle, all
occupants, fuel and cargo. Never exceed
the GVWR for your vehicle, or the Gross
Axle Weight Rating (GAWR) for either
the front or rear axle.
And, if you do have a heavy load, you
should spread it out. Don’t carry more
than
132 lbs. (60 kg) in your trunk.
I NOTICE: 1
Your warranty does not cover parts
or components that fail because of
overloading.
[f you put things inside your vehicle -
like suitcases, tools, packages, or
mything else
- they will go as fast as the
Jehicle goes. If you have to stop or turn
quickly, or if there is a crash, they’ll keep
going.
197.. .
ProCarManuals.com
Page 200 of 274
Inflation - Tire Pressure
The Tire-Loading Information label which is on the rear edge
of the driver’s
L
NOTICE: (Continued)
If your tires have too much air
door shows the correct-inflation pressures
for your tires, when they’re cold. “Cold”
means your vehicle has been sitting for at least three hours or driven no more than a
mile.
Don’t let anyone tell you that underinflation
or overinflation is all
right. It’s not. If your tires don’t
have enough air (underinflation)
0 Too much flexing
0 Too much heat
0 Tire overloading
0 Bad wear
0 Bad fuel economy.
I P
C
c
SI
I
,
(oierinflation), you can get:
0 Unusual wear
0 Bad handling
0 Rough ride
Needless damage from road
hazards.
Yhen to Check
lheck your tires once a month or more.
Ion’t forget your compact spare tire. It
ilould be at 60 psi (420 Pa).
How to Check
Use a good quality pocket-type gage to
:heck tire pressure. Simply looking at the
ires will not
tell you the pressure,
:specially if you have radial tires
--
which may look properly inflated even if
[hey’re underinflated.
;.. :.?
[f your tires have valve caps, be sure to
put them back on. They help prevent
leaks by keeping out dirt and moisture.
. . 1. .
,,
ProCarManuals.com
Page 217 of 274
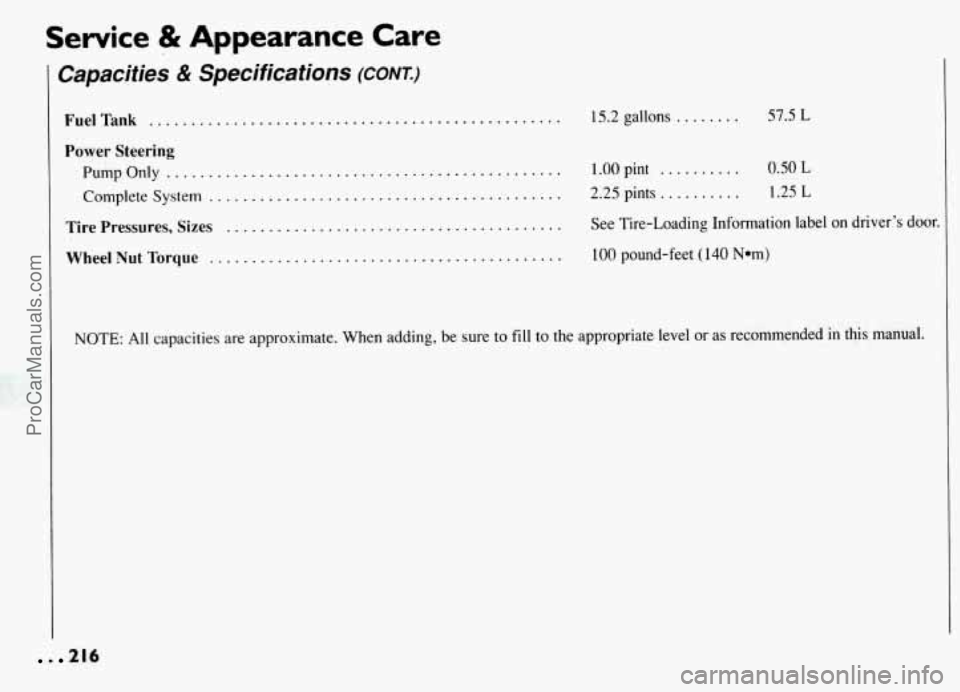
Service & Appearance Care
Capacities & Specifications (CONT.)
Complete System . .
Tire Pressures, Sizes
Wheel
Nut Torque . .
FuelTank .................................................
Power Steering
PumpOnly ...............................................
......................................
........................................
........................................
15.2 gallons ........ 57.5 L
1.00 pint .......... 0.50 L
2.25 pints .......... 1.25 L
See Tire-Loading Information label on driver’s door.
100 pound-feet ( 140 N*m)
NOTE: All capacities are approximate. When adding, be sure to fill to the appropriate level or as recommended in this manual.
. 216
ProCarManuals.com
Page 230 of 274
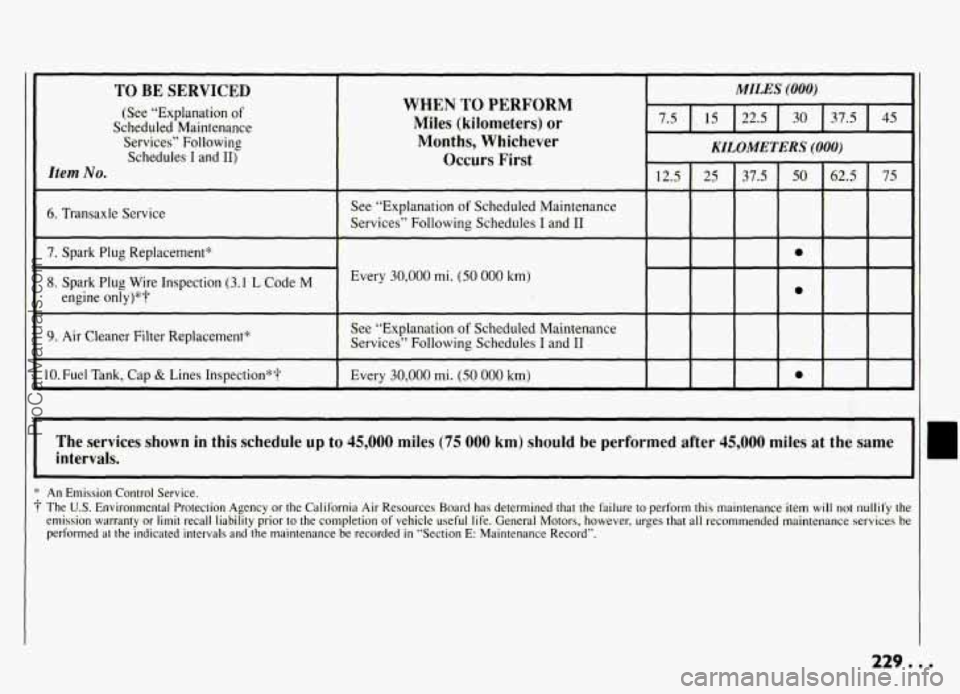
TO BE SERVICED
(See “Explanation of
Scheduled Maintenance
Services” Following
Schedules I and 11)
Item No.
6. Transaxle Service
7. Spark Plug Replacement*
8. Spark Plug Wire Inspection (3.1 L Code M
engine only)*?
9. Air Cleaner Filter Replacement”
10.Fuel Tank, Cap
& Lines Inspection*?’
WHEN TO PERFORM
Miles (kilometers) or
Months, Whichever
Occurs First
See “Explanation of Scheduled Maintenance
Services” Following Schedules
I and I1
Every 30,000 mi. (50 000 km)
See “Explanation of Scheduled Maintenance
Services” Following Schedules I and I1
Every
30,000 mi. (50 000 km)
MILES (000)
KILOMETERS (000)
The services shown in this schedule up to 45,000 miles (75 000 km) should be performed after 45,000 miles at the same
intervals.
I
* An Emission Control Service.
? The U.S. Environmental Protection Agency or the California Air Resources Board has determined that the failure to perform this maintenance item will not nullify the
emission warranty or limit recall liability prior to the completion of vehicle useful life. General Motors, however, urges that all recommended maintenance services be
performed at the indicated intervals and the maintenance be recorded in “Section E: Maintenance Record”.
ProCarManuals.com